Resources are the fundamental building blocks used to model system state in Puppet. They describe the desired end state of unique elements managed by Puppet on the system. Everything that Puppet manages is expressed as a resource. In fact, every interaction between Puppet and the underlying system is expressed as a resource, too. This chapter covers the fundamental concepts behind resources, and lays out the structure of Puppet’s Resource Model for types and providers, setting you up to dive into both in the later chapters.
Installing Puppet
Given that this book is aimed at existing Puppet users, we assume you already have it installed. However, if you don’t, check out Appendix A, and then jump back here to get started.
Resources describe the desired end state of system components by specifying a type, a title, and a list of attributes.
- Type
- The type of a resource determines the system component Puppet manages. Some common types are: user, group, file, service and package. A resource declaration always contains the type of resource being managed.
- Title
- The title of a resource identifies an instance of that resource type. The combination of type and title refers to a single unique element managed by puppet, such as a user name joe or a file with path /root/.bashrc.
- Attributes
- Each resource supports a list of key value pairs called attributes. These attributes provide a detailed description that Puppet uses to manage the resource. For example, the file /root/.bashrc should be present. The user dan should be present and have its login shell set to /bin/bash.
Puppet provides a Domain Specific Language (DSL) that expresses the intended state of a system’s configuration through collections of resources. Resources are declared in Puppet’s DSL with the following syntax:
<type>{<title>:attribute1=>value1,attribute2=>value2,}
The following specific example is applied by Puppet to ensure that a package named apache2 is installed:
package{'apache2':ensure=>present,}
You can combine several resources together to create a manifest (a source file for Puppet code) using the Puppet DSL. Manifests often contain classes that are used to create collections of resources which provide a common application or service.
The following manifest ensures that the latest version of the apache2 package is installed, and checks that the service is running on the web servers managed by Puppet:
classwebserver{package{'apache2':ensure=>latest,}service{'apache2':ensure=>running,subscribe=>Package['apache2'],}}
This description can be applied to any node to ensure it is configured as a web server. The following example demonstrates how the the node web1 is designated as a web server:
node'web1'{class{'webserver':}}
Figure 1-1 shows how the webserver class is applied to several machines.

Understanding how resources behave is extremely important for the following chapters on types and providers. A clear understanding of Puppet resources allows you to effectively develop custom resources using Puppet’s type and provider APIs that are consistent with Puppet’s model. Both the type and provider APIs are used to implement resources that will be declared in Puppet’s DSL. This section will cover a few fundamental characteristics of resources, including:
- Declarative
- Idempotent
- Unique
Resources describe what Puppet should manage without having to specify any information related to the procedure or process that should be used. This is the defining characteristic of being declarative. This is in contrast to scripting languages where the author must specify a sequence of actions to configure the system. To manage a system with Puppet you only have to describe the desired state of each resource.
The example resource below declares an ftp service account:
user{'ftp':ensure=>present,shell=>'/sbin/nologin',}
When applied to a system, Puppet ensures that this user:
- Exists on the system
- Has its shell set to /sbin/nologin (meaning that the system will not allow remote logins for that user)
This resource can be declared without having to specify (or even know) the exact procedure required to ensure that the end result is a system user with those characteristics. The details of how this user is managed are handled by Puppet and abstracted away from the person writing the manifest.
Idempotent is a math term that applies to operations always resulting in the same outcome regardless of how many times they are applied. In the world of Puppet, this simply means that a resource can be applied to a system multiple times and the end result will always be the same.
Consider the resource from our previous example:
user{'ftp':ensure=>present,shell=>'/sbin/nologin',}
Since resources are declarative, the end state of the ftp account should always be the same regardless of the starting state of the system. If the system is already in the desired state, then Puppet will not perform any action. This means that resources can be applied any number of times and the result will always be the same.
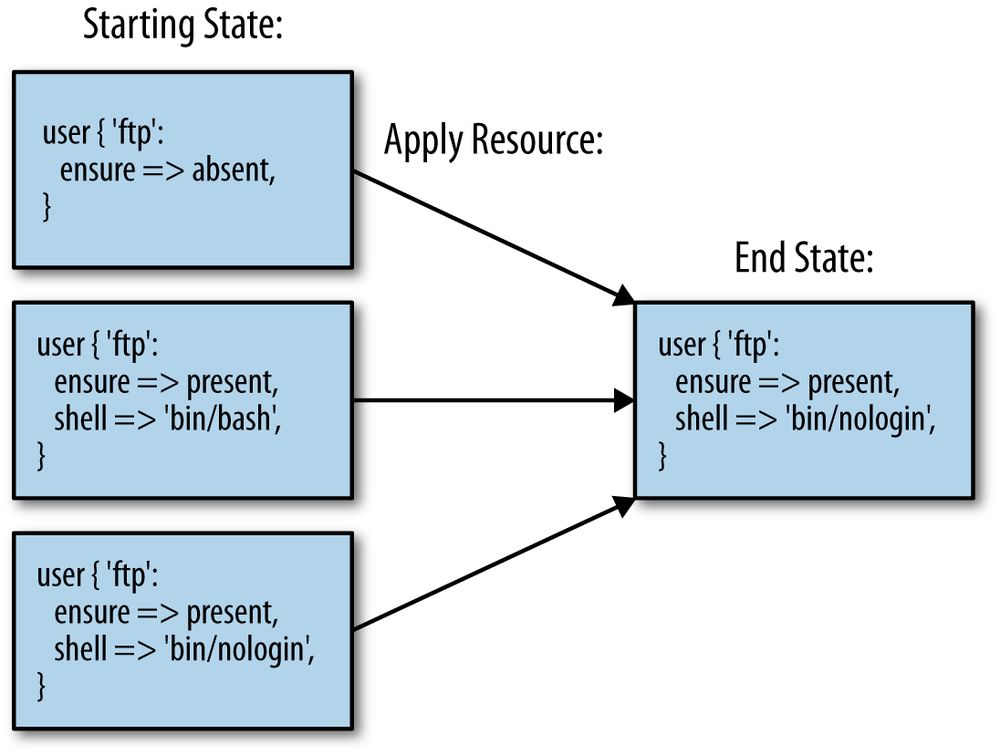
Consider the states that could exist on a system before we apply our example resource to it:
- The user does not exist
- The user exists and has its shell set to /sbin/nologin
- The user exists but its shell is not set to /sbin/nologin
As shown in Figure 1-2, the end state of our system is always the same because resources in Puppet are declarative and idempotent. Users can declare the resulting state that will exist after Puppet has been applied, without having to care about or even know the current state of the system.
With procedural scripts, the author must specify how to modify a resource into the desired end state for each of the starting cases specified above. This is why procedural scripts are rarely idempotent—there is too much logic required to handle every possible starting case correctly.
To achieve the same behavior as Puppet, users need to write complex logic to ensure that each command is only executed conditionally when changes need to be made to the underlying system. The following shell script reimplements our example ftp user resource:
#!/bin/bashset-eset-uifgetent passwd ftp;thenUSER_LOGIN=`getent passwd ftp | cut -d: -f7`if['/sbin/nologin'!="${USER_LOGIN}"];thenusermod -s /sbin/nologin ftpfielseuseradd -s /sbin/nologin ftpfi
The shell script detects if the user already exists, as well as the user’s current shell, in order to decide if any changes need to be made. Puppet’s user resource supports many more properties than just shell. Just imagine how complex the bash equivalent to the following resource would be!
user{'ftp':ensure=>present,shell=>'/sbin/nologin',home=>'/var/lib/ftp',uid=>'601',gid=>'system',}
Resources in Puppet must be unique. Because each resource declares a desired end state, duplicates of the same resource (identified by a unique combination of type and title) could result in a conflicting end state.
The following resources declare two conflicting ftp users:
user{'ftp':ensure=>present,uid=>501,}user{'ftp':ensure=>present,uid=>502,}
This manifest specifies that the ftp user’s uid should be both 501 and 502.
Fortunately, Puppet enforces unique combinations of type and title across all resources. If Puppet detects duplicate resources when processing a manifest, it prevents conflicts by failing with the error below:
Duplicate declaration: User[ftp] is already declared in file user.pp at line 4;cannot redeclare at user.pp:9 on node my_host
Puppet’s ability to detect duplicate resource declarations is extremely handy when combining collections of resources from different modules. Any conflicting state between collections of resources results in a failure and a clear error message. This prevents users from deploying applications with conflicting requirements.
Puppet’s Resource Model consists of two layers called types and providers. Types specify the interfaces used to describe resources in Puppet’s DSL and providers encapsulate the procedure used to manage those resources on a specific platform. A resource uses the interface defined by its type to declare a list of attributes that describe its state. The provider uses these declared attributes to manage the state of a resource.
As an example, a user account may contains settings like username, group, and home directory. These attributes are defined as a part of its type. These users are managed differently on Windows, Linux, or ldap. The methods to create, destroy, and modify accounts are implemented as a separate provider for each of these backends.
We’ll dive into types and providers in much more detail in the following chapters—in the rest of this chapter, we’ll set the stage with some basic concepts for both.
The Type API expresses the interface used to declaratively describe a resource. In Puppet, there are two kinds of types: defined types written in Puppet’s DSL, and native types that are written in Ruby. Puppet ships with a large collection of native resources implemented in Ruby. This includes basic things like: users, groups, packages, services, and files (and some not-so-basic things like zfs/zones).
Defined types create an interface around a composition of resources. Consider the following defined type:
definecustom_user($ensure=present,$home){# …. omitting resources composing custom_user.}
As we saw earlier, a resource (in this case, custom_user) is defined by providing a resource title and the attributes $ensure and $home. This defined type can be consumed without worrying about the resources that provide the implementation:
custom_user{'ftp':ensure=>present,home=>'/var/lib/ftp',}
Ruby Types provide the ability to specify resource interfaces just like the define keyword in the Puppet DSL. They are implemented using the type API, which offers a much richer descriptive language and provides additional features such as validation and resource dependencies (we’ll look at this in much greater depth in the next chapter).
Ruby types, unlike defined types, rely on providers for the procedures used to manage the underlying system.
Providers implement the procedure used to manage resources. A resource is simply declared as a list of attributes because all of the instructions for managing that resource have been encapsulated in the provider. Additionally, multiple providers can be implemented for a single type, allowing the same resource to be applied on different operating systems.
Puppet includes one or more providers for each of its native types. For example, Puppet’s User type includes eight different providers that implement support across a variety of Unix, Linux, and even Windows platforms.
The Package type (as shown below) contains the most providers:
$ls ~/src/puppet/lib/puppet/provider/package/aix.rb blastwave.rb macports.rb pkg.rb rpm.rb yum.rbappdmg.rb dpkg.rb msi.rb pkgdmg.rb rug.rb yumhelper.pyapple.rb fink.rb nim.rb pkgutil.rb sun.rb zypper.rbapt.rb freebsd.rb openbsd.rb portage.rb sunfreeware.rbaptitude.rb gem.rb pacman.rb ports.rb up2date.rbaptrpm.rb hpux.rb pip.r portupgrade.rb urpmi.rb
Note
These examples assume you installed Puppet from source in ~/src/ as outlined in Appendix A. Future references to source code also make this assumption.
Providers are one of the most common sources of community contributions to Puppet Core. One of the most powerful things about Puppet is the amount of operational systems knowledge already encoded into its native providers.
To find all of the providers that are currently part of Puppet, have a look in the provider directory of the Puppet source code:
$ find ~/src/puppet/lib/puppet/provider/ -type fIn order to contribute a provider to an existing type, a developer only has to implement two basic pieces of functionality:
- How to query the current state of this resource
- How to configure the system to reflect the desired state
Implementing this functionality will be explained in detail in Chapter 3.
The puppet resource command-line tool allows users to interact with resources by querying and modifying the underlying system. This tool provides the ability to interact with resources using the same API that is used when they are managed by the Puppet DSL.
This provides a great way for beginners to become more familiar with how resources function by seeing how they interact with the underlying system. It is also a great debugging tool for developing providers.
The puppet resource command interacts directly with resources implemented in Ruby. It relies on the provider to retrieve a list of resource instances on the system where the command is executed. The command also accepts the type and title that uniquely identify the resource to be queried:
# puppet resource <type> <title>The following example shows that the ftp user does not currently exist on the system:
# puppet resource user ftpuser{'ftp':ensure=>'absent',}
The current state of this resource is returned to STDOUT in a format compatible with Puppet’s DSL. In fact, the output could be redirected from this command to create a valid Puppet manifest which could then be applied:
puppetresourceuserftp>ftp_user.pppuppetapplyftp_user.pp
puppet resource can also modify the current state of resources on the underlying system. It accepts resource attributes as key value pairs from the command line using the following syntax:
$puppet resource <type> <title>ensure=<resource_state> <attribute1>=<value1> <attribute2>=<value2> ...
The following example declares that our ftp user should exist with its home directory set as /var/lib/ftp. If the system did not have an ftp user when this command was executed, you should see the following output:
$puppet resource user ftpensure=presenthome='/var/lib/ftp'notice: /User[ftp]/ensure: createduser { 'ftp':ensure => 'present',home => '/var/lib/ftp',}
The message above indicates that Puppet has created this user. Once the account exists on the system, subsequent Puppet runs will simply complete without notice messages indicating there were no changes to the system. This also demonstrates the idempotent nature of Puppet that we discussed earlier:
$puppet resource user ftpensure=presenthome='/var/lib/ftp'user { 'ftp':ensure => 'present',home => '/var/lib/ftp',}
If the user exists, we can use puppet resource to query for the current state of that account:
$puppet resource user ftpuser { 'ftp':ensure => 'present',gid => '1004',home => '/var/lib/ftp',password => '!',password_max_age => '99999',password_min_age => '0',shell => '/bin/bash',uid => '1003',}
Note
puppet resource returns more attributes than those that we explicitly specified for that user. It actually returns all properties for the resource being queried. Properties will be explained in detail in Chapter 2.
The puppet resource command also updates individual attributes of a resource that already exists:
$puppet resource user ftpshell=/sbin/nologin --debugdebug: User[ftp](provider=useradd): ↪Executing '/usr/sbin/usermod -s /sbin/nologin ftp'notice: /User[ftp]/shell: shell changed '/bin/bash' to '/sbin/nologin’...user { 'ftp':ensure => 'present',shell => '/sbin/nologin',}
Note
Running puppet resource with the debug option (--debug) allows you to see the system commands executed by that resource’s provider.
The results above contain two lines of output worth mentioning:
debug: User[ftp](provider=useradd): ↪Executing '/usr/sbin/usermod -s /sbin/nologin ftp'
The debug output shows that the useradd provider modifies the current shell with the usermod command. This information serves as a useful debugging tool. Users can troubleshoot failures using the exact same commands Puppet does, directly from their shell.
notice: /User[ftp]/shell: shell changed '/bin/bash' to '/sbin/nologin'The above message, logged at notice level, shows how the modification to the underlying system is treated as a state transition (the state of the ftp user’s shell attribute has transitioned from /bin/bash to /sbin/nologin). Puppet treats all updates to the system as state transitions and records them as events.
Run the same command again and note that no events occur when the system state already matches the desired state:
#puppet resource --debug user ftpshell=/sbin/nologin
This reiterates the idempotent nature of resources: Puppet does not perform any changes if the system already matches the desired state.
We have already shown how Puppet can retrieve the current state of individual resources. It can also query for all instances of a given resource type on a system. When combined, these two features allow Puppet to discover the current state of all resources of a certain type on the underlying system.
You can query for all instances of a given type using the following syntax:
$puppet resource <type>
The following example queries all existing package resources on an Ubuntu system:
#puppet resource packagepackage { 'accountsservice':ensure => '0.6.15-2ubuntu9',}package { 'adduser':ensure => '3.113ubuntu2',}package { 'apache2':ensure => '2.2.22-1ubuntu1',}package { 'apache2-mpm-worker':ensure => '2.2.22-1ubuntu1',}...
This capability is implemented using the self.instances method, which will be explained in Chapter 3.
Noop (pronounced "no-ahp") mode is a way for Puppet to simulate manifests and report pending changes. When noop mode is enabled (using the --noop flag), Puppet queries each resource and reports differences between the system and its desired state. This provides a safe way to understand the potential impact of applying Puppet manifests. It is common to use noop mode when running Puppet outside a change window, or when you want to get a better understanding of what kinds of changes Puppet needs to make.
The Puppet Resource Model provides this capability by breaking up resource evaluation into the following distinct phases (as shown in Figure 1-3):
- Users declare the desired state of resources.
- The provider discovers the current state of managed resources.
- Puppet compares each resource’s current state against the desired state.
- If they are not the same, the provider updates the underlying system.
- Changes to the underlying system are recorded as events.
When Puppet is run in noop mode, it skips step #4 in the list above, and records differences between desired and observed state as events without making any modifications to the system.

A Puppet catalog is a collection of resources compiled from a set of manifests. We’ve already seen the manner in which resources describe how individual components of the system should be configured. The catalog is a composition of resources that are used to model a service or a system. The catalog can be stored centrally by PuppetDB, which maintains a wealth of information about how your infrastructure is configured. The catalog is easily introspected to better understand how a system should be configured, and what dependencies might exist.
Resources deploying an application often require individual components to be configured in a specific order. These dependencies are expressed as relationships in Puppet. The order of resources can be specified using the require and before resource metaparameters (special attributes that are accepted by every resource type) or with the autorequire method, which will be discussed in the next chapter. When Puppet applies a catalog, its resources will not be applied until all of their dependencies are satisfied.
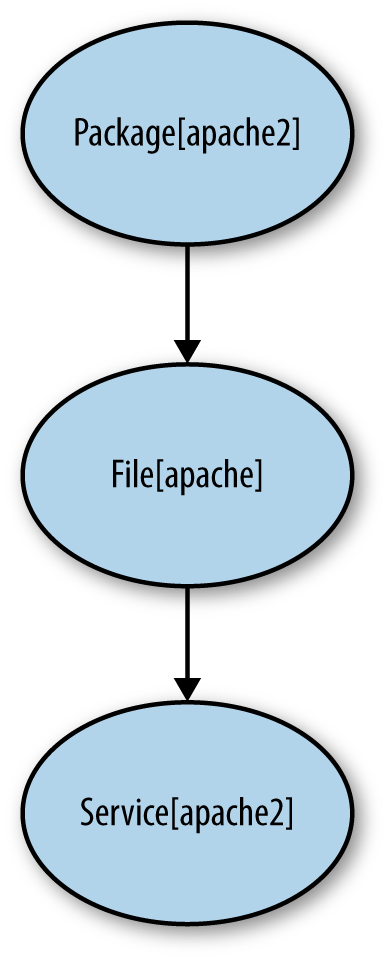
These example manifests show how the require and before metaparameters can construct the same catalog:
package{'apache2':ensure=>present,}service{'apache2':ensure=>running,require=>Package['apache2']}
package{'apache2':ensure=>present,before=>Service['apache2'],}service{'apache2':ensure=>running,}
The data structure of the catalog is a graph. Graphs are characterized as a collection of objects where some of the object pairs are interconnected. The objects are referred to as vertices and the the links between pairs of those objects are edges. As shown in Figure 1-4, the vertices of the catalog are Puppet resources, and the edges are the dependencies between those resources.
The graph that represents Puppet’s catalog has two primary characteristics: it is directed and acyclical.
The Puppet Catalog is said to be a directed graph because all of its edges have a direction; that is, every edge designates the order in which a pair of resources needs to be applied.
Figure 1-5 shows how before and require add directed edges to create a graph:
package{'apache2':ensure=>present,before=>File['apache2'],}file{'apache2':name=>'/etc/apache2/apache2.conf',content=>template('apache/apache.erb'),}service{'apache2':ensure=>running,require=>File['apache2'],}
Since the order in which resources are applied is indicated by the edges of the graph, it follows that there cannot be cycles in the graph. If cycles exist in a graph, Puppet cannot determine the order in which things should be applied.
Consider the following manifest that introduces a dependency cycle. Each resource specifies a dependency on the other resource. It Puppet interpreted these dependencies literally, it would indicate that no resources could ever be applied. Fortunately Puppet detects these kinds of cycles and fails before trying to apply the catalog.
package{'apache2':ensure=>present,require=>Service['apache2']}service{'apache2':ensure=>running,require=>Package['apache2']}
Thus far, we’ve looked at the core characteristics of resources (uniqueness, idempotent, declarative), how they are composed by Puppet’s DSL, and how they interact with the underlying system. With this fundamental understanding of resources, we are ready to move on to how they are created using Puppet’s type and provider APIs.
Get Puppet Types and Providers now with the O’Reilly learning platform.
O’Reilly members experience books, live events, courses curated by job role, and more from O’Reilly and nearly 200 top publishers.

