Chapter 1. The Basics
Hacks 1â11: Introduction
Youâve probably played a few games on your PSP, placed a few music files or pictures on it, and perhaps even gone so far as to watch a movie. Basically, youâve taken advantage of the information provided in the manual. If you happened to throw your copy out, grab a new PDF version online for reference (http://www.us.playstation.com/psp/Manuals.aspx). You may even want to convert that PDF to JPEGs for viewing on your PSP [Hack #29] . Now, however, itâs time to think outside the basic uses for which the PSP was originally intended.
The hacks in this chapter will cover some of the basics about the PSP, while taking them a step further: giving you a breakdown of the different technologies involved. Along the way, weâll give you a few useful tips and tricks and try to cover some topics and ideas you might not have thought of when using your PSP.
Did you know that there are multiple ways to back up your saved game data? Did you ever think of using your PSP as another place to back up important files? We did, and you can.
Quit a Game Quickly
Youâre in-between projects, waiting for a response from one of your coworkers, so you pull out your PSP and start up a quick race in Wipeout Pure. Knock-knock. The boss walks in. Hereâs how to quickly get out of game play, saving both your game and your job.
In designing a portable PlayStation platform, fortunately, Sony did a good job of accounting for the on-the-go nature of PSP game play. The power button on the right bottom corner of your PSP can be pushed up quickly to power down the PSP without harming the game you are currently playing. A quick movement of the power button up and then back down to the locked position should become rather habitual when the phone rings, itâs time to switch buses, your favorite TV show comes on, or the boss walks in.
The only thing you need to make sure of is that the PSP is not writing to the Memory Stick Duo Card when you need to quickly power down. Check for a flashing orange light on the bottom-left corner of the device. If thereâs no light, then youâre in the clear to simply power down. Thatâs it. Simple.
Now, to quickly hide the PSP from your boss, I recommend keeping a bottom drawer of your desk open and one of its hanging folders filled with cotton. When the boss walks in, quickly (but calmly) put the PSP into power-save mode, drop it in the drawer (see Figure 1-1), close the drawer, and say, âHi, boss. Just filing away a report. What can I do for you?â
Remember: practice makes perfect. Try several dry runs, so youâll be ready for the real deal.
Manage Your Saved Games
Save your game progress on the PSP, move these saved games to a computer, and share saved games with others.
Games: you love them. You like to have multiple concurrent sessions of the same game, as if each slightly different character or choice were but one manifestation of you in the multiverse.
Most hard-core game players know that having multiple file saves can be the key to progressing effectively through a game. Weâve all experienced that sinking feeling when you discover in level four that you cannot defeat the boss without the magic cap that you didnât find in level three, and it is much less frustrating to start over from level three than it would be to start over from the beginning or spend a lot of time backtracking.
If you havenât been able to track down that 1GB Memory Stick Duo card that youâve been looking for, the 32MB stick included with your PSP is probably feeling a little cramped. This hack will discuss various options for managing your saved game files and moving them between your PSP and your computer.
Saving Game Progress
You know how to quit a game quickly [Hack #1] , but if you actually want to save your game progress, either to switch to another game, watch a movie, or listen to some tunes, all you have to do is press the Start button. A menu will pop up, providing you with a variety of options, including Save Game (Figure 1-2).
Warning
Not all games will allow you to save your progress in the middle of game play. Several games require you to save at special places along the way called save points, so make sure to glance at the manual that came with each game to find out which saving mechanism the game uses.
For example, Wipeout Pure will only let you save your progress in between races and via a save dialog provided within the game. Metal Gear Ac!d saves to two different types of save game files: one that you create by saving in Intermission mode between boards and another for saving progress in the middle of a board.
Of course, if you are playing wirelessly along with friends [Hack #38] or with strangers over the Internet [Hack #37] , you cannot save game progress, since stopping play disconnects you from the shared game.
Once you have saved your game file, hit the Home button. A dialog will pop up asking, âDo you want to quit the game?â Select Yes and hit the X button to choose to quit the game, and the O button (or select No and hit X) to choose not to.
Now that you have successfully saved your game progress and exited out of the game, Iâll explain what else you can do to manage your game files via the PSP itself.
Copy and Delete Files
Under the Game menu on the PlayStation Portable, just below Game Sharing and just above UMD/Memory Stick (depending on whether you have a UMD disk inserted or not), youâll find the Saved Data Utility (Figure 1-3). Highlight it and hit the X button.
You will be presented with a list of all the saved game files on your PSP. When you highlight each saved game, you will see a screenshot or animation from the game, usually along with music from the game, and a good amount of metadata associated with the game; this usually includes the date and time the file was saved and the size of the file alongside game-specific data that varies from game to game. Some games include information about the board you were on when you saved, the level of difficulty of game play, the type of game-save data, and possibly the name of the player and the total time spent playing the game.
Now, if you hit the Triangle button, you will be given another menu with options for Copy, Delete, and Information (Figure 1-4). If you select Copy and hit X, a dialog will appear noting: âYou will be asked to change the Memory Stick 3 times. Press the X button to begin.â Hit X to begin the copy process or O to go back to the previous menu (Figure 1-5).

The Copy Data Utility allows you to copy your games to another Memory Stick in case you want to give a copy of a game-save file to your friend, or if you just want to keep a backup Memory Stick and game data without bothering to use a separate computer to host your game files.
Tip
Even if you save up and grab a 1GB or even 2GB Memory Stick Duo, I recommend keeping on hand the measly 32MB stick that was included with your PSP. It can come in handy as a game-only backup space.
The PSP will copy the game data into its memory, then prompt you to remove your Memory Stick and insert the Memory Stick on which you want to copy the data. As you can see in Figure 1-6, the PSP tells you that the whole process will require switching out the Memory Stick three times, but what it doesnât tell you is that each of these three times actually entails switching out the Memory Stick twice. Be prepared to spend a few minutes swapping out the two cards a total of six times. When it is finished, you will be prompted to switch back to the original Memory Stick.
If you instead choose Delete from the Saved Data Utility menu, the PSP will ask whether you are sure you want to delete the game data file. Make sure you are sure before choosing to delete, as there is no recovering the data (unless you have previously backed up the information).
And, finally, if you select Information from the Saved Data Utility menu, you are presented with a slightly more detailed view of the metadata associated with the file (see Figure 1-7).
Manually Copy Game Data to Your Computer
To really keep a nice backup of your saved game files, youâre going to want to move them onto your computer. There are a few programs that will do this automatically for you, but first let us discuss how to do it manually. There are two ways to make your saved game data accessible to your computer: either by hooking your PSP up to your computer via a USB mini to USB cable, or by removing your Memory Stick from the PSP and placing it in a Memory Stickâcapable card reader attached to your computer.
Connecting your PSP to your computer via USB.
You need a USB mini to USB cable. Plug the USB mini end of the cable into your PSP and the regular USB end of the cable into your computer (Figure 1-8 shows a hybrid data/USB power cable). Now turn on your PSP and navigate over to the Settings menu. Scroll over to USB Connection and hit the X button. If you are on Windows, the Memory Stick Duo will show up in your drives list under My Computer. If you are on Mac OS X, the Memory Stick Duo will show up on your desktop as a new drive. If youâre on Linux, see âExchange Files with Any Computerâ [Hack #3] .
Tip
If youâre going to keep your PSP connected to your computer via USB for a while, you will want to make sure that it is not set to go to sleep before connecting. If you unplug or disconnect the PSP before dismounting the Memory Stick properly, you could damage the data on the stick. If the PSP goes to sleep while connected to your computer, it can have the same negative results.
To avoid this, under Settings on your PSP, select Power Settings, and then select Auto Sleep and change the setting to Off. To conserve power, you can still change the Backlight Auto-Off setting, also under Power Settings, to two minutes (its lowest setting).
Alternately, you could invest in a USB cord that also supplies power to the PSP.
Open the Memory Stick by double-clicking on it. Inside you will see a folder called PSP. Inside that folder, you will see a SAVEDATA folder. Inside the SAVEDATA folder, you will find all of your saved games. Simply copy the entire SAVEDATA folder over to your computer.
After you have finished copying the files, you must dismount the Memory Stick before severing the connection. To do this, eject the Memory Stick by dragging it to the Trash in Mac OS X or choose "Safely Remove Hardwareâ from the Windows toolbar. After you have dismounted your PSP, hit the O button on your PSP to disconnect it fully from your computer. Now remove the USB cable.
Connecting your Memory Stick to your computer via a card reader.
If you have a Memory Stick Duo capable card reader, there is no need to connect your PSP via USB to transfer files to your computer. Instead, simply power down your PSP, then open up the Memory Stick Duo panel on the bottom-left side of your PSP. Press in lightly on the Memory Stick to eject it from the port. Once it is sticking out of the PSP, grab onto it and pull it free.
Now, simply attach your card reader to your computer and insert the Memory Stick into the card reader. If you have a card reader that is only capable of reading regular Memory Stick cards, you will need a Memory Stick to Memory Stick Duo adapter. Your memory stick will appear as a disk drive on your operating system, and you can follow the instructions in the preceding section to work with files on it.
If you donât like the GUI interface of your OS, you can avoid all this clicking by using the command line.
The Mac OS X Terminal.
Launch the Terminal (found in /Applications/Utilities/), and at the command line, you can type:
open /Volumes/<NAMEOFYOURMEMORYSTICK>/PSP/SAVEDATA/Here you would replace
<NAMEOFYOURMEMORYSTICK> with the
actual name of the device as it appears mounted on the desktop. By
default, this will be âUntitled.â If the name has been changed to
something like âMy PSP,â then you will need to add an \ before the
space in the name. For example, if your Memory Stick were named âMy
PSP,â you would type the following:
open /Volumes/My\ PSP/PSP/SAVEDATA/
Then hit Return. This will open the folder in the Finder, so that you can drag all the files to wherever you like on your Mac.
If you would rather keep the process GUI-free, simply type the commands:
	cd /Volumes/Untitled/PSP/SAVEDATA/
	cp -R * ~/Desktop/PSP/
Hit Return after each line. The first cd command will change the directory on
your mounted Memory Stick (named Untitled) to the SAVEDATA folder.
The cp -R command will then copy
all the files and folders within this folder into a folder called
PSP on your desktop.
The Windows Command Prompt.
In Windows, you can simply go to Start â Run and type E:\PSP\SAVEDATA\ to open the appropriate folder, assuming that the PSP mounts as drive E:. (If you already have a drive E:, then the PSP will be drive F:. If you already have a drive F:, the PSP will be drive G:, and so on through the alphabet.)
This will open the folder in a window from which you can copy all the files.
If you would rather copy them from the command prompt, launch the Command Prompt, found under Start â All Programs â Accessories. Once the command prompt comes up, type the following:
cd e:\PSP\SAVEDATA\xcopy e: c:\gamesaves\ /S
Hit Return between each line. Substitute whatever drive letter your Memory Stick mounted on for e: in the above example. The first command will switch to the SAVEDATA directory on the Memory Stick. The second command will copy all the directories and subdirectories within the SAVEDATA folder into a new folder called âgamesavesâ at the root level of your C: drive.
Automatically Copy Game Data to Your Computer
Sony should come out with their own software to automatically copy game data to your computer, but they havenât as of yet. In the meantime, there are several alternatives for a variety of platforms.
iPSP.
iPSP from RnSKSoftronics (http://ipsp.kaisakura.com/) runs on Windows ME, 2000, XP, or on Mac OS X. The program is described as a full multimedia manager for your PSP; in addition to backing up your saved games each time you connect your PSP or your Memory Stick Duo to your computer, iPSP syncs music, photos, and videos to your PSP, converts video to the proper format, and can convert PDF files into JPEGs for mobile viewing on your PSP. iPSP costs $19.99 USD.
Upon launching, iPSP automatically begins saving your game data to your computer (see Figure 1-9). Once it finishes copying the games to your computer, you can then select the Gamesaves button at the top of the main iPSP window. This will bring up a browser of all the locally saved games (see Figure 1-10).
The sidebar will list all the individual game files saved to your computer. When you highlight a game in the sidebar, a history of all the different versions of the game that have been saved to your computer via iPSP in the past will be displayed by date in the first panel to the right of the sidebar. Selecting the date will list all the different times during that day that the game was backed up to your computer. If you select one of the times, you will see any metadata associated with the file in the far right panel, and you can choose either âErase from Driveâ or âRestore to PSP.â
PSPWare.
If you are using OS X and you like the GUI goodness of iSync and the iLife suite, before going for iPSP, youâll probably want to try the demo of PSPWare for Mac OS X (http://www.nullriver.com/index/products/pspware; $15 USD). If you are on Windows, NullRiver has recently released a Windows version (http://www.nullriver.com/index/products/pspware.win). If you click on the Backup button (see Figure 1-11) in PSPWare, you can choose to automatically sync games to your computer each time you sync PSPWare. Thereâs an Options button where you can select to keep the last 10, 25, 50, or all of your past backups. Thereâs another Restore button via which you can restore your old backups to your PSP. An added benefit of PSPWare is that you can set up sync profiles for managing multiple Memory Sticks (and multiple games).
Hacking the Hack
If youâre a scripter and neither iPSP nor PSPWare fits your bill, consider using the command line instructions discussed in this hack as the basis for a script of your own for backing up your games.
For example, using AppleScript in Mac OS X, you could build a simple two-line script, like this:
	do shell script "cd /Volumes/Untitled/PSP/SAVEDATA/"
	do shell script "cp -R * ~/Desktop/PSP/"
If your Memory Stick Duo card is named something other than Untitled, you will need to change the first line of the script to account for the cardâs name. If there are any special characters or spaces in the cardâs name, you will have to escape them by putting a \ before the space or character. Save this file as an application to simplify backing up your game saves to your computer.
Now that you have managed to successfully save files to your computer, the possibilities are endless. You can email the saved files to friends as attachments. Offer a saved file on your web site as backup or as bragging proof of the speed with which you won Metal Gear Ac!d. With Version 2.0 of the firmware, you can navigate to the page and download the file directly to your PSP (see âFind Yourself a PSP Web Browserâ [Hack #41] ). If your friend has unlocked all of the levels on Tony Hawk Underground 2: Remix, why not grab a copy of his file so that you donât have to go through all the trouble of actually unlocking all the levels before you play them? Think about it. People are willing to pay money for virtual items these days. If youâre a gaming pro, you could develop a lucrative career selling your tricked-out characters from forthcoming PSP RPG titles via eBay (http://www.ebay.com).
Exchange Files with Any Computer
You know that you can put music, pictures, videos, and saved games on your PSPâs Memory Stick Duo. Did you ever think you could also use the PSP as a makeshift USB drive for backup and easy portable storage?
While you are carrying that little gaming wonder around in your bag, why not keep some of your important documents saved on the Memory Stick Duo card for easy access via any computer with a USB connector?
While working on this book, I kept backup copies of all the documents involved on an encrypted, password-protected disk image, zipped and sitting on my 1GB Memory Stick. Easy and secure access.
Things Youâll Need
The Basics
In âManage Your Saved Gamesâ [Hack #2] , you learned the basics of connecting your PSP to your Mac/PC via USB to copy game files to your computer. This essentially works the same way. Simply plug a USB mini to USB cable into your PSP and the computer you will be using. Navigate to Settings (see Figure 1-12), USB Connection, and hit the X button.
If you are connected to a machine running Windows XP, the PSPâs Memory Stick will show up as a removable USB drive under My Computer, and it will be assigned an available letter in the alphabet (most likely E:, F:, or G:, depending upon how many drives you have connected to your computer). When you first plug it in, a little notice will pop up in the System Tray saying that a new USB device has been detected.
On Mac OS X, the Memory Stick will mount on the desktop and will most likely be named Untitled, unless you have changed its name at some previous point in time.
On Linux, the Memory Stick should be available as any other USB mass storage device. Examine the kernel messages with dmesg to see what device the PSP was recognized as:

$ dmesg
Linux version 2.6.8.1-5-686 (buildd@vernadsky) (gcc version 3.3.4 (Debian 1:
3.3.4-9ubuntu5)) #1 Wed Aug 17 23:34:53 UTC 2005
BIOS-provided physical RAM map:
[â¦] lots of output deleted [â¦]
scsi0 : SCSI emulation for USB Mass Storage devices
Vendor: Sony Model: PSP Rev: 1.00
Type: Direct-Access ANSI SCSI revision: 02
USB Mass Storage device found at 2
usbcore: registered new driver usb-storage
USB Mass Storage support registered.
SCSI device sda: 487936 512-byte hdwr sectors (250 MB)
sda: Write Protect is off
sda: Mode Sense: 00 6a 20 00
sda: assuming drive cache: write through
/dev/scsi/host0/bus0/target0/lun0: p1If itâs not automatically detected, run the command modprobe usb-storage as the root user and
examine the output of dmesg again. Once youâve
identified the device, you can mount it (if it was identified as
sda, you want sda1, the
first partition):
$ sudo mount /dev/sda1 /mnt -o uid=$USER$ ls -l /mnt/total 128 -rwxr--r-- 1 me root 5125 2005-09-04 12:35 index.html -rwxr--r-- 1 me root 4060 2005-09-04 12:34 make_index.pl -r-xr--r-- 1 me root 0 2005-01-30 22:28 memstick.ind drwxr--r-- 4 me root 32768 2005-09-02 22:50 mp_root -r-xr--r-- 1 me root 0 1979-12-31 23:00 mstk_pro.ind drwxr--r-- 9 me root 32768 2005-04-08 23:55 psp
The sudo command lets you run
mount as root, and the -o uid $USER mounts it so that the currently
logged-in user is the owner of the files on the stick.
You can now treat the Memory Stick just like any other drive on your computer. Drag files over to the Memory Stick or write a document in Microsoft Word, and choose Save As and select the Memory Stick as the location to save the file.
You can also open any file you have previously stored on the Memory Stick by simply double-clicking the file. Double-click on an Excel spreadsheet to input some information, choose Save, and then quit Excel. Everything will be updated nicely and ready to go with you and your PSP.
When you are done copying files to and from the Memory Stick, you have to dismount the Memory Stick before unplugging the USB cord from your computer. Otherwise, you could risk harming the data (including all those saved games) contained on your Memory Stick.
To do this in Windows XP, click on the little USB device icon in the System Tray, and select âSafely remove USB Mass Storage Deviceâ from the menu that pops up (see Figure 1-13âif you have more than one USB device connected, there may be multiple entries in this list). It should immediately tell you that the device is now safe to remove.

Warning
If Windows or Mac OS X complains that the drive couldnât be removed, make sure youâve closed all the files on the drive, including any open command prompts or terminal windows. Then try to remove it again.
In Mac OS X, drag the Memory Stick to the Trash/Eject icon, or click the Eject icon next to its name in a Finder window.
After you have successfully dismounted your Memory Stick from your computer, hit the O button on your PSP to turn off the USB connection. Now unplug the USB cable and be on your merry way.
Keep Things Organized
The PSP keeps a rudimentary file structure on the Memory Stick that you shouldnât tamper with too much. There are two locked files at the root level of the Memory Stick, MEMSTICK.IND and MSTK_PRO.IND, that you should leave alone. Iâd avoid putting any of your files inside the PSP folder, which the PSP uses to organize your game saves, photos, and music. Nor would I place these files inside an MP_ROOT folder that you may have created for videos. These files would show up as corrupted data files on the PSP. Scrolling through corrupted data files while trying to pick a song to listen to isnât really as fun as it sounds.
Instead, create a new folder at the root level of the Memory Stick. Perhaps make it a Documents folder for holding all these files that you will be using on various machines. If the files are HTML or plain text files and you have Version 2.0 of the firmware on your PSP, you can view these files using the PSPâs Browser (see âFind Yourself a PSP Web Browserâ [Hack #41] and âTurn Your PSP into a PDAâ [Hack #35] ).
Think Security
This is a good tip for regular files you may be working on, but you should consider the security issues involved in carrying any type of sensitive data around with you, especially if these files are crammed on an object as desirable of thievery as the PSP.
Since I am working almost exclusively on an OS X system, Iâve created a password-protected and encrypted disk image of my files using Disk Utility (located in /Applications/Utilities/).
There are many ways to encrypt and lock up your data on Windows, Mac OS X, and Linux. For Windows and Linux, you can use the open source software TrueCrypt (http://www.truecrypt.org). For more information on Linux disk encryption, see http://www.tldp.org/HOWTO/Disk-Encryption-HOWTO/.
Also, consider practicing a little social hacking. Keep all your backed-up files inside a folder named Virus Quarantine Folder to persuade anyone who might come across the information to throw it away immediately rather than rummaging through your top secret files.
Change the Background Color on Your PSP
Do you hate green, but love blue? Find out you how to keep your PSPâs background set to your favorite color.
This is a simple trick to keep the background color in your PSPâs main interface set to whatever color you like best. If you are running Version 2.0 of the firmware, you can set your background color by navigating to Settings â Theme Settings, hit the X button, select Theme, hit the X button again, and select a color from the menu that appears on the right. The colors will change as you scroll through the list. If you choose Original, then the color will change each month. Hit the X button to make your selection and you are done.
If you are running an earlier version of the firmware [Hack #11] , you lack this function, and the background color is solely determined by month. You just have to have a correct charting of the different colors according to month, and then reset the PSPâs date to the corresponding month for the color youâd like. Sure, you have to remember to update it once a month, but this shouldnât adversely affect your PSP in any way (although your saved games will all be dated incorrectly to whichever month you choose).
Charting the Color Calendar
If you want to discover things on your own, itâs a rather simple process:
In the PSPâs main menu, simply navigate to Settings â Date & Time Settings â Date and Time.
Hit the X button and move the date ahead one month.
Hit the X button again, and you will see the color change to whatever color goes with the next month.
Repeat steps 2 and 3 until youâve charted the full year.
To make things easy for you, you can look the colors up in Table 1-1.
Month | PSP background color |
1. January | White/grey/silver |
2. February | Light yellow/gold |
3. March | Light green |
4. April | Pink |
5. May | Dark green |
6. June | Blue/purple |
7. July | Ocean blue/teal |
8. August | Dark blue to light blue |
9. September | Purple |
10. October | Dark yellow/gold |
11. November | Sepia/brown |
12. December | Red |
Get Your Wireless Network On
Set up a wireless network at home so that you can connect your PSP to the Internet for upgrades, faster infrastructure, LAN parties with more players, and even browsing the Internet.
If you want to connect your PSP to the Internet to download a few
new race-tracks for Wipeout Pure, to browse the Web
[Hack
#41] , or to play with other PSP owners over the
Internet [Hack #37] âin short, if you want to use
the wireless capabilities of your PSP to do anything other than simply
play games in ad hoc wireless mode
with your local friendsâthen you are going to need to set up a wireless
network environment that works well with the PSP.
The Basics
If you donât already have a wireless network set up, youâll need to get your hands on some equipment.
Tip
Even if you are still working off of a dial-up connection, you can find wireless routers that plug into your phone line. For example, Appleâs AirPort Extreme Base Station (with Modem and Antenna Port) has a 56k modem built in, and will still connect to a DSL or cable modem if you decide to upgrade in the future.
Wireless routers are relatively cheap these days, especially if you are going for the slightly slower 802.11b variant, which will play very nicely with the PSP (see the next section). As an Apple user, Iâm a big fan of AirPort, AirPort Extreme, and AirPort Express. The latter of these solutions is a nice, portable wireless access point that simply needs an Ethernet connection to your DSL/cable modem and an open electrical plug. However, all these Apple-branded solutions are rather expensive, as they all run in the over-$75 range.
If you have a desktop computer that is plugged directly via Ethernet cable into your broadband modem, and no other computers are in need of a wireless solution, your best bet may be to get an internal wireless card for your computer, and set your computer up as a wireless access point via which you can connect your PSP.
Otherwise, shop around online and in your local electronics stores for the best deals. Linksys, D-Link, and Belkin are just a few of the manufacturers of 802.11 wireless products, and you can usually find nice deals online and some good-quality store-rebated items, so you shouldnât have to spend over $35â45 for an effective 802.11b router. Once you purchase your router, follow the instructions included with the device for setting it up.
802.11b
One of the slight disappointments (for me, anyway) when I first got my hands on my PSP was discovering that the wireless capabilities of the device were 802.11b and not 802.11g.
My network at home is all 802.11g; I have an AirPort Extreme Base Station acting as an access point, an AirPort Express acting as a wireless bBridge for my ReplayTV, and two Apple PowerBooks with AirPort Extreme inside. This meant that I could only set the AirPort Base Station to be 802.11g, thereby ensuring the fastest connection speeds possible.
Now, fortunately, 802.11g is backward compatible with the slower 802.11b wireless protocol used by the PSP. However, in order for my 802.11g network to be compatible with the PSPâs 802.11b, I had to enable connectivity between 802.11b devices as well. Why is this bad news? Well, anytime an 802.11b device hooks into the network, it slows down the connectivity of all those 802.11g devices. All of this is relative, of course, as both 802.11b and 802.11g speeds plugged into a cable modem blow dial-up out of the water.
Security
Another issue with the PSP is security. If you have a PSP with Version 1.0â1.52 of the firmware, the only wireless security option available to you is WEP, which is the most easily cracked wireless encryption protocol out there. WPA is more secure, so both the PSP and, more importantly, your network, will be more vulnerable while using WEP.
WEP is better than nothing, however, so if youâre using older firmware, configure your network for a WEP password, and navigate to your network settings on your PSP (Settings â Network Settings, hit the X button and choose Infrastructure Mode, and hit the X button again). Choose the connection that you want to edit and scroll forward until you reach the WLAN Settings pane.
Make sure that your wireless networkâs name appears under SSID. If it doesnât, scroll down to Scan, hit the X button, select your wireless network from the list that appears on the next page, and hit the X button again. This will take you back to the WLAN Settings page.
Now scroll down to where it reads None under Encryption and hit the X button. Use the up or down arrow on the keypad to toggle None to WEP and hit the X button. Now hit the right arrow on the keypad to bring up a screen asking you to enter your WEP key. Hit the X button, and the PSPâs text entry screen will come up. When you are done entering your password, scroll up to the Enter button on the text entry screen and hit the X button again.
If you already have WPA set up in your current network, youâre going to have to disable it for your Version 1.0â1.52 firmware PSP to be able to access your network. If you have a PSP with Version 2.0 of the firmware, however, you can set the WPA settings on your PSP to work with your WPA-enabled network. This will be nearly identical to the procedure for enabling WEP encryption, except you will toggle down to WPA-PSK under the WLAN Security Setting and enter your WPA password.
Now, your PSP should connect with your WEP-/WPA-encrypted network; however, I have found that I get a better connection with the PSP when I disable the encryption, so I usually do when I am going to be using the PSP wirelessly with my home network. Part of this is a luxury of location. Iâm in an old, thick-walled apartment on the top floor of my apartment building that blocks 802.11 like you wouldnât believe, so very little, if any, of my wireless broadcast is extending outside of my apartment. If you are living in a paper-thin-walled building, you might not want to disengage your encryption with such frivolity.
Conclusions
When connecting your PSP to a wireless network, all you really need to do is make sure that you have an 802.11b-compatible wireless network running and that youâve flipped the WLAN switch on the bottom-left corner of your PSP into the on position. All the other options discussed in this group of tips are merely to help improve upon the wireless connectivity of the PSP. I always disable security and switch my network to Channel 1 when Iâm about to use my PSP for online fun, but it doesnât mean that this is something you must do. If you are having trouble connecting to your network, however, try giving these measures a shot.
Hacking the Hack
If you really want to trick out your wireless network connectivity, make sure you check out all the other wireless related hacks in this book, especially âAdd an External Wireless Antennaâ [Hack #17] .
Troubleshoot Your PSP
What to do when the PSP freezes, a game consistently skips, a game wonât load, or if a memory stick isnât showing up.
Youâre stuck. Your PSP isnât acting the way it once did, and youâre not sure why. Here are some common problems you may encounter, along with a few ideas for troubleshooting those problems.
UMD Game/Movie Wonât Load
This is one of the most common problems you will run into with your PSP. Youâve just placed your favorite UMD game in, but the PSP doesnât seem to recognize that it is there. Here are some things to do.
Check for a clean disk.
First, simply remove the disk and put it back in. Maybe it wasnât firmly seated the first time you tried. If that does nothing, remove the disk again and make sure that it is clean. If youâve been out in the summer heat and have come indoors to some cool air-conditioning, check for condensation. If thatâs the problem, play another game while you wait for the moisture on the disk to dissipate.
If there are any particles or dust on the disk, try blowing these particles off. Consider using a compressed air can to blow particles from the inside of the disk; you can find these cans in any computer or electronics store.
If you have smudged the disk via the little open window compartment on the UMD disk, then you are going to need to wipe that smudge off. Try to rotate the disk by pushing in the middle with your index finger and turning your finger, as shown in Figure 1-14. Do this until the smudged part of the disk is lined up with the open portion. Now, clean the smudge just like you would clean a CD/DVD or a camera lens. Breathe lightly on the disk to get a slight fog on it and then use a soft non-abrasive cloth (see Figure 1-15) to gently wipe from the inner ring of the disk outward. If the smudge extends to other parts of the disk, continue to rotate the disk, working section by section until it is fully clean.
Tip
If you arenât having any luck cleaning your UMD disks using these methods, there are several commercially available UMD disk-cleaning solutions available that you may want to try. The DragonPlus PSP UMD Disk Cleaning System includes a high-quality shammy cloth and nontoxic cleaning solution.
Pelican also makes a UMD disk cleaner that comes with one of their PSP kits and operates like many of the CD/DVD cleaning solutions with which you are most likely familiar. Stick the UMD disk in, turn the crank a few times, and it spins the disk around, cleaning it nicely.
Check the clear plastic cover on the disk.
Another thing that can happen with a UMD disk that has been squished inside a bag is that the clear plastic disk cover on the top of the game can snap loose from the white plastic frame of the disk (see Figure 1-16). The clear cover then exerts pressure on the back of the disk, preventing it from spinning up when the UMD is put inside the PSP. If this happens, simply hold the UMD disk on either side of the white plastic casing, and then take your index finger and push gently up against the middle of the disk until you hear a slight clicking noise (see Figure 1-17). If all went well, you have successfully popped the clear plastic cover back into place and the disk will spin up properly the next time you insert it in the PSP.
Is it a bad disk?
If none of these solutions work, try putting another UMD disk in your PSP to see whether it works. If it does, the good news is that your PSP works fine. The bad news is that game or movie is dead. Time to go buy a replacement.
Check your PSP.
If none of your UMD disks are working, things are looking a little more grim, but there is no reason to totally panic.
Eject your UMD disk and leave the tray door open. Look inside and make sure there is nothing in there. If your UMD disks were dirty, chances are that some of that dirt could have been freed on the inside of your PSP. If any dirt or grime somehow got inside your PSP, it could be blocking some of the inner workings of the device. Turn the PSP around the other way with the tray open and try to shake out any bits that may be in there. Insert a UMD disk and see if it works.
Tip
If you find yourself with dirty UMD disks and a dirty PSP as a result, and actually having to employ these troubleshooting tips, how about a little preventive medicine? Get a case for your PSP and your UMD disks. See âMake Your Own PSP Caseâ [Hack #12] and âRepurpose Everyday Objects as UMD Casesâ [Hack #13] for more information.
If you are still having no luck, try using a compressed air can to blow free any dirt or grime that has collected on the inside of your PSP. After blowing air over the inside of the tray, turn the PSP upside down again and try to gently shake any remaining particles free. In the very middle of Figure 1-18, you can see the lens that reads your UMD disks. If it isnât clean, you wonât be playing any games any time soon.
If, after testing again, your UMD disks are still not loading, you could try putting a small bit of the solution from a DVD/CD cleaning kit on the end of a Q-Tip and reaching carefully inside the PSP to try to clean off the lens that reads the UMD disk, but Iâd wait for a UMD disk-based PSP cleaning kit before trying this one.
Still no luck? Time to take your PSP in for repair. Alternately, if it is no longer under warranty, or if you did something that voids the warranty, you pesky hacker you, then you should check out âRepurpose a Dead PSPâ [Hack #10] . If it looks like the lens inside the PSP is damaged, and you are out of warranty, you could try repairing it yourselfâIrecently noticed a lens replacement kit for sale online.
Canât Read the Memory Stick
If your PSP isnât recognizing your Memory Stick Duo card, first try removing the card and then replacing it, just to make sure it is firmly seated and properly inserted into the PSP.
Check the physical parts.
If it still isnât registering, remove the card again and take a look at the contacts of the card (see Figure 1-19). Some slight abrasion is to be expected, but if there is any dirt here, clean it off.
If the contacts look smudged or there is any sort of dirt on them, take a soft cloth and clean them off. Also, in Figure 1-19, you will notice that there are some slight abrasions on the card. This is to be expected. However, if there is major scarring, your card might be beyond hope. To prevent major scarring of the card, keep it in some sort of case when it is not in use and try not to swap it in and out too often. Over time, these contacts will eventually fail, so make sure you back up your data often [Hack #2] .
If the card was dirty, but youâve cleaned its contacts and it still isnât reading properly, check inside the card slot.
Make sure that there is nothing sticking in the slot that shouldnât be there, and if the area around the slot looks dirty, hold the cover open as in Figure 1-20, turn the PSP on its other end, and shake gently to try to free any debris. Remember: a can of compressed air is your friend. Blow a gust of air down the slot to try to free up anything that your card might have smashed in there, and then turn the PSP on its end and shake again.
Check the data.
If you have a Memory Stick Duo compatible card reader, try hooking the Memory Stick up to your computer. If it doesnât show up at all on your computer either, then it looks like the card is probably dead. Time to buy a new one.
If it does show up, check to see whether the data looks right. Make a backup of the data (separate from any previous backups you may have on file) and reformat the card. Now put the card back into the PSP and see whether it shows up.
If the Memory Stick shows up but doesnât seem to be behaving properly, or if it still isnât showing up, navigate to Settings â System Settings and hit the X button. Select Format Memory Stick (see Figure 1-21) from the list of settings and hit the X button. The PSP will ask you twice whether you are sure you want to format the Memory Stick. Select Yes and hit X, then select Yes again and hit X again. This will erase all of the data on the Memory Stick.
If it still fails to show up, or if the PSP gives you an error saying there is no Memory Stick to format, then either your card is dead or your PSPâs Memory Stick slot is damaged. Try another card (borrow one from a friend if you donât have one on hand) in the slot. If this second card shows up, then your card is deadâgo buy a new one. If it doesnât show up, itâs time to get your PSP repaired.
PSP Wonât Turn On
If your PSP wonât turn on, then of course you are going to want to check the power. Maybe your battery has been fully depleted. Plug in the AC adapter and watch to see whether the power indicator light has turned orange to indicate charging. If yes, check to see whether the PSP will now turn on. If so, then your battery was simply discharged.
If the power indicator light did not turn on and turn orange when you plugged in the PSP, then see whether you can turn the PSP on. If so, look on the upper-right corner of the screen. Is the battery indicator showing up? If so, perhaps your battery was simply discharged and is now charging, but for some reason the charging indicator light didnât turn on. Unplug the unit and see whether it stays powered.
If it shuts down, then there is most likely something wrong with the unit or your battery. Likewise, if the PSP still isnât turning on, then there is quite possibly something wrong with the unit or the internal battery.
Open up the battery compartment on the back of your unit. Remove the battery and check the contacts to make sure they are clean, as shown in Figure 1-22. Reinsert the battery and try repeating the above steps. If everything still fails to work, ask one of your friends to lend you her battery so you can test to see whether it is the battery or your PSP. If your PSP powers up with your friendâs battery, there is something wrong with your battery and you should get a replacement. If your PSP does not power up on your friendâs battery, there is something wrong with your PSP and you need to have it serviced.
Miscellaneous Problems
Hereâs a short list of other problems and their possible solutions:
- All of the buttons on the PSP suddenly stopped working.
Make sure that you didnât accidentally slide the power button into the Hold position.
- My PSP suddenly went to sleep during a game/movie/etc.
Make sure that you didnât accidentally slide the power button up into the Sleep position.
- Thereâs no sound/I can barely hear the sound.
Make sure that you have the volume turned up, that you didnât accidentally hit the music note button (which mutes the console), and that you do/donât have the headphones plugged in (depending upon whether you are wearing headphones or not).
- The picture on the screen is too dim/too bright.
Try hitting the little square button underneath the screen. This toggles through different screen brightness settings.
- I cannot seem to connect to my wireless network.
Make sure that you have turned on the WLAN switch on the bottom-left corner of your PSP. Check out âGet Your Wireless Network Onâ [Hack #5] for a few pointers.
- My PSPâs screen has a dead pixel.
If it is an actual dead pixel, then it isnât fixable. Learn to live with it, or try to sell it online and buy a new PSP. However, you may just have a stuck pixel. This may be fixable. Thereâs an MPEG4 video available from various online PSP-associated sites, such as PSP Hacker (http://www.psphacker.com), called Dead Pixel Cleaner by Placasoft. This two-minute video will need to be loaded onto your Memory Stick. It flashes through red, blue, and green repeatedly and rapidly, filling your PSPâs screen. The rapid instructions to change between these three key RGB colors can sometimes stimulate a frozen/stuck pixel, knocking it back to full functionality. So, if you have what looks to be a dead pixel, give this video a try. Iâve read several recommendations online that say you should leave it running in a loop for a good couple of hours, checking intermittently to see whether it has had any effect. You might learn that your dead pixel is just a stuck pixel when you find it quickly unstuck.
If all seems lost, and you cannot seem to solve whatever problem has befallen your PSP, donât despair. Check out âRepurpose a Dead PSPâ [Hack #10] for some pointers on trying to recoup some of the money from your PSP toward a purchase of a replacement PSP.
Hacking the Hack
Of course, if you run through all these troubleshooting tips and things still arenât working, youâas a would-be hackerâare left with an entirely new set of choices:
Do you try to return the unit to the store where you bought it for a replacement?
Do you send it off to Sony for repair?
Do you crack the sucker open and try to fix it yourself?
If you chose #3, then you are definitely reading the right book. Head on over to âTake Your PSP Apartâ [Hack #8] for some help in finding your way through the maze of your PSPâs electronic innards. If your hacking and attempted repair job doesnât work, you can always try some of the options discussed in âRepurpose a Dead PSPâ [Hack #10] .
Keep Your PSP Clean
Tired of seeing smudges, dust, dirt, and grime on that gorgeous PSP screen? Here are some tips to alleviate the dirt and the glare.
In both âWatch UMD Moviesâ [Hack #21] and âTroubleshoot Your PSPâ [Hack #6] , I touch upon how the PSP, as a portable gaming console, would seem to be some sort of magical dirt and smudge magnet. This brief hack will cover some basic ways you can help cut down on the filth and get rid of any built-up grime.
Prevention
When dealing with dirt, the best offense is a good defense. As clichéd as this bit of advice sounds, itâs the most overlooked bit of common sense. If you donât want your PSP to get dirty, keep it in a dirt-free environment. Donât leave it lying around your home. Whenever you arenât using the PSP, either put it away in a case [Hack #12] or in the sleeve that came with your PSP. If you want to keep the PSP itself clean, make sure that you keep all of the PSP peripherals clean as well. Keep your UMD disks in cases [Hack #13] and only use clean USB cables to connect your PSP to your computer. If you find an old USB cable sitting in the corner of a drawer that, for some unknown reason, had cookie crumbs all over the bottom, take the time to make sure any dust or bits of cookie that were in the drawer are carefully cleaned from the connectors before shoving it into your PSP.
In addition to keeping the PSP and all of the PSPâs peripherals clean, make sure you keep yourself clean. If you find yourself regularly complaining about greasy smudges all over your PSPâs screen and controls, you have to look no further than your own greasy hands for the culprit. Wash your hands. Make sure they are clean, dry, and grease-free when you want to play. If you donât want smudges on the screen, donât touch the screen.
Cleaning
Use the soft cloth that came with your PSP to wipe off the screen whenever it becomes smudged. If you ever get more than basic smudging on your PSP, unplug the PSP and turn it off. Use a damp cloth to clean off the casing. Do not use any cleaning products, since they could harm the PSP.
If anything sticky gets on the PSP, try putting a small amount of cooking oil on a soft cloth and use this to rub it free. To remove the oil, use a damp cloth with a light amount of soap.
If anything gets in the different ports of the PSP, such as the headphone jack, the USB jack, or the power jack, try gently rubbing the open ports with a soft dry cloth. If anything gets in the Memory Stick compartment or the UMD compartment, you can try using a compressed air can to clean out these areas. If the lens inside the PSP that reads the UMD disks appears to be dirty, you can try putting a small bit of the solution from a DVD/CD cleaning kit on the end of a Q-Tip and reaching carefully inside the PSP to clean off the lens, but Iâd wait for someone to offer a UMD disk-based PSP cleaning kit before trying this one.
Keep the Screen Smudge-Free
The simplest way to keep the screen on the PSP smudge-free is to avoid touching it with your fingers, keep your hands as clean and grease-free as possible, and keep a soft cloth handy to wipe smudges away. However, if these methods arenât working for you, there are some alternatives.
One option is a commercially available plastic screen overlay from JAVOedge (http://www.javoedge.com/simtrix/productMtce/jsp/productListScreen_PSP.jsp; $12.95 USD). The PSP JAVOScreen comes in both an anti-glare and an ultra-clear version. The anti-glare version works very well, as I have one that Iâve used, but I usually end up using it only while playing video games. The matte finish tends to make the picture quality of movies look a bit fuzzy. I havenât yet tried the ultra-clear version, as it has just recently been announced.
The JAVOScreen is just a thin piece of plastic, and $12.95 is a little expensive for such a thing. You can find inexpensive cellophane at your local craft store that will most likely work just as well.
Overall, remember that the best way to keep your PSP clean is to prevent it from getting dirty in the first place.
Take Your PSP Apart
This hack is a step-by-step guide on how to take your PSP apart, from top to bottom, from case to wireless network card.
There may come a point in time where you will need to take apart your PSP. For example, your keypad may stop working, or perhaps you will need to remove a stuck Memory Stick. Regardless of the reason, this hack will provide you with the blueprints needed to successfully take your PSP apart. And yes, before we go any further, my PSP still worked even after it was spread out, exposed, and naked before me on my work desk.
I realize many of the readers will want to jump right in and start dismantling their device, but please heed the words of warning spread throughout this hack. Too much enthusiasm is not a good thing when dealing with electronics. A steady hand and some patience can go a long way when dealing with tiny and fragile components. That said: please do not feel threatened. Even the most inexperienced âhackerâ can accomplish this hack. Just follow the instructions, and all should go right! For your convenience, the disassembly process has been broken down into several different sections.
The Tools of the Trade
In order to take your PSP apart, I recommend that you have the following supplies on hand. You do not have to use them all, but things can go much more smoothly with these items available and a few minutes of preparation:
Paper for screw placement notes
Pen/pencil
Small flat head screwdriver
Small Phillips head screwdriver
Needle nose pliers (handy for picking up dropped screws)
Flat and clean white surface (easier to see parts)
Digital camera for snapping photos along the way (use these photos to help you remember how it goes back together and to post cool photos on your weblog)
Critical Suggestions
In addition, you should also keep these suggestions in mind:
Remove the battery when instructed and leave it out when taking apart the PSP. In addition, do not attempt to plug in any power source to the PSP until it is fully reassembled. You can easily kill off large parts of the PSP [Hack #6] by not following this advice.
Use extreme care when releasing circuit strip/ribbon catches, since they can easily break.
Do not drink or eat around the open PSP.
Do not take your PSP apart in a high traffic area. There is nothing like a hyper kid, slobbering pet, or three-foot drop to turn your PSP into a $250 paperweight.
Be careful how much dust is in the air. Since your PSP will be apart, it is easy for that dust to cause problems at a later date if it takes up residence inside the device.
Taking the Top Off
Prior to beginning, place your PSP and all tools on a clean and clear surface. I recommend you have some sort of mat to provide some comfort for your PSP while its internals are removed. Next, create a few sketches of your PSP on the piece of paper, in order to track where the screws go when trying to put the PSP back together again. Figure 1-23 provides you with an illustration of the first screws that need to be removed.
Hereâs how to take the top off:
Remove the battery cover and remove the battery.
Take out the Memory Stick.
Remove the black screw (1) from the upper-right quadrant, shown in Figure 1-23.
Remove the black screw (2) from the lower-right quadrant.
Remove the warranty seal from inside the battery cavity (yup, youâve just voided the warranty).
Remove the black screw (3) from the upper-left quadrant (battery cavity).
Remove the black screw (4) from the lower-left quadrant (battery cavity).
Remove the silver screw (5) from the battery cavity.
Remove the silver screw (6) from the battery cavity.
Remove the silver screw (7) from bottom side of PSP.
Turn the PSP over and slowly lift the top shell off.
Removing the LCD
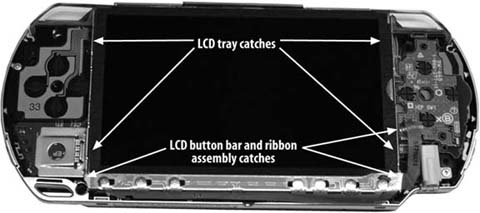
The next step is to remove the LCD from the PSP. Be careful, as this is arguably the key component to your device and almost certainly the most expensive to replace. A scratch or too much pressure could cause serious problems. Figures 1-24 and 1-25 provide you with illustrations for the following steps:
Carefully pry the catch off the left side of the lower button circuit strip with a small flat head screwdriver.
Lift the button bar assembly off the PSP.
Carefully release the catch to the circuit strip that connects the bar to the PSP. This is accomplished by using a small flat head screw driver to lift the brown catch up, which allows the circuit strip to slide free of the catch.
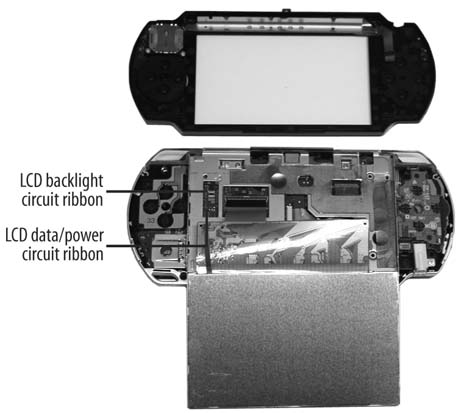
The LCD is held in place by four bevel catches to keep the LCD screen in a metal LCD tray. Carefully slide a flat head screwdriver between the LCD screen and the tray at the top-left corner and lift the LCD screen out of the tray. Once it has freed the catch, do the same on the lower-left side of the LCD tray. Once this side is free, slowly lift the LCD screen up a few millimeters out of the tray and then lift only the top of the LCD screen. There are two circuit strips behind the LCD that need to be removed before taking out the LCD.
Lift the left (smaller) catch from the top to release the circuit strip.
Lift the right (larger) catch from the bottom to release the larger strip.
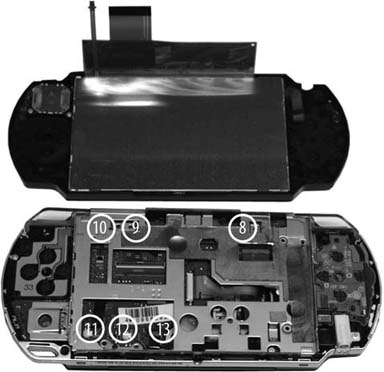
Removing the LCD Tray
The most important part of this stage is that you carefully record where each screw goes. Since most of the screws are different sizes, it would be easy to mix them up. Figure 1-26 illustrates where each of the screws is located.
Warning
Be careful not to strip the screws. It is better to apply pressure to ensure the screwdriver head does not slip than it is to strip the screw.
Hereâs how to remove the LCD tray:
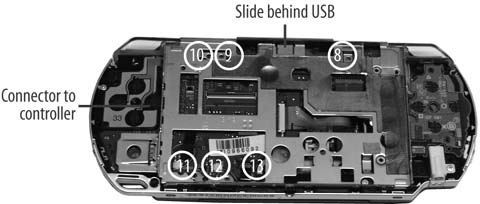
Remove the silver screw (8) from top right of tray.
Remove the two silver screws (9 & 10) from the top left of the tray.
Remove the two silver screws (11 & 13) and one black screw (12) from the lower left of the tray.
Eject the UMD disk tray.
Lift the tray from the bottom of the PSP and slowly wiggle it loose from the UMD catch at the top of the PSP.
Removing the Main Circuit Board
This part of the disassembly process is the most difficult. The main board is connected via screws, a USB connector, and a circuit connector hidden under the board. In addition, there are wires at the lower end of the board that connect to the speakers and components under the board. You do not have to remove these to get under the board if you simply flip the circuit board over onto its top when it is removed. Figure 1-27 highlights the various points you need to pay attention to when removing this circuit board.
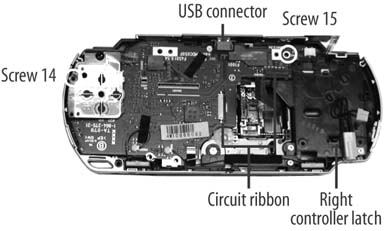
To remove the main circuit board:
Unlatch the right controller circuit strip and the UMD drive circuit strip.
The controller lifts from the bottom, and the UMD catch requires slight pressure from the left against the black plastic arms.
Remove screw 14 from the top right of the circuit board.
Remove screw 15 from the left side of the left controller.
On the top right of the main circuit board, carefully remove the power connector (white with black wires). This will require you lift the board first before disconnecting the white plastic socket.
On the lower side of the left controller, pry up the circuit board over the catch and lift the controller over the top of the PSP.
Peel back the tape holding the black power wire and lift the antenna off the main circuit strip, disentangling it from the tape and the right controller.
Slowly lift the circuit board up off the PSP by slipping out the USB connector from the top plastic shell, then raising the top of the board and flipping it over the bottom of the PSP. You will need to apply pressure and pry the board off a hidden connector that keeps the board connected to components deeper inside the PSP.
Figure 1-28 highlights the various chips found on the main circuit board. The following list names them and shows the identifying information youâll find on each chip:
- Chip 1
CXD2962GG
©2004SCEI
507D10E
641711
- Chip 2
CSD1876
©2004SCEI-102GG
504A99E
278491
- Chip 3
SAMSUNG 501
K5E565H8CM-D060
- Chip 4
SC901583EP
MXAEA0423
- Chip 5
MB44C001
0505 M51
Removing the Wireless Network Card
The following requires you to remove several components before you actually get the network card board (SWU-BXJ154N). This part of the removal is layered, so be sure to follow the instructions. Figure 1-29 highlights the significant pieces and Figure 1-30 provides a shot of the network card with antenna and wire.
To remove the network card:
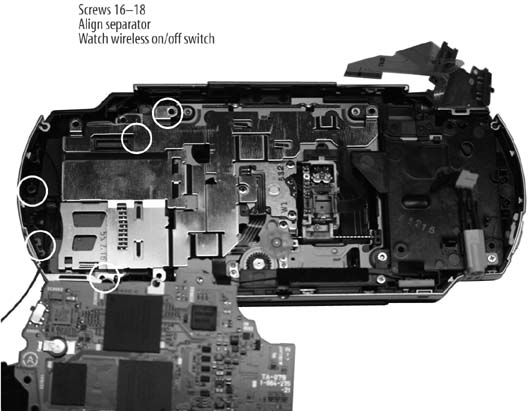
Remove the silver screw (16) from the top left of the PSP, holding the silver tray onto the device.
Remove the silver screw (17) from the bottom left of the PSP, holding a black plastic supporter.
Remove the silver screw (18) from the left of the PSP, holding the black plastic supporter.
Lift the black plastic piece out and then remove the silver grounding tray.
Lift the network/Memory Stick combo circuit board out of the PSP shell.
The End Result
Figure 1-31 shows the final results of disassembling the PSP. All of the major pieces are out of or at least disconnected from the body. Nothing appears to be broken, which means it is time to put it back together! However, that particular chore is left for âReassemble Your PSPâ [Hack #9] .
Hacking the Hack
Now that you know how to take apart the PSP with some semblance of safety and order, you can take your knowledge and put it to use as you find ways to modify the PSP. External antennas, FM receivers, bling-bling, or even just a simple case mod are now easily within your grasp!
âSeth Fogie
Reassemble Your PSP
If your PSP is in pieces, youâll no doubt want to know how to put it back together again.
Taking apart your PSP [Hack #8] is really only half of the puzzle. In fact, many have said that taking something apart is easy; putting it back together again is what really separates the wheat from the chaff. So, in this hack, I am going to provide you with the necessary instructions to get that torn-apart PSP back together again. Assuming you have not caused any permanent damage from spilt soda, four-foot drops, or a frustrated fist, when reassembled, your PSP should turn on and work as originally designed.
The Large Print, etc.
At this point, you know your warranty is worthless and all bets are off as to what will happen when you finally put the battery pack back into the PSP and turn it on. However, that doesnât change the fact that you need to be cautious and use a delicate hand. Before continuing, please review âThe Tools of the Tradeâ and âCritical Suggestionsâ sections in âTake Your PSP Apartâ [Hack #8] .
Installing the Network Card
This step is fairly simple, with the only tricky part being the correct insertion of the WNIC (wireless network interface card)/Memory Stick circuit board. Be sure to take advantage of the many guide pins included in the PSP to ensure that you insert this component, and others, correctly. Figures 1-32 and 1-33 provide illustrations of the following steps.
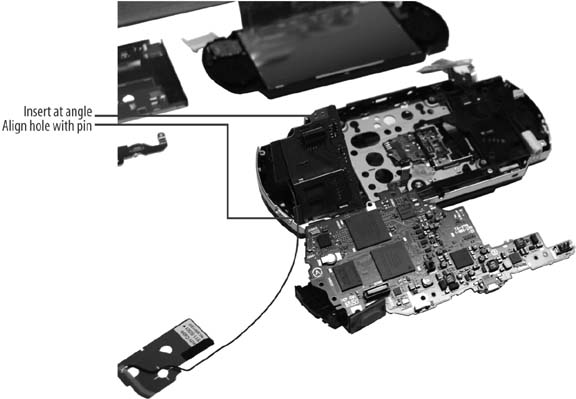
To install the network card:
Insert the small circuit board, wireless network card side down, into the PSP by placing the bottom of the circuit board in first at an angle. Be sure that the wireless antenna is wrapped around the side of the board.
Lay the metal grounding separator in, with the long end at the top. Align the guidance pins and the circuit socket to be sure the separator is in the correct location.
Place the black plastic supporting piece on top of the WNIC, ensuring that both the top and bottom guide pins slip through their respective holes. Be careful to not break the wireless on/off switch as you insert the black plastic piece. You will probably have to move the switch into the On position for easiest installation.
Insert screws 16, 17, and 18.
Installing the Main Circuit Board
This section is the hardest part of reassembling the PSP. It can be a bit tedious to ensure that you have the board seated correctly, but patience is necessary. Pay attention to the critical areas highlighted in Figure 1-34.
To install the main circuit board:
Place the main circuit board in roughly the correct location.
Carefully bend out the top of the PSP plastic case and slip the USB connector into its corresponding hole.
Line up the screw holes and apply a slight but firm pressure about one inch in from the left side of the circuit board. This is to seat the connector on the other side of the board into the smaller circuit board that holds the WNIC and Memory Stick components.
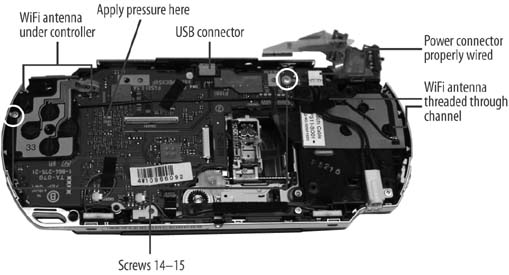
Run the antenna wire across the circuit board and install the wireless antenna. Once the antenna is properly seated, install the antenna wire correctly, ensuring it is held in place by the black fuzzy tape, and that it is threaded through the channel on the right side of the PSP.
Line up and insert screw 15 to install the left controller. If you removed the left controller completely from the PSP, be sure to connect the circuit ribbon.
Insert screw 14 in top-right hole of the main circuit board.
Connect the white power connector to the PSP circuit board, using the fuzzy tape to hold the wires onto the board.
Lay the right controller on top of the antenna and snap it into place, paying attention to the catch on the lower side of the controller circuit.
Connect the right controller strip by sliding the ribbon into the catch. It will slip under the tiny silver guides on each side of the catch. Finally, flip the brown movable part of the catch down into place.
Slip the UMD drive circuit ribbon into its catch. Be sure that the black part of the catch is in its Out position. Otherwise the ribbon will not insert into the catch. Once it is lined up in the catch, apply pressure to both sides of the black catch to seal the connection.
Installing the LCD
You are nearly there. The trickiest part of this step is to be sure that the LCD backlight power strip (the small one) is properly seated. You will note two small extensions on the sides of the strip near the end. These will come in handy when you attempt to seat the connecter. Figures 1-35 and 1-36 highlight the areas you will be working with when reinstalling the LCD.
To reinstall the LCD:
Lay the LCD tray into place. Do this slowly and carefully, since the wrong position can cause problems. The top of the tray should slip behind the USB connector. The bottom of the tray has a screw mount that slides under/behind the black PSP shell. Finally, the left side of the tray merges with the left controller. Once it is in place, shut the UMD tray. If it clicks smoothly shut, the tray is probably installed correctly.
Insert and tighten screws 8, 9, 10, 11, 12, and 13.
Flip the LCD over on its back, slide the large and small circuit ribbons into their respective slots, and close the catch. Start with the large ribbon first, and then do the small ribbon. Use the little wings on the small ribbon to guide it into the catch.
Flip the LCD over and carefully insert it into the tray. Start with the right side, and then apply light but firm pressure on the left side to click the LCD into place.
Putting the Buttons and Shell into Place
Youâre almost there! Try not to jump ahead and insert the battery just yet. Honestly, it is all downhill from here. Figure 1-23 earlier in the chapter provides you with an illustration of where to insert the final screws.
Hereâs how to wrap things up:
If you took the left and right trigger buttons out, now is the time to put them back in.
Insert the circuit ribbon connected to the LCD buttons into its slot on the right side of the PSP.
Lay the button strip onto the LCD and click it into place.
Carefully clean off any smudges on the LCD using a soft cloth.
Lay the PSP top onto the device and apply pressure to snap it into place. Be sure that the bottom button strip lines up.
Flip the PSP over onto its back and insert screws 1, 2, 3, 4, 5, 6, and 7.
Finally, insert the Memory Stick and battery/cover back into the PSP.
Turning It On!
It is now time to see whether you are the owner of a working PSP or a $250 paperweight. As you can see from Figure 1-37, my attempt was successful. However, I will admit that the first time I tried this, the PSPâs backlight did not turn back on. I was still able to see the screen, but only in the right light and at the right angle. I suspect it was because I was testing various components out with the board exposed. I probably shorted out a circuit and fried some capacitor or diode. I learned my lesson, though, and have now successfully taken apart and reassembled a PSP.
Repurpose a Dead PSP
You were trying to play Tony Hawkâs Underground 2 Remix on the PSP, while actually skating, and now youâre left with a broken PSP. This hack will walk you through what can be done with your shattered PSP, as well as how to recoup as much of the original cost of the PSP as possible.
Youâre past the denial stage where you sat rocking back and forth in the corner of your room, cold and alone for hours, clutching it close to your chest, repeatedly switching it on and off, removing the battery, replacing the battery, plugging it in, hoping that suddenly your PSP would turn back on. Youâve followed all the recommendations in âTroubleshoot Your PSPâ [Hack #6] . You took it to a friend skilled in the art of soldering. He opened up your PSP, gently reconnecting all the aged connections, perhaps even replacing the USB port. You tried new batteries and even an odd voodoo ritual that you discovered online. Nothing has worked. Youâve finally come to grips with the dreadful reality of it all: your PSP is dead.
Although everything has seemed hopeless during your futile attempts to resurrect your PSP, donât throw that PSP away in frustration. There are several different things you can do with it, and this hack will discuss some of the possibilities.
Use Your Dead PSP to Get a New PSP
Youâre already in serious withdrawal from the games, the videos, the pictures, and the music you were used to enjoying via your little digital friend. You need to replace your PSP. Here are three ideas for ways to recuperate some of the money you invested in your dead PSP, either to help in the purchase of your next PSP or to simply pad the wallet:
Repeat after me: eBay (http://www.ebay.com) is the sellerâs friend. If you have a broken PSP, chances are that there is some cocky technician obsessed with buying things on eBay who will be willing to spend some money on your PSP just to see whether he can resurrect it. A quick search on eBay for "broken PSPâ will turn up lots of people just like this. If you filter your search results to include completed auctions, you can see what people were willing to pay for these.
Mantra #2: people pay more for parts than they do for an entire PSP. If you as an individual decided to build your own PSP from scratch, you would quickly discover that all the necessary parts would cost you more than buying it from Sony. Why? Because Sony is a big corporation with the resources to buy in serious bulk, which helps drive the prices down on the materials. You are just you with a dead PSP. However, there are probably lots of other people in similar situations to yours who still think they can fix their broken PSP with that magic part. Pop open your PSP [Hack #8] and carefully remove any parts that arenât broken. Sell the screen. Sell the control pad. Sell the earphones. Sell every bit you can. Make sure you say that you cannot guarantee that any of these items will actually work. It wonât matter. Someone will buy them.
When youâre auctioning off all these items, make sure that you offer to sell and ship them internationally. PSPs may be more expensive outside your home country (and sometimes harder to come by), so if you are selling parts that may help repair some poor Britâs ailing PSP that she imported from Japan before the European release of the PSP, she will be likely to pay more than possible U.S. customers. Make sure you point out to them that the same high taxes for importing a fully functional PSP wonât apply to the parts you are selling. Make sure your auction states that the buyer pays for the actual shipping cost.
If you donât want to pay eBayâs fees, you could try to barter or sell your dead PSP or its parts on Craigslist.org (http://www.craigslist.org/). If, on the other hand, you are a wealthy person who has five or more PSPs lying about and you donât want to soil yourself by using eBay or Craigslist, there are other things you can do with your dead PSP.
Uses for Your Dead PSP
Hereâs a short, no-frills list:
Use your dead PSP as a stylish paperweight.
Or a stylish doorstop.
Gut the PSP, seal the case with a watertight adhesive like the silicone used in fish tanks, fill it with water, and add Sea Monkeys. Watch âem grow!
Gut it and seal the case with a watertight adhesive. Cut the screen section out of the faceplate and leave the space where the screen was out and open. Drill small holes in the back of the PSP for drainage. Fill your deceased PSP with soil and the seeds of your favorite small flower or grass. Water and watch âem grow! Voilà ! Your own stylish Manhattan apartmentâsized garden!
Three words: PSP hockey puck.
Use the dead PSP to test the moral fiber of your friends, neighbors, and coworkers. Leave it lying around and watch to see whether anyone nicks it!
People repellant: sure, it may be broken, but nobody else has to know. Put those earphones in and walk around town ignoring people as you please, pretending that you are in your own little portable music world, impervious to their intrusive âCan I interest you in taking a brief survey?â types of questions. This is also a good way to listen in on unsuspecting suspects when you start up your own private detective agency.
Find a really small, portable color TV. Remove all of its insides. Gut the PSP. Squeeze the TVâs innards into the gutted PSPâs case. Cause a media storm with your announcement that you hacked the first TV tuner for the PSP!
Think of your dead PSP as a craft project waiting to happen. Be creative and have fun! The important thing is to make sure that you arenât focusing on your recent loss. Life goes on.
Downgrade Your Firmware
If you have purchased a PSP running Version 2.0 of the firmware, complete with browser, you can downgrade to Version 1.5 with a few easy, albeit somewhat risky, steps. When you are done, the entire world of homebrew will be open to you.
Fortunately, some industrious hackers discovered a buffer overflow error that occurs when loading an appropriately created image file through the PSPâs Photo menu. Then, someone realized that the buffer overflow allowed for a modicum of code to be run. Finally, the pieces fell in place when someone thought to overwrite the PSPâs System Information during this error, so that a PSP running Version 2.0 of the firmware would be fooled into thinking that it was running Version 1.0. A simple substitution of a 1 for a 2, and suddenly you are able to run the 1.5 Software Update to replace the Version 2.0 firmware, effectively downgrading your system to a more hacker- and homebrew-friendly version of the firmware.
Warning
Keep in mind that working with firmware is always risky. Having the power supply cut in the middle of a regular Sony authorized firmware upgrade could very quickly turn your $250 PSP into a $250 doorstop. Such an error in a normal firmware upgrade, though, would be covered under Sonyâs warranty. Anything that goes wrong with this hacked downgrade wonât be covered, so make sure you follow these steps carefully, and consider yourself warned. Proceed at your own risk. Also, be careful where you grab your copy of the downgrader and the 1.5 updater used in this hack; there have been reports of malicious packages posing as these two items that can actually destroy your PSP.
Everything in the Right Place
Download the MPHDowngrader from either http://www.chez.com/mph/, http://www.psp-hacks.com/downloads/MPHDowngrader.zip, or http://www.alden0186.freeserve.co.uk/MPHDowngrader.zip. You will also need a copy of the original 1.5 firmware update. I found my copy via Shockzone (http://shockzone.free.fr/PSP/Tool/EBOOT_1.50.zip). Once you have downloaded the necessary files, unzip them. You will find a Read Me file included with the MPH downgrader that you can follow if you donât want to read through this entire hack; however, the Read Me is a little confusing. So unless you are fluent in âIâm a hacker too busy coding to write a Read Meâ shorthand, I suggest you read on.
EBOOT.PBP.
Connect your PSP to your computer via USB. On your Memory Stick, create a folder called UPDATE inside /PSP/GAME/ and place the EBOOT.PBP file from the 1.5 update inside this UPDATE folder.
MPHDowngrader pieces.
Drop the overflow.tif file that was included in the MPHDowngrader folder into your /PSP/PHOTO/ folder, as you would with any image that you wanted to view on your PSP.
Put both h.bin and index.dat in the root directory of your Memory Stick (in other words, just drop them straight into the Memory Stick without placing them inside any folders).
Trigger the Overflow
After you have all the files in the right places, disconnect your PSP from your computer and plug it into the AC adapter. Make sure that there is no UMD in your PSP and that you have wallpaper turned off before you begin.
On your PSP, navigate to Photo â Memory Stick and hit the X button to start scrolling down through your photos (see Figure 1-38) until you reach the overflow.tif picture. Youâll know youâve hit it when everything freezes and you get a black screen with a bunch of white text output. This may happen before you even see the overflow.tif file name, but if not, simply select the image and hit the X button. The black screen with white text should appear. If your PSP freezes without going to this black text screen, hold the power button up for about 10 seconds until the PSP shuts down, then hit the power button again to start it back up. Repeat this step until you get that black screen.
Tip
If the black screen with white text doesnât appear to be showing up for you, try connecting your PSP to your computer again and check at the root level of your Memory Stick for a new file there called index.dat.bak. If that file is there, then the overflow worked, but you just didnât get the lovely black and white screen. Go ahead to the next step.
Donât panic. The frozen black screen with white text is what was supposed to happen. Hold the power button for about 10 seconds until the PSP powers off. Hit the power button again. Your PSP will start up, and if you navigate to your System Information (Settings â System Settings, hit the X button, then scroll down to System Information and hit the X button again), youâll discover that your PSP thinks it is running Version 1.0 of the firmware. It isnât, and you cannot run homebrew (yet). The important thing is that the PSP thinks it is running 1.0, which means that it will allow you to run the 1.5 Firmware Update over your 2.0 firmware.
Run the 1.5 Updater
Navigate to Game â Memory Stick, hit the X button, and navigate to the 1.5 Updater. Make sure that you have your PSP plugged in, or the upgrade wonât work. Hit the X button and update as you normally would. At the end of the upgrade, the update will freeze at 99% completion, and you will receive an error saying that the upgrade failed and to contact Sony. Donât panic, and donât contact Sony. Ignore this warning and again force your PSP to power off and reboot.
After the PSP reboots, you will receive an error screen that is scary and confusing because it is in multiple languages (see Figure 1-39). Donât panic. Find the language you can understand and read the corresponding line. It notes that your preferences are fragged and that you need only hit the O button to restore some default-ish settings. Hit the O button.
Warning
Some hackers have claimed that unplugging the AC adapter and pulling the battery when this warning appeared resulted in them having a PSP running 1.5 firmware capable of running homebrew, but retaining the 2.0 browser. However, you should never leave the PSP plugged in when you remove the battery (I fried one PSP this way), and a few people have reported that following those directions turned their PSPs swiftly into nonfunctional bricks.
Set up Your PSP
The PSP will start back up and you will go through the initial setup like the day you first bought your PSP. Do so, and then go to the system info pane again, where you will see that you are rocking Version 1.5 of the firmware (Settings â System Settings, hit the X button, then scroll down to System Information and hit the X button again). Run homebrew at will [Hack #40] .
Hacking the Hack
If you really love your PSPâs browser and donât really want to give it up, donât worry. Simply back up all the browser-related files from your Memory Stick before downgrading. I ran through this entire procedure, downloaded the 2.0 update and installed that again, and then went through the entire procedure again. It worked like a charm. Itâs a little time-consuming, but you can have the best of both worlds. Have fun! Just make sure that you donât install any firmware past 2.0, as I am sure Sony intends to plug this hole again as soon as possible. Even if they do, though, Iâm confident that the PSP hackers out there will find a way around it.
Get PSP Hacks now with the O’Reilly learning platform.
O’Reilly members experience books, live events, courses curated by job role, and more from O’Reilly and nearly 200 top publishers.

