Chapter 1. WCF Essentials
This chapter describes the essential concepts and building blocks of Windows Communication Foundation (WCF) and its architecture enabling you to build simple services. You will learn the basic terms regarding addresses, bindings, contracts, and endpoints; see how to host a service; learn how to write a client; understand related topics, such as in-process (in-proc) hosting reliability, and transport sessions; and see how to utilize WCF in Visual Studio. Even if you are already familiar with the basic concepts of WCF, I recommend that you give this chapter at least a cursory reading, not only to ensure that you have a solid foundation, but also because some of the helper classes and terms introduced here will be used and extended throughout the book.
What Is WCF?
WCF is a software development kit for developing and deploying services on Windows (I will describe what a service is in the next section). But WCF is much more—it is literally a better .NET. WCF provides a runtime environment for your services, enabling you to expose Common Language Runtime (CLR) types as services and to consume other services as CLR types. Although in theory you could build services without WCF, in practice, building services is significantly easier with WCF. WCF is Microsoft’s implementation of a set of industry standards defining service interactions, type conversions, marshaling, and the management of various protocols. Consequently, WCF provides interoperability between services.
WCF provides developers with the essential off-the-shelf plumbing required by almost all applications, and as such, it greatly increases productivity. The first release of WCF (as part of .NET 3.0) provided many useful facilities for developing services, such as hosting, service instance management, asynchronous calls, reliability, transaction management, disconnected queued calls, and security. The second release of WCF (as part of .NET 3.5) provided additional tools and extended the original offering with additional communication options. The third release (as part of .NET 4.0) included configuration changes, a few extensions, and the new features of discovery (discussed in Appendix C) and routers (not discussed in this book). With WCF’s fourth release (as part of .NET 4.5), WCF has several new simplification features and additional bindings, including UDP and WebSocket bindings. WCF has an elegant extensibility model you can use to enrich the basic offering. In fact, WCF itself is written using this extensibility model. This book is dedicated to exploring these aspects and features.
WCF is part of .NET 4.5, so it can run only on operating systems that support it. Presently, this list consists of Windows XP and later and Windows Server 2003 and later.
Most of the WCF functionality is included in a single assembly called System.ServiceModel.dll, located in the System.ServiceModel namespace.
Services
A service is a unit of functionality exposed to the world. In that respect, it is the next evolutionary step in the long journey from functions to objects to components to services. Service orientation (SO) is an abstract set of principles and best practices for building service-oriented applications. Appendix A provides a concise overview and outlines the motivation for using this methodology. The rest of this book assumes you are familiar with these principles. A service-oriented application aggregates services into a single logical application, similar to the way a component-oriented application aggregates components and an object-oriented application aggregates objects, as shown in Figure 1-1.
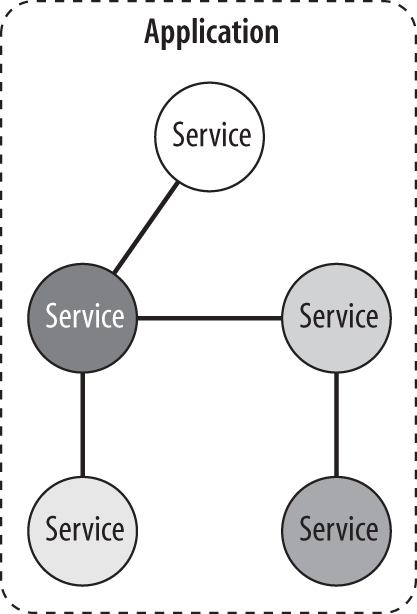
Figure 1-1. A service-oriented application
The services can be local or remote, can be developed by multiple parties using any technology, can be versioned independently, and can even execute on different timelines. Inside a service, you will find concepts such as languages, technologies, platforms, versions, and frameworks, yet between services, only prescribed communication patterns are allowed.
The client of a service is merely the party consuming its functionality. The client can be literally anything—for instance, a Windows Forms, WPF, Silverlight, or Windows Store App class, an ASP.NET page, or another service.
Clients and services interact by sending and receiving messages. Messages may be transferred directly from the client to the service or be sent via an intermediary such as the Azure Service Bus. With WCF, messages are SOAP messages. These messages are independent of transport protocols—unlike web services, WCF services may communicate over a variety of transports (not just HTTP). WCF clients may interoperate with non-WCF services, and WCF services can interact with non-WCF clients. That said, if you develop both the client and the service, you can typically construct the application so that both ends require WCF in order to utilize WCF-specific advantages.
Because the making of the service is opaque from the outside, a WCF service typically exposes metadata describing the available functionality and possible ways of communicating with the service. The metadata is published in a predefined, technology-neutral way, such as using Web Services Description Language (WSDL) over HTTP-GET or an industry standard for metadata exchange over any protocol. A non-WCF client can import the metadata to its native environment as native types. Similarly, a WCF client can import the metadata of a non-WCF service and consume it as native CLR classes and interfaces.
Service Execution Boundaries
With WCF, the client never interacts with a service directly, even when dealing with a local, in-memory service. Instead, the client always uses a proxy to forward calls to the service. The proxy exposes the same operations as the service, plus some proxy-management methods.
WCF allows the client to communicate with a service across all execution boundaries. On the same machine, the client can consume services in the same app domain, across app domains in the same process, or across processes (see Figure 1-2).
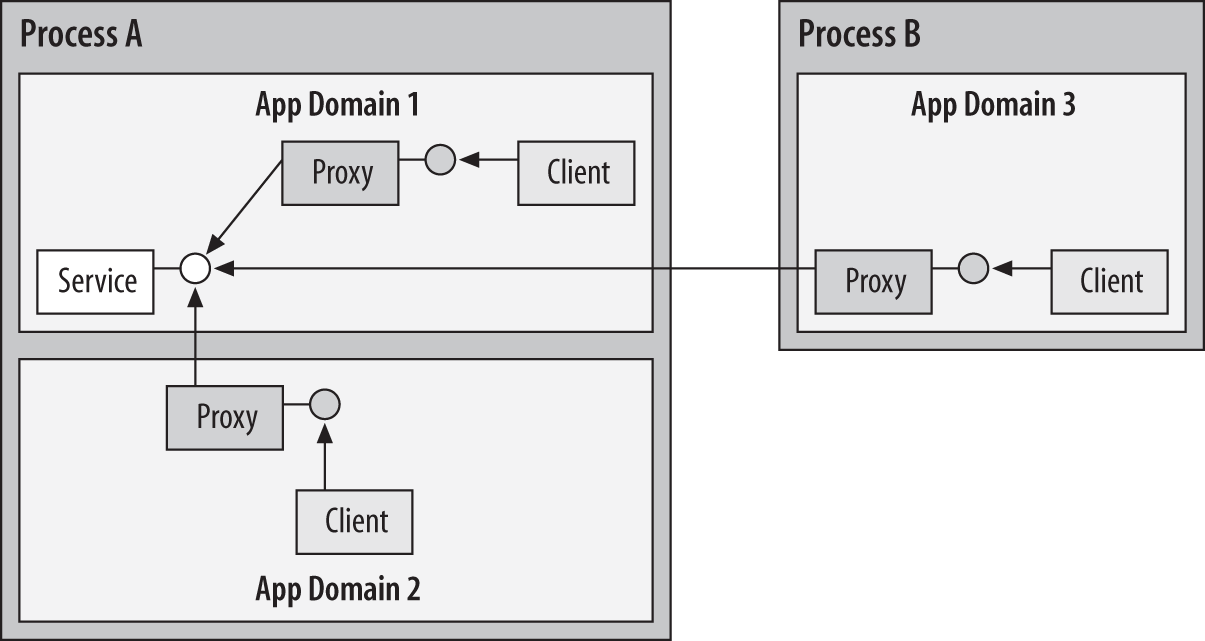
Figure 1-2. Same-machine communication using WCF
Across machine boundaries (Figure 1-3), the client can interact with services in its intranet or across the Internet.
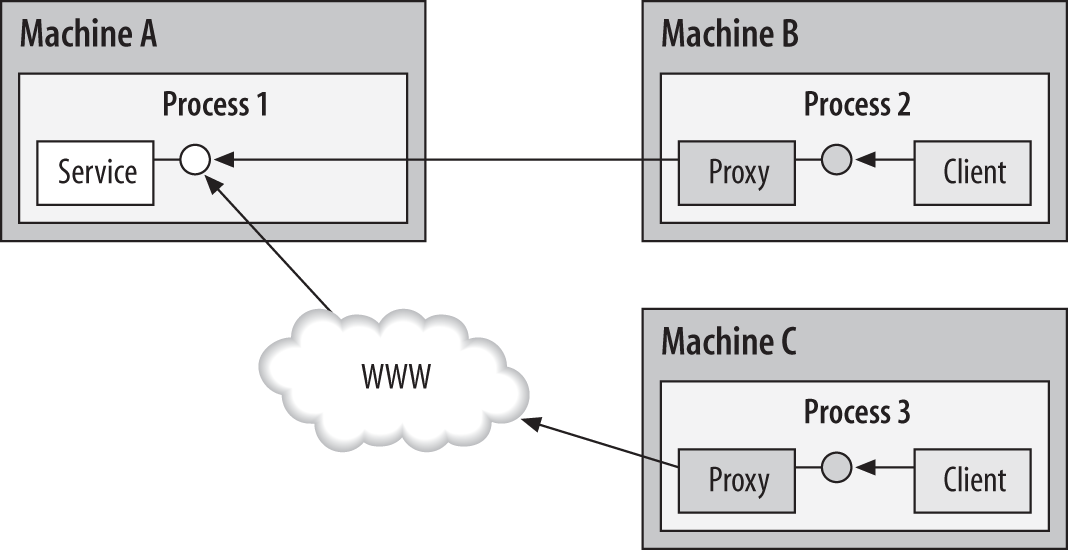
Figure 1-3. Cross-machine communication using WCF
WCF and Location Transparency
In the past, distributed computing technologies such as DCOM and .NET remoting aspired to provide the same programming model to the client regardless of whether the object was local or remote. In the case of a local call, the client used a direct reference, and when dealing with a remote object, the client used a proxy. The problem with trying to use the local programming model as the remote programming model was that there is much more to a remote call than an object with a wire. Complex issues such as lifecycle management, reliability, state management, and security reared their heads, making the remote programming model significantly more complex. Numerous problems arose, all because the remote object was trying to be what it is not—a local object.
WCF also strives to provide the client with the same programming model regardless of the location of the service. However, the WCF approach is the exact opposite: it takes the remote programming model of instantiating and using a proxy and uses it even in the most local case. Because all interactions are done via a proxy, requiring the same configuration and hosting, WCF maintains the same programming model for the local and remote cases; thus, it not only enables you to switch locations without affecting the client, but also significantly simplifies the application programming model. Another important benefit of always using a proxy is that it enables WCF to intercept the calls and add its value, as you will see later on.
Addresses
In WCF, every service is associated with a unique address. The address provides two important elements: the location of the service and the transport protocol, or transport scheme, used to communicate with the service. The location portion of the address indicates the name of the target machine, site, or network; a communication port, pipe, or queue; and an optional specific path, or Uniform Resource Identifier (URI). A URI can be any unique string, such as the service name or a globally unique identifier (GUID).
Out of the box, WCF supports the following transport schemes:
-
HTTP/HTTPS
-
TCP
-
IPC
-
MSMQ
-
Service Bus
-
WebSocket
-
UDP
Addresses always have the following format:
[base address]/[optional URI]
The base address is always in this format:
[transport]://[machine or domain][:optional port]
Here are a few sample addresses:
http://localhost:8001
http://localhost:8001/MyService
net.tcp://localhost:8002/MyService
net.pipe://localhost/MyPipe
net.msmq://localhost/private/MyQueue
net.msmq://localhost/MyQueue
ws://localhost/MyService
soap.udp://localhost:8081/MyService
The way to read an address such as:
http://localhost:8001
is like this: “Using HTTP, go to the machine called localhost, where on port 8001 someone is waiting for my calls.”
If there is also a URI, as in:
http://localhost:8001/MyService
the address will read as follows: “Using HTTP, go to the machine called localhost, where on port 8001 someone called MyService is waiting for my calls.”
TCP Addresses
TCP addresses use net.tcp for transport and typically include a port number, as in:
net.tcp://localhost:8002/MyService
When a port number is not specified, the TCP address defaults to port 808:
net.tcp://localhost/MyService
It is possible for two TCP addresses (from the same host, as discussed later in this chapter) to share a port:
net.tcp://localhost:8002/MyService
net.tcp://localhost:8002/MyOtherService
TCP-based addresses are used throughout this book.
Note
You can configure TCP-based addresses from different service hosts to share a port.
HTTP Addresses
HTTP addresses use http for transport and can also use https for secure transport. You typically use HTTP addresses with outward-facing Internet-based services, and you can specify a port as shown here:
http://localhost:8001
If you do not specify the port number, it defaults to 80 (and port 443 for HTTPS). As with TCP addresses, two HTTP addresses from the same host can share a port, even on the same machine.
HTTP-based addresses are also used throughout this book.
IPC Addresses
Inter-process communication (IPC) addresses use net.pipe for transport, to indicate the use of the Windows named pipe mechanism. In WCF, services that use IPC can only accept calls from the same machine. Consequently, you must specify either the explicit local machine name or localhost for the machine name, followed by a unique string for the pipe name:
net.pipe://localhost/MyPipe
You can open a named pipe only once per machine, so it is not possible for two named pipe addresses to share a pipe name on the same machine.
IPC-based addresses are used throughout this book.
Note
The IPC address format as provided by Microsoft is incorrect, indicating the mechanism instead of the protocol. The correct scheme format should have been net.ipc instead of net.pipe, much like the TCP address uses net.tcp rather than net.socket.
MSMQ Addresses
MSMQ addresses use net.msmq for transport, to indicate the use of the Microsoft Message Queue (MSMQ). You must specify the queue name. When you’re dealing with private queues, you must also specify the queue type, but you can omit that for public queues:
net.msmq://localhost/private/MyService
net.msmq://localhost/MyService
Chapter 9 is dedicated to making queued calls.
WebSocket Addresses
WebSocket addresses are unique in that they are asymmetrical between client and service. The client uses ws for transport and wss for secure transport, while the service always uses http or https respectively. WebSocket addresses are required when you need callbacks over the Internet, and you can specify a port as shown here:
ws://localhost:8080
If you do not specify the port number, a WebSocket defaults to the standard HTTP port 80 (and port 443 for wss or HTTPS). As with TCP addresses, two WebSocket addresses on the same machine from the same host can share a port.
Contracts
In WCF, all services expose contracts. The contract is a platform-neutral and standard way of describing what the service does. WCF defines four types of contracts:
- Service contracts
- Describe which operations the client can perform on the service. Service contracts are the subject of Chapter 2, but they are used extensively in every chapter in this book.
- Data contracts
- Define which data types are passed to and from the service. WCF defines implicit contracts for built-in types such as
intandstring, but you can easily define explicit opt-in data contracts for custom types. Chapter 3 is dedicated to defining and using data contracts, and subsequent chapters make use of data contracts as required. - Fault contracts
- Define which errors are raised by the service and how the service handles and propagates errors to its clients. Chapter 6 is dedicated to defining and using fault contracts.
- Message contracts
- Allow the service to interact directly with messages. Message contracts can be typed or untyped and are useful in interoperability cases when another party has already dictated some explicit (typically proprietary) message format. This, however, is by no means the usual case for common WCF applications, so this book makes no use of message contracts. Unless you are required to leverage the flexibility, power, and extensibility of message contracts, you should avoid them, as they add no value, but do add complexity. In many cases, the desire to use message contracts indicates a need for a custom application context, which you can address using custom headers (a useful alternative technique used throughout this book). For more on message headers, see Appendix B.
The Service Contract
The ServiceContractAttribute is defined as:
[AttributeUsage(AttributeTargets.Interface|AttributeTargets.Class,
                Inherited = false)]
public sealed class ServiceContractAttribute : Attribute
{
   public string Name
   {get;set;}
   public string Namespace
   {get;set;}
   //More members
}
This attribute allows you to define a service contract. You can apply the attribute on an interface or a class, as shown in Example 1-1.
Example 1-1. Defining and implementing a service contract
[ServiceContract]
interface IMyContract
{
   [OperationContract]
   string MyMethod(string text);

   //Will not be part of the contract
   string MyOtherMethod(string text);
}
class MyService : IMyContract
{
   public string MyMethod(string text)
   {
      return "Hello " + text;
   }
   public string MyOtherMethod(string text)
   {
      return "Cannot call this method over WCF";
   }
}
The ServiceContract attribute maps a CLR interface (or inferred interface, as you will see later) to a technology-neutral service contract. The ServiceContract attribute exposes a CLR interface (or a class) as a WCF contract independently of that type’s visibility. The type visibility has no bearing on WCF, because visibility is a CLR concept. Applying the ServiceContract attribute on an internal interface exposes that interface as a public service contract, ready to be consumed across the assembly boundary. Without the ServiceContract attribute, the interface is not visible to WCF clients, in line with the service-oriented tenet that service boundaries should be explicit. To enforce that tenet, all contracts must explicitly opt in: only interfaces (or classes) decorated with the ServiceContract attribute will be considered WCF contracts; other types will not.
In addition, none of the members of the type will ever be part of the contract when using the ServiceContract attribute. You must explicitly indicate to WCF which methods to expose as part of the WCF contract using the OperationContractAttribute, defined as:
[AttributeUsage(AttributeTargets.Method)]
public sealed class OperationContractAttribute : Attribute
{
   public string Name
   {get;set;}
   //More members
}
You can apply the OperationContract attribute only on methods, not on properties, indexers, or events, which are CLR concepts. WCF only understands operations—logical functions—and the OperationContract attribute exposes a contract method as a logical operation to perform as part of the service contract. Other methods on the interface (or class) that do not have the OperationContract attribute will not be part of the contract. This enforces explicit service boundaries and maintains an explicit opt-in model for the operations themselves. In addition, a contract operation cannot use object references as parameters: only primitive types or data contracts are allowed.
Applying the ServiceContract attribute
WCF lets you apply the ServiceContract attribute on an interface or on a class. When you apply it on an interface, some class needs to implement that interface. In general, you use plain C# or VB to implement the interface, and nothing in the service class code pertains to it being a WCF service:
[ServiceContract]
interface IMyContract
{
   [OperationContract]
   string MyMethod();
}
class MyService : IMyContract
{
   public string MyMethod()
   {
      return "Hello WCF";
   }
}
You can use implicit or explicit interface implementation:
class MyService : IMyContract
{
   string IMyContract.MyMethod()
   {
      return "Hello WCF";
   }
}
Note
Because the client can never use the service class directly and must always go through a proxy, using explicit interface implementation is less important in WCF than it is in regular .NET programming.
A single class can support multiple contracts by deriving and implementing multiple interfaces decorated with the ServiceContract attribute:
[ServiceContract]
interface IMyContract
{
   [OperationContract]
   string MyMethod();
}
[ServiceContract]
interface IMyOtherContract
{
   [OperationContract]
   void MyOtherMethod();
}
class MyService : IMyContract,IMyOtherContract
{
   public string MyMethod()
   {...}
   public void MyOtherMethod()
   {...}
}
There are, however, a few implementation constraints on the service implementation class. You should avoid parameterized constructors, because WCF will only use the default constructor. Also, although the class can use internal properties, indexers, and static members, no WCF client will ever be able to access them.
WCF also lets you apply the ServiceContract attribute directly on the service class, without defining a separate contract first:
//Avoid
[ServiceContract]
class MyService
{
   [OperationContract]
   string MyMethod()
   {
      return "Hello WCF";
   }
}
Under the covers, WCF will infer the contract definition. You can apply the OperationContract attribute on any method of the class, be it private or public.
Warning
Avoid using the ServiceContract attribute directly on the service class. Always define a separate contract so that you can both consume it independently of the class and have other classes implement it.
Names and namespaces
You can and should define a namespace for your contract. The contract namespace serves the same purpose in WCF as it does in .NET programming: to scope a type of contract and reduce the overall chance of a collision. You can use the Namespace property of the ServiceContract attribute to provide a namespace:
[ServiceContract(Namespace = "MyNamespace")]
interface IMyContract
{...}
Unspecified, the contract namespace defaults to http://tempuri.org. For outward-facing services, you typically use your company’s URL, and for intranet services, you can use any meaningful unique name, such as MyApplication.
By default, the exposed name of the contract will be the name of the interface. However, you can use an alias for a contract to expose a different name to the clients in the metadata, by using the Name property of the ServiceContract attribute:
[ServiceContract(Name = "IMyContract")]
interface IMyOtherContract
{...}
Similarly, the name of the publicly exposed operation defaults to the method name, but you can use the Name property of the OperationContract attribute to alias it to a different publicly exposed name:
[ServiceContract]
interface IMyContract
{
   [OperationContract(Name = "SomeOperation")]
   void MyMethod(string text);
}
You will see a use for these properties in Chapter 2.
Hosting
The WCF service class cannot exist in a void. Every WCF service must be hosted in a Windows process called the host process. A single host process can host multiple services, and the same service type can be hosted in multiple host processes. WCF has no restrictions regarding whether or not the host process is also the client process, although having a separate process promotes fault and security isolation. It is also immaterial who provides the process and what kind of process is involved. The host can be provided by Internet Information Services (IIS), by the Windows Activation Service (WAS) on versions of Windows before Windows Server 2008 R2 and Windows 7, or by the developer as part of the application.
Note
In-process (or in-proc) hosting, where the service resides in the same process as the client, is a special case. By definition, the developer provides the host for the in-proc case.
IIS Hosting
The main advantage of hosting a service on the Microsoft IIS web server is that the host process is launched automatically upon the first client request, and IIS manages the lifecycle of the host process. The main disadvantage of IIS hosting is that you can only use HTTP.
Hosting in IIS is very similar to hosting a web service or ASP.NET Web API service. You need to provide a virtual directory under IIS and supply an .svc file. IIS uses the .svc file to identify the service code behind the file and class. Example 1-2 shows the syntax for the .svc file.
Example 1-2. A .svc file
<%@ ServiceHost
   Language   = "C#"
   Debug      = "true"
   CodeBehind = "~/App_Code/MyService.cs"
   Service    = "MyService"
%>
Note
You can even inject the service code inline in the .svc file, but that is not advisable.
When you use IIS hosting, the base address used for the service always has to be the same as the address of the .svc file.
Using Visual Studio
You can use Visual Studio to generate a boilerplate IIS-hosted service. From the File menu, select New Web Site, then select WCF Service from the New Web Site dialog box. Visual Studio creates a new website, service code, and a matching .svc file. You can also use the Add New Item dialog box to add another service later.
The Web.Config file
The website config file (web.config) typically lists the types you want to expose as services. You need to use fully qualified type names, including the assembly name if the service type comes from an unreferenced assembly:
<system.serviceModel>
   <services>
      <service name = "MyNamespace.MyService">
         ...
      </service>
   </services>
</system.serviceModel>
Instead of defining an .svc file, you can provide the service type and its address information directly in the application web.config file in the serviceHostingEnvironment section. In fact, you can list as many services as you like there:
<system.serviceModel>
   <serviceHostingEnvironment>
      <serviceActivations>
         <add relativeAddress = "MyService.svc" service =
         "MyNamespace.MyService"/>
         <add relativeAddress = "MyOtherService.svc" service =
         "MyOtherService"/>
      </serviceActivations>
   </serviceHostingEnvironment>
   <services>
      <service name = "MyNamespace.MyService">
         ...
      </service>
      <service name = "MyOtherService">
         ...
      </service>
   </services>
</system.serviceModel>
Self-Hosting
Self-hosting is the technique in which the developer is responsible for providing and managing the lifecycle of the host process. Use self-hosting when you want a process (or machine) boundary between the client and the service and when you are using the service in-proc—that is, in the same process as the client. You can provide any Windows process, such as a Windows Forms application, a WPF application, a Console application, or a Windows Service. Note that the process must be running before the client calls the service, which typically means you have to prelaunch it. This is not an issue for Windows Services or in-proc hosting. You can provide a host with only a few lines of code. Unlike IIS, a self-hosted service can use any WCF transport protocol, and you can take advantage of all the WCF features, including the Service Bus, discovery, and utilizing a singleton service.
As with IIS hosting, the hosting application config file (app.config) typically lists the types of the services you wish to host and expose to the world:
<system.serviceModel>
   <services>
      <service name = "MyNamespace.MyService">
         ...
      </service>
   </services>
</system.serviceModel>
In addition, the host process must explicitly register the service types at runtime and open the host for client calls, which is why the host process must be running before the client calls arrive. Creating the host is typically done in the Main() method using the class ServiceHost, defined in Example 1-3.
Example 1-3. The ServiceHost class
public interface ICommunicationObject
{
   void Open();
   void Close();
   //More members
}
public abstract class CommunicationObject : ICommunicationObject
{...}
public abstract class ServiceHostBase : CommunicationObject,IDisposable,...
{...}
public class ServiceHost : ServiceHostBase
{
   public ServiceHost(Type serviceType,params Uri[] baseAddresses);
   //More members
}
You need to provide the constructor of ServiceHost with the service type and optionally with default base addresses. The set of base addresses can be an empty set, and even if you provide base addresses, you can configure the service to use different base addresses. Having a set of base addresses enables the service to accept calls on multiple addresses and protocols and to use only a relative URI.
Note that each ServiceHost instance is associated with a particular service type, and if the host process needs to host multiple types of services, you will need a matching number of ServiceHost instances. By calling the Open() method on the host, you allow calls in, and by calling the Close() method, you gracefully exit the host instance, allowing calls in progress to complete while refusing future client calls even if the host process is still running. Closing the service host is typically done when the host process shuts down. For example, to host this service in a Windows Forms application:
[ServiceContract]
interface IMyContract
{...}
class MyService : IMyContract
{...}
you would write the following hosting code:
static void Main()
{
   ServiceHost host = new ServiceHost(typeof(MyService));

   host.Open();

   //Can do blocking calls:
   Application.Run(new MyForm());

   host.Close();
}
Opening a host loads the WCF runtime and launches worker threads to monitor incoming requests. The monitoring threads dispatch incoming calls to worker threads from the I/O completion thread pool (where there are up to 1,000 threads by default). Because worker threads are involved, you can perform blocking operations after opening the host.
Because the host is closed gracefully, the amount of time it will take is undetermined. By default, the host will block for 10 seconds waiting for Close() to return and will proceed with the shutdown after that timeout has expired. Before opening the host, you can configure a different close timeout with the CloseTimeout property of ServiceHostBase:
public abstract class ServiceHostBase : ...
{
   public TimeSpan CloseTimeout
   {get;set;}
   //More members
}
For example, you can use programmatic calls to set the close timeout to 20 seconds:
ServiceHost host = new ServiceHost(...);
host.CloseTimeout = TimeSpan.FromSeconds(20);
host.Open();
You can do the same in a config file by placing the close timeout in the host section of the service:
<system.serviceModel>
   <services>
      <service name = "MyNamespace.MyService">
         <host>
            <timeouts
               closeTimeout = "00:00:20"
            />
         </host>
         ...
      </service>
   </services>
</system.serviceModel>
Self-hosting and base addresses
You can launch a service host without providing any base address by omitting the base addresses altogether:
ServiceHost host = new ServiceHost(typeof(MyService));
Warning
Do not provide a null instead of an empty list, because that will throw an exception:
ServiceHost host;
host = new ServiceHost(typeof(MyService),null);
You can also register multiple base addresses separated by commas, as in the following snippet, as long as the addresses do not use the same transport scheme (note the use of the params qualifier in Example 1-3):
Uri tcpBaseAddress  = new Uri("net.tcp://localhost:8001/");
Uri httpBaseAddress = new Uri("http://localhost:8002/");

ServiceHost host = new ServiceHost(typeof(MyService),
                                   tcpBaseAddress,httpBaseAddress);
WCF also lets you list the base addresses in the host config file:
<system.serviceModel>
   <services>
      <service name = "MyNamespace.MyService">
         <host>
            <baseAddresses>
               <add baseAddress = "net.tcp://localhost:8001/"/>
               <add baseAddress = "http://localhost:8002/"/>
            </baseAddresses>
         </host>
         ...
      </service>
   </services>
</system.serviceModel>
When you create the host, it will use whichever base addresses it finds in the config file, plus any base addresses you provide programmatically. Take extra care to ensure the configured base addresses and the programmatic ones do not overlap in the scheme.
Note
On any machine running Windows XP or later, for HTTP addresses other than port 80, you will need to launch the host process (or Visual Studio while testing or debugging) as an administrator. Instead of doing that every time, you can instruct Windows to reserve the port namespace for the user running the host. Do this using the netsh.exe command-line utility. For example, to reserve the HTTP port 8002 on the local machine, you will need to run this command at a command prompt launched as an administrator:
netsh http add urlacl url=http://+:8002/user=
                          "MachineOrDomain\UserName"
You can even register multiple hosts for the same type, as long as the hosts use different base addresses:
Uri baseAddress1  = new Uri("net.tcp://localhost:8001/");
ServiceHost host1 = new ServiceHost(typeof(MyService),baseAddress1);
host1.Open();

Uri baseAddress2  = new Uri("net.tcp://localhost:8002/");
ServiceHost host2 = new ServiceHost(typeof(MyService),baseAddress2);
host2.Open();
However, with the exception of some threading issues discussed in Chapter 8, opening multiple hosts this way offers no real advantage. In addition, opening multiple hosts for the same type does not work with base addresses supplied in the config file and requires use of the ServiceHost constructor.
Advanced hosting features
The ICommunicationObject interface that ServiceHost supports offers some advanced features, listed in Example 1-4.
Example 1-4. The ICommunicationObject interface
public interface ICommunicationObject
{
   void Open();
   void Close();
   void Abort();

   event EventHandler Closed;
   event EventHandler Closing;
   event EventHandler Faulted;
   event EventHandler Opened;
   event EventHandler Opening;
   IAsyncResult BeginClose(AsyncCallback callback,object state);
   IAsyncResult BeginOpen(AsyncCallback callback,object state);
   void EndClose(IAsyncResult result);
   void EndOpen(IAsyncResult result);

   CommunicationState State
   {get;}
  //More members
}
public enum CommunicationState
{
   Created,
   Opening,
   Opened,
   Closing,
   Closed,
   Faulted
}
If opening or closing the host is a lengthy operation, you can do so asynchronously with the BeginOpen() and BeginClose() methods.
You can subscribe to hosting events such as state changes or faults, and you can use the State property to query for the host status. Finally, the ServiceHost class also offers the Abort() method. Abort() is an ungraceful exit—when called, it immediately aborts all service calls in progress and shuts down the host. Active clients will each get an exception.
The ServiceHost<T> class
You can improve on the WCF-provided ServiceHost class by defining the ServiceHost<T> class, as shown in Example 1-5.
Example 1-5. The ServiceHost<T> class
public class ServiceHost<T> : ServiceHost
{
   public ServiceHost() : base(typeof(T))
   {}

   public ServiceHost(params string[] baseAddresses) : base(typeof(T),
                      baseAddresses.Select(address=>new Uri(address)).ToArray())
   {}
   public ServiceHost(params Uri[] baseAddresses) : base(typeof(T),baseAddresses)
   {}
}
ServiceHost<T> provides simple constructors that do not require the service type as a construction parameter and that can operate on raw strings instead of the cumbersome Uri. I’ll add quite a few extensions, features, and capabilities to ServiceHost<T> throughout this book.
WAS Hosting
The problem with hosting in IIS is that it is a web server, not a hosting engine. It therefore requires you to masquerade your service as a website. While ASP.NET encapsulates this step for you, it causes a significant increase in internal complexity, involving the HTTP modules and the ASP.NET pipeline. The problem is that the more moving parts involved, the higher the likelihood of something going wrong. Moreover, limiting the service to using only HTTP makes IIS ill-suited for intranet applications.
With the next wave of Windows, Microsoft rectified this issue by providing a general-purpose hosting engine called the Windows Activation Service (WAS). WAS is a system service available with Windows versions Windows Server 2008 or later. The WAS is a true general-purpose hosting engine. It can host websites (in fact, IIS 7 or later will host its websites in the WAS by default), but it can just as easily host your services, allowing you to use any transport, such as TCP, IPC, or MSMQ. You can install and configure the WAS separately from IIS. Hosting a WCF service in the WAS is designed to look just like hosting in IIS. You need to either supply an .svc file, just as with IIS, or provide the equivalent information in the config file. All the other development aspects, such as support in Visual Studio, remain exactly the same. Because the WAS is a system service, you do not need to pre-launch your service host process. When the first client call arrives, the WAS will intercept it, launch a worker process to host your service, and forward it the call.
WAS offers many features beyond self-hosting, including application pooling, recycling, idle time management, identity management, and isolation. To use the WAS, you must target a platform that supports it, such as a Windows Server 2008 (or later) machine for scalability, or a Windows 7 (or later) client machine for a handful of clients.
That said, self-hosted processes do offer singular advantages, such as in-proc hosting, dealing well with unknown customer environments, and easy programmatic access to the advanced hosting features described previously.
Custom Hosting in IIS/WAS
It is often the case that you need to interact with the host instance. While this is integral to the use of a self-hosting solution, when using IIS or WAS, you have no direct access to the host. To overcome this hurdle, WCF provides a hook called a host factory. Using the Factory tag in the .svc file, you can specify a class you provide that creates the host instance:
<%@ ServiceHost
   Language   = "C#"
   Debug      = "true"
   CodeBehind = "~/App_Code/MyService.cs"
   Service    = "MyService"
   Factory    = "MyServiceFactory"
%>
You can also specify the host factory in the config file when not using an .svc file explicitly:
<serviceActivations>
   <add relativeAddress = "MyService.svc"
        service = "MyService"
        factory = "MyServiceFactory"
   />
</serviceActivations>
The host factory class must derive from the ServiceHostFactory class and override the CreateServiceHost() virtual method:
public class ServiceHostFactory : ...
{
   protected virtual ServiceHost CreateServiceHost(Type serviceType,
                                                   Uri[] baseAddresses);
   //More members
}
For example:
class MyServiceFactory : ServiceHostFactory
{
   protected override ServiceHost CreateServiceHost(Type serviceType,
                                                    Uri[] baseAddresses)
   {
      ServiceHost host = new ServiceHost(serviceType,baseAddresses);

      //Custom steps here

      return host;
   }
}
Note
The CreateServiceHost() method is logically the Main() method of an IIS or WAS hosted service, and you can use it just for that purpose.
Choosing a Host
Although WCF offers such a variety of options, from IIS, to the WAS, to self-hosting, it is easy to choose the correct host, as shown in Figure 1-4. For an Internet application (i.e., an application that receives calls from clients across the Internet), IIS or the WAS provide the best capabilities to harden your services against the security concerns of access over the Internet. Otherwise prefer self-hosting your services. Self-hosting provides your organization with a hosting model that significantly simplifies the administration and provisioning of intranet services. WCF services do not require the many additional lifecycle management facilities that the WAS provides.
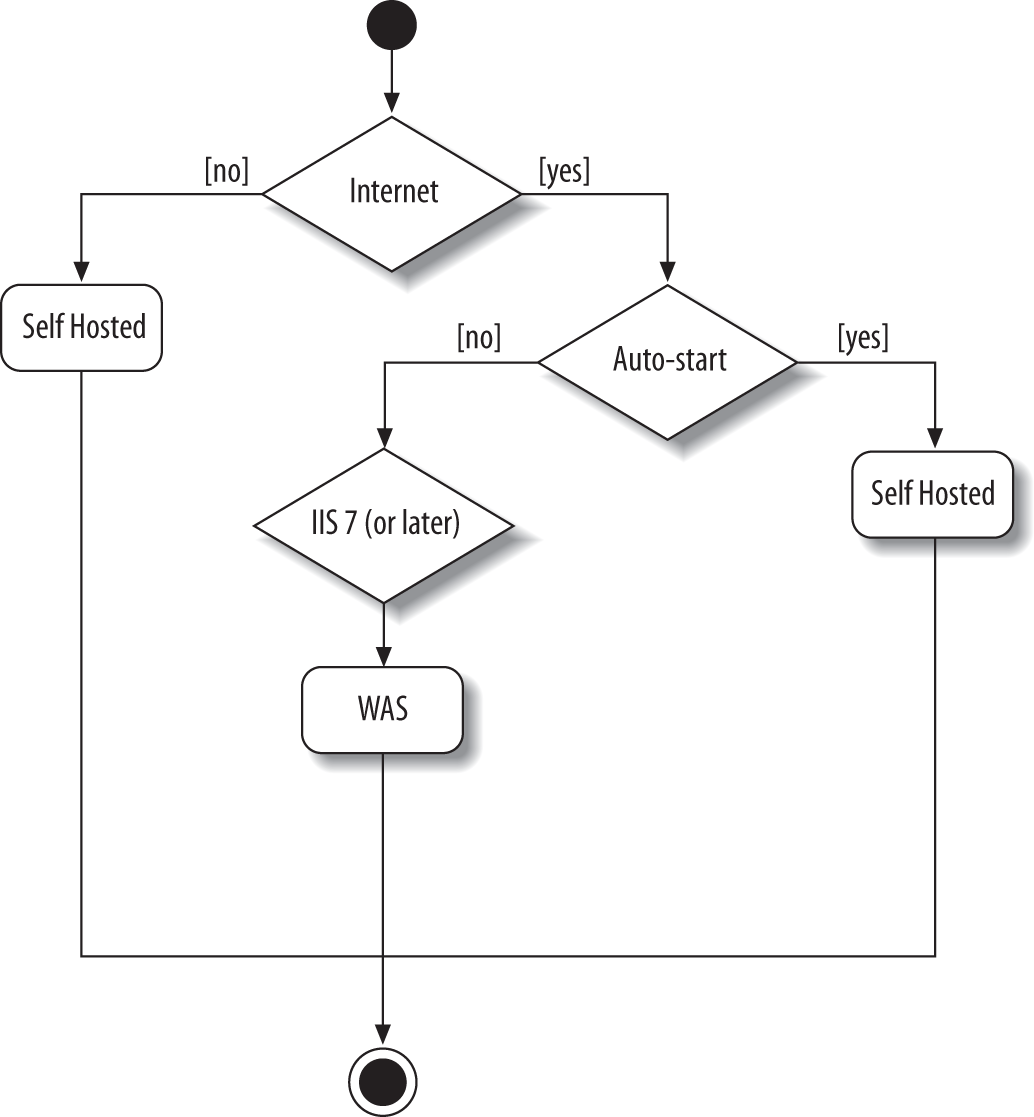
Figure 1-4. Choosing a host for any service
Bindings
There are multiple aspects of communication with any given service, and there are many possible communication patterns. Messages can follow a synchronous request-reply or asynchronous fire-and-forget pattern, messages can be bidirectional, messages can be delivered immediately or queued, and the queues can be durable or volatile. As discussed previously, there are many possible transport protocols for the messages, such as HTTP (or HTTPS), TCP, IPC, MSMQ. There are also a few possible message encoding options. You can choose plain text to enable interoperability, binary encoding to optimize performance, or the Message Transport Optimization Mechanism (MTOM) for large payloads. Finally, there are multiple options for securing messages. You can choose not to secure them at all, to provide transport-level security only, or to provide message-level privacy and security, and of course, there are numerous ways to authenticate and authorize the clients. Message delivery might be unreliable or reliable end-to-end across intermediaries and dropped connections, and the messages might be processed in the order they were sent or in the order they were received. Your service might need to interoperate with other services or clients that are aware of only the basic web service protocol, or with clients and services capable of using the score of WS-* protocols, such as WS-Security and WS-Atomic Transactions. Your service may need to have the capability to interoperate with any client or you may want to restrict your service to interoperate only with another WCF service or client.
If you were to count all the possible communication and interaction options, you’d probably find that the number of permutations is in the tens of thousands. Some of those choices may be mutually exclusive and some may mandate other choices. Clearly, both the client and the service must be aligned on all these options in order to communicate properly. Managing this level of complexity adds no business value to most applications, and yet the productivity and quality implications of making the wrong decisions are severe.
To simplify these choices and make them manageable, WCF groups together sets of communication aspects in bindings. A binding is merely a consistent, canned set of choices regarding the transport protocol, message encoding, communication pattern, reliability, security, transaction propagation, and interoperability. All you need to do is determine the target scenario for your service, and WCF makes a correct multidimensional decision for you regarding all the aspects of the communication. Ideally, you can extract all these “plumbing” aspects from your service code and allow the service to focus solely on the implementation of the business logic. Bindings allow you to use the same service logic over drastically different plumbing.
You can use the WCF-provided bindings out of the box, you can tweak their properties, or you can write your own custom bindings from scratch. The service publishes its choice of binding in its metadata, enabling clients to query for the type and specific properties of the binding. This is important because the client must use the exact same binding values as the service. A single service can support multiple bindings on separate addresses.
The Common Bindings
WCF defines five frequently used bindings:
- Basic binding
- Offered by the
BasicHttpBindingclass, basic binding is designed to expose a WCF service as a legacy ASMX web service so that old clients can work with new services. The basic binding makes your service look, on the wire, like a legacy web service that communicates over the basic web service profile. When used by clients, this binding enables new WCF clients to work with old ASMX services. - TCP binding
- Offered by the
NetTcpBindingclass, TCP binding uses TCP for cross-machine communication on the intranet. It supports a variety of features, including reliability, transactions, and security, and is optimized for WCF-to-WCF communication. As a result, it requires both the client and the service to use WCF. - IPC binding
- Offered by the
NetNamedPipeBindingclass, IPC binding uses named pipes as a transport for same-machine communication. It is the most secure binding, as it cannot accept calls from outside the machine. The IPC binding supports a variety of features similar to the TCP binding. It is also the most performant binding, as IPC is a lighter protocol than TCP.
Note
The NetNamedPipeBinding class is inconsistently named, because the binding naming convention is to refer to the protocol, not the communication mechanism (thus, we have NetTcpBinding rather than NetSocketBinding). The correct name for this binding should have been NetIpcBinding. Throughout this book, I will refer to the NetNamedPipeBinding as the IPC binding.
- Web Service (WS) binding
- Offered by the
WSHttpBindingclass, the WS binding uses HTTP or HTTPS for transport and offers a variety of features (such as reliability, transactions, and security) over the Internet, all using the WS-* standards. This binding is designed to interoperate with any party that supports the WS-* standards. - MSMQ binding
- Offered by the
NetMsmqBindingclass, the MSMQ binding uses MSMQ for transport and offers support for disconnected queued calls. Use of this binding is the subject of Chapter 9.
Format and encoding
Each of the frequently used bindings uses a different transport scheme and encoding, as listed in Table 1-1. Where multiple encodings are possible, the defaults are shown in bold.
| Name | Transport | Encoding | Interoperable |
|---|---|---|---|
BasicHttpBinding |
HTTP/HTTPS | Text, MTOM | Yes |
NetTcpBinding |
TCP | Binary | No |
NetNamedPipeBinding |
IPC | Binary | No |
WSHttpBinding |
HTTP/HTTPS | Text, MTOM | Yes |
NetMsmqBinding |
MSMQ | Binary | No |
Having text-based encoding typically enables a WCF service (or client) to communicate over HTTP with any other service (or client), regardless of its technology and across firewalls. Binary encoding over TCP, IPC, or MSMQ yields the best performance, but it does so at the expense of interoperability because it mandates WCF-to-WCF communication. That said, with the TCP, IPC, and MSMQ bindings, interoperability is often not required. In the case of IPC, because the call can never leave the client machine, the client can rest assured that the target machine is running Windows and has WCF installed on it. In the case of the TCP binding, while your application may need to interoperate with other applications written in other technologies, applications themselves do tend to be homogeneous internally. As such, as long as your application spans only the local intranet, you can typically assume a homogeneous Windows environment without internal firewalls between machines. Finally, the MSMQ binding requires the use of MSMQ server, which of course is Windows-specific.
Choosing a Binding
When choosing a binding for your service, you should follow the decision diagram shown in Figure 1-5.
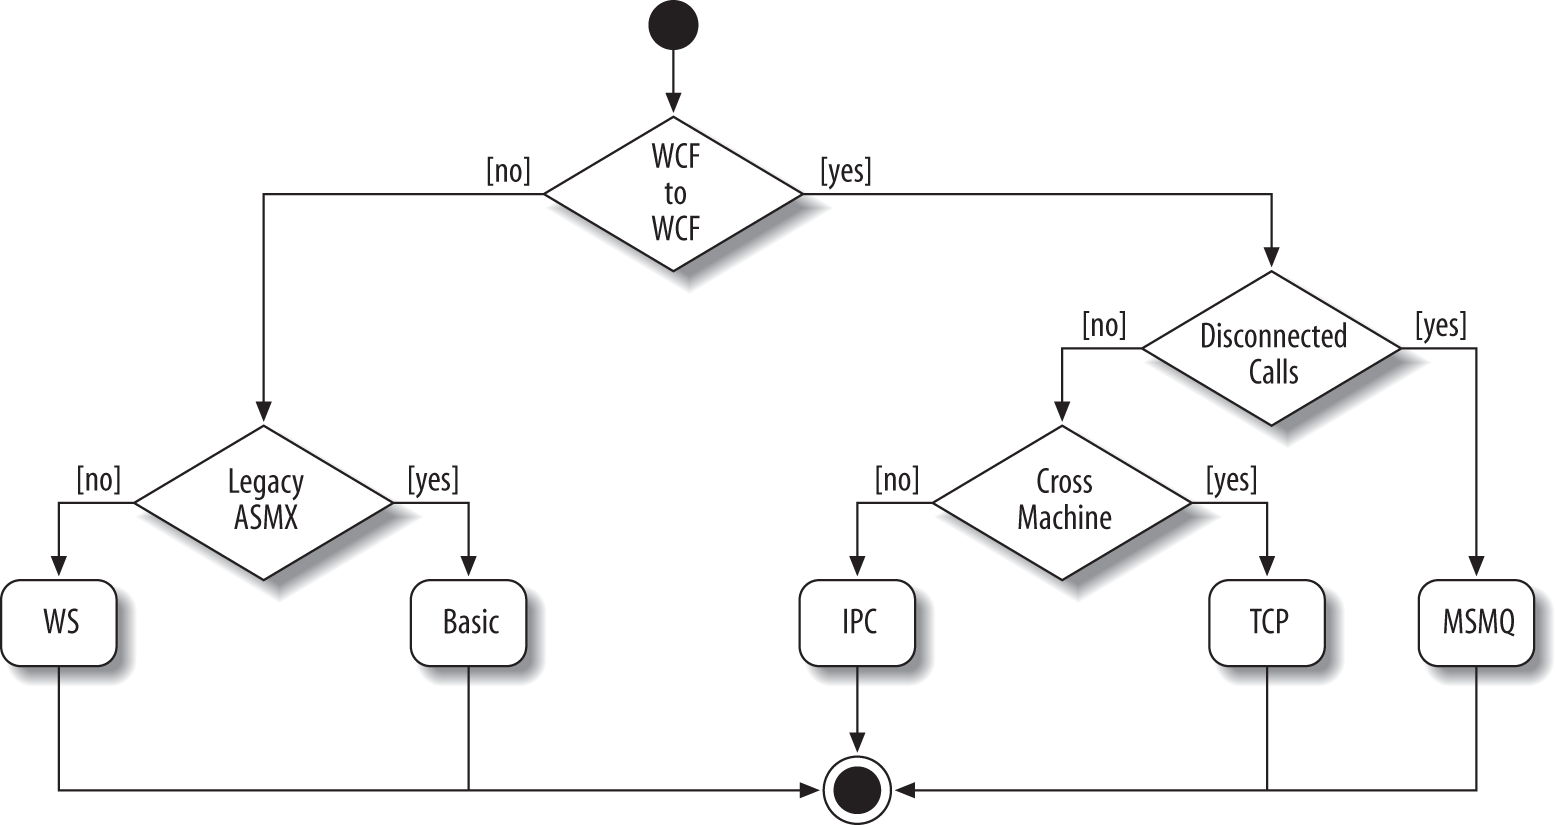
Figure 1-5. Choosing a binding
The first question you should ask yourself is whether your service needs to interact with non-WCF clients. If it does, and those clients expect the basic web service protocol (ASMX web services), choose the BasicHttpBinding, which exposes your WCF service to the outside world as if it were an ASMX web service (i.e., a WSI-basic profile). The downside of this choice is that you cannot take advantage of most of the standard WS-* protocols. If, however, the non-WCF client can understand these standards, you can instead choose the WS binding. If you can assume the client is a WCF client and requires offline or disconnected interaction, choose the NetMsmqBinding, which uses MSMQ for transporting the messages. If the client requires connected communication but could be calling across machine boundaries, choose the NetTcpBinding, which communicates over TCP. If the client is on the same machine as the service, choose the NetNamedPipeBinding, which uses IPC to maximize performance.
Note
Most bindings work well even outside their target scenarios. For example, you can use the TCP binding for same-machine or even in-proc communication, and you can use the basic binding for intranet WCF-to-WCF communication. However, do try to choose a binding according to Figure 1-5.
Additional Bindings
In addition to the five frequently used bindings described so far, WCF provides three specializations of these bindings: the BasicHttpContextBinding, the WSHttpContextBinding, and the NetTcpContextBinding. The context bindings (described in Appendix B) all derive from their respective regular bindings, adding support for a context protocol. The context protocol allows you to pass out-of-band parameters to the service. You can also use the context bindings for durable services support, as described in Chapter 4.
WCF defines eight bindings that we do not think you should use frequently. These bindings (listed next) are each designed for a specific target scenario and you cannot use them easily outside that scenario. This book makes little or no use of these bindings, due to their somewhat esoteric nature and primarily the availability of better design alternatives.
- WS dual binding
- Offered by the
WSDualHttpBindingclass, this is similar to the WS binding, except it also supports bidirectional duplex communication from the service to the client, as discussed in Chapter 5. While this binding does use industry standards (it is nothing more than twoWSHttpBindingbindings wired up against each other to support callbacks), there is no industry standard for setting up the callback, and therefore theWSDualHttpBindingis not interoperable. This binding is a legacy from the first release of WCF. The availability of the WebSocket bindingNetHttpBindingdeprecates theWSDualHttpBindingfor callbacks over the Internet. - WebSocket binding
- Offered by the
NetHttpBindingclass, this binding is a de facto .NET 4.5 replacement for the .NET 3.0WSDualHttpBinding, as it provides a better model for callbacks over the Internet. As with theWSDualHttpBinding, theNetHttpBindingoffers a variety of additional features such as reliability and security. Unless you absolutely need to use callbacks over the Internet, you should instead select one of the common bindings as prescribed in “Choosing a Binding”.
Warning
The WebSocket protocol and associated WebSocket API are both industry standards but the NetHttpBinding represents a proprietary WCF-to-WCF implementation. Therefore, the NetHttpBinding is incompatible with the interoperable WebSocket API. We find this lack of standards compliance severely limits the WebSocket binding’s reach and applicability. Consequently, we do not consider the WebSocket binding one of the recommended bindings and have reduced the role of the NetHttpBinding to advanced scenarios where callbacks over the Internet are appropriate.
- Federated WS binding
- Offered by the
WSFederationHttpBindingclass, this is a specialization of the WS binding that offers support for federated security. Federated security is beyond the scope of this book, as industry presently lacks good support (both in technology and in business models) for true federated scenarios. I do expect federation to become mainstream as time goes by. - Federated WS 2007 binding
- Offered by the
WS2007FederationHttpBindingclass, this is an update ofWSFederationHttpBinding. - MSMQ integration binding
- Offered by the
MsmqIntegrationBindingclass, this is the analogous queued-world binding to the basic binding. The integration binding converts WCF messages to and from MSMQ messages and is designed to interoperate with legacy MSMQ clients, which was a fringe scenario at the time WCF first came out (it is even less applicable today). - WS 2007 binding
- Offered by the
WS2007HttpBindingclass, this binding derives from theWSHttpBindingclass; it adds support for the coordination standard and updates for the transaction, security, and reliability standards. - UDP binding
- Offered by the
UdpBindingclass, this binding provides support for the User Datagram Protocol (UDP). UDP provides no guarantee of message delivery, ordering, or duplicate message detection. Because of these shortcomings, theUdpBinding’s usefulness is limited to the few scenarios that can tolerate message loss, lack of ordering, or duplication. In most business scenarios, using UDP is therefore out of the question. While you could entertain the use of UDP for events broadcasting, a far better management and reliable design solution is to use a pub/sub service, as is shown in Appendix D. - Web binding
- Offered by the
WebHttpBindingclass, this binding allows your service to accept simple calls over web protocols such as HTTP-GET using the REST/POX/JSON patterns. TheWebHttpBindingis now superseded by the new ASP.NET Web API framework initially released in .NET 4.0 and supported in IIS 7 and above. The ASP.NET Web API provides a much cleaner model for implementing HTTP-based services and REST-like interactions.
Using a Binding
Each binding offers literally dozens of configurable properties. There are three ways of working with bindings: you can use the built-in bindings as they are, if they fit your requirements; you can tweak and configure some of their properties, such as transaction propagation, reliability, and security; or you can write your own custom bindings. The most common scenario is using an existing binding mostly as it is and merely configuring two or three of its aspects. Application developers will hardly ever need to write a custom binding, but framework developers may need to.
Endpoints
Every service is associated with an address that defines where the service is, a binding that defines how to communicate with the service, and a contract that defines what the service does. This triumvirate governing the service is easy to remember as the ABC of the service. WCF formalizes this relationship in the form of an endpoint. The endpoint is the fusion of the address, contract, and binding (see Figure 1-6).

Figure 1-6. The endpoint
Every endpoint must have all three elements, and the host exposes the endpoint. Logically, the endpoint is the service’s interface and is analogous to a CLR or COM interface. Note the use of the traditional “lollipop” notation to denote an endpoint in Figure 1-6.
Note
Conceptually, even in C# or VB, there are endpoints: the address is the memory address of the type’s virtual table, the binding is CLR, and the contract is the interface itself. Because in classic .NET programming you never deal with addresses or bindings, you take them for granted, and you’ve probably grown accustomed to equating in your mind’s eye the interface (which is merely a programming construct) with all that it takes to interface with an object. The WCF endpoint is a true interface because it contains all the information required to interface with the object. In WCF, the address and the binding are not preordained and you must specify them.
Every service must expose at least one business endpoint, and each endpoint has exactly one contract. All endpoints on a service have unique addresses, and a single service can expose multiple endpoints. These endpoints can use the same or different bindings and can expose the same or different contracts. There is absolutely no relationship between the various endpoints a service provides.
It is important to point out that nothing in the service code pertains to its endpoints, and they are always external to the service code. You can configure endpoints either administratively (using a config file) or programmatically.
Administrative Endpoint Configuration
Configuring an endpoint administratively requires placing the endpoint details in the hosting process config file. For example, given this service definition:
namespace MyNamespace
{
   [ServiceContract]
   interface IMyContract
   {...}
   class MyService : IMyContract
   {...}
}
Example 1-6 shows the required entries in the config file. Under each service type, you list its endpoints.
Example 1-6. Administrative endpoint configuration
<system.serviceModel>
   <services>
      <service name = "MyNamespace.MyService">
         <endpoint
            address  = "http://localhost:8000/MyService"
            binding  = "wsHttpBinding"
            contract = "MyNamespace.IMyContract"
         />
      </service>
   </services>
</system.serviceModel>
When you specify the service and the contract type, you need to use fully qualified type names. I will omit the namespace in the examples throughout the remainder of this book, but you should use a namespace when applicable. Note that if the endpoint provides a base address, that address scheme must be consistent with the binding, such as HTTP with WSHttpBinding. A mismatch causes an exception at service load time.
Example 1-7 shows a config file defining a single service that exposes multiple endpoints. You can configure multiple endpoints with the same base address as long as the URI is different.
Example 1-7. Multiple endpoints on the same service
<service name = "MyService">
   <endpoint
      address  = "http://localhost:8000/MyService"
      binding  = "wsHttpBinding"
      contract = "IMyContract"
   />
   <endpoint
      address  = "net.tcp://localhost:8001/MyService"
      binding  = "netTcpBinding"
      contract = "IMyContract"
   />
   <endpoint
      address  = "net.tcp://localhost:8002/MyService"
      binding  = "netTcpBinding"
      contract = "IMyOtherContract"
   />
</service>
Using base addresses
In Example 1-7, each endpoint provided its own base address. When you provide an explicit base address, it overrides any base address the host may have provided.
You can also have multiple endpoints use the same base address, as long as the endpoint addresses differ in their URIs:
<service name = "MyService">
   <endpoint
      address  = "net.tcp://localhost:8001/MyService"
      binding  = "netTcpBinding"
      contract = "IMyContract"
   />
   <endpoint
      address  = "net.tcp://localhost:8001/MyOtherService"
      binding  = "netTcpBinding"
      contract = "IMyContract"
   />
</service>
Alternatively, if the host provides a base address with a matching transport scheme, you can leave out the address. In this case, the endpoint address will be the same as the base address of the matching transport:
<endpoint
   binding  = "wsHttpBinding"
   contract = "IMyContract"
/>
If the host does not provide a matching base address, loading the service host will fail with an exception.
When you configure the endpoint address, you can add just the relative URI under the base address:
<endpoint
   address  = "SubAddress"
   binding  = "wsHttpBinding"
   contract = "IMyContract"
/>
The endpoint address in this case will be the matching base address plus the URI, and again, the host must provide a matching base address.
Binding configuration
You can use the config file to customize the binding used by the endpoint. To that end, add the bindingConfiguration tag to the endpoint section and name a customized section in the bindings section of the config file. Example 1-8 demonstrates using this technique to enable transaction propagation. Chapter 7 explains the function of the transactionFlow tag.
Example 1-8. Service-side binding configuration
<system.serviceModel>
   <services>
      <service name = "MyService">
         <endpoint
            address  = "net.tcp://localhost:8000/MyService"
            bindingConfiguration = "TransactionalTCP"
            binding  = "netTcpBinding"
            contract = "IMyContract"
         />
         <endpoint
            address  = "net.tcp://localhost:8001/MyService"
            bindingConfiguration = "TransactionalTCP"
            binding  = "netTcpBinding"
            contract = "IMyOtherContract"
         />
      </service>
   </services>
   <bindings>
      <netTcpBinding>
         <binding name = "TransactionalTCP"
            transactionFlow = "true"
         />
      </netTcpBinding>
   </bindings>
</system.serviceModel>
As shown in Example 1-8, you can reuse the named binding configuration in multiple endpoints simply by referring to it.
Default binding
WCF allows you to use a default binding that affects all endpoints of all services of the application that uses the config file. A default binding is simply a nameless binding section. For example, in the case of TCP:
<netTcpBinding>
   <binding
      transactionFlow = "true"
   />
</netTcpBinding>
The default binding implicitly configures all endpoints that do not explicitly reference a binding configuration.
For example, using a default binding, Example 1-8 is reduced to:
<system.serviceModel>
   <services>
      <service name = "MyService">
         <endpoint
            address  = "net.tcp://localhost:8000/MyService"
            binding  = "netTcpBinding"
            contract = "IMyContract"
         />
         <endpoint
            address  = "net.tcp://localhost:8001/MyService"
            binding  = "netTcpBinding"
            contract = "IMyOtherContract"
         />
      </service>
   </services>
   <bindings>
      <netTcpBinding>
         <binding
            transactionFlow = "true"
         />
      </netTcpBinding>
   </bindings>
</system.serviceModel>
You can only have at most one default binding configuration per binding type.
The problem with the default binding is that when you combine default bindings with named binding configurations, as shown in Figure 1-7, the config file may become difficult for humans to parse and understand.
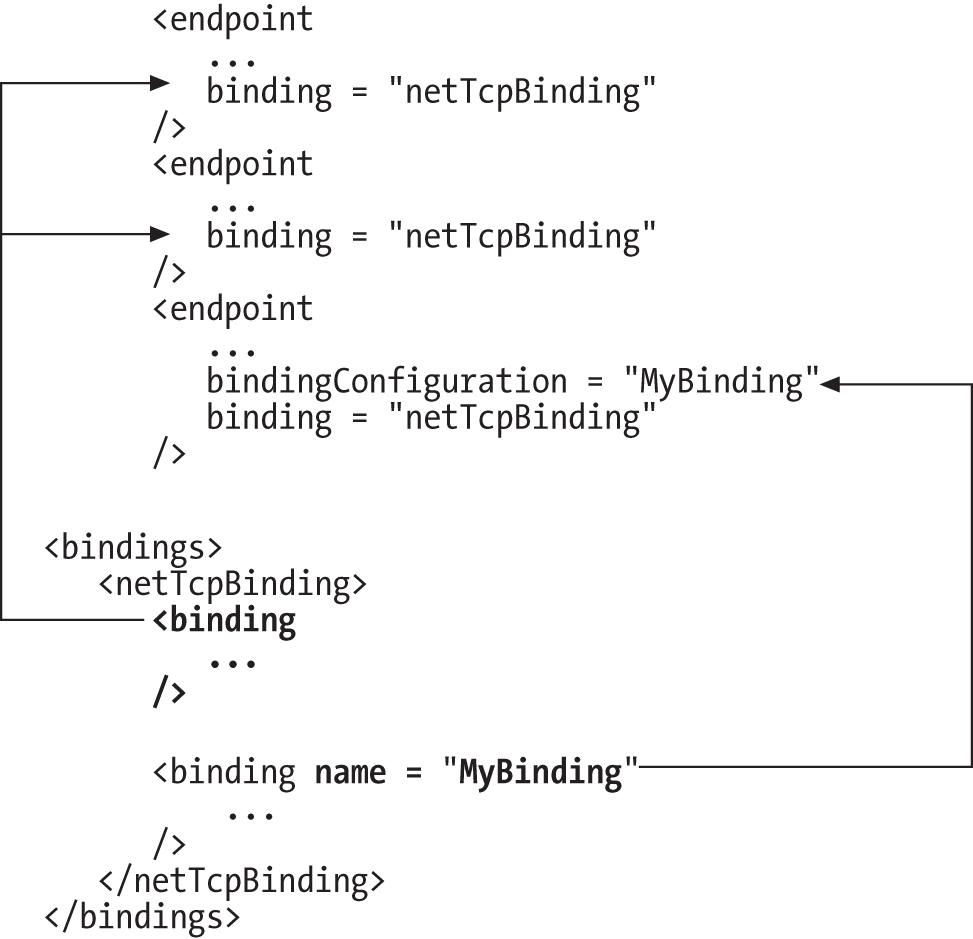
Figure 1-7. Named and default binding configuration
While Figure 1-8 is a perfectly valid configuration, I recommend against mixing named and default bindings. Either have all your binding configurations named or use only the default configuration. Another advantage of a named configuration is that it allows you to weave a bit of documentation via the binding configuration name as to what that configuration is trying to achieve. Most if not all of the binding configurations in this book are named for precisely that reason.
Programmatic Endpoint Configuration
Programmatic endpoint configuration is equivalent to administrative configuration, but instead of resorting to a config file, you rely on programmatic calls to add endpoints to the ServiceHost instance. Again, these calls are always outside the scope of the service code. ServiceHost provides overloaded versions of the AddServiceEndpoint() method:
public class ServiceHost : ServiceHostBase
{
   public ServiceEndpoint AddServiceEndpoint(Type implementedContract,
                                             Binding binding,
                                             string address);
   //Additional members
}
You can provide AddServiceEndpoint() methods with either relative or absolute addresses, just as with a config file. Example 1-9 demonstrates programmatic configuration of the same endpoints as in Example 1-7.
Example 1-9. Service-side programmatic endpoint configuration
ServiceHost host = new ServiceHost(typeof(MyService));

Binding wsBinding  = new WSHttpBinding();
Binding tcpBinding = new NetTcpBinding();

host.AddServiceEndpoint(typeof(IMyContract),wsBinding,
                        "http://localhost:8000/MyService");
host.AddServiceEndpoint(typeof(IMyContract),tcpBinding,
                        "net.tcp://localhost:8001/MyService");
host.AddServiceEndpoint(typeof(IMyOtherContract),tcpBinding,
                        "net.tcp://localhost:8002/MyService");

host.Open();
When you add an endpoint programmatically, the address is given as a string, the contract as a Type, and the binding as one of the subclasses of the abstract class Binding, as in:
public class NetTcpBinding : Binding,...
{...}
To rely on the host base address, provide an empty string if you want to use only the base address, or just the URI to use the base address plus that URI:
Uri tcpBaseAddress = new Uri("net.tcp://localhost:8000/");

ServiceHost host = new ServiceHost(typeof(MyService),tcpBaseAddress);

Binding tcpBinding = new NetTcpBinding();

//Use base address as address
host.AddServiceEndpoint(typeof(IMyContract),tcpBinding,"");
//Add relative address
host.AddServiceEndpoint(typeof(IMyContract),tcpBinding,"MyService");
//Ignore base address
host.AddServiceEndpoint(typeof(IMyContract),tcpBinding,
                        "net.tcp://localhost:8001/MyService");
host.Open();
As with administrative configuration using a config file, the host must provide a matching base address; otherwise, an exception occurs. In fact, in terms of capabilities, there is no difference between programmatic and administrative configuration. When you use a config file, all WCF does is parse the file and execute the appropriate programmatic calls in its place.
Binding configuration
You can programmatically set the properties of the binding used. For example, the following is the code required to enable transaction propagation (similar to Example 1-8):
ServiceHost host = new ServiceHost(typeof(MyService));
NetTcpBinding tcpBinding = new NetTcpBinding();

tcpBinding.TransactionFlow = true;

host.AddServiceEndpoint(typeof(IMyContract),tcpBinding,
                        "net.tcp://localhost:8000/MyService");
host.Open();
Note that when you’re dealing with specific binding properties, you typically interact with a concrete binding subclass, such as NetTcpBinding, rather than its abstract base class, Binding (as was done in Example 1-9).
All the binding classes also offer a constructor that takes a string, for example:
public class NetTcpBinding : Binding,...
{
   public NetTcpBinding(string configurationName);
   //More members
}
You can use that constructor to programmatically initialize a binding object based on settings found in a particular binding section in the config file. You can also pass an empty string to instruct WCF to use the default (nameless) binding configuration. If the config file does not contain a default binding definition, you will encounter a KeyNotFoundException.
Default Endpoints
If the service host does not define any endpoints (neither in config nor programmatically) but does provide at least one base address, WCF will by default add endpoints to the service. These are called the default endpoints. WCF will add an endpoint per base address per contract, using the base address as the endpoint’s address. WCF will infer the binding from the scheme of the base address. For HTTP, WCF will use the basic binding. Note that the default bindings will affect the default endpoints. WCF will also name the endpoint by concatenating the binding name and the contract name.
For example, given this service definition:
[ServiceContract]
interface IMyContract
{...}

[ServiceContract]
interface IMyOtherContract
{...}

class MyService : IMyContract,IMyOtherContract
{...}
for this hosting code:
Uri httpBaseAddress = new Uri("http://localhost:8000/");
Uri tcpBaseAddress  = new Uri("net.tcp://localhost:9000/");
Uri ipcBaseAddress  = new Uri("net.pipe://localhost/");

ServiceHost host = new ServiceHost(typeof(MyService),httpBaseAddress,
                   tcpBaseAddress,ipcBaseAddress);
host.Open();
Assuming no config file is used to define any additional endpoints, WCF will add these endpoints, as if they were defined in config:
<service name = "MyService">
   <endpoint name = "BasicHttpBinding_IMyContract"
      address  = "http://localhost:8000/"
      binding  = "basicHttpBinding"
      contract = "IMyContract"
   />
   <endpoint name = "NetTcpBinding_IMyContract"
      address  = "net.tcp://localhost:9000"
      binding  = "netTcpBinding"
      contract = "IMyContract"
   />
   <endpoint name = "NetNamedPipeBinding_IMyContract"
      address  = "net.pipe://localhost/"
      binding  = "netNamedPipeBinding"
      contract = "IMyContract"
   />

   <endpoint name = "BasicHttpBinding_IMyOtherContract"
      address  = "http://localhost:8000/"
      binding  = "basicHttpBinding"
      contract = "IMyOtherContract"
   />
   <endpoint name = "NetTcpBinding_IMyOtherContract"
      address  = "net.tcp://localhost:9000"
      binding  = "netTcpBinding"
      contract = "IMyOtherContract"
   />
   <endpoint name = "NetNamedPipeBinding_IMyOtherContract"
      address  = "net.pipe://localhost/"
      binding  = "netNamedPipeBinding"
      contract = "IMyOtherContract"
   />
</service>
Note that WCF will provide the same address multiple times to different endpoints. While this works as far as invocation (because the host monitors the incoming ports or pipes only once and simply dispatches the message internally to the correct endpoint), this configuration will fail metadata publishing due to an internal limitation of WCF.
You can also add the default endpoints explicitly using the AddDefaultEndpoints() method of ServiceHost:
public class ServiceHost : ...
{
   public void AddDefaultEndpoints();
   //More members
}
You can add the default endpoints even if you have added other endpoints conventionally using a config file or programmatically. The only thing to watch for is conflict with other endpoints that use the base address as their address.
Protocol mapping
For the default endpoints, WCF will infer the binding to use from the scheme of the base address. This inferring is called protocol mapping. In the case of TCP, IPC, and MSMQ, there is only a single mapping option. However, in the case of HTTP (or HTTPS), WCF will default to the basic binding for mapping. If you like to rely on the WS binding instead (as you should in most cases), you need to override the default protocol mapping using the protocolMapping section in the config file:
<system.serviceModel>
   <protocolMapping>
      <add
         scheme  = "http"
         binding = "wsHttpBinding"
      />
   </protocolMapping>
</system.serviceModel>
You can also specify a particular binding configuration to use:
<protocolMapping>
   <add
      scheme  = "http"
      binding = "wsHttpBinding"
      bindingConfiguration = "..."
   />
</protocolMapping>
You must do protocol mapping administratively in the config file. There is no equivalent programmatic way.
The Configure() Method
Prior to .NET 4.5, when using programmatic configuration, your hosting code was often coupled to the hosting process (or Windows Service) with which it was deployed. When using self-hosting, you were required to provide programmatic configuration by interacting directly with a service host instance. When hosting in WAS, you were required to provide a service host factory. And if you had evolved your configuration strategy to leverage a centralized configuration store, you were required to merge your host’s stored configuration with its file-based configuration.
As part of the WCF simplification features introduced in .NET 4.5, the Configure() method provides you with a hosting process–independent approach to configuring your services programmatically. Regardless of the hosting environment, a Configure() method allows you to define the configuration for your service’s endpoints directly within its code.
You enable this feature for your service by adding a public static method named Configure() with the following signature to your service’s implementation:
class MyService : IMyContract
{
   public static void Configure(ServiceConfiguration config)
   {...}

   // More members
}
Warning
The Configure() method convention is very specific. If you do not mark your Configure() method both as public and as static, WCF will not detect it.
The ServiceConfiguration argument passed to the Configure() method provides many of the same methods for programmatic service configuration as offered by the ServiceHost class:
public class ServiceConfiguration
{
   public void AddServiceEndpoint(ServiceEndpoint endpoint);
   public ServiceEndpoint AddServiceEndpoint(Type contractType,
                                             Binding binding,
                                             Uri address);

   public Collection<ServiceEndpoint> EnableProtocol(Binding protocol);

   public void LoadFromConfiguration();
   public void LoadFromConfiguration(Configuration configuration);

   //More members
}
This allows you to use the ServiceConfiguration class to configure your service with the same techniques described thus far. Example 1-10 shows the same programmatic endpoint configuration as Example 1-9, but instead uses the ServiceConfiguration parameter of the Configure() method.
Example 1-10. Configure() method programmatic endpoint configuration
public static void Configure(ServiceConfiguration config)
{
   Binding wsBinding  = new WSHttpBinding();
   Binding tcpBinding = new NetTcpBinding();

   config.AddServiceEndpoint(typeof(IMyContract),wsBinding,
                             "http://localhost:8000/MyService");
   config.AddServiceEndpoint(typeof(IMyContract),tcpBinding,
                             "net.tcp://localhost:8001/MyService");
   config.AddServiceEndpoint(typeof(IMyOtherContract),tcpBinding,
                             "net.tcp://localhost:8002/MyService");
}
If present, WCF will call your service’s Configure() method during service host instantiation before the service host is opened. This gives you the opportunity to configure your service’s endpoints programmatically or explicitly read your service’s configuration section by calling one of the LoadFromConfiguration() methods offered by the ServiceConfiguration class.
Warning
When you use a Configure() method, WCF will ignore the service configuration section for your service in the app or web config file.
You can also add default endpoints to available base addresses by calling the EnableProtocol() method with a specific binding instance. EnableProtocol() will then add default endpoints using the same conventions as described in “Default Endpoints”. For example, the following EnableProtocol() call will produce the same endpoint configurations for the BasicHttpBinding as the default endpoints added by WCF for each HTTP compatible base address:
config.EnableProtocol(new BasicHttpBinding());
Of course, because you provide the binding, you can use EnableProtocol() to better control the default endpoint configurations WCF produces. WCF will still add default endpoints for any base address for which you have not explicitly provided an endpoint or enabled a protocol. Be aware that if you change the name of the binding you specify when enabling a protocol, you create an endpoint that no longer complies with WCF’s default endpoint naming conventions.
Warning
When you enable a protocol, WCF will ignore the default binding, default endpoint behavior and any protocol mappings related to the binding type you’ve specified.
While a Configure() method provides you with a host-agnostic approach to configuring your services programmatically, it also couples your service’s configuration directly to its implementation and therefore its deployment. In simple scenarios, you may find this approach desirable, even labor saving. But as your service-oriented system grows, you will find it necessary to establish a cleaner separation of concerns.
Using a Configure() method carries a price when you have multiple services that all share very similar, if not identical behavior. Obviously, repeating the same programmatic configuration across all of them is hardly advisable. At the same time, resorting to file-based configuration is often undesirable as well and still carries the same duplication and additional long-term maintenance costs across hosting environments.
Although the convention for implementing a Configure() method is public and static, you can still mitigate the duplication of configuration code by relegating the Configure() method to a base class. This allows you to provide a single expression of configuration for a set of related services:
class MyServiceBase
{
   public static void Configure(ServiceConfiguration config)
   {...}
}

class MyService : MyServiceBase,IMyContract
{...}

class MyOtherService : MyServiceBase,IMyOtherContract
{...}
Because your Configure() method must be static, you cannot mark it as virtual in your base class. Implementing a Configure() method in a child class will hide the implementation in your base class. In this case, you should mark as new any customizations added to your child classes and call your base class’ implementation:
class MyService : MyServiceBase,IMyContract
{
   public new static void Configure(ServiceConfiguration config)
   {
      MyServiceBase.Configure(config);
      //Optional additional processing
   }
}

class MyOtherService : MyServiceBase,IMyOtherContract
{
   public new static void Configure(ServiceConfiguration config)
   {
      MyServiceBase.Configure(config);
      //Optional additional processing
   }
}
While alleviating code redundancy, inheritance still does not provide the cleanest separation between your service’s implementation and its configuration.
You should always endeavor to keep the many facets of your services encapsulated from one another to promote reuse, flexibility, testability, maintainability, and most of all, agility. Anything from simple helper classes to a central configuration repository or even Inversion of Control (IoC) approaches can help you to encapsulate your configuration infrastructure code from your service’s implementation.
In conjunction with these options, as your needs evolve, you can further extend your control of programmatic configuration, as well as many other service capabilities, by creating a custom ServiceHost.
Metadata Exchange
By default, the service will not publish its metadata. However, this does not preclude clients that have obtained the metadata via some other mechanism (such as a project reference to a class library containing the contracts) from invoking operations on the service.
Publishing your service’s metadata involves significant effort, as you have to convert CLR types and binding information into WSDL or some other low-level representation, and all that effort does not add any business value. Fortunately, the host already knows everything there is to know about your service and its endpoints, so it can publish the metadata for you if explicitly instructed to do so.
WCF offers two options for publishing a service’s metadata: you can provide the metadata over HTTP-GET, a simple text-based protocol that most platforms support, or you can use a dedicated endpoint.
Metadata over HTTP-GET
WCF can provide the metadata for your service over HTTP-GET automatically; all you need to do is enable it by adding an explicit service behavior. Behaviors are described fully in subsequent chapters. For now, all you need to know is that a behavior is a local aspect of the service, such as whether or not it wants to have the host publish its metadata over HTTP-GET. You can add this behavior administratively or programmatically.
Enabling metadata exchange administratively
Example 1-11 shows a host application config file where both hosted services reference a custom behavior section that enables metadata publishing over HTTP-GET.
Example 1-11. Enabling metadata exchange behavior using a config file
<system.serviceModel>
   <services>
      <service name = "MyService" behaviorConfiguration = "MEXGET">
         <host>
            <baseAddresses>
               <add baseAddress = "http://localhost:8000/"/>
            </baseAddresses>
         </host>
         ...
      </service>
      <service name = "MyOtherService" behaviorConfiguration = "MEXGET">
         <host>
            <baseAddresses>
               <add baseAddress = "http://localhost:8001/"/>
            </baseAddresses>
         </host>
         ...
      </service>
   </services>
   <behaviors>
      <serviceBehaviors>
         <behavior name = "MEXGET">
            <serviceMetadata httpGetEnabled = "true"/>
         </behavior>
      </serviceBehaviors>
   </behaviors>
</system.serviceModel>
By default, the address the clients need to use for HTTP-GET is the registered HTTP base address of the service. If the host is not configured with an HTTP base address, loading the service will throw an exception. You can also specify a different address (or just a URI appended to the HTTP base address) at which to publish the metadata by setting the httpGetUrl property of the serviceMetadata tag:
<behavior name = "MEXGET">
   <serviceMetadata httpGetEnabled = "true" httpGetUrl = "MyMEXAddress"/>
</behavior>
Once you have enabled the metadata exchange over HTTP-GET, you can navigate to the address you configured (the HTTP base address, by default, or an explicit address) using a browser. If all is well, you will get a confirmation page like the one shown in Figure 1-8, letting you know that you have successfully hosted a service. The confirmation page is unrelated to IIS hosting, and you can use a browser to navigate to the service address even when self-hosting.
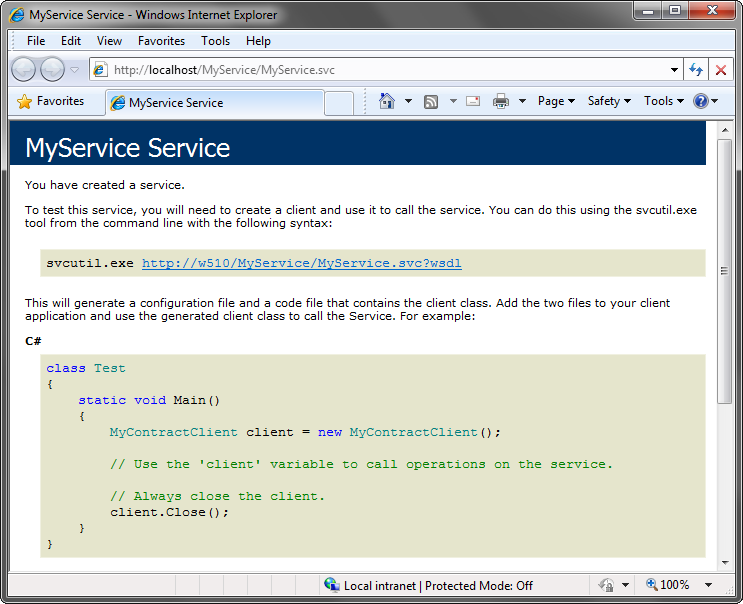
Figure 1-8. A service confirmation page
Enabling metadata exchange programmatically
To enable metadata exchange over HTTP-GET programmatically, you first need to add the behavior to the collection of behaviors the host maintains for the service type. The ServiceHostBase class offers the Description property of the type ServiceDescription:
public abstract class ServiceHostBase : ...
{
   public ServiceDescription Description
   {get;}
   //More members
}
The service description, as its name implies, is the description of the service with all its aspects and behaviors. ServiceDescription contains a property called Behaviors of the type KeyedByTypeCollection<T>, with IServiceBehavior as the generic type parameter:
public class KeyedByTypeCollection<T> : KeyedCollection<Type,T>
{
   public U Find<U>();
   public U Remove<U>();
   //More members
}
public class ServiceDescription
{
   public KeyedByTypeCollection<IServiceBehavior> Behaviors
   {get;}

   //More members
}
IServiceBehavior is the interface that all behavior classes and attributes implement. KeyedByTypeCollection<T> offers the generic method Find<U>(), which returns the requested behavior if it is in the collection, and null otherwise. A given behavior type can be found in the collection at most once.
Example 1-12 shows how to enable the metadata exchange behavior programmatically.
Example 1-12. Enabling the metadata exchange behavior programmatically
ServiceHost host = new ServiceHost(typeof(MyService));

ServiceMetadataBehavior metadataBehavior;
metadataBehavior = host.Description.Behaviors.Find<ServiceMetadataBehavior>();
if(metadataBehavior == null)
{
   Debug.Assert(host.BaseAddresses.Any(baseAddress=>baseAddress.Uri.Scheme ==
                                                                         "http"));

   metadataBehavior = new ServiceMetadataBehavior();
   metadataBehavior.HttpGetEnabled = true;
   host.Description.Behaviors.Add(metadataBehavior);
}

host.Open();
Notice the defensive manner in which the hosting code first verifies that no metadata behavior was provided in the config file, by calling the Find<T>() method of KeyedByTypeCollection<I> and using ServiceMetadataBehavior as the type parameter. ServiceMetadataBehavior is defined in the System.ServiceModel.Description namespace:
public class ServiceMetadataBehavior : IServiceBehavior
{
   public bool HttpGetEnabled
   {get;set;}

   public Uri HttpGetUrl
   {get;set;}
   //More members
}
If the returned behavior is null, it means the config file contains no metadata behavior. In this case, the hosting code creates a new ServiceMetadataBehavior instance, sets HttpGetEnabled to true, and adds it to the behaviors in the service description. By checking defensively for the presence of the behavior first, the hosting code avoids overriding the config file and always allowing the administrator to tweak the behavior or turn it on or off. Note also that the code asserts the presence of an HTTP base address.
The Metadata Exchange Endpoint
Publishing metadata over HTTP-GET is merely a WCF feature; there are no guarantees that other platforms you interact with will support it. There is, however, a standard way of publishing metadata over a special endpoint, called the metadata exchange endpoint (sometimes referred to as the MEX endpoint). Figure 1-9 shows a service with business endpoints and a metadata exchange endpoint. However, you typically do not show the metadata exchange endpoint in your design diagrams.
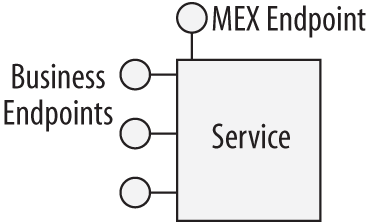
Figure 1-9. The metadata exchange endpoint
The MEX endpoint supports an industry standard for exchanging metadata, represented in WCF by the IMetadataExchange interface:
[ServiceContract(...)]
public interface IMetadataExchange
{
   [OperationContract(...)]
   Message Get(Message request);
   //More members
}
The details of this interface are inconsequential. Like most of these industry standards, it is difficult to implement, but fortunately WCF can have the service host automatically provide the implementation of IMetadataExchange and expose the metadata exchange endpoint. All you need to do is designate the address and the binding to use and add the service metadata behavior. For the bindings, WCF provides dedicated binding transport elements for the HTTP, HTTPS, TCP, and IPC protocols. For the address, you can provide a full address or use any of the registered base addresses. There is no need to enable the HTTP-GET option, but there is no harm in doing so. Example 1-13 shows a service that exposes three MEX endpoints, over HTTP, TCP, and IPC. For demonstration purposes, the TCP and IPC MEX endpoints use relative addresses and the HTTP endpoint uses an absolute address.
Example 1-13. Adding MEX endpoints
<services>
   <service name = "MyService" behaviorConfiguration = "MEX">
      <host>
         <baseAddresses>
            <add baseAddress = "net.tcp://localhost:8001/"/>
            <add baseAddress = "net.pipe://localhost/"/>
         </baseAddresses>
      </host>
      <endpoint
         address  = "MEX"
         binding  = "mexTcpBinding"
         contract = "IMetadataExchange"
      />
      <endpoint
         address  = "MEX"
         binding  = "mexNamedPipeBinding"
         contract = "IMetadataExchange"
      />
      <endpoint
         address  = "http://localhost:8000/MEX"
         binding  = "mexHttpBinding"
         contract = "IMetadataExchange"
      />
      ...
   </service>
</services>
<behaviors>
   <serviceBehaviors>
      <behavior name = "MEX">
         <serviceMetadata/>
      </behavior>
   </serviceBehaviors>
</behaviors>
Note
In Example 1-13, all you need to do to have the host implement the MEX endpoint for your service is include the serviceMetadata tag in the behavior. If you do not reference the behavior, the host will expect your service to implement IMetadataExchange. While this normally adds no value, it is the only way to provide for custom implementation of IMetadataExchange for advanced interoperability needs.
Standard endpoints
In the vast majority of cases, a MEX endpoint always has the same three elements: the contract is always IMetadataExchange, the binding is always the reserved binding element, and the only variable is the address (and even that is typically just the base address). Having developers stipulate these endpoint elements time and time again is excessive. To streamline this and similar infrastructure endpoints, WCF provides pre-canned definitions of several endpoint types, called standard endpoints. WCF offers standard endpoints for metadata exchange, discovery, announcements, workflow, and web. You can use the standard endpoints both in config and programmatically.
You can reference the desired standard endpoint with the kind tag:
<endpoint
   kind = "..."
/>
Whatever is not specified (usually the address or the binding) always defaults to some predefined value, depending on the other fields of the endpoint. Appendix C will take advantage of the standard discovery and announcements endpoints. In the context of this section, you can use the kind value of mexEndpoint to define the MEX endpoint.
For example, suppose you do not specify an address and binding, like so:
<service ...
   <host>
      <baseAddresses>
         <add baseAddress = "http://..."/>
         <add baseAddress = "net.tcp://..."/>
      </baseAddresses>
   </host>

   <endpoint
      kind = "mexEndpoint"
   />
   ...
</service>
WCF will add a MEX endpoint whose address is the HTTP base address. This mandates the presence of an HTTP base address and that no other endpoint is using the base address for its address.
You can also append a URI to the base address:
<endpoint
   kind = "mexEndpoint"
   address = "MEX"
/>
If you specify the binding, WCF will infer the correct base address to use from the binding type, for example:
<service ...
   <host>
      <baseAddresses>
         <add baseAddress = "http://..."/>
         <add baseAddress = "net.tcp://..."/>
      </baseAddresses>
   </host>

   <endpoint
      kind = "mexEndpoint"
      binding = "mexTcpBinding"
   />
   <endpoint
      kind = "mexEndpoint"
      address = "MEX"
      binding = "mexTcpBinding"
   />
   ...
</service>
You can also specify a fully qualified address irrespective of the base address.
Note that WCF is not smart enough to infer the binding to use from the address scheme, meaning the following configuration is invalid:
<!-- Invalid configuration -->
<endpoint
   kind = "mexEndpoint"
   address = "net.tcp://..."
/>
Adding MEX endpoints programmatically
Like any other endpoint, you can only add a metadata exchange endpoint programmatically before opening the host. WCF does not offer a dedicated binding type for the metadata exchange endpoint. Instead, you need to construct a custom binding that uses the matching transport binding element and provide that binding element as a construction parameter to an instance of a custom binding. To streamline this process, use the MetadataExchangeBindings static helper class defined as:
public static class MetadataExchangeBindings
{
   public static Binding CreateMexHttpBinding();
   public static Binding CreateMexNamedPipeBinding();
   public static Binding CreateMexTcpBinding();

   //More members
}
Finally, call the AddServiceEndpoint() method of the host, providing it with the address, the MEX binding, and the IMetadataExchange contract type. Example 1-14 shows the code required to add a MEX endpoint over TCP. Note that before adding the endpoint, you must verify the presence of the metadata behavior.
Example 1-14. Adding a TCP MEX endpoint programmatically
Uri tcpBaseAddress = new Uri("net.tcp://localhost:9000/");
ServiceHost host = new ServiceHost(typeof(MyService),tcpBaseAddress);

ServiceMetadataBehavior metadataBehavior;
metadataBehavior = host.Description.Behaviors.Find<ServiceMetadataBehavior>();
if(metadataBehavior == null)
{
   metadataBehavior = new ServiceMetadataBehavior();
   host.Description.Behaviors.Add(metadataBehavior);
}
Binding binding = MetadataExchangeBindings.CreateMexTcpBinding();
host.AddServiceEndpoint(typeof(IMetadataExchange),binding,"MEX");
host.Open();
You can also add a MEX endpoint using the standard MEX endpoint. To do so, use the type ServiceMetadataEndpoint, defined as:
public class ServiceMetadataEndpoint : ServiceEndpoint
{
   public ServiceMetadataEndpoint();
   public ServiceMetadataEndpoint(EndpointAddress address);
   public ServiceMetadataEndpoint(Binding binding,EndpointAddress address);
}
The default constructor of ServiceMetadataEndpoint defaults to using the HTTP base address and binding. The constructor that takes an endpoint address must receive a fully qualified HTTP or HTTPS address:
ServiceHost host = new ServiceHost(typeof(MyService));
host.Description.Behaviors.Add(new ServiceMetadataBehavior());

EndpointAddress address = new EndpointAddress("http://localhost:8000/MEX");

ServiceEndpoint endpoint = new ServiceMetadataEndpoint(address);
host.AddServiceEndpoint(endpoint);
...
host.Open();
In addition, ServiceMetadataEndpoint will never use the host base addresses.
Streamlining with ServiceHost<T>
You can extend ServiceHost<T> to automate the code in Examples 1-12 and 1-14. ServiceHost<T> offers the EnableMetadataExchange() method, which you can call to both publish metadata over HTTP-GET and add the MEX endpoints:
public class ServiceHost<T> : ServiceHost
{
   public void EnableMetadataExchange(bool enableHttpGet = true);

   public bool HasMexEndpoint
   {get;}
   public void AddAllMexEndPoints();
   //More members
}
The default EnableMetadataExchange() publishes metadata over HTTP-GET, and if no MEX endpoint is available, EnableMetadataExchange() adds a MEX endpoint for each registered base address scheme. Using ServiceHost<T>, 1-12 and 1-14 are reduced to:
ServiceHost<MyService> host = new ServiceHost<MyService>();
host.EnableMetadataExchange();
host.Open();
EnableMetadataExchange() will not override the behavior in the config file if one is present.
ServiceHost<T> offers the HasMexEndpoint Boolean property, which returns true if the service has any MEX endpoint (regardless of transport protocol), and the AddAllMexEndPoints() method, which adds a MEX endpoint for each registered base address of the scheme type of HTTP, TCP, or IPC. Example 1-15 shows the implementation of these methods.
Example 1-15. Implementing EnableMetadataExchange and its supporting methods
public class ServiceHost<T> : ServiceHost
{
   public void EnableMetadataExchange(bool enableHttpGet = true)
   {
      if(State == CommunicationState.Opened)
      {
         throw new InvalidOperationException("Host is already opened");
      }
      ServiceMetadataBehavior metadataBehavior
                          = Description.Behaviors.Find<ServiceMetadataBehavior>();

      if(metadataBehavior == null)
      {
         metadataBehavior = new ServiceMetadataBehavior();
         Description.Behaviors.Add(metadataBehavior);

         if(BaseAddresses.Any(uri=>uri.Scheme == "http"))
         {
            metadataBehavior.HttpGetEnabled = enableHttpGet;
         }
      }
      AddAllMexEndPoints();
   }
   public bool HasMexEndpoint
   {
      get
      {
         return Description.Endpoints.Any(
                                       endpoint=>endpoint.Contract.ContractType ==
                                       typeof(IMetadataExchange));
      }
   }
   public void AddAllMexEndPoints()
   {
      Debug.Assert(HasMexEndpoint == false);

      foreach(Uri baseAddress in BaseAddresses)
      {
         Binding binding = null;

         switch(baseAddress.Scheme)
         {
            case "net.tcp":
            {
               binding = MetadataExchangeBindings.CreateMexTcpBinding();
               break;
            }
            case "net.pipe":
            {...}
            case "http":
            {...}
            case "https":
            {...}
         }
         if(binding != null)
         {
            AddServiceEndpoint(typeof(IMetadataExchange),binding,"MEX");
         }
      }
   }
}
EnableMetadataExchange() verifies that the host has not been opened yet using the State property of the CommunicationObject base class. The HasMexEndpoint property checks whether a given endpoint’s contract is indeed IMetadataExchange. Any() invokes the expression on the endpoints in the collection, returning true when any one of the endpoints in the collection satisfies the predicate (that is, if the invocation of the lambda expression method returned true) and false otherwise. The AddAllMexEndPoints() method iterates over the BaseAddresses collection. For each base address found, it creates a matching MEX binding and adds the MEX endpoint with a MEX URI under the base address.
The Metadata Explorer
The metadata exchange endpoint provides metadata that describes not just contracts and operations, but also information about data contracts, security, transactions, reliability, and faults. To visualize the metadata of a running service, I developed the Metadata Explorer tool, which is available along with the rest of the source code for this book. Figure 1-10 shows the Metadata Explorer reflecting the endpoints of Example 1-7. To use the Metadata Explorer, simply provide it with the HTTP-GET address or the metadata exchange endpoint of the running service, and it will reflect the returned metadata.
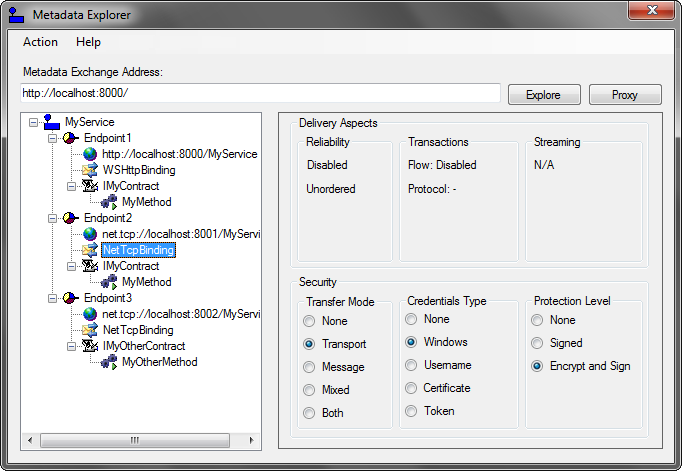
Figure 1-10. The Metadata Explorer
More on Behavior Configuration
The service metadata behavior demonstrated in the previous section is just one of many such ready-to-use behaviors, and you will see many examples in the subsequent chapters. You can configure behaviors at the service level (as with the metadata behavior) or at the endpoint level:
<services>
   <service name = "MyService" behaviorConfiguration = "MyServiceBehavior">
      <endpoint behaviorConfiguration = "MyEndpointBehavior"
         ...
      />
   </service>
</services>
<behaviors>
   <endpointBehaviors>
      <behavior name = "MyEndpointBehavior">
         ...
      </behavior>
   </endpointBehaviors>
   <serviceBehaviors>
      <behavior name = "MyServiceBehavior">
         ...
      </behavior>
   </serviceBehaviors>
</behaviors>
Similar to default bindings, WCF allows for the notion of a default behavior. A default behavior is a nameless behavior (either a service or an endpoint level) that implicitly affects all services or endpoints that do not explicitly reference a behavior configuration. For example, consider the services MyService1, MyService2, and MyService3. To add the service metadata exchange on all services in the application, you can use this config file:
<services>
   <service name = "MyService1">
      ...
   </service>
   <service name = "MyService2">
      ...
   </service>
</services>
<behaviors>
   <serviceBehaviors>
      <behavior>
         <serviceMetadata/>
      </behavior>
   </serviceBehaviors>
</behaviors>
Along with this hosting code:
ServiceHost host1 = new ServiceHost(typeof(MyService1));
ServiceHost host2 = new ServiceHost(typeof(MyService2));
ServiceHost host3 = new ServiceHost(typeof(MyService3));
host3.AddServiceEndpoint(...);

host1.Open();
host2.Open();
host3.Open();
Note that the default behavior affects all services in the application that do not reference a behavior, even those (like MyService3) that do not rely at all on the config file.
You can have at most one default service behavior and one default endpoint behavior.
As with default bindings, the problem with the default behaviors is that a config file may get difficult for humans to parse and understand once you combine default behaviors with named behaviors, as shown in Figure 1-11.

Figure 1-11. Named and default behavior configuration
Because of this difficulty, coupled with the side effect of implicitly affecting even services that do not rely on the config file at all, I recommend exercising caution when utilizing a default behavior. Only use it when you want to affect all services in the application. Never mix and match them with named behaviors, since any service using a named behavior will be exempt from the default behavior. In the interest of readability, most if not all of the behaviors in this book are explicitly named, except in the rare cases in which a default behavior is required.
Client-Side Programming
To invoke operations on a service, a client first needs to import the service contract to the client’s native representation. If the client uses WCF, the common way of invoking operations is to use a proxy. The proxy is a CLR class that exposes a single CLR interface representing the service contract. If the service supports several contracts (over at least as many endpoints), the client needs one proxy per contract type. The proxy provides the same operations as the service’s contract, but also has additional methods for managing the proxy lifecycle and the connection to the service. The proxy completely encapsulates every aspect of the service: its location, its implementation technology and runtime platform, and the communication transport.
Generating the Proxy
You can use Visual Studio to import the service metadata and generate a proxy. If the service is self-hosted outside the solution, first launch the service and then select Add Service Reference from the client project’s context menu. If the service is self-hosted in the same solution, first launch it without the debugger, and then select the Add Service Reference option from the context menu.
If the service is hosted in IIS or WAS, there is no need to prelaunch the service; simply select Add Service Reference from the client project’s context menu, and Visual Studio will bring up the Add Service Reference dialog, shown in Figure 1-12.
Note
For the Add Service Reference option to appear in a project’s context menu, the project must be configured to target .NET Framework 3.0 or later.
In the Add Service Reference dialog box, specify the service metadata address (not the service URL, as the dialog box states) and click Go to view the available service endpoints (not Services, as labeled). Specify a namespace (such as MyService) to contain the generated proxy, then click OK to generate the proxy and update the config file. Use the Discover button to discover WCF services in your own solution, as long as they are hosted either in a website project or in one of the WCF service library project types. In the case of a website project, Visual Studio will either retrieve the metadata from IIS or launch IIS Express. In the case of a WCF service library, WCF will automatically launch its host (WcfSvcHost, described in “The WCF-Provided Test Host”) to get the metadata.
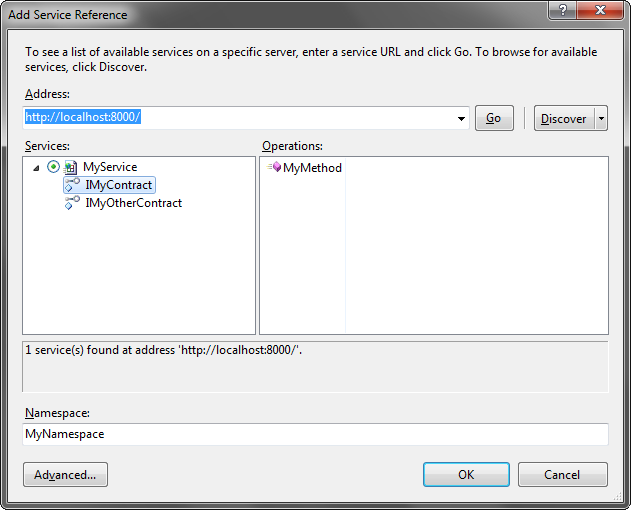
Figure 1-12. Generating a proxy using Visual Studio
Click the Advanced button to bring up the Service Reference Settings dialog box, where you can tweak the proxy generation options (see Figure 1-13).
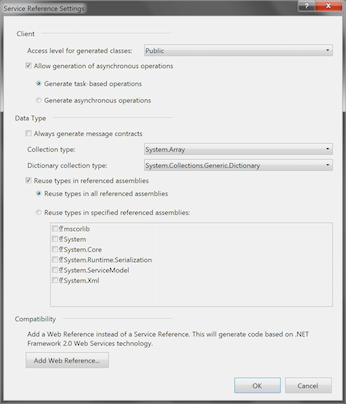
Figure 1-13. Advanced options for the service reference
The more intuitive options let you configure the visibility of the generated proxy and contracts (public or internal), and you can generate message contracts for your data types for advanced interoperability scenarios, where you have to comply with an existing (typically custom) message format. You can also click the Add Web Reference button to convert the reference to an old ASMX web service reference, as long as the service is using the basic binding.
Once you’ve added a reference, your project will have a new folder called Service References. In it, you’ll find a service reference item for each referenced service (see Figure 1-14).
At any point, you can right-click a reference and select Update Service Reference to regenerate the proxy. This is possible because each service reference item also contains a file that records the original metadata address used. You can also select Configure Service Reference to bring up a dialog box similar to the advanced settings dialog box used when adding a reference. The Configure Service Reference dialog box lets you change the service metadata address, as well as the rest of the advanced proxy settings.
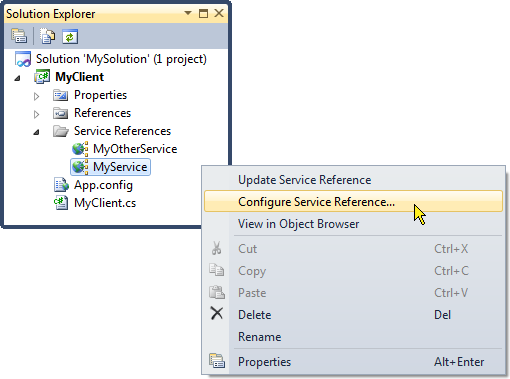
Figure 1-14. The Service References folder
Generating the proxy using SvcUtil
As an alternative to Visual Studio, you can use the SvcUtil.exe command-line utility to import the service metadata and generate a proxy. You need to provide SvcUtil with the metadata exchange address and, optionally, with a proxy filename. The default proxy filename is output.cs, but you can use the /out switch to indicate a different name.
For example, if you’re hosting the service MyService in the WAS and have enabled metadata publishing over HTTP-GET, you can simply run this command line:
SvcUtil http://localhost/MyService/MyService.svc /out:Proxy.cs
With self-hosting, suppose that the self-hosted service has enabled metadata publishing over HTTP-GET on the address
http://localhost:8000/
and has exposed MEX endpoints using these addresses:
http://localhost:8000/MEX
http://localhost:8001/MEX
net.tcp://localhost:8002/MEX
net.pipe://localhost/MyPipe/MEX
After launching the host, you’ll be able to use the following commands to generate the proxy:
SvcUtil http://localhost:8000            /out:Proxy.cs
SvcUtil http://localhost:8000/MEX        /out:Proxy.cs
SvcUtil http://localhost:8001/MEX        /out:Proxy.cs
SvcUtil net.tcp://localhost:8002/MEX     /out:Proxy.cs
SvcUtil net.pipe://localhost/MyPipe/MEX  /out:Proxy.cs
Note
The main advantage of using SvcUtil over Visual Studio is that you can include the command line for generating the proxy as a pre-build event.
SvcUtil offers numerous command-line switches that correspond to the options in the Visual Studio advanced settings dialog box shown in Figure 1-14.
Regardless of whether you use Visual Studio or SvcUtil to generate the proxy, Example 1-16 shows the imported contract and generated proxy for this service definition:
[ServiceContract(Namespace = "MyNamespace")]
interface IMyContract
{
   [OperationContract]
   void MyMethod();
}
class MyService : IMyContract
{
   public void MyMethod()
   {...}
}
You can safely remove many of the gunk attributes the tools generate, which merely state the defaults, so that you end up with the cleaned-up proxy shown in Example 1-16.
Example 1-16. Client proxy file
[ServiceContract(Namespace = "MyNamespace")]
interface IMyContract
{
   [OperationContract]
   void MyMethod();
}

class MyContractClient : ClientBase<IMyContract>,IMyContract
{
   public MyContractClient()
   {}
   public MyContractClient(string endpointName) : base(endpointName)
   {}
   public MyContractClient(Binding binding,EndpointAddress remoteAddress) :
                                                       base(binding,remoteAddress)
   {}

   /* Additional constructors */

   public void MyMethod()
   {
      Channel.MyMethod();
   }
}
Note
You can also instruct SvcUtil to forgo generating the proxy and only generate the service and data contracts for your service by specifying the /servicecontract switch.
The most glaring aspect of the proxy class is that it has no reference to the service-implementing class, only to the contract exposed by the service. You can use the proxy in conjunction with a client-side config file that provides the address and the binding, or you can use it without a config file. Note that each proxy instance points at exactly one endpoint. The endpoint to interact with is provided to the proxy at construction time. As mentioned previously, if the service-side contract does not provide a namespace, it will default to the http://tempuri.org namespace.
Administrative Client Configuration
The client needs to know where the service is located and must use the same binding as the service, and of course, import the service contract definition. In essence, this is exactly the same information captured in the service’s endpoint. To reflect that, the client config file can contain information about the target endpoints and even uses the same endpoint configuration scheme as the host.
Example 1-17 shows the client configuration file required to interact with a service whose host is configured according to Example 1-6.
Example 1-17. Client config file
<system.serviceModel>
   <client>
      <endpoint name = "MyEndpoint"
         address  = "http://localhost:8000/MyService"
         binding  = "wsHttpBinding"
         contract = "IMyContract"
      />
   </client>
</system.serviceModel>
The client config file may list as many endpoints as the services it deals with support, and the client may use any one of them. Example 1-18 shows the client config file matching the host config file of Example 1-7. There is no relationship between the various endpoints in the client’s config file: they could all be pointing at the same endpoint on the service, at different endpoints on the service, at different endpoints on different services, or any mix and match in between. Note that on the client side, you typically name endpoints with unique names (you will see why shortly). Naming the endpoints on the client side is optional, just as it is optional on the service side, yet on the service side you typically do not name the endpoints, while on the client side, you typically do.
Example 1-18. Client config file with multiple target endpoints
<system.serviceModel>
   <client>
      <endpoint name = "FirstEndpoint"
         address  = "http://localhost:8000/MyService"
         binding  = "wsHttpBinding"
         contract = "IMyContract"
      />
      <endpoint name = "SecondEndpoint"
         address  = "net.tcp://localhost:8001/MyService"
         binding  = "netTcpBinding"
         contract = "IMyContract"
      />
      <endpoint name = "ThirdEndpoint"
         address  = "net.tcp://localhost:8002/MyService"
         binding  = "netTcpBinding"
         contract = "IMyOtherContract"
      />
   </client>
</system.serviceModel>
Binding configuration
You can customize the client-side bindings to match the service binding in a manner identical to the service configuration, as shown in Example 1-19.
Example 1-19. Client-side binding configuration
<system.serviceModel>
   <client>
      <endpoint name = "MyEndpoint"
         address  = "net.tcp://localhost:8000/MyService"
         bindingConfiguration = "TransactionalTCP"
         binding  = "netTcpBinding"
         contract = "IMyContract"
      />
   </client>
   <bindings>
      <netTcpBinding>
         <binding name = "TransactionalTCP"
            transactionFlow = "true"
         />
      </netTcpBinding>
   </bindings>
</system.serviceModel>
The client can rely on a default binding configuration, just as the service does. Note that if the config file contains both client and service sections, the default binding will affect both.
Generating the client config file
When you add a service reference in Visual Studio, it will also try to automatically edit the client’s config file and insert the required client section describing the service’s endpoints in it. In versions of Visual Studio prior to 2012, Visual Studio was not smart enough to infer the cleanest binding values and it would therefore butcher the config file by stating all the default values for the bindings, which effectively rendered the file unreadable. Visual Studio 2012 and later solves this problem by only adding values to the config file for binding properties that are set to nondefault values.
Like Visual Studio, SvcUtil also autogenerates a client-side config file called output.config. You can specify a different config filename using the /config switch:
SvcUtil http://localhost:8002/MyService/out:Proxy.cs /config:App.Config
As with Visual Studio, the SvcUtil with .NET 4.5 is smart enough to only produce configuration values for binding properties that are set to nondefault values. However, unlike with Visual Studio, with SvcUtil you can suppress generating the config file by using the /noconfig switch:
SvcUtil http://localhost:8002/MyService/out:Proxy.cs /noconfig
Although these tools no longer litter the config file with redundant default values, we still recommend never letting SvcUtil or Visual Studio control the config file.
In-proc configuration
With in-proc hosting, the client config file is also the service host config file, and the same file contains both service and client entries, as shown in Example 1-20.
Example 1-20. In-proc hosting config file
<system.serviceModel>
   <services>
      <service name = "MyService">
         <endpoint
            address  = "net.pipe://localhost/MyPipe"
            binding  = "netNamedPipeBinding"
            contract = "IMyContract"
         />
      </service>
   </services>
   <client>
      <endpoint name = "MyEndpoint"
         address  = "net.pipe://localhost/MyPipe"
         binding  = "netNamedPipeBinding"
         contract = "IMyContract"
      />
   </client>
</system.serviceModel>
Note the use of the named pipe binding for in-proc hosting.
The SvcConfigEditor
WCF provides a config file editor called SvcConfigEditor.exe that can edit both host and client configuration files (see Figure 1-15). You can launch the editor from within Visual Studio by right-clicking on the configuration file (for either the client or the host) and selecting Edit WCF Configuration.
Note
If you are using a version of Visual Studio earlier than 2012, you will have to launch the editor first from the Tools menu.
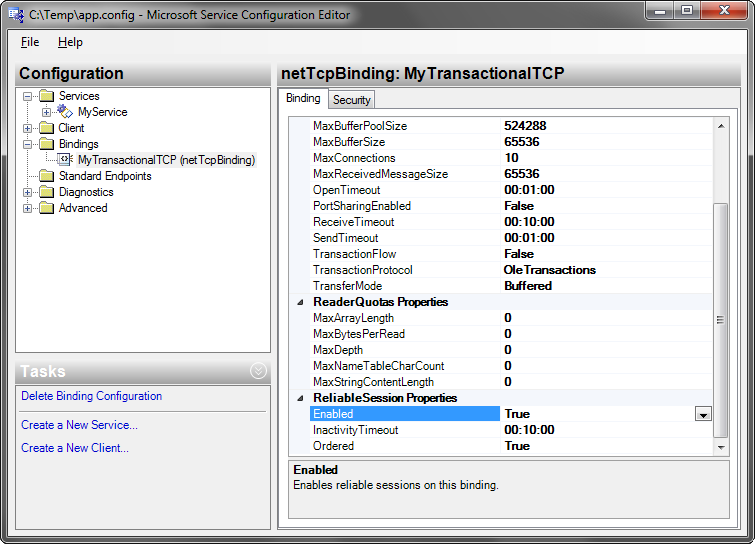
Figure 1-15. SvcConfigEditor is used to edit both host and client config files
I have mixed feelings about SvcConfigEditor. On the one hand, it edits the config files nicely and it saves developers the need to learn the configuration scheme. On the other hand, it does not shield developers from needing to thoroughly understand WCF configuration, and it’s often faster to do the light editing that’s typically required in a config file by hand than it is using Visual Studio.
Working with the proxy
The proxy class derives from the class ClientBase<T>, defined as:
public abstract class ClientBase<T> : ICommunicationObject,IDisposable
{
   protected ClientBase(string endpointName);
   protected ClientBase(Binding binding,EndpointAddress remoteAddress);

   public void Open();
   public void Close();

   protected T Channel
   {get;}

   //Additional members
}
ClientBase<T> accepts a single generic type parameter identifying the service contract that this proxy encapsulates. The Channel property of ClientBase<T> is of that type parameter. As shown in Example 1-16, the generated subclass of ClientBase<T> simply delegates the method call to Channel. Calling the method on the Channel property sends the appropriate WCF message to the service.
To use the proxy, the client first needs to instantiate a proxy object and to provide the constructor with endpoint information: either the endpoint section name from the config file or the endpoint address and binding objects if you’re not using a config file. The client can then use the proxy methods to call the service and when it is done, the client needs to close the proxy instance. For example, given the same definitions as in Examples 1-16 and 1-17, the client constructs the proxy, identifying the endpoint to use from the config file, and then invokes the method and closes the proxy:
MyContractClient proxy = new MyContractClient("MyEndpoint");
proxy.MyMethod();
proxy.Close();
When specifying the endpoint name to the proxy, its constructor also verifies that the contract configured for that endpoint matches the proxy’s type parameter. Because of this verification ability, if exactly one endpoint is defined in the client config file for the type of contract the proxy is using, the client can omit the endpoint name from the proxy’s constructor:
MyContractClient proxy = new MyContractClient();
proxy.MyMethod();
proxy.Close();
The proxy will simply look up that endpoint (named or not in the config file) and use it. However, if you use this technique when multiple (or zero) endpoints are available for the same contract type, the proxy will throw an exception.
Closing the proxy
It is a recommended best practice to always close the proxy when the client is done using it. Closing the proxy releases the connection held toward the service, which is particularly important to do in the presence of a transport session (as discussed later in this chapter). It also helps ensure the threshold for the maximum number of connections on the client’s machine is not reached. Furthermore, as you will see in Chapter 4, closing the proxy terminates the session with the service instance.
Instead of closing the proxy, you can use its Dispose() method. Internally, Dispose() just calls Close(). The advantage of the Dispose() method is that you can use the using statement to call it even in the face of exceptions:
using(MyContractClient proxy = new MyContractClient())
{
   //Any exception here automatically closes the proxy;
}
If the client is declaring the contract directly instead of the concrete proxy class, the client can query for the presence of IDisposable:
IMyContract proxy = new MyContractClient();
proxy.MyMethod();
IDisposable disposable = proxy as IDisposable;
if(disposable != null)
{
   disposable.Dispose();
}
Alternatively, the client can collapse the query inside the using statement:
IMyContract proxy = new MyContractClient();
using(proxy as IDisposable)
{
   proxy.MyMethod();
}
Note
While the results of calling Dispose() and Close() are identical, you will see in Chapter 6 that it is always better to call Close() than to use the using statement.
Call timeout
Each call made by a WCF client must complete within a configurable timeout. If, for whatever reason, the call duration exceeds the timeout, the call is aborted and the client gets a TimeoutException. This behavior is very handy, since it offers an elegant way to deal with deadlocks on the service side or just poor availability. In traditional .NET, the client has to spin a worker thread and have the worker thread call the class (and potentially hang), and the client then monitors some timed-out event that the worker thread has to signal when done. This is obviously a complicated programming model. The advantage of using a proxy for every call is that the proxy can do all this for you. The exact value of the timeout is a property of the binding, and the default timeout is one minute. To provide a different timeout, set the SendTimeout property of the abstract Binding base class:
public abstract class Binding : ...
{
   public TimeSpan SendTimeout
   {get;set;}
   //More members
}
For example, here’s how to configure the WSHttpBinding with a five-minute call timeout:
<client>
   <endpoint
      ...
      binding = "wsHttpBinding"
      bindingConfiguration = "LongTimeout"
      ...
   />
</client>
<bindings>
   <wsHttpBinding>
      <binding name = "LongTimeout" sendTimeout = "00:05:00"/>
   </wsHttpBinding>
</bindings>
Programmatic Client Configuration
Instead of relying on a config file, the client can programmatically construct address and binding objects matching the service endpoint and provide them to the proxy constructor. There is no need to provide the contract, since that was provided in the form of the generic type parameter of the proxy. To represent the address, the client needs to instantiate an EndpointAddress class, defined as:
public class EndpointAddress
{
   public EndpointAddress(string uri);
   //More members
}
Example 1-21 demonstrates this technique, showing the code equivalent of Example 1-17 targeting the service in Example 1-9.
Example 1-21. Programmatic client configuration
Binding wsBinding = new WSHttpBinding();
EndpointAddress endpointAddress = new EndpointAddress(
                                               "http://localhost:8000/MyService");

MyContractClient proxy = new MyContractClient(wsBinding,endpointAddress);
proxy.MyMethod();
proxy.Close();
Similar to using a binding section in a config file, the client can programmatically configure the binding properties:
WSHttpBinding wsBinding = new WSHttpBinding();
wsBinding.SendTimeout = TimeSpan.FromMinutes(5);
wsBinding.TransactionFlow = true;

EndpointAddress endpointAddress = new EndpointAddress
                                  ("http://localhost:8000/MyService");

MyContractClient proxy = new MyContractClient(wsBinding,endpointAddress);
proxy.MyMethod();
proxy.Close();
Again, note the use of the concrete subclass of Binding in order to access binding-specific properties such as the transaction flow.
The WCF-Provided Test Client
Visual Studio ships with a simple general-purpose test client for rudimentary testing that you can use to invoke operations on most services. The test client is called WcfTestClient.exe, and after a normal installation it is found in C:\Program Files\Microsoft Visual Studio <version>\Common7\IDE. You can provide WcfTestClient with a single command-line argument containing the metadata address of the service to test:
WcfTestClient.exe http://localhost:9000/
You can specify any metadata address (be it an HTTP-GET address or a metadata exchange endpoint over HTTP, TCP, or IPC). You can also specify multiple metadata addresses:
WcfTestClient.exe http://localhost:8000/ net.tcp://localhost:9000/MEX
You can also launch the test client without a command-line parameter. Once it’s running, you can add a new service by selecting Add Service from the File menu and specifying the metadata address in the Add Service dialog box. You can also remove a service by right-clicking it in the services tree.
WcfTestClient is a Windows Forms application. The tree control in the left pane contains the tested services and their endpoints. You can drill into an endpoint’s contract and select an operation to display a dedicated tab for that invocation in the pane on the right. For example, for this simple contract and implementation:
[ServiceContract]
interface IMyContract
{
   [OperationContract]
   string MyMethod(int someNumber,string someText);
}
class MyService : IMyContract
{
   public string MyMethod(int someNumber,string someText)
   {
      return "Hello";
   }
}
The method tab will let you provide an integer and a string as operation parameters in the Request section, as shown in Figure 1-16.

Figure 1-16. Using WcfTestClient
When you click the Invoke button, WcfTestClient will dispatch the call to the service and display the returned value or out-parameters in the Response section. In case of an exception, WcfTestClient will display the exception information in a message box and allow you to issue additional calls. All calls are made on new proxy instances. In addition, all calls are made asynchronously so that the UI is kept responsive. However, while the calls are asynchronous, WcfTestClient will let you dispatch only one call at a time.
WcfTestClient functions by silently creating an assembly from a proxy file, complete with a config file, and then loading it for use from a temporary location. If you click the Config File item in the tree on the left, you can actually grab that config file (the same config file generated when adding a service reference) and display the config file in its own tab. You can even edit the config file using SvcConfigEditor.
WcfTestClient allows you to invoke operations with enumerations, composite parameters such as classes or structures (each of which is a composite of other classes or structures), and even collections and arrays of parameters. Simply expand the items in the Request section, set their values from the drop-down lists (e.g., enum values), and invoke the call. If the operation accepts a collection or an array, you will also need to set the length. Again, the Response pane will contain any composite returned value or out-parameters.
As with WcfSvcHost (see the sidebar “The WCF-Provided Test Host”), you can integrate WcfTestClient directly into your Visual Studio solution. First, add a class library project to the solution and delete from it all references, folders, and source files, since you have no need for those. Next, set WcfTestClient.exe as the external start program and provide the metadata address (or addresses) of the tested service (or services). This may be the .svc address of an IIS- or WAS-hosted project or, for that matter, any other metadata address of a host project, whether inside or outside your solution.
Of course, you can combine the use of WcfTestClient and WcfSvcHost in a single step to automatically host a service in a service library and test it:
WcfSvcHost.exe /service:MyService.dll    /config:App.config
               /client:WcfTestClient.exe /clientArg:http://localhost:9000/
However, with WcfSvcHost, specifying the metadata arguments is optional. By default, WcfSvcHost will pipe into the specified client application any metadata addresses it finds in the service config file. You should specify a service’s metadata address explicitly only if the service (or services) does not provide its own metadata, or if you would like the test client to use different addresses. If the service config file contains multiple metadata endpoints for a given service, they will be provided in this precedence order: HTTP, TCP, IPC, HTTP-GET.
You can incorporate these steps into Visual Studio for a seamless hosting and testing experience. To do this, specify WcfSvcHost.exe as the startup program along with the config file and specify WcfTestClient.exe as the client. When you invoke WcfTestClient using /client, closing the test client also terminates the host.
Programmatic Versus Administrative Configuration
The two techniques shown so far for configuring the client and the service complement each other. Administrative configuration gives you the option to change major aspects of the service and the client post-deployment, without the need to rebuild or redeploy. The major downside of administrative configuration is that it is not type-safe; you will discover certain configuration errors only at runtime and WCF configuration files often become unwieldy as a system matures.
Note
Unlike previous versions of Visual Studio, Visual Studio 2012 and later will now validate the majority of the values within the <serviceModel> section of a config file. Visual Studio still does not validate configuration values that contain external references, such as the address property.
Programmatic configuration is useful when the configuration decision either is completely dynamic (i.e., when it is taken at runtime based on the current input or conditions) or is static and never changes (in which case, you might as well hardcode it). For example, if you are interested in hosting in-proc calls only, you can hardcode the use of the NetNamedPipeBinding and its configuration.
Configuration Policy
Generally, for each application, it’s best to select a single configuration approach and stick with it. If you find you must mix different configuration approaches, you should do so consistently or things can become confusing. Defining and conveying a configuration policy for your application is a great way to establish a consistent configuration approach across your entire development effort. Your configuration policy should clearly define if developers may use file-based config, rely on default endpoints, hardcode programmatic defaults or dynamically apply configuration based on runtime conditions.
Your configuration policy should also address when developers should leverage various configuration mechanisms for both client and service. For example, your service configuration policy should clearly state when a Configure() method, programmatic ServiceHost usage, or even a custom ServiceHost implementation is appropriate. And your client configuration policy should suggest when direct channel usage, a proxy-based hierarchy, or even a custom ChannelFactory is necessary.
Since the options are many but the correct choices are few, you should consider folding your configuration policy into the WCF portion of your infrastructure. Doing so allows you to lower the bar of entry for your developer community, wrap best practice usage, enforce policy, and enable extensibility.
WCF Architecture
So far in this chapter, I’ve covered all that is required to set up and consume simple WCF services. However, as you’ll see in the rest of the book, WCF offers immensely valuable support for reliability, transactions, concurrency management, security, and instance activation, all of which rely on the WCF interception-based architecture. Having the client interact with a proxy means that WCF is always present between the service and the client, intercepting the call and performing pre-call and post-call processing. The interception starts when the proxy serializes the call stack frame to a message and sends the message down a chain of channels. The channel is merely an interceptor whose purpose is to perform a specific task. Each client-side channel does pre-call processing of the message. The exact structure and composition of the chain depend mostly on the binding. For example, one of the channels may be responsible for encoding the message (binary, text, or MTOM), another for passing the security call context, another for propagating the client transaction, another for managing the reliable session, another for encrypting the message body (if so configured), and so on. The last channel on the client side is the transport channel, which sends the message over the configured transport to the host.
On the host side, the message goes through another chain of channels that perform host-side pre-call processing of the message. The first channel on the host side is the transport channel, which receives the message from the transport. Subsequent channels perform various tasks, such as decryption of the message body, decoding of the message, joining the propagated transaction, setting the security principal, managing the session, and activating the service instance. The last channel on the host side passes the message to the dispatcher. The dispatcher converts the message to a stack frame and calls the service instance. This sequence is depicted in Figure 1-17.

Figure 1-17. The WCF architecture
The service has no way of knowing that it was not called by a local client. In fact, it was called by a local client—the dispatcher. The interception both on the client and the service sides ensures that the client and the service get the runtime environments they require to operate properly.
The service instance executes the call and returns control to the dispatcher, which then converts the returned values and error information (if any) into a return message. The process is then reversed: the dispatcher passes the message through the host-side channels to perform post-call processing, such as managing the transaction, deactivating the instance, encoding the reply, encrypting it, and so on. The returned message then goes to the transport channel, which sends it to the client-side channels for client-side post-call processing. This process in turn consists of tasks such as decryption, decoding, committing or aborting the transaction, and so on. The last channel passes the message to the proxy, which converts the returned message to a stack frame and returns control to the client.
Most noteworthy is that almost all the points in the architecture provide hooks for extensibility—you can provide custom channels for proprietary interaction, custom behaviors for instance management, custom security behavior, and so on. In fact, the standard facilities that WCF offers are all implemented using the same extensibility model. You will see many examples and uses of extensibility throughout this book.
Host Architecture
It is also important to explore how the transition is made from a technology-neutral, service-oriented interaction to CLR interfaces and classes. The host performs the bridging. Each .NET host process can have many app domains, and each app domain can have zero or more service host instances. Each service host instance is dedicated to a particular service type. Thus, when you create a host instance, you are in effect registering that service host instance with all the endpoints for that type on the host machine that correspond to its base addresses. Each service host instance has zero or more contexts. The context is the innermost execution scope of the service instance. A context is associated with zero or one service instance, meaning it could also be empty (i.e., not associated with any service instance). This architecture is shown in Figure 1-18.
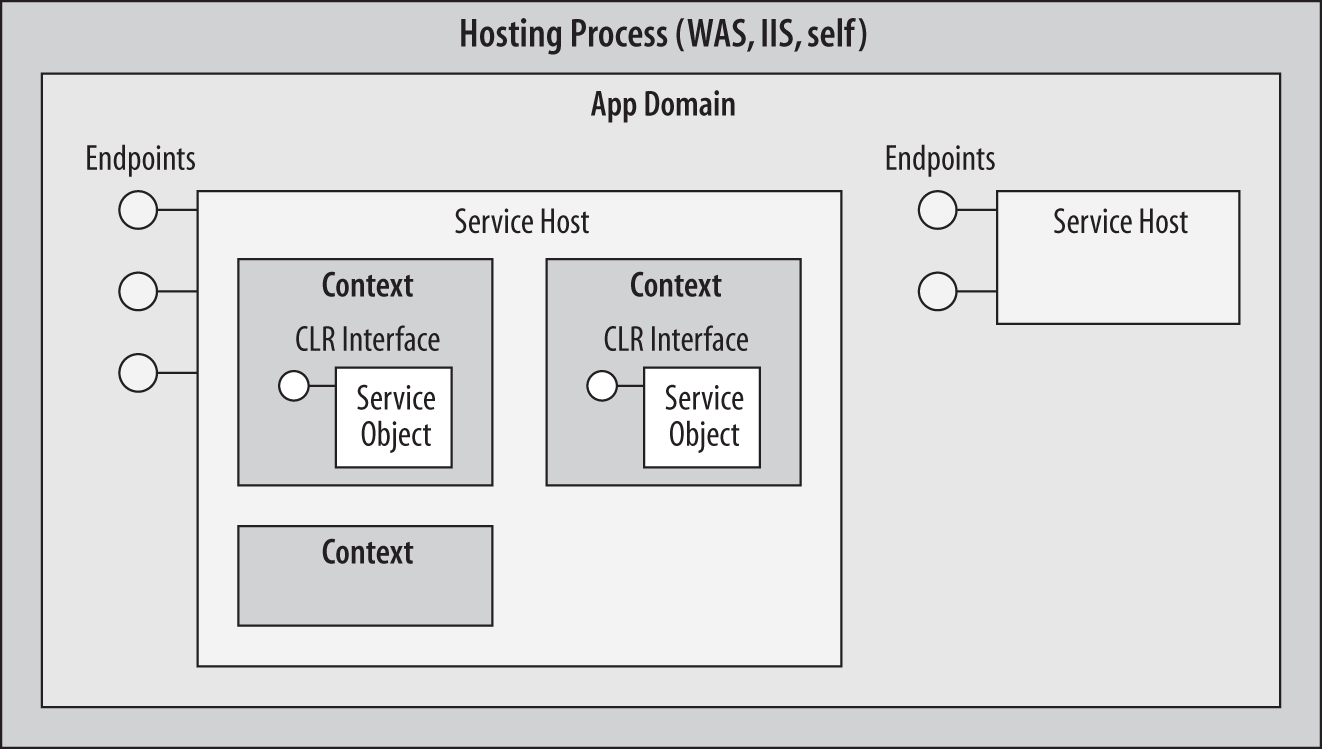
Figure 1-18. The WCF host architecture
Note
The WCF context is conceptually similar to the Enterprise Services context or the .NET context-bound object context.
It is the combined work of the service host and the context that exposes a native CLR type as a service. After the message is passed through the channels, the host maps that message to a new or existing context (and the object instance inside) and lets it process the call.
Working with Channels
You can use channels directly to invoke operations on a service without ever resorting to using a proxy class. The ChannelFactory<T> class (and its supporting types), shown in Example 1-22, allows you to create a proxy on the fly.
Example 1-22. The ChannelFactory<T> class
public class ContractDescription
{
   public Type ContractType
   {get;set;}
   //More members
}

public class ServiceEndpoint
{
   public ServiceEndpoint(ContractDescription contract,Binding binding,
                          EndpointAddress address);
   public EndpointAddress Address
   {get;set;}
   public Binding Binding
   {get;set;}
   public ContractDescription Contract
   {get;}
   //More members
}

public abstract class ChannelFactory : ...
{
   public ServiceEndpoint Endpoint
   {get;}
   //More members
}
public class ChannelFactory<T> : ChannelFactory,...
{
   public ChannelFactory(ServiceEndpoint endpoint);
   public ChannelFactory(string configurationName);
   public ChannelFactory(Binding binding,EndpointAddress endpointAddress);

   public static T CreateChannel(Binding binding,EndpointAddress endpointAddress);
   public T CreateChannel();

   //More members
}
You need to provide the constructor of ChannelFactory<T> with the endpoint. This can be the endpoint name from the client config file, the binding and address objects, or a ServiceEndpoint object. Next, use the CreateChannel() method to obtain a reference to the proxy and use its methods. Finally, close the proxy by either casting it to IDisposable and calling the Dispose() method or casting it to ICommunicationObject and calling the Close() method:
ChannelFactory<IMyContract> factory = new ChannelFactory<IMyContract>();

IMyContract proxy1 = factory.CreateChannel();
using(proxy1 as IDisposable)
{
   proxy1.MyMethod();
}

IMyContract proxy2 = factory.CreateChannel();
proxy2.MyMethod();
ICommunicationObject channel = proxy2 as ICommunicationObject;
Debug.Assert(channel != null);
channel.Close();
You can also use the shorthand static CreateChannel() method to create a proxy given a binding and an address without directly constructing an instance of ChannelFactory<T>:
Binding binding = new NetTcpBinding();
EndpointAddress address = new EndpointAddress("net.tcp://localhost:8000");

IMyContract proxy = ChannelFactory<IMyContract>.CreateChannel(binding,address);
using(proxy as IDisposable)
{
   proxy.MyMethod();
}
The InProcFactory Class
To demonstrate the power of ChannelFactory<T>, consider my static helper class InProcFactory, defined as:
public static class InProcFactory
{
   public static I CreateInstance<S,I>() where I : class
                                         where S : I;
   public static void CloseProxy<I>(I instance) where I : class;
   //More members
}
InProcFactory is designed to streamline and automate in-proc hosting. The CreateInstance() method takes two generic type parameters: the type of the service S and the type of the supported contract I. CreateInstance() constrains S to derive from I. Using InProcFactory is straightforward:
IMyContract proxy = InProcFactory.CreateInstance<MyService,IMyContract>();

proxy.MyMethod();

InProcFactory.CloseProxy(proxy);
It literally takes a service class and hoists it up as a WCF service. This is very similar to the C# new operator, as these two lines are equivalent in their coupling to the service type:
IMyContract proxy = InProcFactory.CreateInstance<MyService,IMyContract>();
IMyContract obj = new MyService();
In the case of C#, the compiler verifies that the type supports the requested interface and then, in effect, casts the interface into the variable. In the absence of compiler support, InProcFactory requires the interface type so it will know which interface type to return.
Implementing InProcFactory<T>
All in-proc calls should use named pipes and should flow all transactions. You can use programmatic configuration to automate the configurations of both the client and the service, and use ChannelFactory<T> to avoid the need for a proxy. Example 1-23 shows the implementation of InProcFactory with some of the code removed for brevity.
Example 1-23. The InProcFactory class
public static class InProcFactory
{
   static readonly string BaseAddress = "net.pipe://localhost/" + Guid.NewGuid();
   static readonly Binding Binding;
   static Dictionary<Type,Tuple<ServiceHost,EndpointAddress>> m_Hosts =
                        new Dictionary<Type,Tuple<ServiceHost,EndpointAddress>>();
   static InProcFactory()
   {
      NetNamedPipeBinding binding = new NetNamedPipeBinding();
      binding.TransactionFlow = true;
      Binding = binding;
      AppDomain.CurrentDomain.ProcessExit += delegate
                                             {
                                        foreach(Tuple<ServiceHost,EndpointAddress>
                                                         record in m_Hosts.Values)
                                                   {
                                                      record.Item1.Close();
                                                   }
                                             };
   }   public static I CreateInstance<S,I>() where I : class
                                         where S : I
   {
      EndpointAddress address = GetAddress<S,I>();
      return ChannelFactory<I>.CreateChannel(Binding,address);
   }
   static EndpointAddress GetAddress<S,I>() where I : class
                                            where S : class,I
   {
      Tuple<ServiceHost,EndpointAddress> record;

      if(m_Hosts.ContainsKey(typeof(S)))
      {
         hostRecord = m_Hosts[typeof(S)];
      }
      else
      {
         ServiceHost host = new ServiceHost(typeof(S));
         string address = BaseAddress + Guid.NewGuid();
         record = new Tuple<ServiceHost,EndpointAddress>(
                                               host,new EndpointAddress(address));
         m_Hosts[typeof(S)] = record;
         host.AddServiceEndpoint(typeof(I),Binding,address);
         host.Open();
      }
      return hostRecord;
   }
   public static void CloseProxy<I>(I instance) where I : class
   {
      ICommunicationObject proxy = instance as ICommunicationObject;
      Debug.Assert(proxy != null);
      proxy.Close();
   }
}
InProcFactory’s static constructor is called once per app domain, allocating in each case a new unique base address using a GUID. This allows you to use InProcFactory multiple times on the same machine, across app domains and processes.
The main challenge facing InProcFactory is that CreateInstance() can be called to instantiate services of every type. For every service type, there should be a single matching host (an instance of ServiceHost). Allocating a host instance for each call is not a good idea. The problem is what CreateInstance() should do when it is asked to instantiate a second object of the same type, like so:
IMyContract proxy1 = InProcFactory.CreateInstance<MyService,IMyContract>();
IMyContract proxy2 = InProcFactory.CreateInstance<MyService,IMyContract>();
The solution is for InProcFactory to internally manage a dictionary that maps service types to a particular host instance and the endpoint address using a tuple. When CreateInstance() is called to create an instance of a particular type, it looks in the dictionary using a helper method called GetAddress(). If the dictionary does not already contain the service type, this helper method creates a host instance for it. If it needs to create a host, GetAddress() programmatically adds an endpoint to that host, using a new GUID as the unique pipe name. GetAddress() stores the new host and its address in the dictionary. CreateInstance() then uses ChannelFactory<T> to create the proxy. In its static constructor, which is called upon the first use of the class, InProcFactory subscribes to the process exit event using an anonymous method to close all hosts when the process shuts down. Finally, to help the clients close the proxy, InProcFactory provides the CloseProxy() method, which queries the proxy to ICommunicationObject and closes it.
The WcfWrapper
If you wish to completely approximate the C# programming model, you can wrap the in-proc factory (and thus, all of WCF) with my helper base class WcfWrapper, shown in Example 1-24.
Example 1-24. The WcfWrapper class
public abstract class WcfWrapper<S,I> : IDisposable,ICommunicationObject
                                                         where I : class
                                                         where S : class,I
{
   protected I Proxy
   {get;private set;}

   protected WcfWrapper()
   {
      Proxy = InProcFactory.CreateInstance<S,I>();
   }

   public void Dispose()
   {
      Close();
   }

   public void Close()
   {
      InProcFactory.CloseProxy(Proxy);
   }

   void ICommunicationObject.Close()
   {
      (Proxy as ICommunicationObject).Close();
   }
   //Rest of ICommunicationObject
}
Using WcfWrapper<S,I> is simple—derive from it and the contract and implement the operations on the contract by delegating to the Proxy property. For example, for this service definition:
[ServiceContract]
interface IMyContract{
   [OperationContract]
   string MyMethod();
}

class MyService : IMyContract
{
   public string MyMethod()
   {...}
}
This is the matching wrapper class:
class MyClass : WcfWrapper<MyService,IMyContract>,IMyContract
{
   public string MyMethod()
   {
      return Proxy.MyMethod();
   }
}
Using the wrapper class is now indistinguishable from regular C# code and yet all the calls are actually WCF calls:
MyClass obj = new MyClass();
string text = obj.MyMethod();
obj.Close();
Appendix A further discusses the profound implications of this programming model.
Transport-Level Sessions
In traditional programming, an object is indirectly associated with a client by virtue of the call stack. That is, each object is tied to a particular client. But in WCF, since the client sends a message to the service and never invokes the instance directly, such an association is not possible. The analogous concept in WCF is the transport session, which ensures that all messages coming from a particular client are sent to the same transport channel on the host. It is as if the client and the channel maintain a logical session at the transport level (hence the name). As in traditional programming, with a transport session, the calls (or rather, the messages) are strictly processed in the order in which they were received. The transport session is unrelated to any application-level session the client may or may not have with the instance itself. Note that using a transport session is optional and is largely an aspect of the binding configuration, so the client and the service may or may not have a transport session. The transport session is one of the key fundamental concepts of WCF, affecting reliability, instance management, error management, synchronization, transactions, and security.
A transport session relies on WCF’s ability to identify the client and correlate all its messages to a particular channel. Thus, there has to be something in the transport or in the message that identifies the client.
Transport Session and Binding
The TCP, IPC and WebSocket bindings are connection-full. That is, all calls from the client come on the same connection or pipe, enabling WCF to easily identify the client. However, HTTP is, by definition, a connectionless protocol, and every message from the client comes on a new connection. Consequently, when using the basic binding, there is never a transport session. Or, more precisely, there is a transport session, but it lasts for only one call and after the call returns, the channel is destroyed along with the connection. The next call will come on a new connection and will be routed to a new channel. The WS binding can improve on this situation by emulating a transport session. If configured to do so, it will insert a unique ID identifying the client in each message and will keep sending this ID for every call from that client. You will see more about this ID in Chapter 4.
Transport Session Termination
Typically, the transport session will end once the client closes the proxy. However, in case the client terminates ungracefully or in case of a communication problem, each transport session also has an idle-time timeout that defaults to 10 minutes. The transport session will automatically terminate after 10 minutes of inactivity from the client, even if the client still intends to use the proxy. If the client tries to use its proxy after the transport session has been terminated due to the idle timeout, it will get a CommunicationObjectFaultedException. You can configure different timeouts on the client and the service by setting different values in the binding. The bindings that support a transport-level session provide the ReliableSession property, which can be of the type ReliableSession or OptionalReliableSession. The ReliableSession class offers the InactivityTimeout property, which you can use to configure a new idle-time timeout:
public class ReliableSession
{
   public TimeSpan InactivityTimeout
   {get;set;}
   //More members
}
public class OptionalReliableSession : ReliableSession
{...}
public class NetTcpBinding : Binding,...
{
   public OptionalReliableSession ReliableSession
   {get;set}
   //More members
}
public abstract class WSHttpBindingBase : ...
{
   public OptionalReliableSession ReliableSession
   {get;set}
   //More members
}
public class WSHttpBinding : WSHttpBindingBase,...
{...}
For example, here is the code required to programmatically configure an idle timeout of 25 minutes for the TCP binding:
NetTcpBinding tcpSessionBinding = new NetTcpBinding();
tcpSessionBinding.ReliableSession.InactivityTimeout = TimeSpan.FromMinutes(25);
Here is the equivalent configuration setting using a config file:
<netTcpBinding>
   <binding name = "TCPSession">
      <reliableSession inactivityTimeout = "00:25:00"/>
   </binding>
</netTcpBinding>
If both the client and the service configure a timeout, the shorter timeout prevails.
Note
There is another esoteric service-side configuration for session termination: the ServiceBehavior attribute offers an advanced option for managing session shutdown via the AutomaticSessionShutdown property. This property is intended for optimizing certain callback scenarios and you can safely ignore it in most cases. In a nutshell, AutomaticSessionShutdown defaults to true so that when the client closes the proxy, the session is terminated. Setting it to false causes the session to continue until the service explicitly closes its sending channel. When this attribute is set to false, the client of a duplex session (discussed in Chapter 5) must manually close the output session on the duplex client channel; otherwise, the client will hang waiting for the session to terminate.
Reliability
WCF and other service-oriented technologies make a distinction between transport reliability and message reliability. Transport reliability (such as that offered by TCP/IP) offers point-to-point guaranteed delivery at the network packet level and also guarantees in-order delivery of the packets. Transport reliability is not resilient to dropped network connections or a variety of other communication problems.
Message reliability, as the name implies, deals with reliability at the message level, independent of how many packets are required to deliver the message. Message reliability provides end-to-end guaranteed delivery and order of messages, regardless of how many intermediaries are involved and how many network hops are required to deliver the message from the client to the service. Message reliability is based on an industry standard for reliable message-based communication that maintains a session at the transport level and supports retries in case of transport failures, such as dropping a wireless connection. It automatically deals with congestion, message buffering, and flow control, and can adjust the flow of messages accordingly. Message reliability also deals with connection management, verifying connections and cleaning them up when they are no longer needed.
Note
Message reliability does not guarantee message delivery. It provides only a guarantee that if the message does not reach its destination, the sender will know about it.
Bindings, Reliability, and Ordered Messages
In WCF, you control and configure reliability in the binding. A particular binding can support or not support reliable messaging and, if it’s supported, you can enable or disable it. Whether a binding supports reliability is driven by the target scenario for that particular binding. Table 1-2 summarizes the relationship between binding, reliability, and ordered delivery for the five recommended bindings and lists the respective default values.
| Binding name | Supports reliability | Default reliability | Supports ordered delivery | Default ordered delivery |
|---|---|---|---|---|
BasicHttpBinding |
No | N/A | No | N/A |
NetTcpBinding |
Yes | Off | Yes | On |
NetNamedPipeBinding |
No | N/A (On) | Yes | N/A (On) |
WSHttpBinding |
Yes | Off | Yes | On |
NetMsmqBinding |
No | N/A | No | N/A |
The BasicHttpBinding and the NetMsmqBinding do not support reliability. The BasicHttpBinding is oriented toward the legacy ASMX web services world, which does not support reliability, while the NetMsmqBinding is for disconnected calls and has its own notion of reliability (discussed in Chapter 9).
Reliability is disabled by default, but you can enable it in the NetTcpBinding, and the WSHttpBinding bindings. Finally, the NetNamedPipeBinding is considered inherently reliable because it always has exactly one hop from the client to the service.
Message reliability also provides ordered delivery assurance, allowing execution of messages in the order in which they were sent, not the order in which they were delivered. In addition, it guarantees that each message is delivered exactly once.
WCF lets you enable reliability but not ordered delivery, in which case messages are executed in the order in which they were received. The default for all bindings that support reliability is that when reliability is enabled, ordered delivery is enabled as well. Ordered delivery requires reliability. Thus, if ordered delivery is turned on but reliability is turned off, the calls will not be delivered in order.
Configuring Reliability
You can configure reliability (and ordered delivery) both programmatically and administratively. When you enable reliability, you must do so on both the client and the service host sides, or the client will not be able to communicate with the service. You can only configure reliability for the bindings that support it. Example 1-25 shows a service-side config file that uses a binding configuration section to enable reliability when using the TCP binding.
Example 1-25. Enabling reliability with the TCP binding
<system.serviceModel>
   <services>
      <service name = "MyService">
         <endpoint
            address  = "net.tcp://localhost:8000/MyService"
            binding  = "netTcpBinding"
            bindingConfiguration = "ReliableTCP"
            contract = "IMyContract"
         />
      </service>
   </services>
   <bindings>
      <netTcpBinding>
         <binding name = "ReliableTCP">
            <reliableSession enabled = "true"/>
         </binding>
      </netTcpBinding>
   </bindings>
</system.serviceModel>
When it comes to programmatic configuration, the TCP and WS bindings both offer a construction parameter and a property for configuring reliability. For example, the NetTcpBinding binding accepts a Boolean construction parameter for enabling reliability:
public class NetTcpBinding : Binding,...
{
   public NetTcpBinding(...,bool reliableSessionEnabled);
   //More members
}
You can also enable reliability post-construction by accessing the ReliableSession property:
public class ReliableSession
{
   public bool Ordered
   {get;set;}
   //More members
}
public class OptionalReliableSession : ReliableSession
{
   public bool Enabled
   {get;set;}
   //More members
}
public class NetTcpBinding : Binding,...
{
   public OptionalReliableSession ReliableSession
   {get;}
   //More members
}
Requiring Ordered Delivery
In theory, the service code and the contract definition should be independent of the binding used and its properties. The service should not care about the binding, and nothing in the service code pertains to the binding used. The service should be able to work with any aspect of the configured binding. In practice, however, the service implementation or the contract itself may depend on ordered delivery of the messages. To enable the contract or service developer to constrain the allowed bindings, WCF defines the DeliveryRequirementsAttribute:
[AttributeUsage(AttributeTargets.Class|AttributeTargets.Interface,
                AllowMultiple = true)]
public sealed class DeliveryRequirementsAttribute : Attribute,...
{
   public Type TargetContract
   {get;set;}
   public bool RequireOrderedDelivery
   {get;set;}

   //More members
}
You can apply the DeliveryRequirements attribute at the service level, affecting all endpoints of the service, or only at those endpoints that expose a particular contract. When applied at the service level, requiring ordered delivery is an implementation decision. For example, to demand that all endpoints of the service, regardless of contracts, have ordered delivery enabled, apply the attribute directly on the service class:
[DeliveryRequirements(RequireOrderedDelivery = true)]
class MyService : IMyContract,IMyOtherContract
{...}
By setting the TargetContract property, you can demand that only endpoints of the service that support the specified contract be constrained to have reliable ordered delivery:
[DeliveryRequirements(TargetContract = typeof(IMyContract),
                      RequireOrderedDelivery = true)]
class MyService : IMyContract,IMyOtherContract
{...}
You can also use the attribute at the contract level, affecting all services that support that contract. When applied at the contract level, requiring ordered delivery is a design decision. Enforcing the constraint is done at service load time. If an endpoint has a binding that does not support reliability, supports reliability but has it disabled, or has reliability enabled but ordered delivery disabled, loading the service will fail with an InvalidOperationException.
By applying the DeliveryRequirements attribute on the contract interface, you place the constraint on all services that support it:
[ServiceContract]
[DeliveryRequirements(RequireOrderedDelivery = true)]
interface IMyContract
{...}

class MyService : IMyContract
{...}

class MyOtherService : IMyContract
{...}
The default value of RequireOrderedDelivery is false, so merely applying the attribute has no effect. For example, these statements are equivalent:
[ServiceContract]
interface IMyContract
{...}

[ServiceContract]
[DeliveryRequirements]
interface IMyContract
{...}

[ServiceContract]
[DeliveryRequirements(RequireOrderedDelivery = false)]
interface IMyContract
{...}
Get Programming WCF Services, 4th Edition now with the O’Reilly learning platform.
O’Reilly members experience books, live events, courses curated by job role, and more from O’Reilly and nearly 200 top publishers.

