Chapter 4. Iterate: Evolve the Prototype
So now that we have a working voice-enabled piece of hardware for us to work with, we’ll want to start evolving it and customizing it to fit our use cases. First, let’s get our feet wet and start with a basic “Hello, World” Amazon Alexa skill. Once we have that in place, you will have a better understanding of how to create skills, how to use intents and slots, as well as how to handle sessions, exceptions, and the various request types (e.g., LaunchRequest, IntentRequest, and SessionEndedRequest).
Why Iterate?
The evolution of a product isn’t a single cycle occurrence. This is something that requires constant attention and fine-tuning. Development cycles should be kept short and nimble. This allows us to rule out issues fast, which is where the common mantra of “fail fast” comes from. Issues can arise from various points along the product lifecycle, from technical issues to user experience.
At this point, you’re simply experimenting with the prototype we’re building in these pages and learning as you go. But in the long run, you will want to plan for maintenance even if you’re just building a device for yourself rather than something for market. We will touch on basic over-the-air firmware updates to cloud-based services updates in Chapter 6. This will help you set up efficient methods for updating your voice-enabled IoT device long into the future.
Intents, Utterances, Slots, and Invocation Names
Before we dive into creating our API, we need to learn some common natural language processing (NLP) terms. These terms are fairly universal across the current spectrum of NLP systems and form the foundational guide rails for natural language understanding (NLU) and the engines that drive them.
There are really four core terms you must be aware of: intents, utterances, slots (also known as entities), and invocation names. We touched upon some of them in Chapter 1, but they bear repeating. Let’s break them down one by one:
- Intents
These are the actions users/bots can take within your skill. For example, if there is a skill for handling spa reservations, you would have intents that take care of date requests or filtering services. The naming convention for intents typically includes the word “Intent” in the name. For example,
ReservationDateIntentorServiceTypeIntent. It’s not a hard-and-fast rule, but it does help to self-document code, as you will see in our examples. A skill’s intents are created using an intent schema. An intent schema outlines all of the intents and slots (defined momentarily) that a given skill will handle. We will see more about intent schemas when we create our skill in the Amazon Developer Portal later in this chapter.- Utterances
The words or phrases that will invoke a given intent. Think of utterances as the words users will say while using a particular skill. For instance, consider our reservation skill example. We would expect users to interact with our skill by saying phrases like “I’d like to book a spa appointment.” That entire phrase is considered a single utterance, which we would then map to a single intent—we might call it the
InitiateReservationIntent, for example. It’s important to note that not every user will interact with your skill in the same way. For example, when scheduling an appointment, some users might say “I’d like to book a spa appointment,” while others might say “Book me a spa appointment,” or “I’d like to reserve a spa appointment.” Thus, as developers, we need to anticipate and map all of the possible utterances (the “domain” of phrases) we believe users might speak to initiate a single action. In other words, we need to map multiple utterances to a given intent. This will help to ensure we trigger the correct intent, regardless of how users decide to phrase their request (note: this is not always easy and will take time to evolve as you learn how users interact with your skill. Local dialects, intonations, and accents can also affect how your skill will react to user utterances).- Slots (entities)
These are the set (domain) of allowable terms for a given word within an utterance. For example, in our
InitiateReservationIntent, we could create multiple utterances similar to the following:- I’d like to book a spa appointment
- I’d like to reserve a spa appointment
- Book me a spa appointment
- Reserve me a spa appointment
While this is perfectly acceptable, slots simplify the utterance creation process. Let’s revise the preceding list using slots:
- I’d like to
{verbType}a spa appointment {verbType}me a spa appointment
As you can see, using slots trimmed our utterance list down to just two phrases. While that may not seem significant, it is extremely beneficial in a more practical, real-world skill example where you might have 15–30 utterances for a given intent. In this example, the
{verbType}is a named slot containing all of the possible values we expect to be spoken by our users. For example, in the case ofInitiateReservationIntent, the slot values for{verbType}arebookandreserve. The key takeaway here is that slots can greatly simplify your utterance development and maintenance and should be used whenever possible.- Invocation name
An invocation name is the phrase used to invoke your skill (Amazon requires invocation names to be at least two words). For our spa reservation skill, we might use “My Spa” as the invocation name. Users of our skill would invoke it by saying, “Alexa, ask My Spa to book me a spa appointment.”
Note
Because we are working with AVS and ASK in this chapter, it’s important to understand that an Alexa skill is simply a set of intents (or actions) around an idea or concept. Think of an Alexa skill as the voice equivalent of a smartphone app. The equivalent to a skill on the Google Home platform is referred to as an action, which can obviously create some confusion. Just remember to learn the terms and definitions of the platform you are working with before diving in—it will save you some headaches later on.
Amazon Alexa Requests and Responses
Users interact with your Alexa Skill via requests and responses. These objects are sent and received in the well-known JSON format. Amazon updates these objects periodically, as new features are added to the Alexa platform. For that reason, we won’t break down each element of the request and response objects, but we want to outline the top-level request types before we move forward. The primary request types are as follows:
LaunchRequestSent when the user invokes a skill without providing a specific intent. For example, “Alexa, open my skill.”
IntentRequestSent when a user makes a request matching one of the intents within your skill intent schema.
SessionEndedRequestSent when the skill session ends for any reason other than your code closing the session.
There is only one type of response object that can be returned from a skill, but the elements contained within the response may vary depending upon your particular skill. Both the request and response objects have mandatory and optional elements. Amazon has documented each element on the Amazon Developer Portal and we recommend reviewing the Custom Skill reference to familiarize yourself with JSON format.
Create Your Own API
First things first: you will need to pick your poison as it relates to web stacks. Do you love Node.js? Java? Python? C#? Have no idea what we’re talking about here? No problem, we’ll pick one for you and you can go on to experiment from there in case your use case is better suited to a different language. We will demonstrate how you can create a quick web API that’s capable of handling Alexa requests in Node.js. While you can technically host these almost anywhere, we will focus our attention on Amazon Web Services (AWS), specifically Amazon’s lambda functions using the alexa-sdk node module.
Alexa “Hello, World” in Node.js
OK, it’s time to dive in. Amazon makes it very simple to get a skill up and running. We’ll follow a step-by-step process, similar to the one we used to create our Raspberry Pi AVS solution. First, we’ll configure and create our node skill within the AWS console. Next, we will set up a new skill in the Developer Portal (just like we did in Chapter 3). Finally, we’ll test our skill using both the Developer Portal and an Amazon Dot, Echo, or Show. Let’s get started!
Creating your Node.js Skill in AWS
-
Open a browser and go to the Amazon AWS console.
-
From the main navigation menu, click the My Account menu and select AWS Management Console (see Figure 4-1).
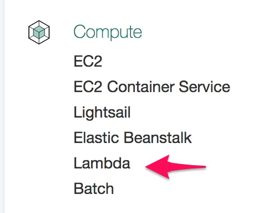
Figure 4-1. Accessing the AWS Management Console
-
Using the Amazon Developer Portal login you created in Chapter 3, log in to AWS. If successful, you will be redirected to the AWS Services page. There are a bunch of items listed on this page but we only need to focus on one. Under the Compute category, select Lambda (Figure 4-2).
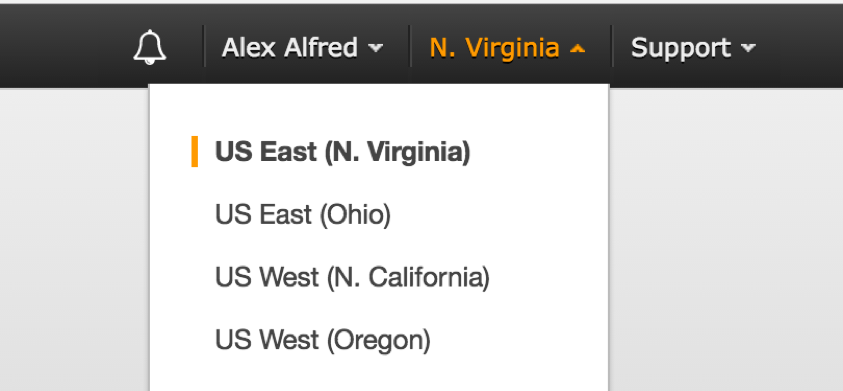
Figure 4-2. Selecting the Lambda service
You will be redirected to the AWS Lambda page. Click the region drop-down in the upper-right corner of the console and select US East (N. Virginia); see Figure 4-3. This is currently the only region that supports hosting of Alexa Skills.
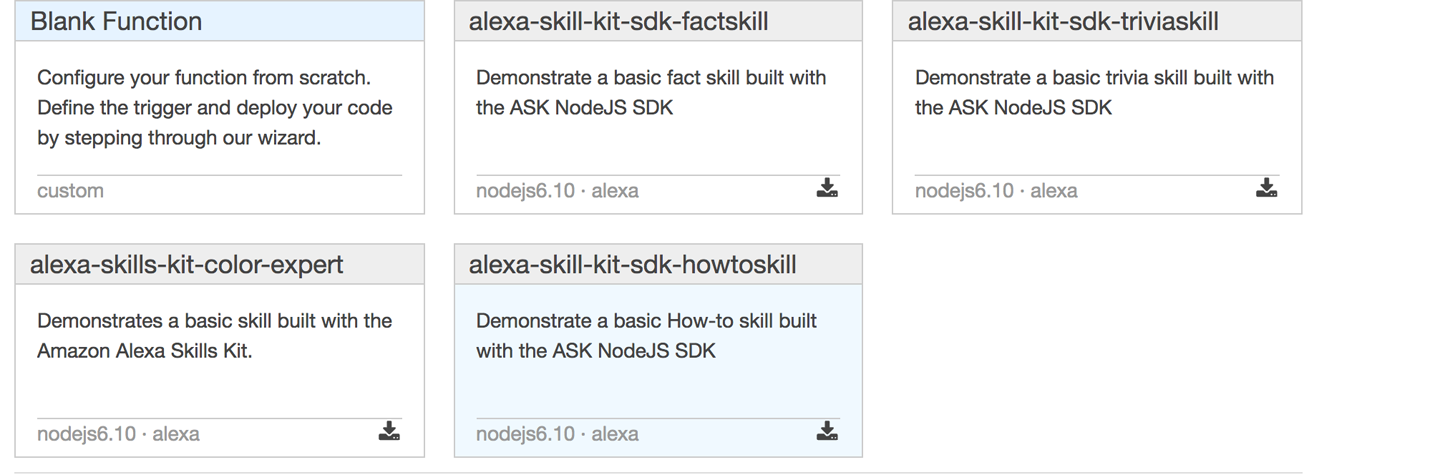
Figure 4-3. Selecting your region
-
Next, click the Get Started button. This will direct you to the Lambda blueprint page. You will see Select Runtime and Filter options. If you click the Select Runtime option, you will see that Amazon supports multiple flavors of Node.js as well as Python (and ASP.NET core, although it’s not listed in the runtime drop-down). For our example, select Node.js 6.x.
-
Next, in the Filter text box, enter “alexa” (without the quotes). This will filter the skill templates to just Alexa-based options.
-
Amazon provides a great list of Alexa Skill templates and we encourage you to take each of them for a test drive. They provide great examples of how you can create a variety of Alexa skills. For our example, we will start with the “alexa-skill-kit-sdk-howtoskill” template (Figure 4-4). Using this template ensures that the Alexa-SDK library is installed as part of the template. Having the SDK preinstalled simplifies the remaining steps.
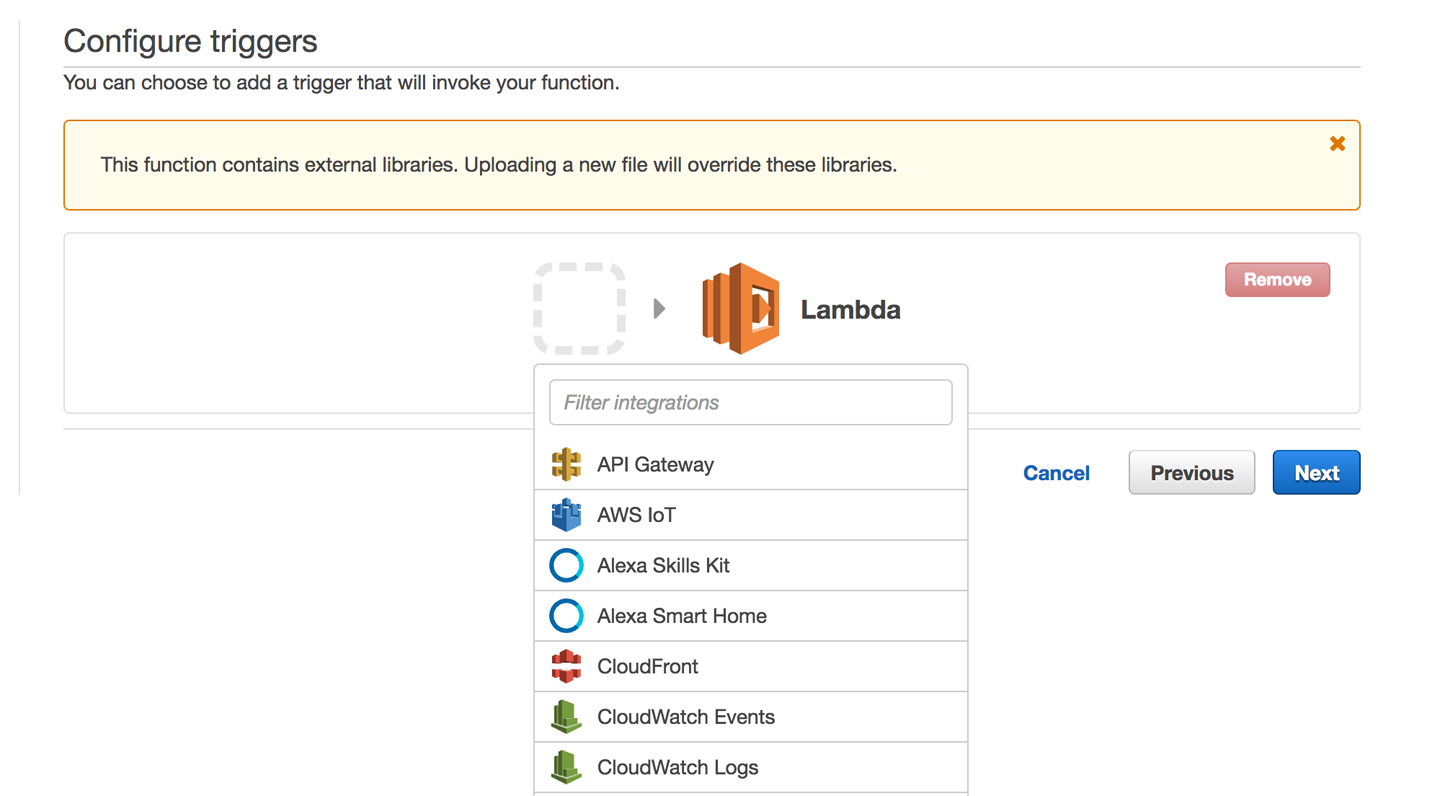
Figure 4-4. Selecting an Alexa SDK template
-
Adding the template will direct you to the “Configure triggers” page. From the pop-up window, click the dash-enclosed box to reveal a trigger list. Select Alexa Skills Kit and then click Next (Figure 4-5).
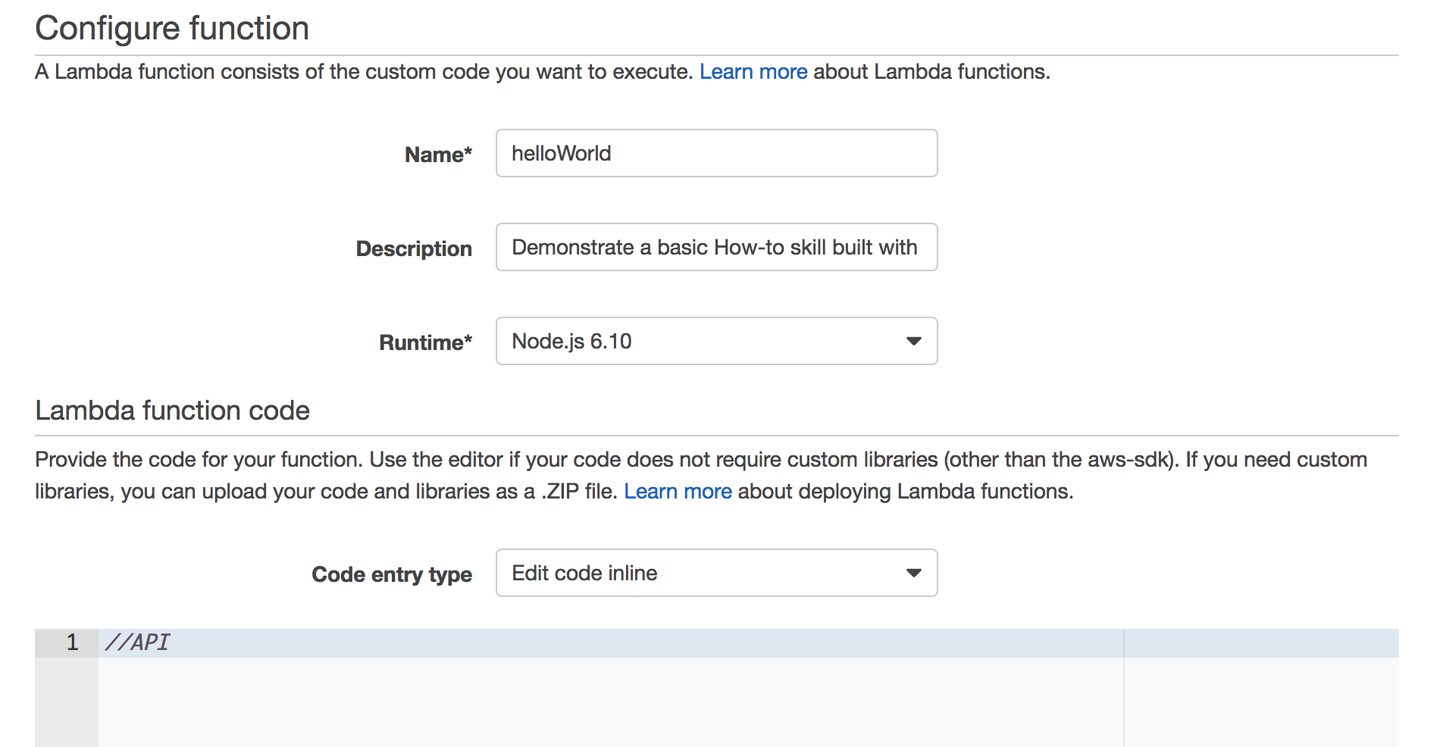
Figure 4-5. Selecting a trigger for our API
-
You should now be at the “Configure function” page. This is where we will name and code our hello world skill function. Let’s call our skill “Hello, World.” The description is optional, but make sure the runtime is set to Node.js 6.xx (Figure 4-6). Finally, select all of the Node.js code in the editor window and delete it. In the editor window, add a simple remark as a placeholder for our future API.
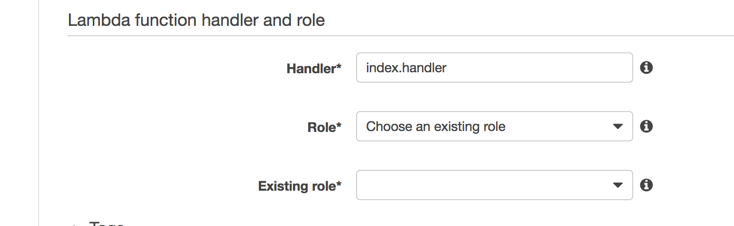
Figure 4-6. AWS Lambda function configuration form
Note
You might be wondering why we deleted all that code. We used this template to ensure the Alexa-SDK is pre-installed, however, we want to create our own custom skill. Consequently, we need to remove templated code and replace it with our own, which we will do shortly. If you’re feeling more adventurous and would like to start with the “Blank Template,” you will need to upload a ZIP file with your source and the alexa-sdk node modules rather than simply starting in the code editor. For further details, visit the latest documentation on the topic.
-
Scroll down to the “Lambda function handler and role” section. The default value for Handler does not need to be changed for our example. However, we do need to update the Role value. Using the Role drop-down box, select “Create custom role” (Figure 4-7).
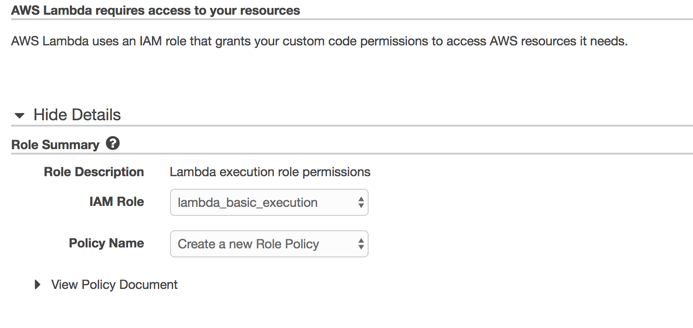
Figure 4-7. Specifying function handler and role
-
Creating a custom role will open IAM Role page (Figure 4-8). You can accept all the default settings and just select Allow. This will close the IAM page and update the Role on your function page.
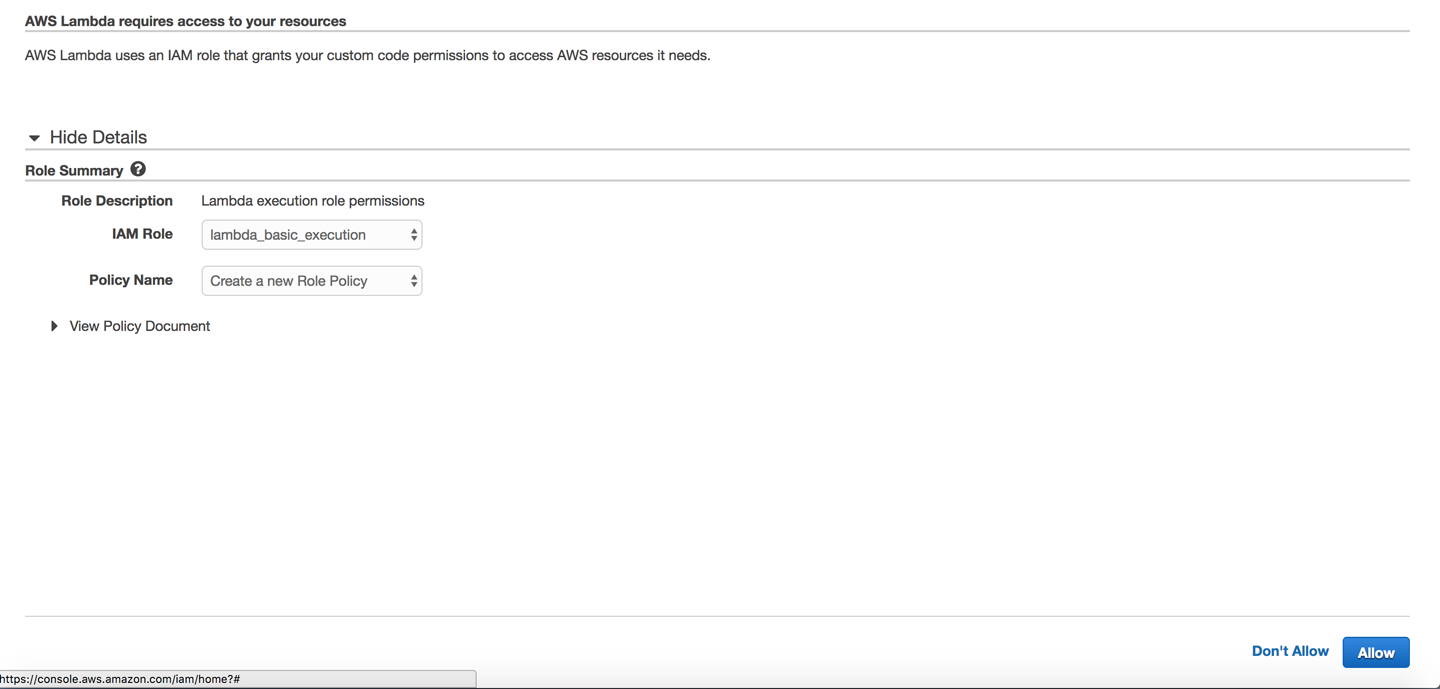
Figure 4-8. Setting up a new IAM role
-
Now that we have the existing role updated, our function will be able to execute. You can leave all of the remaining defaults and select Next (Figure 4-9).
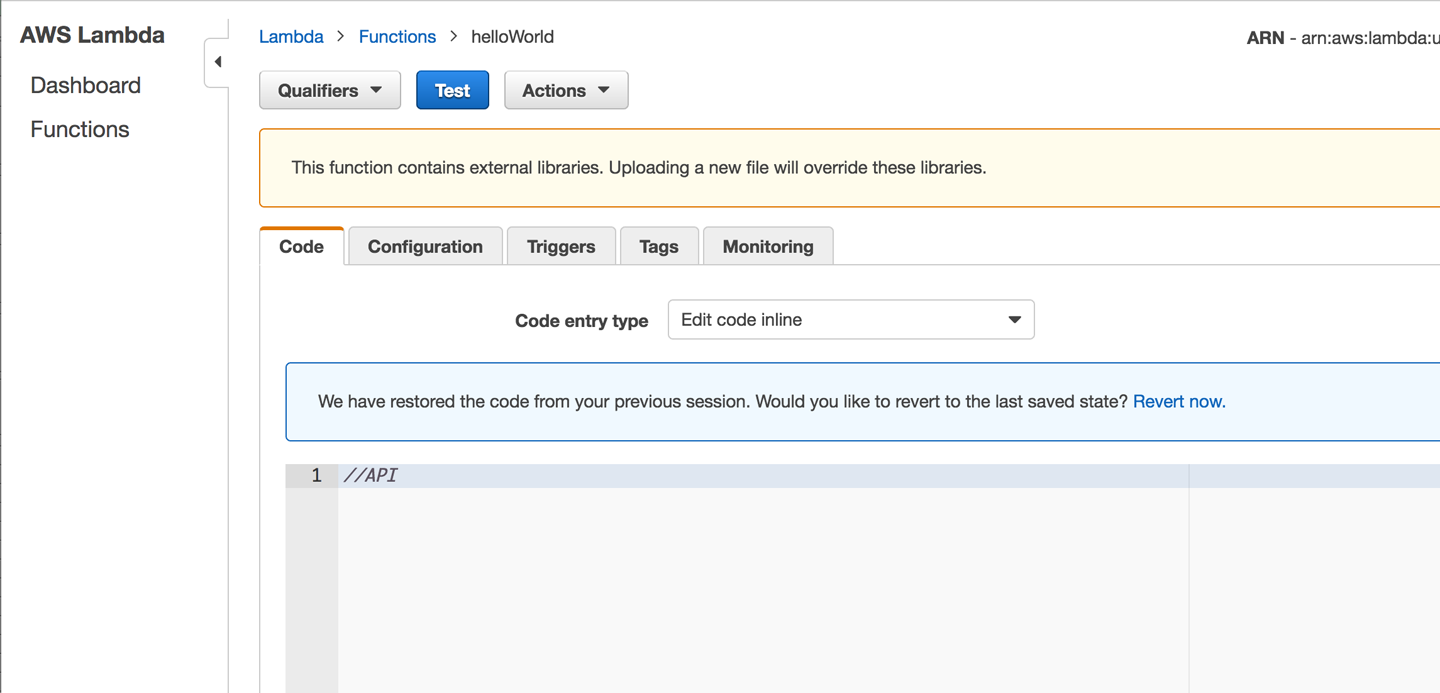
Figure 4-9. Selecting an existing role
-
You will then be taken to the Review page, where you are given an opportunity to edit your settings before creating your function. If you followed the preceding steps you can just select Create Function.
-
So far so good! Now we can start coding up our
helloWorldfunction. When you clicked Create Function, you should have been directed to the page shown in Figure 4-10. From there, you can create the intent handlers and wire them up to the main request handler. When we create our skill in the Amazon Developer Portal we will need the ARN, located at the top right of the function page. Let’s get started.
Figure 4-10. Lambda code editor
Writing our lambda function in Node.js
This section assumes a basic familiarity with Node.js, JavaScript, and node packages. With that little caveat out of the way, let’s get started on our “Hello, World” API.
In the code editor window of your lambda function, remove the “//API” remark we added when we created the functions, and replace it with the code shown here (we have included inline notes to explain the purpose of each major section within the code):
'use strict';

//Wire-up the Alexa SDK for Node.js
var Alexa = require('alexa-sdk');

//we will used this later to validate
//requests to our lambda function
var APP_ID = undefined;

exports.handler = (event, context, callback) => {
    var alexa = Alexa.handler(event, context);
    //When we wire up our APP_ID, we ensure that our
    //API can only process requests from our registered
    //skill
    alexa.APP_ID = APP_ID;
    //Here is where we register our intent handlers
    //more than one handler can be registered
    alexa.registerHandlers(handlers);
    alexa.execute();
};

//This is our intent handler
//All requests to our skill will be routed to
//this handler for resolution.
var handlers = {
    //This handles all LaunchRequests
    'LaunchRequest': function () {
        this.emit('SayHelloWorld');
    },
    //This handles all SessionEndedRequests
    'SessionEndedRequest': function () {
        //used for any housekeeping
    },
    //This handles our custom HelloWorldIntent
    'HelloWorldIntent': function () {
        this.emit('SayHelloWorld')
    },
    //This is our custom HelloWorld function
    //It calls the Alexa SDK via the emit event emitter
    //to build a HelloWorld response for our users.
    'SayHelloWorld': function () {
        this.emit(':tell', 'Hello World!');
    }
};
For more information on the Alexa SDK for Node.js, visit the full documentation at https://github.com/alexa/alexa-skills-kit-sdk-for-nodejs.
After you have made the code updates, click the Save button located just above the coding window.
Congratulations! You just created your first Node.js Alexa API.
Now that we have our API in place, we need to create and register our custom skill within the Amazon Developer Portal. There we will create our intent schema and utterances as well as connect our skill to our new API. Let’s head over to the Developer Portal and get started.
Amazon Developer Portal
This is a great place for a quick recap of what we’ve accomplished thus far. In Chapter 3 we created our Raspberry Pi AVS, which we will use as our test Alexa device. And in this chapter, we’ve created our our lambda function, which we will use as our skill’s API. Now we need to create and register our custom skill in the Developer Portal. Let’s get started:
-
Visit the Amazon Developer Portal and click Sign In (top right of the menu bar, as shown in Figure 4-11).
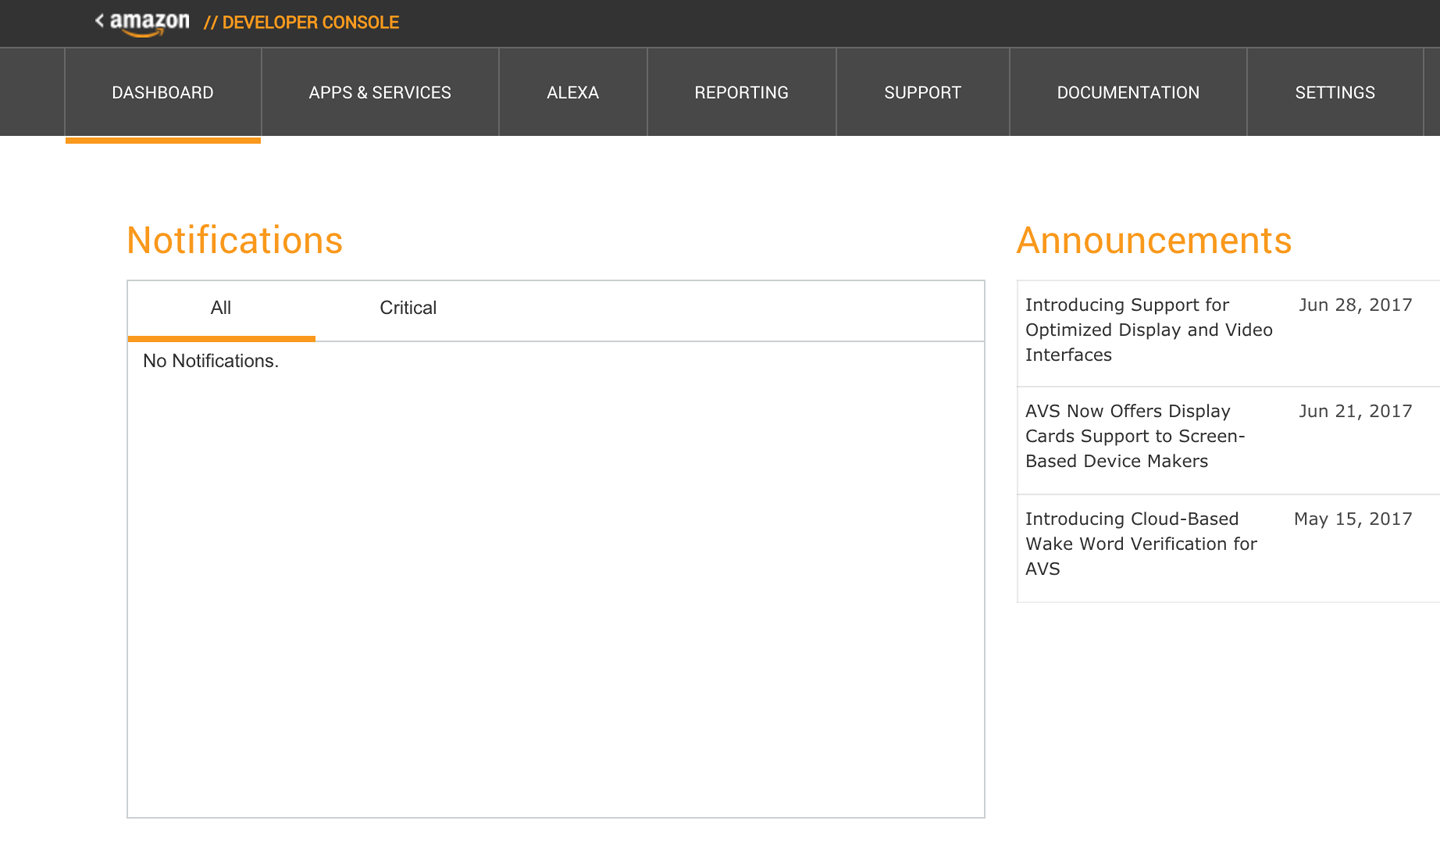
Figure 4-11. Amazon Developer Portal
-
Using the Amazon developer username you created in Chapter 3, log in to the portal. If successful, you will be redirected to the Developer Dashboard page (Figure 4-12). There are many options to choose from on this page but we only need to focus on one. Click the Alexa option on the menu bar.
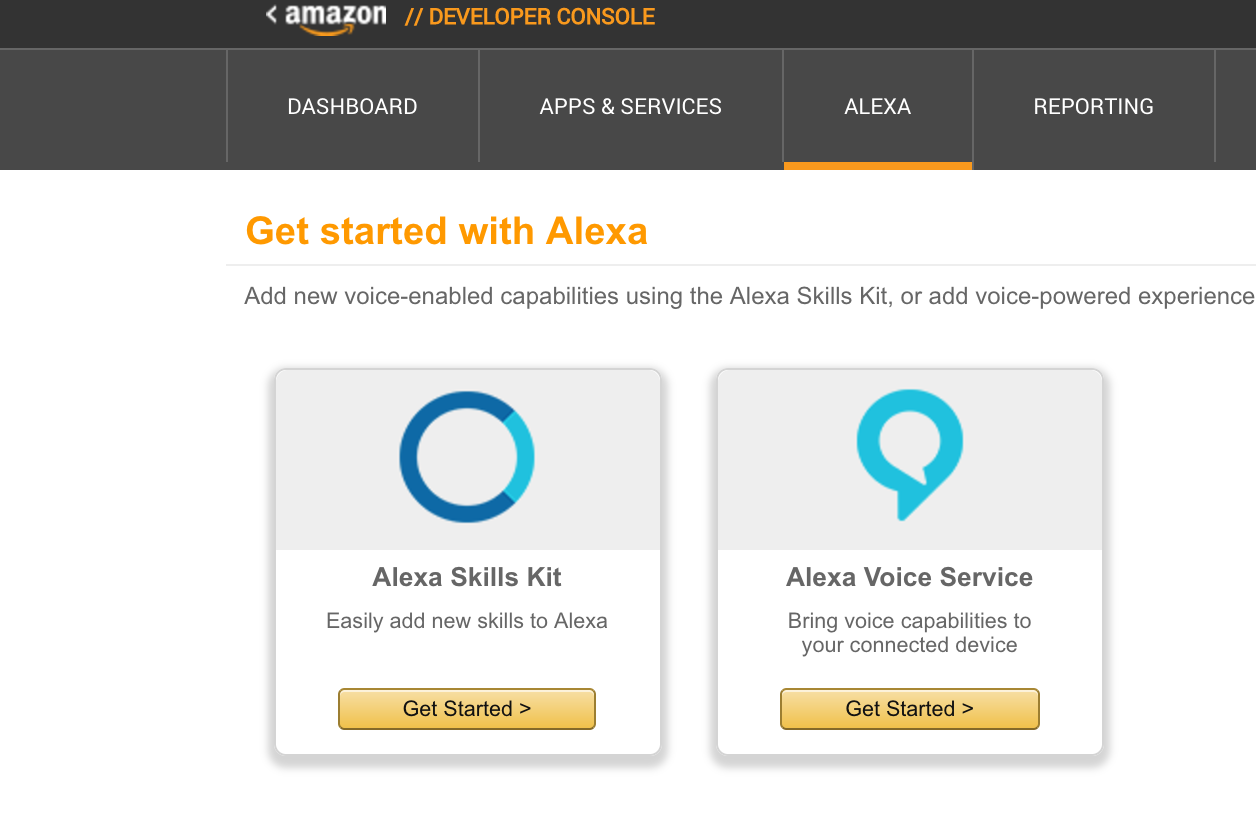
Figure 4-12. Developer dashboard
-
Once you are directed to the Get Started with Alexa page, click Get Started within the Alexa Skills Kit option (Figure 4-13).

Figure 4-13. Getting started with Alexa
-
You should now see an Add a New Skill button. This page is also your custom skill dashboard, where all of the custom skills you develop will be listed. We haven’t created any skills yet, so go ahead and click Add a New Skill (Figure 4-14).
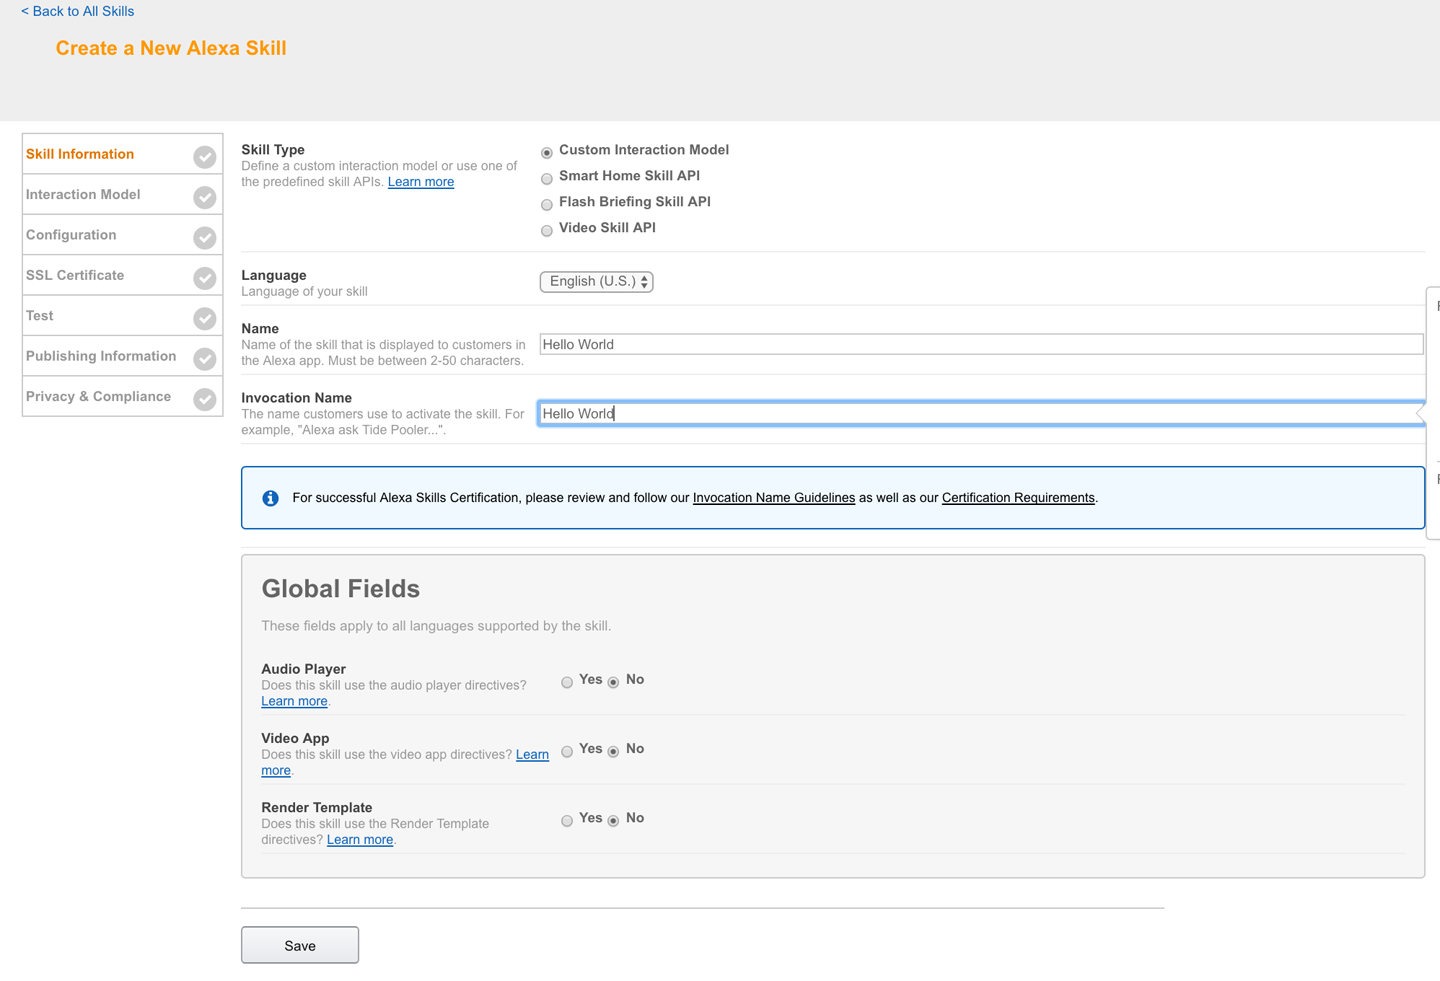
Figure 4-14. Your custom skills list
-
Now we can start creating our skill details for registration in the Developer Portal. Notice there are seven tabs running across the lefthand side of the page. Each tab holds configuration data for your custom skill. The Skill Information tab elements are shown in Figure 4-15. Figure 4-15 shows the completed tab for our “Hello, World” skill. Fill in the Skill Information tab with the settings shown here, and click Save and then Next.
Note
The options available on your custom skill tabs may be slightly different from the ones shown, but the core items should be identical.
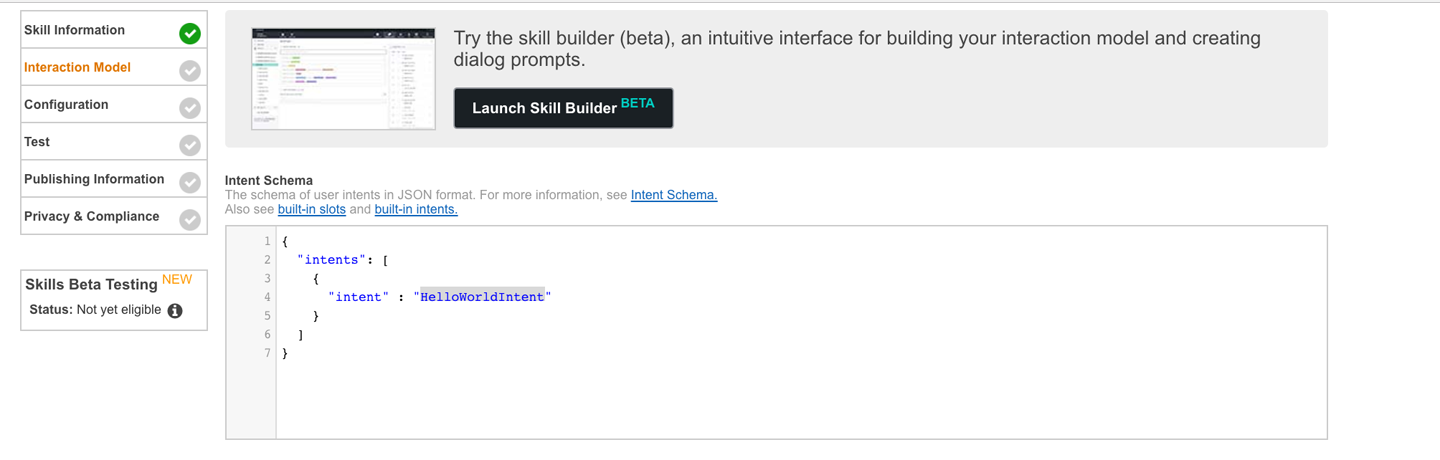
Figure 4-15. Skill Information tab
-
The Interaction Model is where we set up up our intent schema, slots, and utterances. We won’t need slots for this “Hello, World” example but our intent schema and utterances are shown in Figures 4-16 and 4-17. You’ll notice that we created four utterances for our skill. This allows our users to ask our “Hello, World” skill to “Say, ‘Hello’” using one of the four utterances shown. For example, our users can say “Alexa, ask Hello World to say ‘hello’” or “Alexa, ask ‘Hello, World’ to please say ‘hello’ to the world.” Skills typically have multiple intents and each of those intents will have multiple utterances. We kept it rather simple for our particular sample, but it’s important to remember that the consistency and accuracy of your skill is greatly dependent upon the diversity of your sample intent utterances. With that said, let’s update your Interaction Model tab as shown in Figure 4-16 and click Save and then Next. (Save can take some time with more complex models, so please be patient as it builds your model.)

Figure 4-16. “Hello, World” intent schema
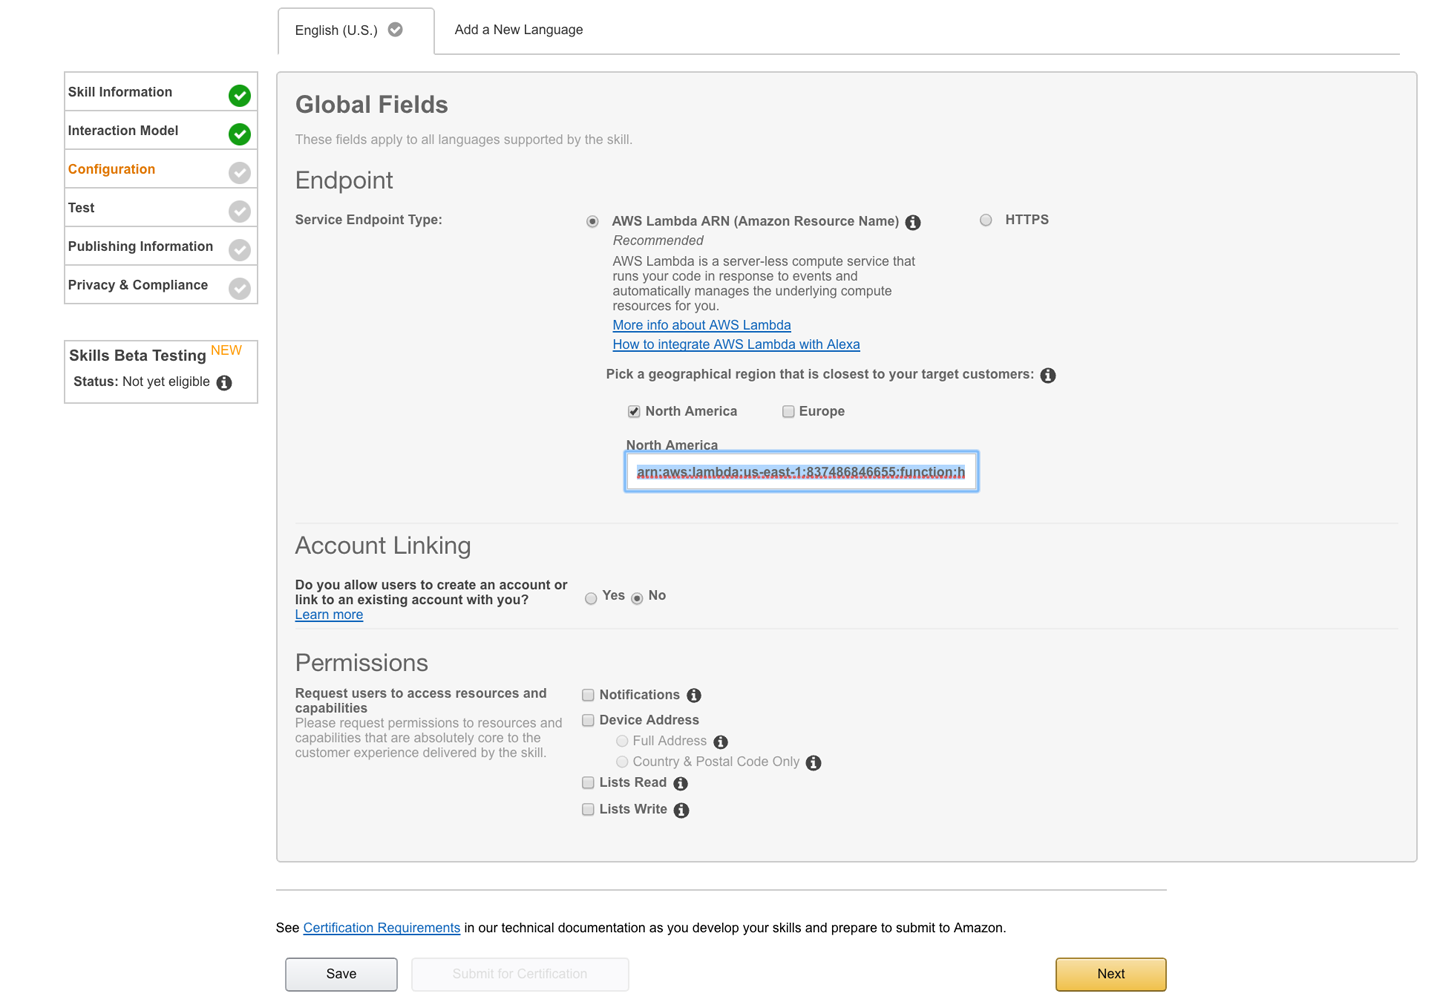
Figure 4-17. Sample utterances
-
The Configuration tab is where we connect our portal skill to our lamdba function. The link to your lambda function can be found in the AWS portal (shown in Figure 4-18). Copy the entire ARN value and paste as indicated in Figure 4-19. You’ll notice that we could also use a standard HTTPS endpoint as our skill API endpoint, so you have many options when it comes to hosting your Alexa API.

Figure 4-18. AWS Portal ARN ID
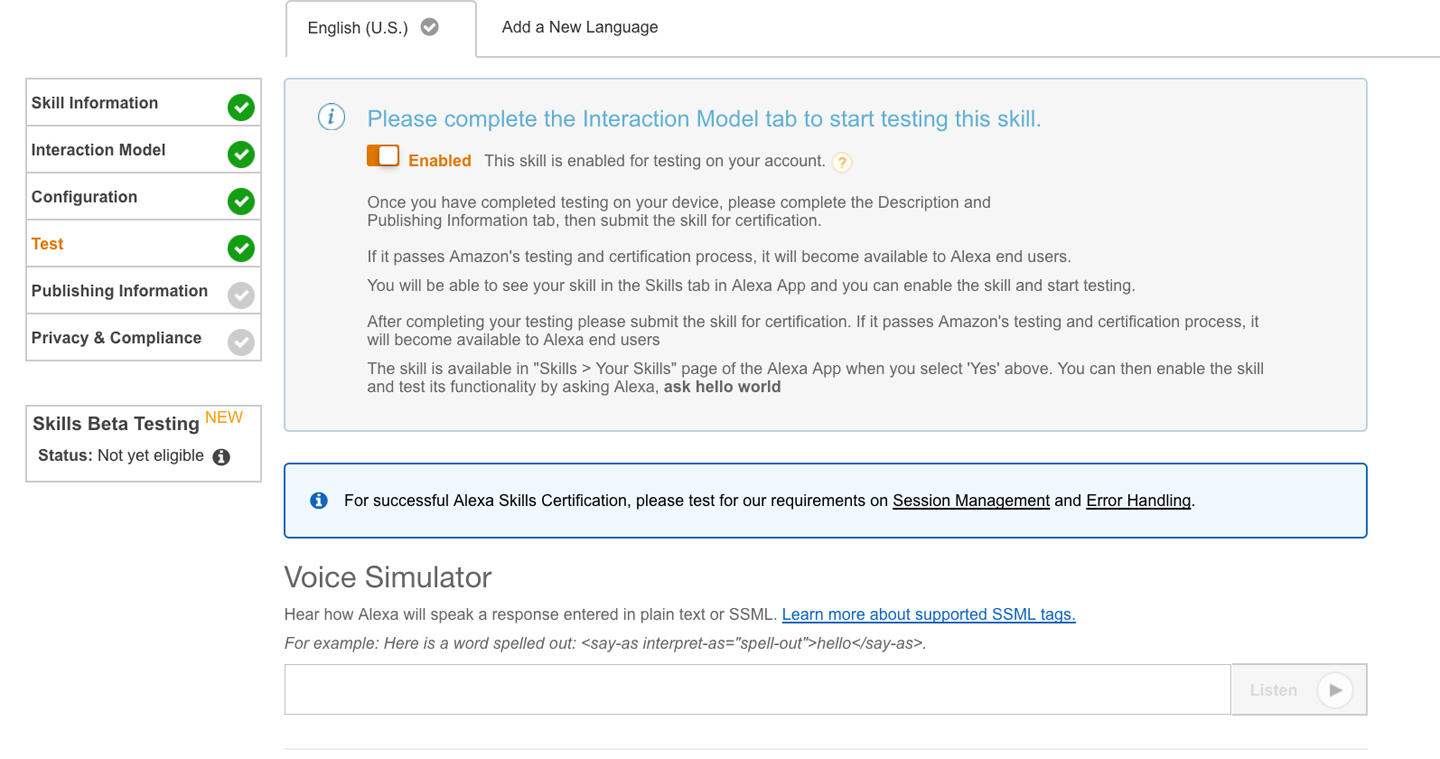
Figure 4-19. Configuration tab
-
The final tab we will set up for our “Hello, World” skill is the Test tab. The Test tab allows us to test our skill by passing in typed sample utterances. The first thing we need to do is turn on testing for this skill (Figure 4-20). Make sure the testing option is set to Enabled. Once enabled, scroll down to the Service Simulator and type the sample utterance,
say hello world, then click “Ask Hello World” (Figure 4-21).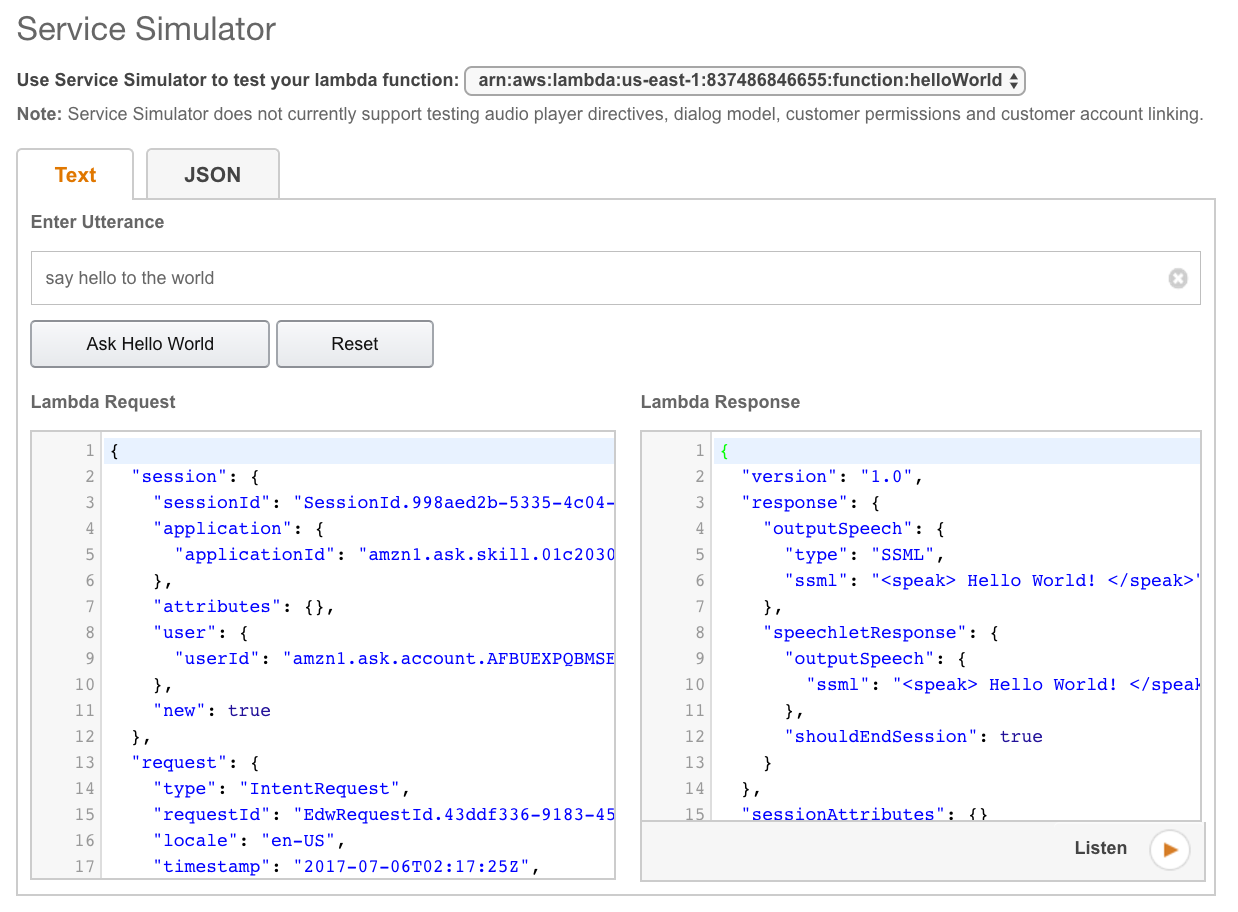
Figure 4-20. Enabling testing of your skill

Figure 4-21. Testing your skill
Notice that you don’t need to type the invocation name of “Hello, World” to run this test. Invocation names are only needed for voice-based tests. The simulator lists the exact request object sent to your lambda function as well as the response object returned by your skill. As you can see, there are quite a few JSON elements in each object and we encourage you to read through the Amazon documentation referenced earlier. The Alexa SDK node package handles most of the heavy lifting of building response objects for your skill, but it also provides finer control of each element should your skill require it. There are a couple things to point out, however: first, the Alexa SDK always returns your
outputSpeechas Speech Synthesis Markup Language (SSML), so if your response output contains special characters like an ampersand (&) or brackets (< or >), you will need to escape those characters before they are returned. Second, by default the Alexa SDK setsshouldEndSessionto true, so if you need to keep the session open and wait for user input, you will need to build your response object using syntax similar to the following:... //This is our intent handler //All requests to our skill will be routed to //this handler for resolution. var handlers = { ... //This is our custom HelloWorld function //It calls the Alexa SDK via the emit event emitter //to build a HelloWorld response for our users. 'SayHelloWorld': function () { //sets the outputSpeech element this.response.speak('Hello World!'); //sets shouldEndSesssion to false and //and sets the repromptSpeech element this.response.listen('I said, Hello World!'); //returns the response object this.emit(':reponseReady'); } };Finally, if you click the Listen icon, you will hear the response as it would be played through an Alexa device.
Note
Amazon provides a rich set of SSML offerings that you can use as part of your
outputSpeechresponse element. SSML allows you to emphasize words, and can generally make your interactions feel more realistic and human-like. For more information on SSML with Alexa, check out the documentation. -
The remaining tabs, Publishing Information and Privacy and Compliance, are required whenever you wish to submit your skill for certification. The field elements are self-explanatory and Amazon provides comprehensive documentation detailing how to complete the required items. For our example, we can skip those tabs.
-
Now that we have the skill registered, we need to add the skill App ID to our lambda function. Go back to the Skill Information tab and select and copy the entire value for your skill’s Application ID; it starts with “amzn1.ask.skill” (Figure 4-22).
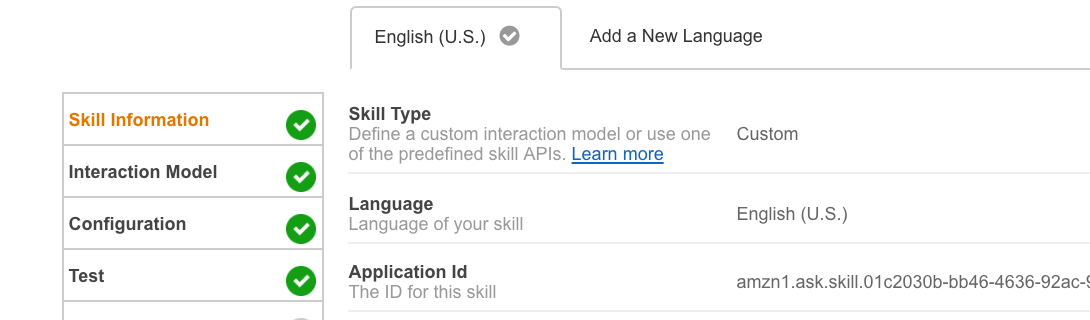
Figure 4-22. Application ID of skill
Next, log back in to the AWS portal so we can add the App ID to your lambda function. Open your lambda function in the portal code editor and replace the text “undefined” with your skill’s Application ID (enclosed in single quotes) and save your lambda function. Now your lambda function will only accept requests from the skill matching your Application ID:
'use strict';

//Wire-up the Alexa Node.js
var Alexa = require('alexa-sdk');

//we will use this later to validate
//requests to our lambda function
var APP_ID = undefined;
...
Congratulations, you have completed your very first Amazon skill! While this first skill may be very simplistic in function, you now have the foundational understanding to create skills of varying size and complexity. Be proud of yourself!
Testing Custom Skills on Your Device
We created our lambda function and our skill, and we even tested a sample utterance in the Developer Portal. All that is great but let’s face it: we want our skill to work using our voice requests. Luckily, testing a skill is really simple.
In this chapter, we created and registered our custom Alexa skill with the same Amazon developer login used to create our Raspberry Pi AVS. Since we used the same login ID for both, our AVS Raspberry Pi (and any other Amazon device registered with the same Amazon login) automatically has access to every custom skill created under that login. The caveat of course is that the custom skill must be “enabled” for testing under the Testing tab in the Developer Portal. Since we already enabled our skill for testing, your AVS device created in Chapter 3 should be ready to access your new “Hello, World” skill. Let’s give it a try, shall we?
If your AVS device isn’t already running, plug it in or if need be, follow the steps for creating the AVS-enabled device in Chapter 3. Once your device is up and running, just ask Alexa to say “hello” by saying “Alexa, ask ‘Hello, World’ to say ‘hello’.” If you followed the instructions outlined in Chapters 3 and 4, Alexa should respond with “Hello, World.” Welcome to the world of voice IoT!
What’s Next?
We covered a lot in this chapter. However, there are a few more items we wanted to share as you start down your voice-based path.
As with any system, user experience (UX) is paramount. If the interaction performs inconsistently or feels too robotic or clunky, users will not enjoy the experience. A main goal of AI engineers and UX designers is to have the experience feel as natural as possible, like a conversation with another human. That is not a simple feat. We are still in the early stages of truly intelligent voice interfaces. We have only scratched the surface of where this technology will eventually lead. And while there are challenges with creating rich, interactive voice interfaces, there are things we can do to make the experience more natural. Here are a few principles we keep in mind when designing your interactions:
- Design for conversation
When creating your skill’s interaction flow, design it as if you were writing a movie script rather than a Q&A with a computer. Amazon has recently added new interfaces to help with this process, specifically the Dialog Interface. This new interface simplifies the multiturn (conversational) interactions between the user and your skill. Official details and examples can be found at https://github.com/alexa/alexa-skills-kit-sdk-for-nodejs.
- Prepare for the unexpected
If you have experience with developing software, you are keenly aware that some users do the unexpected—they want to do things differently or in a flow that diverges from the original design. When it comes to voice-based interactions, this is magnified by 1,000. It can be very challenging to predict all variations of intent utterances, not to mention account for various local vernacular differences (soda pop versus cola, hoagie versus sub). Plan for the unexpected in your design. Experiment with utterance wording, research alternate terms for similar words within your slots, and test, test, test.
- Vary the dialogue
This principle is closely tied to designing for conversation. When people interact with one another, the personalities of those involved affects the dialogue. For example, a simple question like “How are you doing?” will elicit a number of responses depending upon who is being asked. Some people may respond with, “I’m great! How about you?” while others might simply say, “I’m fine.” The point is, variation is human, variation is natural. When you design your responses, create natural variations, especially when providing listed responses. Varying the phrasing with which you respond provides a more human feel to your AI, offering a richer user experience. For instance, consider our “Hello, World” example. To make it more interesting and human-like, we could create an array of possible responses for
HelloWorldIntent. Instead of just saying “Hello, World” we could say “Well, hello there, World” or “Hello, cold, cruel World” or perhaps even, “Hello, you big, beautiful, blue marble.” These simple variations make interacting with skills more fun and even provide a form of anticipation, as our users aren’t quite sure what to expect (in a good way).
In the not-too-distant future, the AIs we interact with will be more intelligent and have a more natural feel to them (think Star Trek computer). They will “learn” in real time and be able alternate dialogue and even adapt based on conversational context. Until then, however, it’s up to us to design AI experiences to be as human-like and natural as possible.
Account Linking
We also wanted to address the topic of account linking. Account linking enables you to tie your skill’s users to a new or existing backend system. Banking-related skills leverage account linking extensively, but any skill can use the feature. Account linking is a more advanced topic and multiple chapters could be written about it, but if you do plan on using it, we recommend a thorough read (and perhaps a second read as well) of the Amazon Account linking documentation.
State Management
Another topic of interest is session or state management. Very often, a skill will need to maintain state to track where a user is within a given process—a reservation system, for instance. There are several ways this can be achieved, but Amazon provides detailed documentation on maintaining state using the Alexa SDK and AWS. We highly encourage reading through this documentation once you begin building more complex skills.
Bigger Picture
Finally, while Node.js and AWS are incredible tools for building custom skills, you can also build skills using other tools and platforms. If you love C# (and let’s face it, who doesn’t), we encourage you to check out Walter’s Pluralsight course: Developing Alexa Skills for Amazon Echo. The course walks you through creating an Alexa skill hosted on Microsoft’s Azure Cloud platform, and even touches on account linking and session management.
That’s a wrap on this chapter! In Chapter 5, we will take a look at using Windows IoT Core on a Raspberry Pi with Google’s API.AI engine.
Get Programming Voice Interfaces now with the O’Reilly learning platform.
O’Reilly members experience books, live events, courses curated by job role, and more from O’Reilly and nearly 200 top publishers.

