Modules are reusable software components that form the building blocks of applications. Modularity satisfies some very important design goals, perhaps the most important of which is simplicity.
When you design an application with a lot of interdependencies between different parts, it becomes more difficult to fully understand the impact of your changes across the whole system.
If you design parts of a system to a modular interface contract instead, you can safely make changes without having a deep understanding of all of the related modules.
Another important goal of modularity is the ability to reuse your module in other applications. Well-designed modules built on similar frameworks should be easy to transplant into new applications with few (if any) changes. By defining a standard interface for application extensions and then building your functionality on top of that interface, you’ll go a long way toward building an application that is easy to extend and maintain and easy to reassemble into different forms in the future.
JavaScript modules are encapsulated, meaning that they keep implementation details private and expose a public API. That way, you can change how a module behaves under the hood without changing code that relies on it. Encapsulation also provides protection, meaning that it prevents outside code from interfering with the functionality of the module.
There are several ways to define modules in JavaScript. The most popular and common are the module pattern, CommonJS modules (the inspiration for Node modules), and AMD (Asynchronous Module Definition).
You can think of modules as small, independent applications that are fully functional and fully testable in their own right. Keep them as small and simple as possible to do the job that they are designed to do.
Modules should be:
- Specialized
Each module should have a very specific function. The module’s parts should be integral to solving the single problem that the module exists to solve. The public API should be simple and clean.
- Independent
Modules should know as little as possible about other modules. Instead of calling other modules directly, they should communicate through mediators, such as a central event-handling system or command object.
- Decomposable
It should be fairly simple to test and use modules in isolation from other modules. It is common to compare them to components in an entertainment system. You could have a disc player, radio receiver, TV, amplifier, and speakers, all of which can operate independently. If you remove the disc player, the rest of the components continue to function.
- Recomposable
It should be possible to fit various modules together in different ways to build a different version of the same software or an entirely different application.
- Substitutable
It should be possible to completely substitute one module with another, as long is it supplies the same interface. The rest of the application should not be adversely impacted by the change. The substitute module doesn’t have to perform the same function. For example, you might want to substitute a data module that uses REST endpoints as its data source with one that uses a local storage database.
Tip
The Open Closed Principle states that a module interface should be open to extension but closed to modification. Changing an interface that a lot of software relies on can be a daunting task. It’s best if you can avoid making changes to an existing interface once it has been established. However, software should evolve, and as it does, it should be easy to extend existing interfaces with new functionality.
Program to an interface, not an implementation.
—The Gang of Four, Design Patterns
Interfaces are one of the primary tools of modular software design. Interfaces define a contract that an implementing module will fulfill. For instance, a common problem in JavaScript applications is that the application stops functioning if the Internet connection is lost. In order to solve that problem, you could use local storage and sync changes periodically with the server. Unfortunately, some browsers don’t support local storage, so you may have to fall back to cookies or even Flash (depending on how much data you need to store).
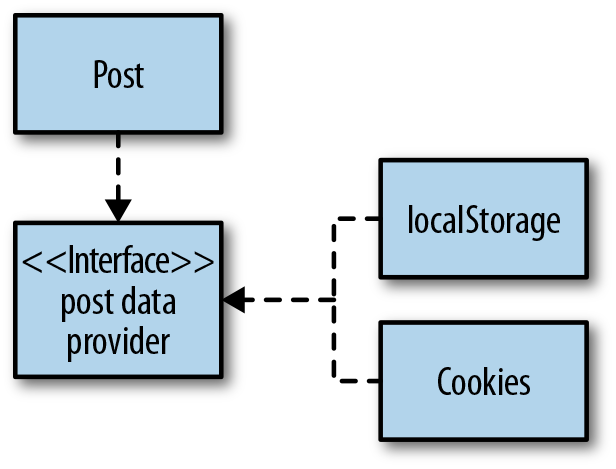
Imagine you’re writing software that allows users to post notes. You
want to store posts in localStorage if its available, but fall
back to cookie storage if it’s not.
That will be difficult if your business logic depends directly on
localStorage features (see Figure 4-1).

A better alternative is to create a standard interface to provide data access for the post module. That way, the module can save data using the same interface, regardless of where the data is being stored (see Figure 4-2).
Other languages have native support for interfaces that may enforce the requirements of an interface. You might know them as abstract base classes or pure virtual functions. In JavaScript, there is no distinction between a class, interface, or object instance. There are only object instances, and that simplification is a good thing. You may be wondering, if there’s no native support for interfaces in JavaScript, why bother to write one at all?
When you need multiple implementations of the same interface, it’s
good to have a canonical reference in the code that explicitly spells out
exactly what that interface is. It’s important to write code that is
self-documenting. For example, a storage interface might have a required
.save() method. You can write the default implementation so
that it will throw if you forget to implement it. Since it’s a working
prototype, you could even write a sensible default implementation that
doesn’t throw. In this case, the factory will throw an error if the
.save() method is not implemented.
Using Stampit to define the factory:
(function(exports){'use strict';// Make sure local storage is supported.varns='post',supportsLocalStorage=(typeoflocalStorage!=='undefined')&&localStorage!==null,storage,storageInterface=stampit().methods({save:functionsaveStorage(){thrownewError('.save() method not implemented.');}}),localStorageProvider=stampit.compose(storageInterface).methods({save:functionsaveLocal(){localStorage.storage=JSON.stringify(storage);}}),cookieProvider=stampit.compose(storageInterface).methods({save:functionsaveCookie(){$.cookie('storage',JSON.stringify(storage));}}),post=stampit().methods({save:functionsave(){storage[this.id]=this.data;storage.save();returnthis;},set:functionset(name,value){this.data[name]=value;returnthis;}}).state({data:{message:'',published:false},id:undefined}).enclose(functioninit(){this.id=generateUUID();returnthis;}),api=post;storage=(supportsLocalStorage)?localStorageProvider():cookieProvider();exports[ns]=api;}((typeofexports==='undefined')?window:exports));$(function(){'use strict';varmyPost=post().set('message','Hello, world!');test('Interface example',function(){varstoredMessage,storage;myPost.save();storage=JSON.parse(localStorage.storage);storedMessage=storage[myPost.id].message;equal(storedMessage,'Hello, world!','.save() method should save post.');});});
The important part here is the storage interface. First you create
the factory (using Stampit in this case, but it can be any function that
returns an object that demonstrates the interface). This example has only
one method, .save():
storageInterface=stampit().methods({save:functionsaveStorage(){thrownewError('.save() method not implemented.');}}),
Create a concrete implementation that inherits from the interface. If the interface is especially large, you might want to put each implementation in a separate file. In this case, that isn’t required. Notice that the concrete implementations are using named function expressions. During debugging, you’ll be able to see which concrete implementation you’re using by looking at the function name in the call stack:
localStorageProvider=stampit.compose(storageInterface).methods({save:functionsaveLocal(){localStorage.storage=JSON.stringify(storage);}}),cookieProvider=stampit.compose(storageInterface).methods({save:functionsaveCookie(){$.cookie('storage',JSON.stringify(storage));}}),
Stampit’s .compose() method allows you to inherit from any number of sources, and it
returns a stamp that you can further extend with .methods(), .state(), or
.enclose(). You can use those features to flesh out the
concrete implementations.
The final step is to decide which implementation to use. The
following ternary expression checks to see if
localStorage is supported. If it is, it uses the
localStorageProvider(); otherwise, it falls back to cookie
storage:
storage=(supportsLocalStorage)?localStorageProvider():cookieProvider();
There are alternative ways to define interfaces in JavaScript. You
could simply define object literals and use something like
jQuery.extend() to build the desired concrete implementation. The downside there is
that you won’t be able to take advantage of prototype delegation or data
privacy.
You could also define the concrete implementations as prototype
objects and then pass the appropriate prototype into Stampit or Object.create() during the final
step. I prefer to use stamps because they give you a lot of
composability.
Erich Gamma, one of the Gang of Four authors who created Design Patterns, shared some interesting thoughts about interfaces in an interview with Bill Venners called “Leading-Edge Java Design Principles from Design Patterns: A Conversation with Erich Gamma, Part III”.
Modules in the browser use a wrapping function to encapsulate private data in a closure (for example, with an IIFE; see Immediately Invoked Function Expressions). Without the encapsulated function scope provided by the IIFE, other scripts could try to use the same variable and function names, which could cause some unexpected behavior.
Most libraries, such as jQuery and Underscore, are encapsulated in modules.
The module pattern encapsulates module contents in an immediately invoked function expression (IIFE) and exposes a public interface by assignment. Douglas Crockford gave the module pattern its name, and Eric Miraglia popularized it in a well-known blog post on the YUI Blog.
The original module pattern assigns the result of the IIFE to a predefined namespace variable:
varmyModule=(function(){return{hello:functionhello(){return'Hello, world!';}};}());test('Module pattern',function(){equal(myModule.hello(),'Hello, world!','Module works.');});
The problem with this pattern is that you have no choice but to expose at least one global variable for each module. If you’re building an application with a lot of modules, that is not a good option. Instead, it’s possible to pass in an existing variable to extend with your new module.
Here, that variable is called exports, for
compatibility with CommonJS (see Node-Style Modules for an
explanation of CommonJS). If exports does not exist, you can
fall back on window:
(function(exports){varapi={moduleExists:functiontest(){returntrue;}};$.extend(exports,api);}((typeofexports==='undefined')?window:exports));test('Pass in exports.',function(){ok(moduleExists(),'The module exists.');});
A common mistake is to pass in a specific application namespace inside your module’s source file (instead of using
a globally defined exports). Normally, that will not
harm anything. However, if you wish to reuse the module in another
application, you’ll have to modify the source of the module in order to
attach it to the correct namespace.
Instead, you can pass your application object in as
exports. It’s common in client-side code to have a
build step that wraps all of your modules together in a single outer
function. If you pass your application object into that wrapper function
as a parameter called exports, you’re in business:
varapp={};(function(exports){(function(exports){varapi={moduleExists:functiontest(){returntrue;}};$.extend(exports,api);}((typeofexports==='undefined')?window:exports));}(app));test('Pass app as exports.',function(){ok(app.moduleExists(),'The module exists.');});
An upside to this version of the module pattern is that the code you write with it can be easily run and tested in Node. From this point on, when the module pattern gets mentioned, this is the version that should spring to mind. Its ancestor is obsolete.
On the client side, there is often a need to load modules asynchronously at runtime in order to avoid the need for the client to download the entire codebase every time the app is loaded. Imagine you have an app like Twitter, where users can post messages or status updates. The core of the application is the messaging feature. However, you also have a large profile editing module that allows users to customize the look of their profile pages.
Users will generally update the look of their profiles a few times per year, so the entire profile editing module (all 50,000 lines of it) goes completely unused 99% of the time. What you need is a way to defer the loading of the profile editor until the user actually enters edit mode. You could just make it a separate page, but then the user has to endure a page refresh, when maybe all she wanted to do was change her profile image. It would be a much better experience to keep this all on one page, with no new page load.
The module pattern doesn’t solve this problem. CommonJS modules (like those used by Node) are not asynchronous. In the future, JavaScript will have a native module system that works in the browser (see ES6 Modules), but it’s very young technology that may not be widely implemented in all major browsers in the foreseeable future.
AMD is an interim solution to the problem. It works by wrapping the
module inside a function called define(). The call signature
looks like this:
define([moduleId,]dependencies,definitionFunction);
The moduleId parameter is a string that will identify
the module. However, this parameter has fallen out of favor because
changes in the application or module structure can necessitate a refactor,
and there really is no need for an ID in the first place. If you leave it
out and begin your define call with the dependency list, you’ll create a
more adaptable anonymous module:
define(['ch04/amd1','ch04/amd2'],functionmyModule(amd1,amd2){vartestResults={test1:amd1.test(),test2:amd2.test()},// Define a public API for your module:api={testResults:function(){returntestResults;}};returnapi;});
To kick it off, call require(). You specify
dependencies similar to define():
require(['ch04-amd'],function(amd){varresults=amd.testResults();test('AMD with Require.js',function(){equal(results.test1,true,'First dependency loaded correctly.');equal(results.test2,true,'Second dependency loaded correctly.');});});
Tip
Use anonymous modules wherever possible in order to avoid refactors.
The problem with this approach is that if you define your module this way, it can only be used with an AMD loader, such as Require.js or Curl.js (two popular AMD loaders). However, it is possible to get the best of both AMD and module pattern modules. Simply create a module using the module pattern, and at the end of the wrapping function, add this:
if(typeofdefine==='function'){define([],function(){returnapi;});}
That way, it will be possible to load your module asynchronously if
you want to, but your module will still function properly if it’s loaded
with a simple script tag, or compiled together with a
bunch of other modules. This is the pattern that jQuery uses to add AMD loader support. The only trouble with this
pattern is that dependency timing is a little more complicated. You’ll
need to ensure that your dependencies have loaded before you try to use
them.
UMD (Universal Module Definition) is another alternative. My favorite way to create a UMD is to bundle the module using Browserify in standalone mode. See Building Client-Side Code with CommonJS, npm, Grunt, and Browserify.
Loader plug-ins are an AMD mechanism that allow you to load non-JavaScript
resources, such as templates and CSS. Require.js supplies a
text! plug-in that you can use to load your HTML templates. To use a
plug-in, simply prefix the file path with the plug-in name:
'use strict';require(['ch04/mymodule.js','text!ch04/mymodule.html'],function(myModule,view){varcontainer=document.body,css='ch04/mymodule.css';myModule.render(container,view,css);test('AMD Plugins',function(){equal($('#mymodule').text(),'Hello, world!','Plugin loading works.');});});
Here’s what mymodule.js looks like:
define(function(){'use strict';varapi={render:functionrender(container,view,css){loadCss('ch04/mymodule.css');$(view).text('Hello, world!').appendTo(container);}};returnapi;});
And the mymodule.html template:
<divid="mymodule"></div>
The stylesheet is simple:
#mymodule{font-size:2em;color:green;}
Note that the CSS is not loaded as a plug-in. Instead, the URL is
assigned to a variable and passed into the .render() method
for manual loading. The loadCSS() function looks like
this:
functionloadCss(url){$('<link>',{type:'text/css',rel:'stylesheet',href:url,}).appendTo('head');}
This obviously isn’t an ideal solution, but as of this writing,
there is no standard recommended css! plug-in for
Require.js. There is a css! plug-in for Curl.js,
and you might want to try Xstyle. Use them the same way you define the HTML
template.
AMD has a couple of serious drawbacks. First, it requires you to include a boilerplate wrapper function for every module. Second, it forces you to either compile your whole application in a compile step, or asynchronously load every single module on the client side, which, in spite of advertising to the contrary, could actually slow down the load and execution of your scripts due to simultaneous download limits and connection latency.
I recommend the precompile solution over the asynchronous load solution, and as long as you’re doing that anyway, you may as well be using the simplified CommonJS syntax and a tool like Browserify. See Building Client-Side Code with CommonJS, npm, Grunt, and Browserify.
CommonJS is a set of standards for JavaScript environments that attempts to make JavaScript engine implementations more compatible. CommonJS modules specify an API that modules use to declare dependencies. CommonJS module implementations are responsible for reading the modules and resolving those dependencies.
Before Node.js, there were several other attempts to run JavaScript on the server side, as far back as the late 1990s. Both Netscape and Microsoft allowed JavaScript-compatible scripting in their server environments. However, few people used those capabilities. The first server-side JavaScript solution to gain any real traction was Rhino, but it was too slow and cumbersome to build web-scale applications on top of.
By the time Node.js arrived on the scene, there were several different server-side environments for JavaScript that all started out using different conventions for dealing with issues such as module loading. CommonJS was created to solve that problem. Node-style modules are essentially an implementation of the CommonJS module specification.
The CommonJS module system has a much simpler syntax than either the
module pattern or AMD. In CommonJS, the file is the module. There is no
need for a function wrapper to contain the scope, because each file is
given its own scope. Modules declare dependencies with a synchronous require() function. That means that
execution is blocked while the required module is being resolved, so it’s
safe to start using the module immediately after you require it.
First, assign to keys on the free variable exports to
declare your module’s public API:
'use strict';varfoo=functionfoo(){returntrue;};exports.foo=foo;
Then use require() to import your module and assign it
to a local variable. You can specify the name of a module in the list of
installed Node modules or specify a path to the module using relative
paths.
For example, if you want to use the Flatiron HTTP module, you can require() by name
(from the Flatiron.js
docs):
varflatiron=require('flatiron'),app=flatiron.app;app.use(flatiron.plugins.http,{// HTTP options});//// app.router is now available. app[HTTP-VERB] is also available// as a shortcut for creating routes//app.router.get('/version',function(){this.res.writeHead(200,{'Content-Type':'text/plain'})this.res.end('flatiron '+flatiron.version);});app.start(8080);
Or specify a relative path:
'use strict';varmod=require('./ch04-modules.js'),result=(mod.foo()===true)?'Pass:':'Fail:';console.log(result,'.foo() should return true.');
Here, console.log() is used to simulate a unit testing
framework, but there are several better alternatives for Node, including tape and nodeunit.
Node package manager (npm) is a package manager that comes bundled with Node. Contrary to popular belief, npm is not an acronym, according to the npm FAQ, so it’s technically incorrect to capitalize the letters. It provides an easy way to install modules for your application, including all required dependencies. Node relies on the package.json specification for package configuration. It’s common to use npm to pull in all of your project’s dependencies on the server side, but there is also a movement forming to use npm to pull in dependencies for the client side as well.
npm has a number of well-documented directives, but for the purposes of this book, you’ll only need to know the ones you’ll commonly need to modify in order to get your typical app up and running:
nameThe name of the package.
versionPackage version number (npm modules must use semantic versioning).
authorSome information about the author.
descriptionA short description of the package.
keywordsSearch terms to help users find the package.
mainThe path of the main package file.
scriptsA list of scripts to expose to npm; most projects should define a “test” script that runs with the command
npm
          test
, which you can use to execute your unit tests.repositoryThe location of the package repository.
dependencies,bundledDependenciesDependencies your package will
require().devDependenciesA list of dependencies that developers will need in order to contribute.
enginesSpecifies which version of Node to use.
If you want to build a Node app, one of the first things you’ll need to do is create a server. One of the easiest ways to do that is to use Express, a minimal application framework for Node. Before you begin, you should look at the latest version available. By the time you read this, the version you see here should no longer be the latest:
$ npm info express
3.0.0rc5
Example 4-1 shows how to add it to your package.json file.
Example 4-1. package.json
{"name":"simple-express-static-server","version":"0.1.0","author":"Sandro Padin","description":"A very simple static file server. For development use only.","keywords":["http","web server","static server"],"main":"./server.js","scripts":{"start":"node ./server.js"},"repository":{"type":"git","url":"https://github.com/spadin/simple-express-static-server.git"},"dependencies":{"express":"3.0.x"},"engines":{"node":">=0.6"}}
Notice that the Express version is specified as 3.0.x.
The x acts like a wildcard. It will install the latest 3.0
version, regardless of the patch number. It’s another way of saying, “give
me bug fixes, but no API changes.” Node modules use semantic
versioning. Read it as Major.Minor.Patch. Working backward, bug
fixes increment the patch version, nonbreaking API changes increment the
minor version, and backward-breaking changes increment the major version.
A zero for the major version indicates initial development. The public API
should not be considered stable, and there is no indication in the version
string for backward-breaking changes.
Now that your package and dependencies are declared, return to the console and run:
$ npm install
express@3.0.0rc5 node_modules/express
├── methods@0.0.1
├── fresh@0.1.0
├── range-parser@0.0.4
├── cookie@0.0.4
├── crc@0.2.0
├── commander@0.6.1
├── debug@0.7.0
├── mkdirp@0.3.3
├── send@0.1.0 (mime@1.2.6)
└── connect@2.5.0 (pause@0.0.1, bytes@0.1.0, send@0.0.4, formidable@1.0.11,
    qs@0.5.1)
When you run npm install, it will look at
package.json and install all of the dependencies for
you, including those that were declared by the express package.
None of the module systems discussed so far are included in the official ECMAScript specifications. In the future, a module system will be built in to all ECMA-compliant JavaScript engines.
The ES6 module specification isn’t widely usable yet, but when it is, it should be possible to write modules and compile using build tools to fall back on the module pattern, AMD, and CommonJS where required. ES6 module build tools are already beginning to appear, but you should probably wait a bit longer before you start to rely on them for your production applications.
ES6 modules are similar to Node modules, with subtle differences. Instead of
module.exports, you get the export
keyword:
varfoo=functionfoo(){returntrue;};export{foo};
Instead of require(), there’s a new import keyword:
import{foo}from'es6-foo';lettest=foo()===true?'Pass':'Fail';console.log(test,'foo() should import and return true.');
In both cases, you can include multiple variables inside the
import/export brackets, but I recommend that you try to export one thing
from each module. Keep it simple. You can also rename the imported
variable using the keyword as:
import{fooasbar}from'es6-foo';
When you’re only exporting one thing, you should make it the default export:
varfoo=functionfoo(){returntrue;};exportdefaultfoo;// No braces required
Now you can use the simplified import:
importfoofrom'es6-foo';// No braces required
If you are interested in experimenting with ES6 modules today, you can use them with the Browserify transform, es6ify.
There are a variety of competing standards for module management with JavaScript, but due to the popularity of Node, by far the most established is npm + CommonJS. There have been efforts to create a similar combination of features for the client side, including AMD, Yeoman, and Bower, but none of them can compete with the simplicity and package availability of npm and CommonJS modules.
To demonstrate, take a look at how you might build a minimal client-side guest-list app (just in case you need a bouncer at your birthday party).
Most new software projects use agile development methods to produce quick software creation and enhancement iterations. In agile software, the time between releases is measured in days or weeks rather than months or years. To learn more about agile, see The Art of Agile Development: Pragmatic guide to agile software development by James Shore (O’Reilly, 2007).
Typically when you set out to build an app, you’ll start with a list of user stories. You can use those scenarios to come up with acceptance criteria, which can be further distilled into functional unit tests.
A user story is a short, simple description of some action that your user might want to perform. For example, “As an event organizer, I want to check arriving guests against the guest list.” User stories should always contain a role along with the story. Answer the questions, “Who is performing the action?” and “What is the user trying to accomplish?”
To express this example story in code, you’ll need a list element with clickable links in list items. The unit tests might look something like Example 4-2.
Example 4-2. guestlist/test/test.js
var$list=$('#guestlist-view'),checkedinClass='icon-check',guestSelector='.guest';test('Guestlist',function(){ok($list.length,'List element should have guests.');});test('Guests',function(){// Grab the first guest from the listvar$guest=$($list.find(guestSelector)[0]),guestExists=!!$guest[0];// Simulate click$guest.click();ok($guest.hasClass(checkedinClass),'Should be checked on click');$guest.click();// To avoid a false positive, make sure// you have a guest element to test against.ok(guestExists&&!$guest.hasClass(checkedinClass),'Should toggle off when clicked again');});
You’ll need to include that in your QUnit HTML file, as shown in Example 4-3.
Example 4-3. guestlist/test/index.html
<!DOCTYPE html><html><head></head><body><section><h1id="qunit-header">QUnit Test Suite</h1><h2id="qunit-banner"></h2><divid="qunit-testrunner-toolbar"></div><h2id="qunit-userAgent"></h2><olid="qunit-tests"></ol></section><sectionid="container"></section><scriptsrc="jquery.js"></script><scriptsrc="qunit.js"></script><scriptsrc="../public/app.js"></script><scriptsrc="test.js"></script><linkhref="qunit.css"rel="stylesheet"></style></body></html>
These tests will obviously fail at first. That’s a good thing. If you can see your tests fail before you make them pass, you eliminate the possibility that your test results are showing you false positives. For this reason, TDD (test-driven development) proponents advocate writing your unit tests before you implement the code that they’re written against. Because you’re writing from an API user perspective when you write tests first, using test-driven development forces you to write more modular, testable code. You may also notice that your APIs are easier to use because you’re not worried about implementation details when you write your tests—you won’t accidentally leak implementation details into your APIs.
In fact, while I was writing this example, I started with the preceding tests, and then decided to implement the features. I was tempted to use some Twitter Bootstrap controls out of the box to implement my styles, but that would have forced me to expose unnecessary markup details in the API because Bootstrap makes assumptions about the tags you’ll use to implement controls. As a result, I adapted the stylesheet to pass the tests, and the API is better for it. Had I not written failing tests first, I might have accepted the extra markup, overcomplicated the example, and then written tests that passed against the inferior implementation.
Tip
Twitter Bootstrap is a popular CSS framework that is sometimes useful for prototyping web applications quickly. It’s a good idea to play with it and see if it would be useful to you. Remember, though, that it’s designed to be tweaked and customized. Don’t feel like you have to conform to the default markup and classes if they don’t fit your particular use case.
There’s a running joke about how many sites look the same because they use all the same Bootstrap styles and controls. You may want to mix it up a little. There’s an interesting blog post on the topic called “Customize Twitter Bootstrap To Not Look Bootstrap-y” by Antonin Januska.
Time to see the test output from QUnit, shown in Figure 4-3.
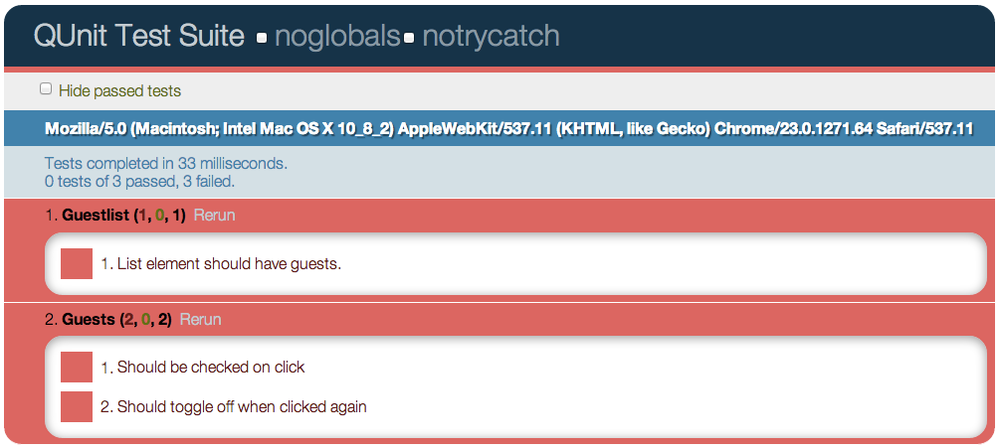
Failing tests will be listed in red. To make the tests turn green, you’ll need to implement the features. Normally, it’s wise to break the code up into separate concerns. There’s a lot more on that topic in Chapter 5. In this case, you’ll separate presentation concerns from data management. The data will come from a stubbed model module named guestlistmodel.js. For now, it will just return some hard-coded names. You can implement loading and saving later, as shown in Example 4-4.
Example 4-4. guestlist/src/guestlistmodel.js
varapi={load:functionload(){return['Jimi Hendrix','Billie Holiday','Nina Simone','Jim Morrison','Duke Ellington','John Bonham'];}};module.exports=api;
As you can see, this file is pretty straightforward. It just
defines an api object and sets it on
module.exports to expose it to other modules in accordance
with the CommonJS specification.
The code to manipulate the list DOM elements will go into a file named guestlistview.js, as shown in Example 4-5.
Example 4-5. guestlist/src/guestlistview.js
var$=require('jquery-browserify'),checkedinClass='icon-check',listClass='dropdown-menu',guestClass='guest',toggleCheckedIn=functiontoggleCheckedIn(e){$(this).toggleClass(checkedinClass);},$listView=$('<ol>',{id:'guestlist-view','class':listClass}).on('click','.'+guestClass,toggleCheckedIn),render=functionrender(guestlist){$listView.empty();guestlist.forEach(function(guest){$guest=$('<li class="'+guestClass+'">'+'<span class="name">'+guest+'</span></li>');$guest.appendTo($listView);});return$listView;},api={render:render};module.exports=api;
This is the file doing all the work. First, it uses
.require() to get a reference to jQuery and sets a few
self-documenting variable names. The toggleCheckedIn()
function is an event handler for the click event.
The list element gets added. Note that it’s using jQuery’s .on() method to delegate the click
events. .on() is the recently recommended way to hook up
event handlers in jQuery. It replaces the deprecated
.bind(), .live(), and .delegate()
methods with a simplified syntax and more consistent signature.
Tip
By delegating to the parent-ordered list element, you can replace, remove, and add children to the list without worrying about removing and replacing event listeners. There won’t be any memory leaks, and you don’t have to wait until the whole list is rendered before you attach the listener. If you’re hooking up listeners to DOM elements, most of the time, delegating to an ancestor is the right approach.
The .render() method takes an array of guest names,
iterates over each one, and adds a corresponding list item to the
$listView element. It then returns the rendered element to
the calling function.
The rest of the code simply defines the public API and exposes it via CommonJS.
Tip
Some developers will intersperse module.exports
assignments throughout a module. I find that having a single
module.exports at the bottom of the file more clearly
documents the module’s public API.
So far, the modules don’t know about each other, so there’s no way for them to do any work. To bring all the pieces together and manage the initial render, you’ll need a higher level abstraction to kick things off. Enter app.js, as shown in Example 4-6.
Example 4-6. guestlist/src/app.js
var$=require('jquery-browserify'),guestlistModel=require('./guestlistmodel'),guestlistView=require('./guestlistview'),$container=$('#container');$(functioninit(){varguestlistData=guestlistModel.load();$guestlist=guestlistView.render(guestlistData);$container.empty().append($guestlist);});
This one should be fairly simple to follow. It uses
require() to reference guestlistModel and
guestlistView, loads the guestlist, passes the data into guestlistView.render(), and adds it
to the container element.
Tip
The .append() line at the end of the
init() function calls jQuery’s .empty()
method first for a couple of important reasons. First, if there’s
anything in that space already, it should be replaced, but it also
releases references to event listeners so that the memory can be
garbage collected. This is a better strategy than simply calling
.html(). The latter is by far the more popular method,
but it can be a major source of bugs and confusion when you start to
develop large, client-heavy applications in JavaScript.
None of this is going to work yet, because the modules all need to be compiled together in order of their dependencies. For that, you’ll need Browserify.
Browserify is
a Node module that makes CommonJS modules work in the browser, using a
server-side build step. The browserify command is available
to kick off the bundle:
$ browserify src/app.js -o public/app.jsThat’s a bit too manual, though. You’ll want to use grunt to automate the build. That way you
can lint, build, and run your unit tests all in one step. Start with
package.json, as shown in Example 4-7.
Example 4-7. guestlist/package.json
{"name":"guestlist","version":"0.1.0","author":"Eric Elliott","description":"A handy tool for bouncers.","keywords":["party","guestlist"],"main":"dist/app.js","scripts":{"test":"grunt test"},"dependencies":{"jquery-browserify":"*"},"devDependencies":{"traverse":"*","grunt":"*","grunt-browserify":"*","browserify":"*"},"engines":{"node":">=0.6"}}
Since you’ll be deploying this app, you should consider all of the
code it uses to be part of the app, including its dependencies. You
don’t want those dependency versions shifting around under your feet
during your deploy step. The less uncertainty and moving parts you have
in a deploy step the better. For that reason, you’re going to want to
check in your node_modules directory (don’t add it to
.gitignore).
Because all of the dependencies are going to be checked into the
repository, you don’t need to specify the versions to install. The
"*" indicates that you want to use the latest version. This
practice assumes that you have been religiously unit testing your code,
that your deploy does not require its own npm install
(which I strongly discourage), and that you block deploys when
integration tests fail. In other words, * allows you to
keep up with the latest versions, but if you plan to use it, you need to
have a process in place so that you don’t break your production
deployment if something changes.
You’ll also need a gruntfile. Older versions of Grunt look for grunt.js by default. Versions after 0.4.0 expect gruntfile.js, instead (see Example 4-8).
Example 4-8. guestlist/grunt.js
/*global module*/module.exports=function(grunt){'use strict';grunt.initConfig({// Read package.json into an object for later// reference (for example, in meta, below).pkg:'<json:package.json>',meta:{// A template to add to the top of the bundled// output.banner:'\n/*! <%= pkg.title || pkg.name %> '+'- v<%= pkg.version %> - '+'<%= grunt.template.today("yyyy-mm-dd") %>\n '+'<%= pkg.homepage ? "* " + pkg.homepage + "\n'+' *\n " : "" %>'+'* Copyright (c) '+'<%= grunt.template.today("yyyy") %> '+'<%= pkg.author.name %>;\n'+' * Licensed under the <%= '+'_.pluck(pkg.licenses, "type").join(", ") %>'+' license */'},// Specify which files to send through JSHint.lint:{all:['./grunt.js','./src/**/*.js','./test-src/test.js']},// JSHint configuration options.jshint:{browser:false,node:true,strict:false,curly:true,eqeqeq:true,immed:true,latedef:true,newcap:true,nonew:true,noarg:true,sub:true,undef:true,unused:true,eqnull:true,boss:false},// Specify test locations for QUnit.qunit:{browser:['test/index.html']},// Configuration for browserify.browserify:{"public/app.js":{requires:['traverse'],entries:['src/**/*.js'],prepend:['<banner:meta.banner>'],append:[],hook:function(){// bundle is passed in as first param}}}});// Load browserify tasks. Needed for bundling.grunt.loadNpmTasks('grunt-browserify');// Setup command line argument tasks. For e.g.:// $ grunt # executes lint, browserify, qunit// $ grunt test # runs qunit task, only.grunt.registerTask('default','lint browserify qunit');grunt.registerTask('install','browserify');grunt.registerTask('test','qunit');};
The Grunt configuration file is just a Node JavaScript module, so you can write functions in it, evaluate expressions, and so on.
Browserify requires a little extra configuration sometimes. Please refer to the grunt-browserify
documentation for specific settings. Just don’t forget to load the
grunt tasks with
grunt.loadNpmTasks('grunt-browserify').
The .registerTask() calls make grunt command-line
arguments available. For example, all the default tasks
will run when you execute grunt without any arguments, and
grunt test will only run the tests.
Time for some action:
$ grunt
Running "lint:all" (lint) task
Lint free.

Running "browserify:public/app.js" (browserify) task

Running "qunit:browser" (qunit) task
Testing index.html..OK
>> 3 assertions passed (32ms)

Done, without errors.
Notice the QUnit task output. The tests are green, and in this form, you can run them on an automated continuous integration system.
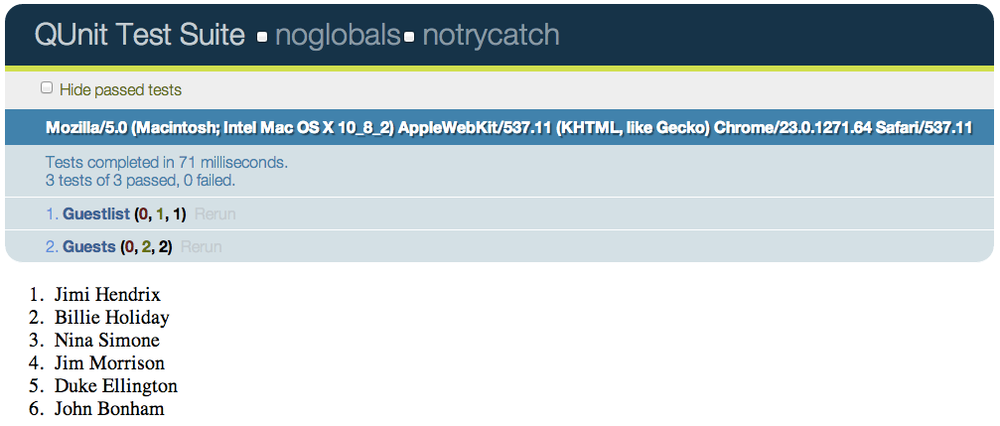
In case you’re curious, Figure 4-4 shows the browser output.
In general, CSS is a little outside the scope of this book, but there are a few tips you should be aware of. For some great ideas on how to use CSS for applications, see “Scalable and Modular Architecture for CSS” by Jonathan Snook.
The Guestlist code employs a custom icon font for the checkbox.
Fonts provide a major advantage over traditional methods like
png icons. For instance, they are infinitely scaleable, and
you can apply any CSS you’d normally apply to text. You can also create
a single, custom font that is easy for clients to download. The font was
created using a free custom font app called IcoMoon. Example 4-9
shows the icon font-related CSS.
Example 4-9. Icon font CSS
@font-face{font-family:'guestlist';src:url('fonts/guestlist.eot');src:url('fonts/guestlist.eot?#iefix')format('embedded-opentype'),url('fonts/guestlist.svg#guestlist')format('svg'),url('fonts/guestlist.woff')format('woff'),url('fonts/guestlist.ttf')format('truetype');font-weight:normal;font-style:normal;}[class^="icon-check"]:before,[class*=" icon-check"]:before{font-family:'guestlist';font-style:normal;font-size:.75em;speak:none;font-weight:normal;-webkit-font-smoothing:antialiased;}.icon-check:before{content:"\e000";}.dropdown-menu.icon-check.name{padding-left:1em;}
By now you should be familiar with the concept of modularity and comfortable with the idea of using build tools to bundle your application for deployment. You’ve seen an example of how to do that with Browserify. You should be able to figure out how to accomplish the same thing with AMD, if that’s your preference.
You saw some hinting at separation of concerns in this chapter, splitting the model from the view and so on. In the next chapter, you’ll see a much deeper explanation of what that means.
Get Programming JavaScript Applications now with the O’Reilly learning platform.
O’Reilly members experience books, live events, courses curated by job role, and more from O’Reilly and nearly 200 top publishers.

