Chapter 4. Networking and Messaging
This chapter is mostly concerned with communication between Chrome App clients and servers on the Internet, using both APIs unique to Chrome Apps and APIs that are part of HTML5, such as WebSockets. I also discuss communication between windows in the same app as well as between apps on the same computer. We also explore notifications that an app can pop up at the top of the screen to alert the user.
The first section, which looks at the Socket API, is highly technical and perhaps not of interest to many readers, but it’s one of the most important Chrome APIs, so I cover it in detail. However, if you want to go directly to the APIs you’re likely to actually use, you can skip that section and start with The XMLHttpRequest API.
Socket API
The Internet communicates by using TCP/IP, the initials of its two most important protocols: Transmission Control Protocol and Internet Protocol. These were developed from research sponsored by the United States government that began in the 1960s. The TCP/IP standard was eventually adopted by the Department of Defense in 1982. A year or so later, an API implementing TCP/IP was released by the University of California in version 4.2BSD (Berkeley Software Distribution) of Unix, and that API came to be called BSD Sockets.
It’s not much of an exaggeration to call BSD Sockets the API of the Internet. Nearly all web servers, browsers, email systems, FTP clients and servers, and everything else that talks to the Internet is based on BSD Sockets. That makes BSD Sockets probably the most important and universally implemented API there is.
The BSD Sockets API is today the principal networking API on essentially all general-purpose operating systems, including Windows and Unix-like systems such as OS X and Linux. Other platforms built on Unix-like systems, such as iOS, Android, and Chrome OS, generally wrap the BSD Sockets API with one better suited to their programming environment, and we’ll see the details of how Chrome does that later in this chapter.
How BSD Sockets Works
Although the C-language BSD Sockets API isn’t used directly by Chrome Apps, it’s informative to sketch how it works. The first thing to note is that it’s synchronous, as were almost all of the Unix system calls at the time it was designed.
A server creates a socket by using socket and then calls bind to bind it to a name that can be accessed by clients, such as api.openweathermap.org or 23.21.124.185. Then, it calls listen to indicate that it’s ready to accept connections from clients, and accept to wait until a client connects. The server’s thread that issued the accept is blocked (it’s synchronous) and can’t execute until an error occurs or somebody connects.
The client calls socket to create a socket. It then calls connect to connect to a name that some server is listening on (e.g., api.openweathermap.org). While it’s waiting, the thread is blocked. When connect returns, the client has what in Unix is called a file descriptor, open for reading and writing on the socket, and it can use the conventional Unix-style read and write system calls to communicate with the server.
On the server, when the client connects, the accept call returns with a file descriptor for the server’s use, open to another socket (not the one the server passed to accept), one just for that client. Then, the server must both service the client and issue another blocking accept. This requires tricky programming that I won’t go into, because it’s a Unix issue.
The sockets API is only for connecting client and server; what they say to each other after they’re connected is up to them. In practice, various data protocols have been defined, such as HTTP (Hypertext Transfer Protocol) for the web, FTP (File Transfer Protocol), WebSockets, or one of the email protocols such as SMTP (Simple Mail Transfer Protocol) or IMAP (Internet Message Access Protocol). In an example that I’ll present shortly, we’ll see what HTTP data actually looks like.
Chrome Socket API
For two reasons, the BSD Sockets API isn’t a good match for Chrome Apps: first, BSD Sockets is synchronous (accept and connect block until something happens), and second, it’s a C-language interface. Thus, the Chrome Socket API is a thin layer on top of BSD Sockets that’s designed specifically for JavaScript programs. (Don’t confuse the Chrome Socket API with HTML5 WebSockets, discussed in WebSockets.)
There are three Chrome Socket APIs:
-
chrome.sockets.tcpServerfor implementing servers. -
chrome.sockets.tcpfor implementing clients. -
chrome.sockets.udp, an alternative to TCP that uses packets instead of connections. This is very rarely used compared to TCP, and therefore not discussed in this book.
Note
Even though it’s strange to think of developing a server as a Chrome App, it’s possible, and it’s good to know that the APIs are there if you ever need them. More commonly, of course, Chrome Apps are clients, so I’ll present just chrome.sockets.tcp, and you can investigate the server APIs when and if you need them. Having said that, you’ll rarely even be using chrome.sockets.tcp, because there are higher-level APIs that are much easier to use, such as XMLHttpRequest and WebSockets, which I’ll get to later in this chapter.
To use the socket API, you need to add a socket section to the manifest.json file. It’s not a permission but a section in its own right where you specify the host and port to which you want to connect:
{
    "app": {
        "background": {
            "scripts": [ "background.js" ]
        }
    },
    ...
    "sockets": {
        "tcp": {
            "connect": "api.openweathermap.org:80"
        }
    }
}
A client starts by creating a socket:
chrome.sockets.tcp.create(properties, callback)
The properties are for unusual situations and normally can be empty. The callback is called when the socket is created; it’s passed a createInfo object with one important property, socketId, which identifies the socket. For example, this code displays the socket ID 3 on the console:
chrome.sockets.tcp.create({},
    function (createInfo) {
        console.log(createInfo.socketId);
    }
);
After you create the socket, the next step is to connect to a host and port:
chrome.sockets.tcp.connect(socketId, address, port, callback)
If chrome.runtime.lastError is defined when the callback is called, an error occurred; otherwise, the client has connected:
chrome.sockets.tcp.create({},
    function (createInfo) {
        console.log(createInfo.socketId);
        chrome.sockets.tcp.connect(createInfo.socketId,
            "api.openweathermap.org", 80,
            function (result) {
                if (chrome.runtime.lastError)
                    console.log(chrome.runtime.lastError.message);
                else {
                    console.log(result);
                }
            }
        );
    }
);
There isn’t any interesting result, just a zero to indicate that all is well.
After the connection is made, the client can send data to the server. Because api.openweathermap.org is an HTTP server, you must talk to it in HTTP, which means sending a GET request, which looks something like this:
GET /data/2.1/find/name?units=imperial&q=Chicago HTTP/1.1\r\n
Host: api.openweathermap.org\r\n
\r\n
Each line is terminated by a carriage return/newline combination (denoted by \r\n), and the request must end with a blank line. The path and query string are defined by the folks at openweathermap.org in their API specification for using their weather map service, which we’ll be using for a few example apps. In JavaScript, you’d write the request like this:
var req = "GET /data/2.1/find/name?units=imperial&q=Chicago HTTP/1.1\r\n" +
  "Host: api.openweathermap.org\r\n\r\n";
But, you can’t just send a plain string—it must be a JavaScript ArrayBuffer. Using the relatively new TextEncoder API, here’s a function to do the conversion:
function str2ab(str) {
    var encoder = new TextEncoder('utf-8');
    return encoder.encode(str).buffer;
}
The reverse function, which we’ll need later, is the following:
function ab2str(ab) {
    var dataView = new DataView(ab);
    var decoder = new TextDecoder('utf-8');
    return decoder.decode(dataView);
}
The API chrome.sockets.tcp.send does the sending after the connection has been made:
chrome.sockets.tcp.send(socketId, arrayBufferData, callback)
Now, we can do a little HTTP by sending the GET request to api.openweathermap.org:
var req = "GET /data/2.1/find/name?units=imperial&q=Chicago HTTP/1.1\r\n" +
  "Host: api.openweathermap.org\r\n\r\n";

chrome.sockets.tcp.create({},
    function (createInfo) {
        console.log(createInfo.socketId);
        chrome.sockets.tcp.connect(createInfo.socketId,
            "api.openweathermap.org", 80,
            function (result) {
                if (chrome.runtime.lastError)
                    console.log(chrome.runtime.lastError.message);
                else {
                    console.log(result);
                    chrome.sockets.tcp.send(createInfo.socketId,
                        str2ab(req),
                          function (sendInfo) {
                              console.log(sendInfo);
                          }
                    );
                }
            }
        );
    }
);
The sendInfo on the console should display as {bytesSent: 42, resultCode: 0}.
The request has been sent, but we didn’t set up a handler to receive anything back. We do that by using chrome.sockets.tcp.onReceive.addListener, whose callback function gets an info object with one property: data. It’s an ArrayBuffer, so we use ab2str to convert it to text:
chrome.sockets.tcp.onReceive.addListener(
    function (info) {
       if (info.data)
            console.log(ab2str(info.data));
    }
);
With the onReceive handler in place, we can rerun the sending code, and the entire HTML of the response—the weather in Chicago—appears on the console, as shown in Example 4-1.
GET requestHTTP/1.1 200 OK
Server: nginx
Date: Wed, 19 Mar 2014 14:38:26 GMT
Content-Type: text/html
Transfer-Encoding: chunked
Connection: keep-alive
X-Source: back
24d
{"message":"","cod":"200","type":"base","calctime":"","units":"imperial","
count":1,"list":[{"id":4887398,"coord":{"lat":41.850029,"lon":-87.650047},
"name":"Chicago","main":{"temp":43.74,"pressure":1002,"humidity":93,"
temp_min":41,"temp_max":46.4},"dt":1395237126,"date":"2014-03-19
13:52:06","wind":{"speed":7.78,"deg":210,"gust":7.2},"clouds":{"all":90},"
weather":[{"id":500,"main":"Rain","description":"light
rain","icon":"10d"},{"id":701,"main":"Mist","description":"mist","icon":"
50d"}],"sys":{"country":"US","population":2695598},"url":"http:\/\/
openweathermap.org\/city\/4887398"}]}
0The meat of the response is the JSON data we requested, which is easy to parse, and we’ll soon see how that’s done in a small weather-report application that accesses api.openweathermap.org.
Modules and Module Loading
In the next section, I’m going to present code in the form of a module, so here’s a brief excursion to explain how I use modules in JavaScript.
Generally, a module is a software component that implements functionality through a formally defined interface, the implementation of which is hidden inside the module. JavaScript, unlike almost all other languages, doesn’t have modules built in, but you can accomplish the same thing by defining an object with an exposed interface and internal functions and variables to implement that interface.
As an example, a module defining socket functionality, in a file named socket.js, might look like this:
var Socket = (function () {
    var module_var1 = 0;
    // ... more module variables ...

    var api = {
        HttpRequest: function () {
        }
    };

    api.HttpRequest.prototype.method1 = function () {
        // ...
    };

    // ... more methods ...

    return api;

    function internal_function1() {
        // ...
    }

    // ... more internal functions ...

})();
The global Socket is the module object, and its value is set by calling an anonymous function, so anything defined inside the function is local to it and invisible to the rest of the app. Note that the function definition is enclosed in parentheses, so as not to confuse the JavaScript parser, and then it’s immediately called, with the open and close parentheses on the very last line.
The anonymous function returns a module object with one method, HttpRequest, that’s a constructor for a HttpRequest object. The module object is assigned to the Socket global variable, so you refer to the constructor as Socket.HttpRequest. The Socket.HttpRequest object has a public method, method1, and a module-wide variable, module_var1, which is internal to the Socket module, but visible to everything inside the module.
You use the Socket.HttpRequest object like this:
var skt = new Socket.HttpRequest();
skt.method1();
The socket.js file is only one of several utility objects we’ll be defining, and it’s a nuisance to keep adding script tags to the HTML file—made especially tricky because some will refer to others, so the order of inclusion matters. I like to include just one file, common.html, and have it load the other JavaScript files:
<script src="Socket.js"></script>
<script src="Facebook.js"></script>
<!-- ... more modules to be loaded -->
Now, I can list the modules I commonly use in one file. (We’ll see Facebook.js later in this chapter.) All of the modules are in a lib subdirectory, so most of the index.html files in the examples from now on will have one <link> tag (for common.html, if needed, and one <script> tag for the app code):
<!DOCTYPE html>
<html lang="en">
<head>
    <meta charset="utf-8" />
    <title>WeatherReport</title>
    <link rel="import" href="lib/common.html">
    <script src="WeatherReport.js"></script>
</head>
<body>
...
I’ll be following this scheme for all of the modules that I present in this book. It’s probably the simplest approach that provides the essentials without getting too complicated; thus, our focus can stay on Chrome Apps. If you want something more feature-rich, you can read about the Asynchronous Module Definition (AMD) API at github.com/amdjs/amdjs-api. AMD and dynamic loading are supported by RequireJS, which works well with Chrome Apps.
Wrapping the Socket API as an Object in a Module
Our socket example works, but it’s an awkward way to use sockets. The API calls aren’t especially hard to code, but they’re tedious to write, and doing all those string conversions is annoying. What we want are some simple wrapper functions that we can use any time we need to use sockets for HTTP requests.
It’s most convenient if all of the code for these functions is placed in a single JavaScript file that defines a module. We’ll implement the object Socket.HttpRequest as such a module, basing it on the chrome.sockets.tcp example code that we already have.
We don’t normally think of a URL as a host plus a path; rather, we consider it one continuous string, so we’d like the Socket.HttpRequest object to parse it for us by using a method that we’ll call open, like this:
var skt = new Socket.HttpRequest();
skt.open("get",
  "http://api.openweathermap.org/data/2.1/find/name" +
  "?units=imperial&cnt=2&q=Chicago");
I’ve formed the URL from two concatenated strings so that the code fits on this page. The first argument says that GET should be used, in case we want to implement POST requests, too, at some point. Here’s the code for open:
var Socket = (function () {

var api = {
    HttpRequest: function () {
    }
};

api.HttpRequest.prototype.open = function (method, url) {
    var a = url.match(/^http:\/\/([^/]*)(.*)$/);
    this.host = a[1];
    this.path = a[2];
    this.req = "GET " + this.path + " HTTP/1.1\r\nHost: " +
      this.host + "\r\n\r\n";
};

return api;
})();
This method adds several object properties (for example, this.host) to the object, for use later.
Before we’re ready to go further, there’s a problem: the chrome.sockets.tcp.onReceive handler is global and is called for data received on any socket. However, we’ll want to associate a receive callback with a specific Socket.HttpRequest instance, so the single handler will have to know what callback to call. We do that by using a global (to the module) array of Socket.HttpRequest instances, indexed by socket ID:
var activeSockets = [];
When a socket is created, the object reference is stored in activeSockets, and then the handler has a way to find out which object belongs to that socket. We can see this in the code for the send method, which is almost identical to the earlier example, except that some of the literals have been replaced by object properties:
api.HttpRequest.prototype.send = function () {
    var that = this;
    chrome.sockets.tcp.create({},
        function (createInfo) {
            activeSockets[createInfo.socketId] = that;
            chrome.sockets.tcp.connect(createInfo.socketId, that.host, 80,
                function (result) {
                    if (chrome.runtime.lastError) {
                        if (that.onerror)
                            that.onerror(chrome.runtime.lastError.message);
                    }
                    else {
                        chrome.sockets.tcp.send(createInfo.socketId,
                          str2ab(that.req),
                            function (sendInfo) {
                            }
                        );
                    }
                }
            );
        }
    );
}
A well-known JavaScript trap is that local functions (such as the callback in this example) have this set to themselves, rather than to the outer object. Consider this line:
chrome.sockets.tcp.connect(createInfo.socketId, that.host, 80,
If the code had used this.host, it would have been undefined because this would refer to the callback passed to chrome.sockets.tcp.create, not to the Socket.HttpRequest instance. The fix is to define a that variable local to the method and refer to it, as shown in the code.
If an error occurs, a onerror callback is called if it’s defined, as it might be like this:
skt.onerror = function (msg) {
    // display the msg
};
To send the request, all we have to do is add a call to send to what we had before:
var skt = new Socket.HttpRequest();
skt.open("get",
  "http://api.openweathermap.org/data/2.1/find/name" +
  "?units=imperial&cnt=2&q=Chicago");
skt.send();
Now, we’re ready for the chrome.sockets.tcp.onReceive handler, which can use the activeSockets array to figure out to which object the socket ID belongs:
chrome.sockets.tcp.onReceive.addListener(
    function (info) {
        var req = activeSockets[info.socketId];
        if (req) {
            if (info.data)
                req.receiveData(ab2str(info.data));
            else
                req.receiveData();
        }
    }
);
Recall from Example 4-1 that the data comes back in the form of an HTTP header followed by some JSON (if the request succeeded). The format of the response follows this pattern, assuming chunking (splitting the response into pieces), which is how openweathermap.org delivers it:
HTTP/1.1 <status> OK
...

<count>
<json>


0
Finding the status and, if it’s 200 (the HTTP success code), extracting the JSON, is the job of the receiveData method. I’ve written it only for a single chunk; if you want, you can extend it for multiple chunks and for unchunked responses. Here’s the code:
api.HttpRequest.prototype.receiveData = function (s) {
    var a = s.split("\r\n");
    var msg;
    if (a.length > 0) {
        if (a[0].indexOf("HTTP/1.1 ") == 0)
            this.statusText = a[0].substr(9);
        else
            this.statusText = a[0];
        this.status = parseInt(this.statusText);
    }
    else {
        this.status = 0;
        this.statusText = null;
    }
    if (this.status == 200) {
        var a = s.split("\r\n\r\n");
        var n = a[1].indexOf("{");
        var len = parseInt(a[1], 16);
        this.response = a[1].substr(n, len);
    }
    else
        this.response = null;
    if (this.onload)
        this.onload();
}
The app can set a callback like the following to receive the response:
skt.onload = function () {
    // data was received
}
Finally, there’s an error callback, using chrome.sockets.tcp.onReceiveError.addListener, which I didn’t show earlier. It also uses the activeSockets array to find the object:
chrome.sockets.tcp.onReceiveError.addListener(
    function (info) {
        var req = activeSockets[info.socketId];
        if (req && req.onerror)
            req.onerror("Result Code: " + info.resultCode);
    }
);
Although Socket.HttpRequest is only for HTTP, its HTTP-ness resides in the form of data sent and how received data is interpreted. All of the socket plumbing is universal and can work for any Internet protocol.
A Weather Report App
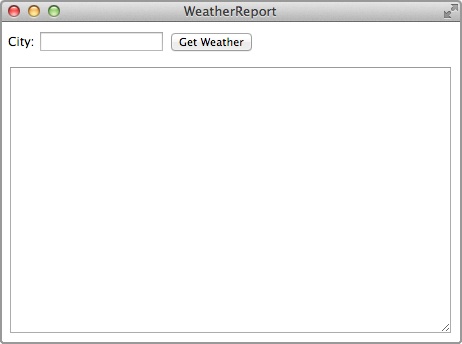
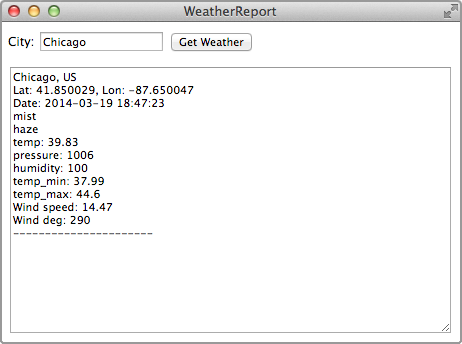
In this section, we’re going to use Socket.HttpRequest to implement a simple weather report app, which you can see in Figure 4-1. When you type a city and click the Get Weather button, a report displays, as shown in Figure 4-2.
The index.html file is pretty simple (note the link and script elements):
<!DOCTYPE html>
<html lang="en">
<head>
    <meta charset="utf-8" />
    <title>WeatherReport</title>
    <link rel="import" href="lib/common.html">
    <script src="WeatherReport.js"></script>
</head>
<body>
    <label for="city">City:</label>
    <input type="text" id="city">
    <button id="get">Get Weather</button>
    <p>
    <textarea id="textarea" cols="60" rows="20" readonly
      style='outline: none;'></textarea>
    </p>
    <p id="message"></p>
</body>
</html>
The app’s JavaScript file, WeatherReport.js, begins with the usual onload handler:
window.onload = function () {

var skt = new Socket.HttpRequest();

document.querySelector("#get").addEventListener("click",
    function () {
        getWeather(document.querySelector("#city").value);
    }
);

};
When the button is clicked, getWeather is called. It uses Socket.HttpRequest, just as we’ve seen in the examples earlier:
function getWeather(city) {
    var textarea = document.querySelector("#textarea");
    textarea.value = "Wait...";

    skt.onload = function () {
        if (skt.status === 200) {
            var obj = JSON.parse(skt.response);
            showMessage(obj.message, true);
            textarea.value = formatWeather(obj);
        }
        else
            showMessage("Error: " + skt.status);
    }

    skt.onerror = function (msg) {
        showMessage(msg);
    };
    skt.open("get", "http://api.openweathermap.org/data/2.1/find/name" +
      "?units=imperial&cnt=2&q=" + city);
    skt.send();
}
The showMessage function is the same one we used in Chapters 2 and 3. Because the JSON response has already been extracted if the status is 200, it’s easy to convert it to a JavaScript object by using the call to JSON.parse. Sometimes, the openweathermap.org API provides a message property, which is displayed. Then, the report object is passed on to formatWeather for formatting:
function formatWeather(value) {
    if (!value.list || value.list.count == 0)
        return "No cities found";
    var s = "";
    for (var x of value.list) {
        s += x.name;
        if (x.sys.country)
            s += ", " + x.sys.country;
        s += "\n";
        s += "Lat: " + x.coord.lat + ", Lon: " + x.coord.lon + "\n";
        s += "Date: " + x.date + "\n";
        for (var d of x.weather)
            s += d.description + "\n";
        if (x.main)
            for (var k in x.main)
                s += k + ": " + x.main[k] + "\n";
        if (x.wind)
            for (var k in x.wind)
                s += "Wind " + k + ": " + x.wind[k] + "\n";
        if (x.rain)
            s += "Rain today: " + x.rain.today + "\n";
        s += "----------------------\n";
    }
    return s;
}
There’s no methodology that you can use to construct functions like formatWeather, because every API I’ve used formats its results differently. You just keep horsing around until you’ve got something you like, which is what I did. You’ll find it helpful to dump out the object with console.log so that you can explore its properties.
The XMLHttpRequest API
There might have been something familiar to you about Socket.HttpRequest: it’s a lot like XMLHttpRequest, which is built in to Chrome and most other browsers. Actually, Socket.HttpRequest is modeled on XMLHttpRequest exactly, both to provide an example of how you use sockets, and to provide an in-depth explanation of what XMLHttpRequest actually does under the covers.
Incidentally, although XMLHttpRequest is at the heart of the Ajax technique, which is widely used for dynamic websites, it has little to do with XML and, in fact, is just as often used with JSON, as we did.
Note
The name Ajax started out life presented in all uppercase (AJAX) and until not long ago was actually an acronym that stood for Asynchronous JavaScript and XML. Today, the convention is to consider it just a name, spelled “Ajax.”
I had a surprise in store all along: you can change the Weather Report example to use XMLHttpRequest by changing the following single line of code:
var skt = new XMLHttpRequest();
You also need to add any URLs you access as permissions to the manifest.json file, not in the socket section that was required for chrome.sockets.tcp, but as actual permissions, like this:
"permissions": [
    "http://api.openweathermap.org/*"
],
If you don’t want to enumerate every URL in the permissions section, you can arrange for the app to access any and all URLs:
"permissions": [
    "<all_urls>"
]
With these minor changes, the app behaves exactly as before, but now using the built-in XMLHttpRequest API instead of one based on chrome.sockets.tcp.
For HTTP, you’re definitely better off with XMLHttpRequest as opposed to doing the same thing with sockets, but XMLHttpRequest is only for HTTP and HTTPS requests. You’ll go to sockets when you need to implement a nonstandard protocol, as might be used by specialized devices such as drones or programmable ball machines.
It’s convenient to put a wrapper around XMLHttpRequest. This makes it even easier to use and was inspired by the popular Ajax function in jQuery, but with a very different interface. Here it is as a module in the file Ajax.js:
var Ajax = (function () {
    var api = {
        ajaxSend: function (url, responseType, successCallback, errorCallback,
          headers) {
            var req = new XMLHttpRequest();
            req.onload = function (e) {
                successCallback(req.status, req.response);
            };
            req.onerror = errorCallback;
            req.responseType = responseType ? responseType : "text";
            req.open("get", url);
            if (headers)
                for (var v in headers)
                    req.setRequestHeader(v, headers[v]);
            req.send();
        }
    };
    return api;
})();
One feature of XMLHttpRequest that we haven’t used but that is implemented by the Ajax object, is a fifth argument to ajaxSend that provides headers to be added to the request. We’ll need that feature later, in Accessing Google APIs.
To see how to use the Ajax object, here’s a rewrite of getWeather from the Weather Report app we developed earlier:
function getWeather(city) {
    var textarea = document.querySelector("#textarea");
    textarea.value = "Wait...";

    Ajax.ajaxSend("http://api.openweathermap.org/data/2.1/find/name" +
      "?units=imperial&cnt=2&q=" + city, "json",
        function (status, obj) {
            if (status === 200) {
                showMessage(obj.message, true);
                textarea.value = formatWeather(obj);
            }
            else
                showMessage("Error: " + status);
        },
        function (e) {
            showMessage("Communication error");
            console.log('Communication error:', e);
        }
    );
}
We’ll see more uses of the Ajax module later in this chapter when we use the chrome.identity API to access Facebook.
Identity API
Anybody can access api.openweathermap.org, but when you access nonpublic resources on sites such as Facebook, you must log in. In the past, apps did this by requesting a login name and password from the user and then storing that so it could be used with whatever login API the website provided. This created a few problems:
- It isn’t safe to have logins and passwords stored in various places, because there’s no guarantee that they’re sufficiently protected.
- There’s no way to revoke permission for the app to access the site, other than changing the password. (Deleting the app from your computer isn’t an option if it’s actually a website.)
- Permissions are all-or-nothing. There’s no way to provide permission to access the site but not update it; when the app is logged in, it has all the privileges of a user.
A few years ago an API called OAuth became widely available. With OAuth, you don’t provide your login and password to an app that needs to log in; rather, the app contacts the website you’re trying to access (for example, Facebook) and requests the permissions it needs. You then get an authorization request from the website, not from the app. If you grant permission, the website provides a token to the app that it can use to access APIs. You can go to the website and revoke permission at any time, causing the token to become invalid. The important part is that the app never sees your login or password.
The first version of OAuth was complicated to use, but OAuth2 is much more straightforward. It’s especially easy for Chrome Apps because there’s a chrome.identity.launchWebAuthFlow API that does all the work for you:
chrome.identity.launchWebAuthFlow(details, callback)
The details include the OAuth2 URL provided by the website and a few other options, as we’ll see shortly.
You need identity permission in the manifest.json file as well as permission for any URLs you need to access. Here’s the easiest way to do this:
"permissions": [
    "identity",
    "<all_urls>"
]
Accessing the Facebook API
When the chrome.identity.launchWebAuthFlow call is made, the user sees a login form from the website, similar to the one in Figure 4-3. Then, after successfully logging in, the user sees an authorization form (Figure 4-4) listing just the permissions requested by the app.
If the user authorizes the app, chrome.identity.launchWebAuthFlow calls its callback function and provides the app with an access token. If the user had already authorized the app in a previous launch, chrome.identity.launchWebAuthFlow will provide the access token without any dialogs, in effect keeping the user “logged in.”


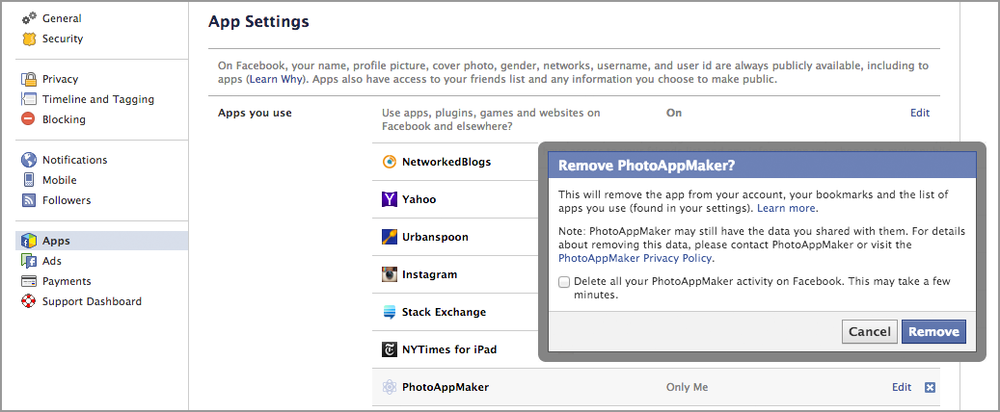
At any time, the user can go to the website to revoke permission for the app, as shown in Figure 4-5 for Facebook.
What makes OAuth2 challenging to use isn’t the interaction with the website—which is automated by the Chrome API—but figuring out what URL to pass to chrome.identity.launchWebAuthFlow. You’ll need to study the website’s developer documentation in depth; here, I’ll show the details for Facebook, but, unfortunately, you’ll find that every website does it differently.
Facebook uses a URL similar to the following (broken into several lines for readability):
https://www.facebook.com/dialog/oauth
?client_id=<clientID>
&response_type=token
&redirect_uri=<redirect_uri>
&scope=<scope>
The <clientID>, a 15-digit number, is provided by Facebook when the app is registered by the developer—yet another step that’s done differently for every website, although Facebook makes it fairly easy. (Log in to Facebook and find the Create App page; doing it for apps that want to use Google APIs is described in Appendix B.)
The <redirect_uri> is what Facebook accesses when the OAuth2 process is completed. For Chrome Apps, there’s an API for getting it: chrome.identity.getRedirectURL.
The <scope> is the list of permissions you want authorized, which is documented on the website’s developer pages. For our Facebook example, we just need user_photos.
We’ll put the call to chrome.identity.launchWebAuthFlow in an authorize method of a Facebook object defined in lib/Facebook.js:
var Facebook = (function () {
    var access_token = null;
    var api = {
        authorize: function (clientID, scope, callback) {
            access_token = null;
            chrome.identity.launchWebAuthFlow(
                {
                    url: "https://www.facebook.com/dialog/oauth?client_id=" +
                      clientID + "&response_type=token&" +
                      "redirect_uri=" + chrome.identity.getRedirectURL() + "&" +
                      "scope=" + scope,
                    interactive: true
                },
                function (responseURL) {
                    console.log(responseURL);
                    if (responseURL) {
                        var a = responseURL.match(/access_token=([^&]*)&/);
                        if (a.length > 0)
                            access_token = a[1];
                        callback(true);
                    }
                    else
                        callback(false);
                }
            );
        }
    };
    return api;
})();
In the first argument (detail) to chrome.identity.launchWebAuthFlow, the interactive property is set to true so we get the login/authorization interaction that we saw earlier, which is required for Facebook and most other websites that use OAuth2.
If authorization succeeds, responseURL is a string containing various parameters, so that we use a regular expression to extract the access_token, which we store in a module variable. Then, we call the app’s callback by specifying true, indicating that the app can proceed to execute various Facebook APIs, which I’ll show shortly.
I’ll show the app that uses the Facebook object soon, but for now here’s the part that calls Facebook.authorize (the client ID is bogus):
Facebook.authorize('123...345', 'user_photos',
    function () {
        getPhotos();
    }
);
The function getPhotos, which we’ll see when we see the app, displays the Facebook photos.
There’s one more method to look at: Facebook.call, which makes Facebook API calls after an app is authorized. Again, every website is different, so you need to study the developer documentation to find out how the API works. This isn’t a book about accessing Facebook, so I’ll just explain the one call we’ll use (there are dozens of them):
https://graph.facebook.com/me/photos/uploaded?access_token=<access-token>
Facebook uses what it calls a Graph API, which works like this: we start with me (the logged-in user), navigate to the user’s photos, and then to the uploaded photos. Each API call returns its results differently, but always as a JSON-formatted object that you must explore to find what you want, although Facebook does document the subobjects and their properties.
For photos, it’s easy: the returned object is an array of Photo objects, each of which has properties such as source, the URL of the photo, width, and height. We’ll use those properties in the app.
With that introduction, here’s the Facebook.call method from lib/Facebook.js:
        call: function (method, successCallback, errorCallback) {
            var url = 'https://graph.facebook.com/' + method;
            if (method.indexOf('?') === -1)
                url += '?';
            else
                url += '&';
            url += 'access_token=' + access_token;
            Ajax.ajaxSend(url, "json",
                function (status, response) {
                    if (response.error) {
                        var err = response.error;
                        if (response.error.message)
                            err = response.error.message;
                        if (errorCallback)
                            errorCallback(response.error.message);
                    }
                    else
                        successCallback(response);
                }
            );
        }
In building up the URL, we need to precede the access_token parameter with & if the method itself had a ?, which some do; otherwise, we use a ?. We send the query with Ajax.ajaxSend (see The XMLHttpRequest API).
A Facebook Photos App
With the Facebook object in hand, let’s build a little app to show Facebook photos (mine), as presented in Figure 4-6.

This simple app doesn’t have any buttons or any options; when you launch it, it gets authorization (if isn’t already authorized), gets a list of photos, and displays them in the window. The index.html file is pretty simple, consisting mostly of CSS to make the content div fill the entire window and to display “Wait…” while the photos are being fetched.
<!DOCTYPE html>
<html lang="en">
<head>
    <meta charset="utf-8" />
    <title>FBphotos</title>
    <link rel="import" href="lib/common.html">
    <script src="FBphotos.js"></script>
    <style>
        body, html {
            height: 100%;
            margin: 0;
        }
        #content {
            overflow-y: scroll;
            height: 100%;
            position: relative;
            background-color: black;
        }
        #wait {
            margin: 100px 100px;
            color: white;
            font-size: 30px;
        }
    </style>
</head>
<body>
    <div id="content"><p id="wait">Wait...</p></div>
</body>
</html>
As usual, the app file, FBphotos.js, puts all of the code in the onload handler to ensure that the HTML is processed and all the modules are loaded:
window.onload = function () {

Facebook.authorize('123...345', 'user_photos',
    function () {
        getPhotos();
    }
);
window.onresize = layoutPhotos;

// ... rest of app

};
Laying out the photos in the window is the job of layoutPhotos, which is also the handler for onresize events.
As I mentioned earlier, getPhotos executes the Facebook API call to retrieve the URLs of the uploaded photos, an example of which is shown here:
https://scontent-a.xx.fbcdn.net/hphotos-ash3/t1.0-9/s720x720/
48007_10200417185706189_1210761502_n.jpg
Because of a Chrome App restriction, you can’t just set this URL as the src attribute of an <img> element and add it to the HTML, a technique that would work just fine in a web page. Instead, you must access the image’s URL via HTTP and get the binary data coming back (compressed JPEG data) as a Blob, form it into a very long URL that contains the literal Blob data, and then use that self-contained URL in the <img> element. It’s convenient to code a method to do that conversion in a Photo object, in the file Photo.js:
var Photo = (function () {
    var api = {
        getBlobUri: function(url, callback) {
            Ajax.ajaxSend(url, "blob",
                function (status, response) {
                    callback(URL.createObjectURL(response));
                }
            );
        }
    };
    return api;
})();
The creation of the Blob-containing URL is done by URL.createObjectURL, which is built into Chrome.
With the Photo.getBlobUri method, we’re ready to look at getPhotos:
var photos;

function getPhotos() {
    Facebook.call('/me/photos/uploaded',
        function (response) {
            photos = response.data;
            var blobCount = 0;
            photos.forEach(
                function (photo) {
                    Photo.getBlobUri(photo.source,
                        function (blob_uri) {
                            photo.blob_uri = blob_uri;
                            if (++blobCount === photos.length)
                                layoutPhotos();
                        }
                    );
                }
            );
        }
    );
}
The Photo.getBlobUri callback has only three lines of code, but they’re tricky:
-
The returned URI is added to the
Photoobject. That’s a little adventurous because the object was supplied by Facebook, but there’s not much chance that Facebook will ever have a property calledblob_uri. -
Like most things worth doing,
Photo.getBlobUriis asynchronous, and we don’t want to lay out and display the photos until we’ve converted all thesourceURLs. So, we keep a count of how many were converted and calllayoutPhotosonly when they’re all done.
One way or another—because the photos were just downloaded or because the window was resized—layoutPhotos lays out and displays the photos:
function layoutPhotos() {
    var gap = 5;
    var div = document.querySelector('#content');
    while (div.firstChild)
        div.removeChild(div.firstChild);
    var totalHeight = layout(photos, div.clientWidth, div.clientHeight / 4, gap);
    var img;
    photos.forEach(
        function (photo) {
            img = new Image();
            img.src = photo.blob_uri;
            img.style['max-width'] = photo.xWidth + 'px';
            img.style['max-height'] = photo.xHeight + 'px';
            img.style['left'] = photo.xLeft + 'px';
            img.style['top'] = photo.xTop + 'px';
            img.style['position'] = 'absolute';
            div.appendChild(img);
        }
    );
    img.style['margin-bottom'] = gap + 'px'; // gap at bottom of whole div
}

function layout(photos, targetWidth, targetHeight, gap) {
    var x = gap;
    var y = gap;
    photos.forEach(
        function (photo) {
            photo.xHeight = targetHeight;
            photo.xWidth = photo.width * targetHeight / photo.height;
            var cellWidth = photo.xWidth + 5;
            if (x + cellWidth > targetWidth) {
                x = gap;
                y += targetHeight + gap;
            }
            photo.xLeft = x;
            photo.xTop = y;
            x += cellWidth;
        }
    );
}
The layout function determines where each photo goes with a very simple scheme not unlike how a word processor fills lines with ragged-right text. You can see the results in Figure 4-6. These two functions don’t do anything particularly related to Chrome Apps, so I won’t go through them line by line. All they do is take the dimensions of each photo to figure out where it goes and then construct a corresponding <img> element, which is then appended to the HTML.
I won’t show the code here, but there’s a much more sophisticated layout algorithm in the Photo object (Photos.js) that you can find in the online example code for this book.
Accessing Google APIs
Like Facebook and many other sites, Google requires that an app be registered to get a client ID before it can use any APIs. The steps for getting a client ID through Google are enumerated in Appendix B.
Google uses OAuth2, but there’s a special authorization API just for Google, used in place of chrome.identity.launchWebAuthFlow, called chrome.identity.getAuthToken:
chrome.identity.getAuthToken(details, callback)
The details are the same as for chrome.identity.launchWebAuthFlow: an object with the interactive property, which you’ll usually set to true. The callback function gets the access token directly, so you don’t have to extract it from a response URL, as we did earlier in the FBphotos example. If the token argument is undefined, an error occurred.
Instead of passing the client ID and scope directly to the OAuth2 call as URL parameters, chrome.identity.getAuthToken takes them from the manifest:
"permissions": [
    "identity"
],
"key": "MIIBIjANB...yyltEwIDAQAB",
"oauth2": {
    "client_id": "2546277...3kj.apps.googleusercontent.com",
    "scopes": [
        "https://www.googleapis.com/auth/drive"
    ]
}
The various scopes are documented along with the particular API you’re using. Appendix B explains how to get the client ID and how to include a key property in the manifest so that the app ID remains fixed, because having it change during development is awkward and prone to error.
After the app is authorized by chrome.identity.getAuthToken, you can issue calls specified by the API you want to use. There are dozens of them at developers.google.com/apis-explorer.
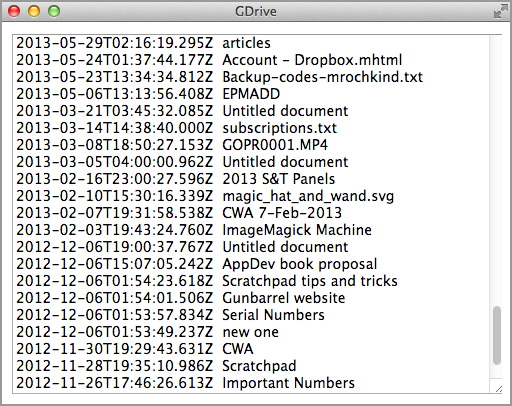
As a simple example, the GDrive app shown in Figure 4-7 lists files on your Google Drive.
The index.html file is similar to ones we’ve been using in other examples:
<!DOCTYPE html>
<html lang="en">
<head>
    <meta charset="utf-8" />
    <title>GDrive</title>
    <link rel="import" href="lib/common.html">
    <script src="GDrive.js"></script>
</head>
<body>
    <textarea id="textarea" cols="55" rows="20" readonly
      style='outline: none;'></textarea>
</body>
</html>
An object in Google.js wraps the calls needed to access Google APIs, very similar to Facebook.js that we saw in Accessing the Facebook API:
var Google = (function () {
    var access_token;

    var api = {
        authorize: function (callback) {
            chrome.identity.getAuthToken(
                {
                    'interactive': true
                },
                function(token) {
                    access_token = token;
                    callback(token !== undefined);
                }
            );
        },

        call: function (method, successCallback, errorCallback) {
            var url = 'https://www.googleapis.com/' + method;
            Ajax.ajaxSend(url, "json",
                function (status, response) {
                    if (response && response.error && response.error.message)
                        errorCallback(response.error.message);
                    else if (status == 200)
                        successCallback(response);
                    else
                        errorCallback('Result code: ' + status);
                },
                function (e) {
                    if (errorCallback)
                        errorCallback('Communication error');
                },
                {
                    Authorization: 'Bearer ' + access_token
                }
            );
        }
    };
    return api;
})();
Google API calls generally have the form https://www.googleapis.com/, where <method><method> is the method (e.g., drive/v2/files). Note in the call method that we send the access token along as an Authorization header, which is a bit more convenient than supplying it as a URL query parameter. That uses the fifth argument to Ajax.ajaxSend that I mentioned earlier.
The entire GDrive app code is surprisingly compact:
window.onload = function () {

Google.authorize(
    function () {
        var ta = document.querySelector('#textarea');
        ta.value = 'Wait ...';
        Google.call('drive/v2/files?q=trashed%3dfalse',
            function (response) {
                var s = '';
                response.items.forEach(
                    function (file) {
                        s += file.modifiedDate + '  ' + file.title + '\n';
                    }
                );
                ta.value = s;
            },
            function (msg) {
                ta.value = 'Error: ' + msg;
            }
        );
    }
);

};
Notice the method string:
drive/v2/files?q=trashed%3dfalse
The trashed=false parameter value is written with the equals sign escaped as %3d. This is because it’s the value of the q parameter, not a top-level query parameter in its own right.
As GDrive illustrates, using Google APIs from Chrome Apps is much like using any other API, except for the special, Google-only, OAuth2 authorization.
WebSockets
HTTP was originally designed as a way for web browsers to fetch web pages. It has since been coopted for use by web APIs, as we’ve seen. Parameters describing the request are specified by paths and query parameters (or by POST data), and the requested data must be extracted from the response. This approach, though very widely used, is inefficient for two reasons:
- Supplying all those headers with every request and response slows down communication and requires extra processing.
- All interaction must be initiated from the client.
The second issue is occasionally worked around by having the client issue a long-term request, which the server responds to when it has something to say, possibly minutes or even hours after the request was issued. This can become complicated if the client wants to do some other communication in the interim or if the long-term request times out; in both cases, the request must be reissued.
Much better would be to use a symmetrical protocol by which either client or server can send a message and the overhead of all those headers is eliminated. That’s what WebSockets (part of the HTML5 effort) are all about. They’re not specific to Chrome Apps, but they do work well with them.
WebSockets API
Using WebSockets is considerably easier than using XMLHttpRequest. First, the client creates a connection to the server with the constructor, like this:
var ws = new WebSocket('ws://23.21.124.185:5002');The special ws protocol indicates that the connection is to a WebSocket. After the object is instantiated, a message can be sent by using send:
ws.send(data);
The data can be a string, an ArrayBuffer, or a Blob. A message is received with an onmessage handler:
ws.onmessage = function (event) {
    if (event.data) {
        // do something with data
    }
    else
        // no data was received
};
Those are the basics. There is one additional API call, close, and a few additional events such as onopen, but not many—WebSockets really is very simple.
WebSockets is only a client API; there is no corresponding server API. To build a server, you need to follow Internet Engineering Task Force (IETF) document RFC6455, which defines the WebSocket Protocol in terms of the raw data being transmitted on the sockets. (Recall from Socket API that I characterized sockets as the underlying API of the Internet.)
Example WebSocket Server
There is a Chrome API for server-side sockets (chrome.sockets.tcpServer), so it’s possible to implement a WebSocket server as a Chrome App. But, WebSocket servers are normally built by using server technologies. Because implementing a WebSocket server is a distraction from our focus on Chrome Apps, I won’t describe the example one I’ve built in detail, but I’ve included it in the example code for this book. It accesses the New York City MTA (Metropolitan Transportation Authority) Bus Time service to provide a WebSocket interface that supplies bus status.
The example server is implemented with Node.js, for which there’s a good WebSocket library. I ran the server on an Amazon Elastic Computer Cloud (EC2) instance that is accessible (when I’m running it) at IP address 23.21.124.185, port 5002. (Sorry, it’s not available to you, although its source code and the MTA Bus Time server are.)
Example WebSocket Client
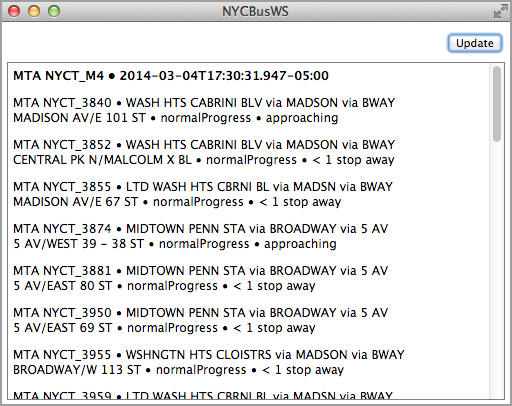
After you connect to the example server, it begins sending status-update messages every minute. The messages contain information about buses on the M4 line (what stop they’re approaching, whether they’re making progress, and so on), which runs between Penn Station and The Cloisters, about as far north as Manhattan goes. Figure 4-8 shows a typical status display in the app, called NYCBusWS, where, for example, bus 3840 is approaching 101 Street making normal progress. Figure 4-9 shows that it’s reached that stop a short time later.
Here’s the index.html file:
<!DOCTYPE html>
<html lang="en">
<head>
<meta charset="utf-8" />
<title>NYCBusWS</title>
<link rel="import" href="lib/common.html">
<script src="NYCBusWS.js"></script>
<style>
body, html {
height: 100%;
width: 100%;
margin: 0;
margin-top: 5px;
}
#results {
height: 85%;
width: 95%;
margin: 0 auto;
padding: 5px;
overflow: auto;
border: 1px solid gray;
}
#message {
margin-left: 10px;
}
#update {
float: right;
margin-right: 10px;
margin-bottom: 10px;
}
</style>
</head>
<body>
<span id="message"> </span>
<button id="update">Update</button>
<div id="results"></div>
</body>
</html>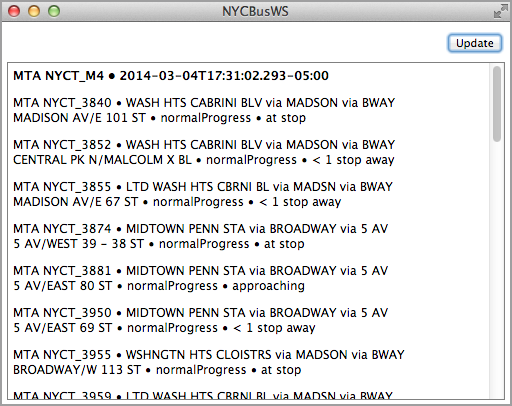
If you don’t want to wait for the next status report to come from the server, you can click the Update button to get the status right away. It sends an update request to the server like this:
ws.send('update');Using WebSockets requires no special permissions or anything else in the manifest.json file.
As usual, the app’s JavaScript code is entirely in the window.onload handler:
window.onload = function () {

var ws = new WebSocket('ws://23.21.124.185:5002'); // Bus status server
ws.onclose = function () {
    showMessage('Not connected');
};
ws.onopen = function () {
    showMessage('Connected', true);
    ws.onmessage = function (event) {
        if (event.data) {
            showStatus(JSON.parse(event.data));
        }
        else
            showMessage('No data received');
    };
};
ws.onerror = function (e) {
    console.log(e);
}

document.querySelector("#update").addEventListener("click",
    function () {
        ws.send('update');
    }
);

// ... rest of app

};
Messages are shown by using showMessage, which is what we’ve seen in earlier examples. (See Local Files.) Observe that setting the ws.onmessage handler is deferred until a callback to the ws.onopen handler confirms that the WebSocket is connected; this is just to make sure that we don’t execute setup code too soon.
When data arrives from the server, it’s converted to a JavaScript object with JSON.parse and then displayed by using showStatus:
function showStatus(obj) {
var buses = [];
var lineRef;
obj.Siri.ServiceDelivery.VehicleMonitoringDelivery.forEach(
function (vmd) {
vmd.VehicleActivity.forEach(
function (va) {
var mvj = va.MonitoredVehicleJourney;
buses.push(mvj);
lineRef = mvj.LineRef;
}
);
}
);
buses.sort(
function(a, b) {
return (a.VehicleRef < b.VehicleRef) ? -1 :
(a.VehicleRef > b.VehicleRef) ? 1 : 0;
}
);
var s = "<b>" + lineRef + " • " +
obj.Siri.ServiceDelivery.ResponseTimestamp + "</b>";
buses.forEach(
function (bus) {
s += "<p>" + bus.VehicleRef + " • " +
bus.DestinationName + "<br>";
s += bus.MonitoredCall.StopPointName + " • " +
bus.ProgressRate + " • " +
bus.MonitoredCall.Extensions.Distances.PresentableDistance;
}
);
document.querySelector('#results').innerHTML = s;
}As I mentioned in A Weather Report App, you need to work on this sort of display code a bit as you come to terms with the JSON that the server returns.
This app is pretty simple, but that’s because most of the work is being done on the server. To build the server, I had to register it with the MTA, figure out its APIs, and incorporate it into a WebSocket server.
Just to be clear, the WebSocket protocol is different from the HTTP protocol, and you can’t use WebSockets to execute APIs that expect HTTP interaction (so-called REST APIs). As yet, no mainstream websites that I know of have a WebSocket API (it’s pretty new), but they are increasingly being used internally, within client/server applications. (The bus status WebSocket server was written by me for this book, not by the MTA.)
Google Cloud Messaging
So far in this chapter, we’ve confined our communication to executing APIs provided by servers. Now, it’s time to look at Google Cloud Messaging (GCM), which can send messages from a Google server to applications to provide information about software updates, weather alerts, news flashes, calendar events, or anything else that needs to be efficiently broadcast.
This kind of messaging is also called push messaging, because these messages are pushed from server to client, not pulled by the client from the server. The corresponding Chrome API was actually called chrome.pushMessaging, but that API was very difficult to use from the server side and has since been replaced by chrome.gcm, which is compatible with GCM for Android and is much easier to use.
Figure 4-10 shows the overall GCM architecture. You begin by creating a project on the Google Developers Console, identified by its project number (shown at the bottom of Figure 4-10). (More about project numbers shortly.) A Chrome App that wants to use GCM executes the chrome.gcm.register call to get a registration ID, which is unique for each Chrome App (identified by its app ID), user, and project number. The Chrome App uploads that registration ID to the app server, the same server that handles the server-side of the application through whatever API has been designed for it by the developer. The app server stores the registration IDs (in a database or a file) for all clients to which it might want to send messages.
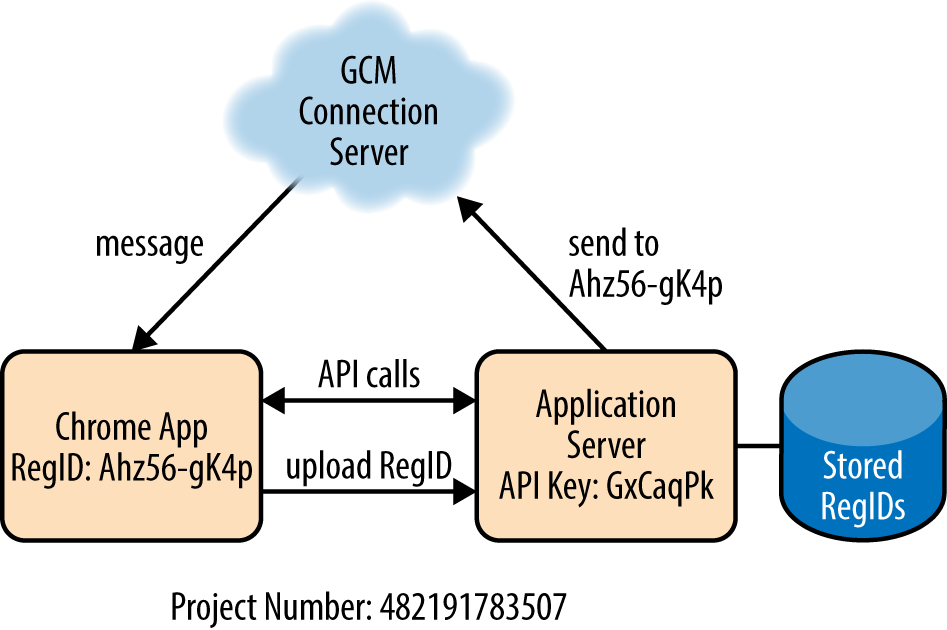
To send a GCM message, the app server sends to the GCM Connection Server (operated by Google) the message, the API key (obtained from the Google Developers Console), and a list of registration IDs that the message is to go to. The GCM Connection Server then sends the messages to the Chrome Apps associated with those registration IDs. The messages are received by chrome.gcm.onMessage handlers that the apps have set up.
For the Chrome App this is extremely efficient, because once the chrome.gcm.onMessage handler is set up, there’s nothing further to do until a message arrives. In fact, the Chrome App doesn’t even have to be running—Chrome will activate it automatically when a message arrives.
Example Application Server
Here we’ll see the code for a simple GCM-receiving Chrome App that receives GCM messages about buses at a stop on Fifth Avenue in New York. The example app server is a variation on the one used in WebSockets. It also queries the New York MTA Bus Time server, but it’s written in PHP instead of JavaScript running on Node.js. The implementation of this app server isn’t directly related to Chrome Apps (it would also serve Android apps), so it’s discussed, and the example PHP program is shown, in Appendix C. There I also describe how to send GCM messages from Amazon Simple Notification Service, which, unlike GCM itself, can also handle Apple Push Notification Service and Amazon Device Messaging.
A typical GCM message sent to the Chrome App is:
12:45:50 -- M4 at stop; M4 1 stop away@5 AV/WEST 47 - 46 ST
For simplicity the app server only monitors one stop, so the stop name after the @ is always the same. As we’ll see, all the Chrome App has to do when it receives the message is set the window title to the stop name and show the rest of the message in its window.
Example Client
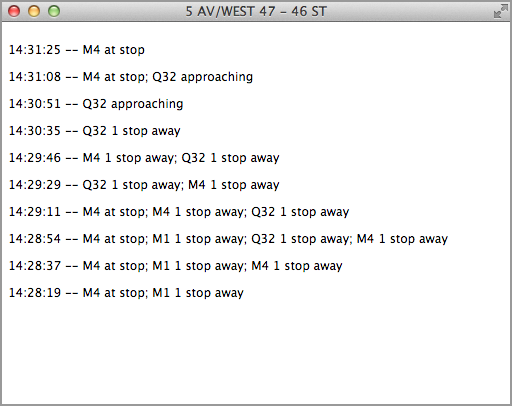
The Chrome App client displays the last 10 status updates, as shown in Figure 4-11.
The first thing a GCM client has to do is get a registration ID so it can tell the app server where to send messages. This is done with chrome.gcm.register:
chrome.gcm.register(senderIDs, callback)
senderIDs is an array of sender IDs, which are project numbers assigned by Google when a project is created (see Figure 4-10). In our examples, there is only one project, but a single client could be interested in messages from several projects. The callback is called with the registration ID as its argument.
One difference between this example client, called NYCBusGCM, and those we’ve seen previously, is that all of the GCM-related code goes into the background.js file, not the app’s JavaScript file that’s referenced from its HTML file. This is to allow GCM messages to be received and handled even if the app isn’t running. Chrome remembers which events had handlers and reloads the background script automatically when such an event occurs and the script is inactive.
It’s necessary to register a sender ID (project number) only once, provided the registration ID is retained by the app for further use. It makes sense, then, to do the registration when the app is first installed or updated, and then to save the registration ID in local storage (see Setting and Getting Local Storage). That’s what’s done for chrome.runtime.onInstalled in background.js:
chrome.runtime.onInstalled.addListener(
    function() {
        chrome.storage.local.get("registered",
            function(result) {
                if (!result["registered"]) {
                    var senderIDs = ["806...503"];
                    chrome.gcm.register(senderIDs,
                        function (registrationID) {
                            console.log(registrationID);
                            if (chrome.runtime.lastError)
                                console.log(chrome.runtime.lastError);
                            else
                                sendRegistrationID(registrationID);
                        }
                    );
                }
            }
        );
    }
);
If there is a new registration ID, it’s sent to the server by sendRegistrationID:
function sendRegistrationID(registrationID) {
    // Should use https
    Ajax.ajaxSend("http://basepath.com/servers/gcmv2-bus.php?regid=" +
      registrationID, 'json',
        function (status, response) {
            if (status == 200)
                chrome.storage.local.set(
                    {
                        registered: true
                    }
                );
            else
                console.log('Error sending registrationID');
        }
    );
}
The server is basepath.com/servers/gcmv2-bus.php (details are in Appendix C); the regid parameter tells it to store a registration ID and then to send messages to that registration ID when there’s something to send. As the comment indicates, a registration ID needs to be kept secure, so https should have been used, but the website I use for examples isn’t set up for SSL.
Note that Ajax.ajaxSend is being executed from the background script, so the technique we’ve been using of having it loaded by a common.html file referenced from index.html won’t work. Rather, it has to be loaded along with background.js from the manifest, which lists two scripts instead of one. While we’re looking at manifest.json, note that it requests three permissions, gcm, storage (so the registration ID can saved), and "http://basepath.com/*" (so the registration ID can be uploaded to the server):
{
    "app": {
        "background": {
            "scripts": [
                "background.js",
                "lib/Ajax.js"
            ]
        }
    },
    "manifest_version": 2,
    "name": "NYCBusGCM",
    "version": "1.0.0",
    "permissions": [
        "gcm",
        "storage",
        "http://basepath.com/*"
    ]
}
The app also has a window, which is created the normal way, except that it’s saved in a global so we can post messages to it from elsewhere in the background script, as we’ll see shortly:
var win;

chrome.app.runtime.onLaunched.addListener(
    function (launchData) {
        chrome.app.window.create('index.html', null,
            function (createdWindow) {
                win = createdWindow.contentWindow;
            }
        );
    }
);
Note that the Chrome window object is what’s passed to the chrome.app.window.create callback, and that the Document Object Model (DOM) window (what you normally manipulate with JavaScript) is in createdWindow.contentWindow.
That’s all the setup we need to enable the app to receive GCM messages, but we still need to add a handler for the messages. It writes the message to the log (essential during development to understand what’s going on) and then posts it to the application window:
chrome.gcm.onMessage.addListener(
    function(message) {
        console.log('chrome.gcm.onMessage', message);
        win.postMessage(message, '*');
    }
);
(Posting and receiving window messages is standard DOM stuff; it’s not unique to Chrome Apps.)
This example’s index.html is about as simple as one can be:
<!DOCTYPE html>
<html lang="en">
<head>
    <meta charset="utf-8" />
    <title>NYCBusGCM</title>
    <script src="NYCBusGCM.js"></script>
</head>
<body>
</body>
</html>
The window’s JavaScript is simple, too:
var msgs = Array();

window.addEventListener("message",
    function (messageEvent) {
        showStatus(messageEvent.data.data.message);
    }
);

function showStatus(message) {
    var body = document.querySelector('body');
    body.innerHTML = '';
    var a = message.split('@');
    if (a.length > 1)
        document.title = a[1];
    msgs.push(a[0]);
    if (msgs.length > 10)
        msgs.shift();
    for (var i = msgs.length - 1; i >= 0; i--)
        body.insertAdjacentHTML('beforeend',
          "<p>" + msgs[i]);
}
Observe that the message received by the message handler is in messageEvent.data, which is the message received from GCM. It in turn has a data property with a message property, which is why the string sent from the app server is referred to as messageEvent.data.data.message.
The showStatus function just breaks out the stop name (following the @), sets it as the window title, and displays the status that preceded it. All the push and shift stuff is for limiting the display to the last 10 status updates.
Summary of IDs, Numbers, and Keys
It took me a while to get all the GCM credentials straight, so I thought I’d do you a favor and summarize it all in one place:
- Each GCM project you create with the Google Developers Console has a unique project number.
- That project number is also known as a sender ID; this is what you send to get a registration ID.
- The registration ID uniquely identifies the combination of the app (by app ID), the user, and the project.
- An app server needs an API key, which you get from the Google Developers Console (see Appendix C for details).
- To cause a GCM message to be sent, the app server passes the API key, the list of registration IDs, and the message to the GCM Connection Server.
- One added twist: If you use something other than Google’s GCM Connection Server to send messages, you might find that a registration ID is referred to as a device token.
Note
If you’re using chrome.pushMessaging (the predecessor API to chrome.gcm) things are much worse. If you’re struggling with client IDs, client secrets, redirect URIs, refresh tokens, and access tokens, you have the wrong API. Thankfully, chrome.gcm dispenses with those horrors. The 50 hours I spent chasing them down is lost and gone forever, but now at least Google has set things right.
App-to-App Messaging
So far, we’ve see how GCM can send messages from the cloud to an app that’s asked for them, and we’ve also seen how to send a message to a window within an app, by using the standard window.postMessage DOM API.
It’s also possible for a Chrome App to send a message to another app running on the same computer. You can do this by using the chrome.runtime.sendMessage API:
chrome.runtime.sendMessage(appId, message, options, responseCallback)
You need the app ID of the the app you want to send the message to, which is available from the Extensions page. To keep it from changing, you can fix it, as explained in Appendix B.
The message can be a string, array, or object. The only available option is rarely used, so I won’t go into it, but you can check the API documentation for the details. The callback is called when the exchange is complete. An error occurred if chrome.runtime.lastError is defined in the callback; otherwise, the callback argument is the receiver’s response.
The receiving app should set an onMessageExternal listener:
chrome.runtime.onMessageExternal.addListener(callback)
When a message arrives, the callback is called with three arguments: the message, a MessageSender object that provides information about the sender (see the documentation for details), and a function that the callback can call to send a response, which is its single argument. If you want the response function to work after the callback returns, save it in a variable and return true from the event callback.
You can also send a message by using chrome.runtime.connect, which keeps the port open and thus is more efficient for lots of messages than is chrome.runtime.sendMessage. I won’t go into the details of chrome.runtime.connect here.
To show how app-to-app messaging works, we’ll modify the bus-status Chrome App to get rid of its window and instead send a message to a different app. The new app, NYCBusGCM-s, now has only three files: background.js, Ajax.js (needed to send the registration ID to the app server), and, as always, manifest.json. There are no permissions required to use chrome.runtime.sendMessage.
The only change to background.js from the example in Figure 4-11 is to the onMessage handler that receives GCM messages:
chrome.gcm.onMessage.addListener(
    function(message) {
        console.log('chrome.gcm.onMessage', message);
        chrome.runtime.sendMessage('lgibpahbcalokboffnkpdcelgobbmkfd',
          message.data.message, {},
            function (response) {
                if (chrome.runtime.lastError)
                    console.log('chrome.runtime.sendMessage error',
                      chrome.runtime.lastError);
                else
                    console.log(response);
            }
        );
    }
);
When a GCM message arrives, it’s sent to the app with app ID lgibpahbcalokboffnkpdcelgobbmkfd. That app, called ReceiveMessage, doesn’t use GCM, so its background.js file is as simple as can be:
chrome.app.runtime.onLaunched.addListener(
    function (launchData) {
        chrome.app.window.create('index.html');
    }
);
Its manifest.json is also simple, devoid of permissions, except that it has a key property so its app ID is fixed (see Appendix B):
{
    "app": {
        "background": {
            "scripts": [ "background.js" ]
        }
    },
    "manifest_version": 2,
    "name": "ReceiveMessage",
    "version": "1.0.0",
    "key": "MIIBIjANBgkqhki...cv1dsGtG5UbWrj5aQIDAQAB"
}
The index.html file is similar to what the earlier bus-status app had:
<!DOCTYPE html>
<html lang="en">
<head>
    <meta charset="utf-8" />
    <title>ReceiveMessage</title>
    <script src="ReceiveMessage.js"></script>
</head>
<body>
</body>
</html>
The app’s JavaScript sets up an onMessageExternal handler in window.onload:
window.onload = function () {
    chrome.runtime.onMessageExternal.addListener(
        function(message, sender) {
            console.log('chrome.runtime.onMessageExternal', message);
            showStatus(message);
        }
    );
};
The function showStatus is identical to the one in Figure 4-11, and, indeed, when ReceiveMessage is running and receiving messages, its window shows the same information as that shown in Figure 4-11.
Notifications
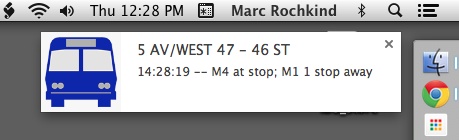
There’s yet another kind of messaging: the transient display of a notification that appears in the upper-right corner of the screen, as shown in Figure 4-12.
Sending a screen notification uses the chrome.notifications API, primarily the call to create a notification:
chrome.notifications.create(notificationId, options, creationCallback)
The optional notificationId is a unique identifier that you make up that’s associated with the notification. This way, if a notification with the same ID is sent, any earlier ones are first cleared. There are a bunch of options, which you can read about in the chrome.notifications API documentation; we’ll use the four that are required when you create a notification:
-
type -
basic,image,list, orprogress(we’ll usebasic) -
iconUrl - An icon to appear in the notification
-
title - The notification title
-
message - The notification message
Recall from Figure 4-11 that the bus-status messages have this form:
12:45:50 -- M4 at stop; M4 1 stop away@5 AV/WEST 47 - 46 ST
We want the stop name (after the @) to be the notification title, and whatever precedes it to be the message. Here’s the onMessage handler in background.js that does the splitting and the creation of the notification (shown in Figure 4-12):
chrome.gcm.onMessage.addListener(
    function(message) {
        console.log('chrome.gcm.onMessage', message);
        var a = message.data.message.split('@');
        var title = 'Bus Status';
        if (a.length > 1)
            title = a[1];
        chrome.notifications.create(
            '',
            {
                type: 'basic',
                iconUrl: 'icon128-bus.png',
                title: title,
                message: a[0]
            },
            function (notificationID) {
            }
        );
    }
);
Because we have an icon (examples up to now have omitted them), we might as well use it in the manifest, too. We also need notifications permission:
{
    "app": {
        "background": {
            "scripts": [
                "background.js",
                "lib/Ajax.js"
            ]
        }
    },
    "manifest_version": 2,
    "name": "NYCBusGCM",
    "version": "1.0.0",
    "icons": {
        "128": "icon128-bus.png"
    },
    "permissions": [
        "gcm",
        "storage",
        "notifications",
        "<all_urls>"
    ]
}
Unlike the example in App-to-App Messaging, here the app is complete; no app such as ReceiveMessage is needed to show the bus status, because notifications do it; nor is there any onLaunched event handler, because the app is never launched, only loaded. There are only four files: background.js, Ajax.js, icon128-bus.png, and manifest.json.
Moreover, the app continues to work and show notifications even if it’s inactive (as long as it’s installed, of course). Figure 4-13 demonstrates that it goes inactive if no status arrives for about 15 seconds.
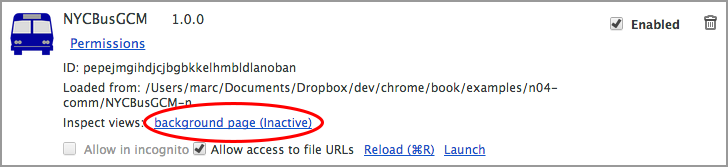
For a background page (not other JavaScript files), Chrome remembers which handlers were set. The page is unloaded when it’s no longer needed (no windows and no consoles open), destroying all the handlers (but not the fact that they once existed) along with all the other code. When an event that it wanted to handle occurs, the page is reloaded. It executes from the top, as it did when it was first installed, reestablishing the handlers, and then the handler for the event that just occurred is called. In this way, apps that only occasionally need to execute take up very few resources, and certainly none for their code and associated data.
Chapter Summary
We’ve seen a lot of different approaches to messaging in this chapter, some unique to Chrome Apps, some part of HTML5, and some as old as the Internet:
- The Socket API provides basic Internet communication. You can use it to implement any Internet protocol.
-
For the HTTP protocol, whether to fetch web pages or execute REST APIs, you can use the standard JavaScript
XMLHttpRequestAPI, wrapped by a convenientAjaxobject. -
There’s a
chrome.identityAPI for handling OAuth2, with a special call just for accessing Google APIs. After the app is authorized, you invoke API operations via HTTP. - HTML5 includes WebSockets, which are easier to use and more efficient than HTTP protocols, but they do require somewhat exotic server-side programming. The Chrome App end is easy.
- Google Cloud Messaging (GCM) can send messages from the cloud to any running apps that have registered to receive them. You can even send GCM messages from Amazon Simple Notification Service and from other commercial servers.
-
If you just want to go from window to window within an app, you can use the old and standardized
window.postMessage. -
The
chrome.runtimeAPI can send messages between Chrome Apps on the same computer. -
The
chrome.notificationsAPI can display a transient notification at the top of the user’s screen.
Get Programming Chrome Apps now with the O’Reilly learning platform.
O’Reilly members experience books, live events, courses curated by job role, and more from O’Reilly and nearly 200 top publishers.

