To test whether your setup of Atlas has been successful and to see the framework in action, let’s end this chapter by creating a tiny sample application. The sample page accepts a username, sends it to the web server (in the background, using XMLHttpRequest), and receives it back with some extra text. The new version of the name is then shown to the user. This sample just shows you how easy it can be to set up an application using the features of Atlas. A more detailed description of the inner workings and the usage of Atlas can be found in the chapters following; however, the description of this example is not as exhaustive as the information about the other samples in this book.
After creating a new web site using the Atlas template, create a new web service (using the web service file template) in the root directory of the web site and call it WebService.asmx. In the web service .asmx file, implement a simple web method that accepts one string parameter, by pasting the code shown in Example 1-1 into the file.
Example 1-1. The web service
WebService.asmx
<%@ WebService Language="C#" Class="WebService" %>
using System;
using System.Web;
using System.Web.Services;
using System.Web.Services.Protocols;
[WebService(Namespace = "http://hauser-wenz.de/atlas/")]
[WebServiceBinding(ConformsTo = WsiProfiles.BasicProfile1_1)]
public class WebService : System.Web.Services.WebService {
[WebMethod]
public string sayHello(string name) {
return "Hello " + name + ", says the server!";
}
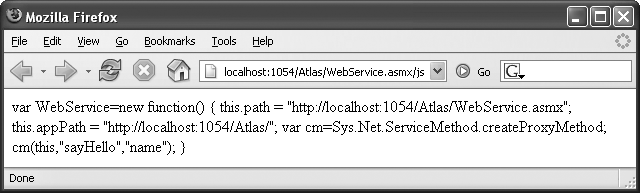
}Now call this web service in your web browser, but append /js to the URL. As you will see from the resulting data, this URL actually returns JavaScript code. In fact, this code implements a kind of JavaScript proxy, something that will be covered in more detail in Chapter 10. Most important, the code produces a variable named WebService that provides a reference to the web service. Figure 1-11 shows the JavaScript that displays.
You will see that the Atlas template already created a file Default.aspx with some contents, which you will expand in the following steps. Here’s the code you will see in this file:
<%@ Page Language="C#" AutoEventWireup="true" CodeFile="Default.aspx.cs"
Inherits="_Default" %>

<!DOCTYPE html PUBLIC "-//W3C//DTD XHTML 1.1//EN"
"http://www.w3.org/TR/xhtml11/DTD/xhtml11.dtd">
<html xmlns="http://www.w3.org/1999/xhtml">
<head runat="server">
    <title>Untitled Page</title>
</head>
<body>
    <form id="form1" runat="server">
    <atlas:ScriptManager ID="ScriptManager1" runat="server" />
        <div>
        </div>
    </form>

    <script type="text/xml-script">
        <page xmlns:script="http://schemas.microsoft.com/xml-script/2005">
            <references>
            </references>
            <components>
            </components>
        </page>
    </script>
</body>
</html>
The first thing you will notice is a new control: <atlas:ScriptManager>.
This control is the central element of every Atlas application and will be covered in greater detail later in this chapter (see "The ScriptManager Control“).
The other new element is the <script> tag with the attribute type="text/xml-script". This is used for client-side markup that is then processed by Atlas; you will see this markup in many of the examples, starting in Chapter 5.
First, open the Default.aspx file and reference the web service in the following fashion within the ScriptManager element. This generates a JavaScript proxy so that your page can use the code generated dynamically by the web service code:
<atlas:ScriptManager ID="ScriptManager1" runat="server">
  <Services>
    <atlas:ServiceReference Path="WebService.asmx" />
  </Services>
</atlas:ScriptManager>
Now you need to add some HTML elements. Add a text box and an HTML button to the existing <form> element (within the <div> element, if you want to adhere to XHTML standards):
<input type="text" id="name" name="name" />
<input type="button" value="Call Service" onclick="callService(this.form);" />
The code in the onclick event handler of the button calls a custom JavaScript function named callService() and passes a reference to the current form. The callService() method is where the web service is invoked. To call the web service’s sayHello() method, the code can use the JavaScript proxy object, which is exposed via an automatically generated variable named WebService. (The name WebService matches the name of the web service class you created earlier.)
This sayHello() method expects not only a string, but also references up to two handler functions: one to call when the web service succeeds (callComplete), one to call when a timeout or an error occurs (callTimeout) and one to call when an error occurs (callError).
Put the following code within a client-side <script> element on your page:
function callService(f) {
  WebService.sayHello(
    f.elements["name"].value,
    callComplete,
    callTimeout,
    callError);
}
Finally, you have to provide the three handler functions for the callComplete, callTimeout, and callError events. Add the following code to the client script block that you just created:
function callComplete(result) {
  window.alert(result);
}
function callTimeout(result) {
  window.alert("Error! " + result);
}
function callError(result) {
  window.alert("Error! " + result);
}
Example 1-2 shows the complete code for the Default.aspx file.
Example 1-2. The updated file
Default.aspx
<%@ Page Language="C#" AutoEventWireup="true" CodeFile="Default.aspx.cs"
Inherits="_Default" %>
<!DOCTYPE html PUBLIC "-//W3C//DTD XHTML 1.1//EN"
"http://www.w3.org/TR/xhtml11/DTD/xhtml11.dtd">
<html xmlns="http://www.w3.org/1999/xhtml">
<head runat="server">
<title>Atlas</title>
<script language="Javascript" type="text/javascript">
function callService(f) {
WebService.sayHello(
f.elements["name"].value,
callComplete,
callTimeout,
callError);
}
function callComplete(result) {
window.alert(result);
}
function callTimeout(result) {
window.alert("Error! " + result);
}
function callError(result) {
window.alert("Error! " + result);
}
</script>
</head>
<body>
<form id="form1" runat="server">
<atlas:ScriptManager
ID="ScriptManager1"
runat="server">
<Services>
<atlas:ServiceReference Path="WebService.asmx" />
</Services>
</atlas:ScriptManager>
<div>
<input type="text" id="name" name="name" />
<input type="button" value="Call Service" onclick="callService(this.form);" />
</div>
</form>
<script type="text/xml-script">
<page xmlns:script="http://schemas.microsoft.com/xml-script/2005">
<references>
</references>
<components>
</components>
</page>
</script>
</body>
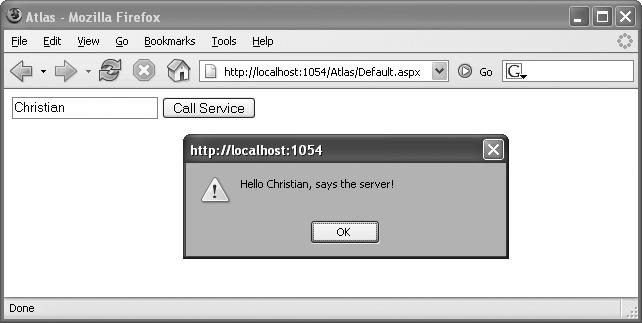
</html>Figure 1-12 shows the results displayed when the page is loaded and the Call Service button is clicked.
Get Programming Atlas now with the O’Reilly learning platform.
O’Reilly members experience books, live events, courses curated by job role, and more from O’Reilly and nearly 200 top publishers.

