This chapter covers everything it takes to get your application into usersâ hands. Earlier in this book, we told you everything you needed to get started reading example code and creating simple programs. Here, we complete the picture, with all the other operations you need to perform to widely distribute your applications, sell them (if that is your aim), and subsequently get paid by Google, which operates the Android Market.
You may not be ready to put your application into the Android Market, but keeping this process in mind will shape the way you design and implement your application. Commerce has considerations that are distinct from most other aspects of software development, including identifying yourself to the Android Market and to your customers, obtaining permission to use certain APIs, protecting your identity, and preparing your app to be run on a variety of hardware as well as to be updated over time.
Application signing, or code signing, enables Android devices, the Android Market, and alternative means of distribution to know which applications originate with the owner of a signing certificate, and to be certain the code has not been modified since it was signed.
Public key cryptography depends on this mathematical principle: it is easy to multiply large prime numbers together, but it is extremely difficult to factor the resultant product. The multiplication might take milliseconds, while factoring would take from hundreds to millions of years and would require an astronomically powerful computer.
This asymmetry between multiplication and factoring means that a key made with the product of two large prime numbers can be made public. The knowledge that enables encrypted messages to be decrypted is the pair of large primes that are part of the private key. That means that documents encrypted with the public key are secure, and only the possessor of the private key can decrypt them.
Signing, which is what we will do to Android applications, depends on related properties of public key encryption.
The steps to sign a document are:
Voilà ! You now have a numberâa signatureâthat is tied to the document by the hashing algorithm, and tied to the signerâs private key.
The steps to verify a signed document are:
Now you know some interesting facts: the documentâin our case, an applicationâcame from the person with the private key corresponding to the public key you used in the verification. And you know that the document was not altered; otherwise, the hash decrypted from the signature would not be the same as the one computed from the document.
Verifying a signature also verifies that the signature was not copied to a different document. Signatures are unalterably tied to the document from which they were created.
Tip
You may have noticed we put the words encrypt and decrypt in quotes when we said the message digest, or hash, is encrypted. This is because itâs not encryption in the way you normally use a publicâprivate key systemâto keep prying eyes away from a message by encrypting it with the public key so that only the person with the private key can read the message.
Here, âencryptâ just means âcompute a number.â You are not hiding information when you âencryptâ a hash or message digest with a signerâs private key. The reason you use the words encrypt and decrypt is that you get the same hash or message digest when you decrypt with the public key.
Anyone with the public key and a published algorithm can âdecryptââwhich is the point in verification: to see that you got the same hash the sender signed, which also proves that the sender is in possession of a private key corresponding to the public key, and proves that the document is what the sender signed.
Because verification can be computed using a public key, your Android systemâand any other interested partyâcan verify that an application was signed with a particular key and that it was not modified since it was signed.
More generally, any electronic documentâany set of bitsâcan be cryptographically signed, and cryptographic signatures, or âdigital signatures,â can be used to sign documents in a way that can legally substitute for a personâs handwritten signature.
As a user of computer software, you may already have been thinking, âIt would be nice to know where my software comes from and that it has not been modified en route to my device.â Signed applications enable you to have this confidence. This is a form of confidence based on cryptographic signatures similar to one you already use. When you browse the Web you already rely on cryptographic signatures to trust that the ecommerce site you are communicating with is authentic, and not a rogue impostor set up to take your money and run. In the case of ecommerce, the client verifies a signature of the serverâs certificate using a public key from a certificate authority. Your browser comes with keys from several certificate authorities used for this purpose.
The role of the certificate authority is to consolidate the number of parties you need to trust: you trust your browser vendor to use only keys from reputable certificate authorities, and ecommerce vendors obtain certificates from authorities browser vendors trust. The certificate authorities have a responsibility to verify that the people claiming to be, for example, Amazon.com are, in fact, Amazon.com. Now, when your browser initiates a secure session with Amazon.com, you know two things: your data is secured from eavesdropping by encryption that only the ecommerce vendorâs server can decrypt, and you are reasonably sure that the server you are connecting to is using a certificate issued by a certificate authority to the company you want to communicate with, because the certificate authority has taken steps to assure itself that it issues certificates to known parties.
In signing Android software, the signing certificate does not have to come from a certificate authority. It can be created by the software publisherâin this case, you. Unlike ecommerce transactions, where you have the additional requirement that you want to ensure that each and every connection your browser makes is to the authentic Amazon.com, perhaps through a link of unknown provenance, the act of using software does not depend as critically on knowing the identity of the signing party.
For organizations considering using a signature issued by a certificate authority, the Google documentation explicitly mentions that there is no need to have your application signed using a certificate authority, and that self-certification is the informal standard for Android applications.
In addition to initially verifying application developer identity, digital signatures on Android are also used during application upgrades to ensure that an application upgrade should be permitted to access files created by an earlier version of the application, and that the upgrading application is not actually a malicious application trying to steal user data.
As long as you are confident that updates to the software come from the same party you obtained the software from in the first place, you can be reasonably sure the programs you are using are safe, and that the publisher of that software is known to the distributor of the software, which is the Android Market.
In addition to the assurance of updates from the original publisher, Android applications are sandboxed and require permissions, as described at http://developer.android.com/guide/topics/security/security.html, to access functionality that could compromise your data or cause chargeable events on your mobile service.
The concepts behind cryptographic signing are subtle and complex. But the complexity is managed by the SDK tools. When you compile and run Android code on a device or on an emulator, you are running signed code.
If you have been following the examples in this book and have created an Android project and run it in an emulator or device, you may have noticed you didnât need to create a certificate and that your application is installable on an Android handset, despite the fact that all Android code must be signed. This convenience is achieved through the use of an automatically created debug certificate. Letâs take a look at the debug certificate.
Look in the .android folder in your home folder. There
you will find a file named debug.keystore. Using the keytool command, you can find out what is
inside this file:
keytool -list -keystore debug.keystore
When you are prompted for a password, enter
android. You will see output
that looks like this:
Keystore type: JKS
Keystore provider: SUN

Your keystore contains 1 entry

androiddebugkey, May 13, 2010, PrivateKeyEntry,
Certificate fingerprint (MD5): 95:04:04:F4:51:0B:98:46:14:74:58:15:D3:CA:73:CE
The keystore type and provider indicate the keystore is a Java keystore, compatible with the Java Cryptography Architecture and Java classes that enable Android to use code signing and other cryptography tools. More information on the Java Cryptography Architecture is available at http://download.oracle.com/javase/6/docs/technotes/tools/solaris/keytool.html.
The keytool command is part of the JDK, and is
described briefly in keytool
and in greater detail at http://developer.android.com/guide/publishing/app-signing.html#cert.
Detailed documentation on keytool
can also be found at http://download.oracle.com/javase/6/docs/technotes/tools/solaris/keytool.html.
The last line produced by the list option in keytool is a certificate fingerprint. This
is a unique number generated from a key. Youâve seen one way in which
this number is used in Application Signing, where you
used it to get an API key.
This certificate expires in a short enough interval that it cannot be used to distribute Android software other than for testing. Do not mistake the convenience of using a debug certificate for signing software as an indication that you can do without a signing certificate for distributing your applications!
Ready to sign some code for release? First,
create a private key using the keytool command:
keytool -genkey -v -keystoremy-release-key.keystore -aliasalias_name\ -keyalg RSA -keysize 2048 -validity 50000
Note
The \
character indicates a line break, and is valid for multiline
commands on Unix and Mac OS X. However, you will need to type this
all on one line without the \ on
Windows.
You can substitute a name of your choice for
my-release-key and an alias of your choice
for alias_name. The -keysize and -validity parameters should remain as shown
in the preceding code.
As shown in the following code, keytool will ask you for a password for the
keystore, which you will need to remember when accessing it, and a
series of questions about you, your organizational structure, and your
location. keytool generates a
private key, usable as a signing certificate with a valid life span of
about 150 years, and puts it in the file named
<my-release_key>.keystore.
example-user@default-hostname:~$keytool -genkey -v \-keystore example-release-key.keystore -alias example_alias_name \-keyalg RSA -keysize 2048 -validity 50000Enter keystore password: Re-enter new password: What is your first and last name? [Unknown]:Example ExamplenikWhat is the name of your organizational unit? [Unknown]:ExampleWhat is the name of your organization? [Unknown]:ExampleWhat is the name of your City or Locality? [Unknown]:ExampleWhat is the name of your State or Province? [Unknown]:MassachusettsWhat is the two-letter country code for this unit? [Unknown]:USIs CN=Example Examplenik, OU=Example, O=Example, L=Example, ST=Massachusetts, C=US correct? [no]:yesGenerating 2,048 bit RSA key pair and self-signed certificate (SHA1withRSA) with a validity of 50,000 days for: CN=Example Examplenik, OU=Example, O=Example, L=Example, ST=Massachusetts, C=US Enter key password for <example_alias_name> (RETURN if same as keystore password): Re-enter new password: [Storing example-release-key.keystore]
While cryptographic digital signatures are, in many ways, more reliable and secure than a handwritten signature, there is one way in which they differ: you can lose your ability to sign a document digitally.
If you lose your signing certificate, you lose your identity to Android devices and the Android Market. This means that, despite the fact that you compile and release the same code as before, you cannot use these newly compiled applications to update applications in the field, as neither Android devices nor the Android Market will recognize you as the same publisher.
Keep multiple backup copies of your signing certificate on multiple types of media, including paper, in multiple locations. And keep those backups secure. If your signing certificate is used by people other than you, they can replace your programs on your customersâ Android devices.
Detailed recommendations from the Android Developers site regarding securing your signing certificate are available at http://developer.android.com/guide/publishing/app-signing.html#secure-key.
Tip
Conversely, your cryptographic signature is your signature solely because it is in your possession. Up to the time you want to publish an Android application and continue to be identified as the publisher, you can generate, use, and discard signatures as much as you like. Donât be afraid to experiment and learn!
Now itâs time to sign an application. In Eclipse, select the project of the application you want to sign for release, and select the FileâExport command. âWhy the âexportâ command?â you may ask. After all, if you want to give someone your app to try out, you can just give her a copy of the .apk file in the bin directory of the project file hierarchy. It is as arbitrary as it seems: the âexportâ dialog is a grab bag of functionality, and it was a convenient place to put a procedure that isnât quite the same as âdeploying.â
In this example we use the TestActivity project, but you can use any applicationâyour own, or any project from the examples in this book.
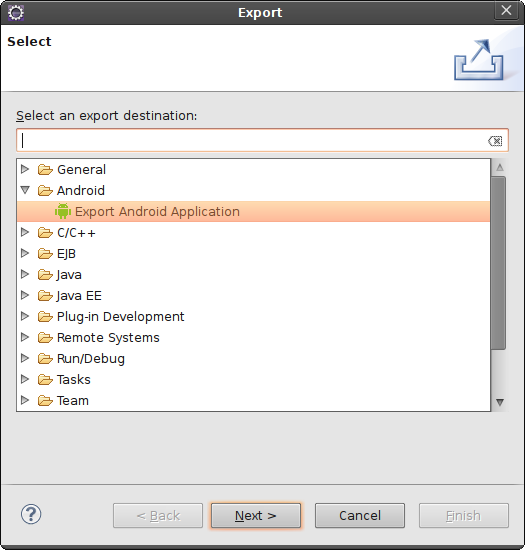
You will be presented with a list of options for exporting, organized into folders. Select the Android folder and select Export Android Application (as shown in Figure 4-1), and then click the Next button.
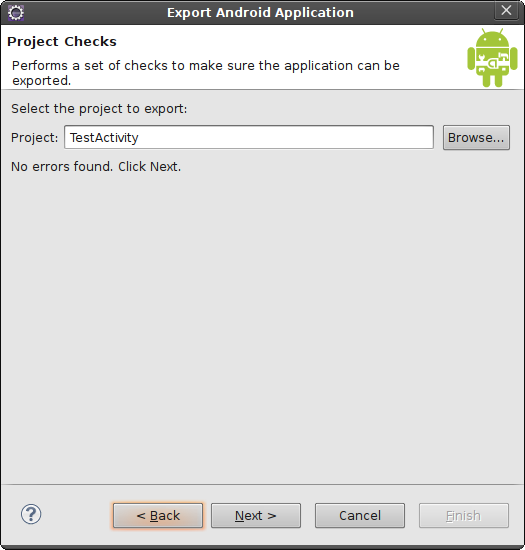
First, you will see whether your
application has any errors in configuration that might prevent it from
being ready to publish, such as having the debuggable attribute set to true in the manifest. If your app is ready
to go, you will see the dialog in Figure 4-2, which displays no
errors.
Subsequent dialog boxes in this multistep sequence focus on signing. The information requested mirrors the information you entered to create your release key in Creating a self-signed certificate.
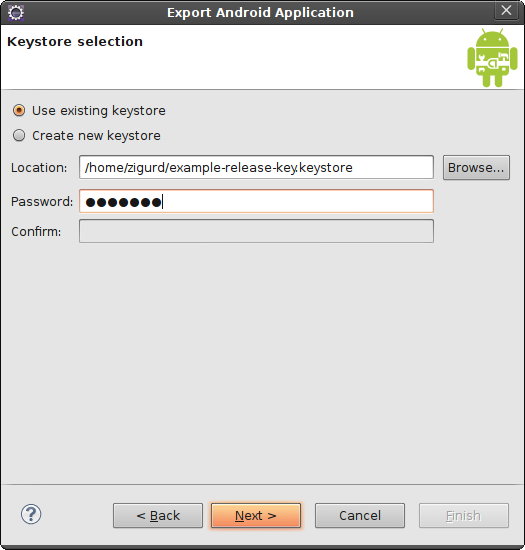
Next, you will select your keystore, as shown in Figure 4-3. The keystore is the file holding your key.
Once you have entered the name of the keystore and the password, click Next and proceed to the next step: selecting the alias of the key, and entering the password for the alias, as shown in Figure 4-4.

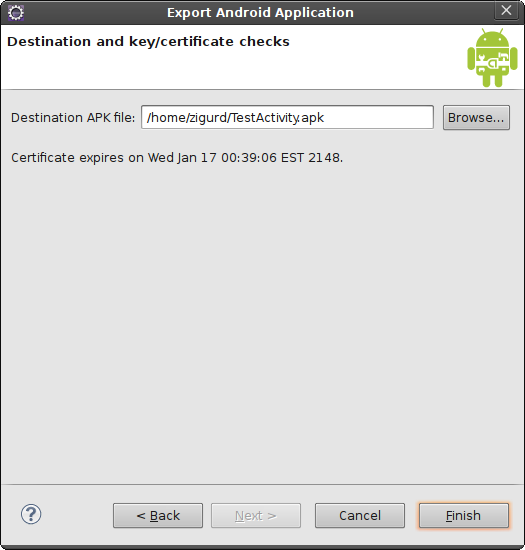
If you followed the steps in Creating a self-signed certificate, you have only one key, with one alias, in your keystore. Enter the password and click Next. The next step is to specify the destination .apk file and pass some checks to determine if anything else might be wrong with your app. If everything is in order, you will see a screen resembling that shown in Figure 4-5.
When you click Finish you will get a signed .apk file in the specified location.
Putting an application on the Android Market is remarkably easy, especially if you are comparing it to your experience with the Apple iTunes App Store. The only prerequisite is that you have a Google account such as a Gmail account. A $25 credit card transaction and some information about yourself are all you need to start uploading applications to the Android Market. Charging for applications and getting paid takes only slightly more information and effortâyou donât even need a website or a corporate entity. (Consulting a lawyer before selling products is a good idea. A lawyer may suggest setting up a corporation and other ways to protect your personal assets from liabilities resulting from commercial activities.)
The Android Market site is where you become an official Android developer. You can sign up at http://market.android.com/publish/signup.
This site will ask you for identifying information, and will ask you to pay a $25 fee using Google Checkout. This transaction confirms that you have a method of payment, such as a credit card, accepted by Google Checkout. Once you are signed up as a developer, you can use your Google account to log in to the Android Market site.
At this point, Google has reasonable assurance that you are who you say you are: a financial transaction linked to some entity that can pay off a credit card bill. This, combined with the fact that your applications are signed, means Google is also confident that the key you created to sign your applications is in the possession of the person who created the Android Market account for the purpose of uploading applications to the Android Market. If you turn out to be a spammer or a source of badware, you will be shut down, and you will need to find another identity with which to create another Google Checkout account and Android Market account.
The page at https://market.android.com/publish/Home#AppEditorPlace is where you upload applications. On it, you will see the latest requirements, and options, for providing information about your application. The page has upload buttons for the applicationâs .apk file, plus screenshots, videos, and similar content, most of which is optional. When you have an application you would like to leave up on the Market for others to download, you should read the descriptions of the kinds of promotional and explanatory material you can upload, and make use of them. For now, letâs get our app up with the minimum requirements met.
The first thing to do is to upload an .apk file. To try it out, you can use the .apk file you created if you followed along in Using a self-signed certificate to sign an application. Donât worry that this is not your application, and that it is just an example. You can publish it and then unpublish it right away, as you will see from the instructions in the rest of this section.
Most required information is either part of your profile as an Android developer, or part of the application manifest. As of this writing, the required uploads are two screenshots and an icon image. You will find usable images in the doc folder of the example project. If these requirements changeâand the Android Market has changed substantially since it was first introducedâyou will find out if you have skipped any required fields or uploads when you click the Publish button at the bottom of the page. Anything you missed will be highlighted, and you can go back and fill in fields or perform uploads as needed to make your application ready for publication.
Congratulations, you have published an Android application. If you go back to https://market.android.com/publish/Home, you will see from the listing of applications that you have one published application (if you have not previously published an application). If you go to https://market.android.com and search for, say, your name, the search function should find the application you just published and list it the way a potential customer might see it if he were to find it in the Android Market. From there, you can click through to the applicationâs page in the Android Market.
Now you can go back to the Home page where your application is listed and select it by clicking on the link in the listing. This takes you to a page where the information you entered when you published your app is displayed in such a way that you can modify it and update the applicationâs listing. You can also unpublish your application from this page, using the Unpublish button at the bottom of the page. Whew! You thought you might start getting customer support inquiries!
An application that has been unpublished is not removed from the Market system. It is still listed among your applications, but is not made available for download. You can reverse your decision to unpublish at any time by using the Publish button.
Google Checkout is the payment mechanism for the Android Market. That is, the Android Market provides a streamlined way to sign up as a Google Checkout merchant.
If you elect to be a publisher of paid applications, you will be directed to a page where you can create a âmerchant account.â This may sound a bit intimidating, but Google has made it easy to get paid. You donât need to form a corporation or get a business bank account.
Caution
You should consult a lawyer about forming a corporate entity for your business and you should segregate your business finances from your personal accounts.
The process of getting a merchant account amounts to entering some more informationâmost importantly your tax ID, which can be your Social Security numberâso that income from your sales can be reported.
Getting paid involves linking a bank account to your Google Checkout merchant account. Payments to Google Checkout for sales of your app will be deposited in your bank account. A full description of terms of service, payment terms, and similar information can be found in the sellersâ section of the Google Checkout site, at http://checkout.google.com/support/sell/bin/answer.py?hl=en&answer=113730.
Another attribute that distinguishes the Android marketplace from the Apple marketplace is that, in the Android marketplace, many sales channels are available for your iOS application. Google does not prevent third-party entrepreneurs from creating their own markets with their own rules. Indeed, several other companies have set up their own application storefronts that serve specific markets. These markets vary dramatically in their target, their app submission procedures, and how they structure relationships with developers and customers. Two significant Android application stores spring to mind: Verizonâs Verizon Apps and Amazon.comâs Appstore.
Although deploying an application to several stores may seem like a slam dunkâmore stores mean more exposureâthere are drawbacks. Each marketplace has its own requirements for promotion, release, and customer support and each of these takes time away from development. A reasonable, practical plan might be to start with one marketplace, expanding into new ones as you get comfortable with the demands of those you are already in.
The Verizon Apps store for Android provides some significant differences and potential advantages in comparison to the Android Market. The key distinction is that applications are reviewed before they are deployed to the store. This provides Verizon an opportunity to filter out low-quality or malicious applications before they find their way onto usersâ handsets. The approval process also enables Verizon to screen applications for appropriate network behavior.
The Verizon Apps store also provides developers with a streamlined mechanism for receiving payment and for billing users, called âcarrier billing.â The store is integrated with each userâs account. When a user downloads an application, she automatically incurs charges for the cost of the application without having to register with an external payment service. Verizon shares application revenue with developers: 70% for the developer and 30% for Verizon.
Verizon also provides an API that enables âin-applicationâ carrier billing, which enables applications to charge users for in-application items, such as opening additional levels in a game, and have the charges appear on the subscriberâs wireless bill.
To submit an application to the Verizon Apps for Android store, follow these steps:
Create an account at http://developer.verizon.com.
Submit your application, which involves the following:
Provide basic application information.
Review and accept the Verizon Developer Community App License Agreement.
Fill out setup and network usage questionnaires, which includes picking an appropriate application descriptor.
Select up to four application screenshots and/or preview video.
Select up to four application banners for merchandising opportunities.
Select a pricing model, which can be âAlways Free.â
Select an application rating that is appropriate for your application content.
Upload your binary application and select the handset devices and operating system that your application supports.
Wait for Verizon to send notification regarding the approval of your submission.
Get financially certified. This ensures faster, easier payment by validating that Verizon Wireless has accurate information to pay you for sales of your apps, and to ensure that all legal and other requirements are satisfied.
Get paid when developers install your application through the Verizon Apps store for Android.
When you develop for the Verizon Apps store, you should investigate some of the helpful tools that Verizon provides.
- Deep linking
The Verizon Apps store for Android supports deep linking, an Android-based programming mechanism in which one Android application can invoke the Verizon Apps store user interface to install another application. This is useful for application developers who wish to encourage the installation of a âpayâ version of an application as an upgrade from a free version of the same application. It also assists with application co-marketing, where one application can encourage the installation of another. Verizon provides code examples of this procedure on its developer site.
- NAVBuilder Inside
Verizon supports a product called NAVBuilder Inside (NBI). NBI is mapping software similar to the Google Maps navigation system that is installed by default on most Android handsets. Many handsets that ship with Verizon also have a version of NBI preinstalled. The Verizon developer site provides an Android SDK and documentation dedicated to helping developers create applications for its NBI product. NBI is free, is cross-platform, and supports coupon-based revenue.
- Network API
Verizon has opened its carrier network for web service development using SOAP-based and REST-based APIs. Although these APIs are not directly accessible from handset applications, itâs possible to set up a web service proxy that can support indirect handset invocations. These APIs support the following services:
- SMS- and MMS-based messaging
Enables sending and receiving SMS and MMS messages.
- Location as a service
Provides locations to callers of the API.
- Carrier information
Enables a caller to obtain the carrier that services a given mobile phone number. Works for numbers not directly subscribed to Verizon.
All Verizon Network APIs make use of a single, secure, and consistent gateway interface. Handset users must opt-in before any information, such as location fixes, becomes available through the API.
The Amazon Appstore is an extremely visible marketplace and gives you instant access to the Kindle Fire, which at the time of this writing, is by far the most popular Android tablet. The submission process is web-based, straightforward, and pretty well documented at the developer portal located at https://developer.amazon.com/welcome.html. To get started, simply register yourself as a developer. Amazon is, at the moment, waiving the first $99 yearly developer fee. Once you have registered, you may submit as many applications as you choose: just follow the instructions at the portal.
As in most other markets, you will be asked, during the submission process, to provide various promotional assets. You will need, at the very least, an icon, a thumbnail, and three screenshots. You may additionally supply larger promotional images and even up to five short video clips, which Amazon may use to advertise your application.
Amazon pays you a royalty for your application that is the greater of 70% of the purchase price or 20% of the list price. When you list your application, you are entering into a legal relationshipâwith Amazon. As always, you should take care to understand the terms of the agreement, in this case, Amazonâs Distribution Agreement. You must be registered and logged in to see it. There are a few points of which you should be aware:
Amazon expects you to support your application as long as it is in the Appstore. If Amazon determines that a problem with your application is âcritical,â you are expected to respond within 24 hours. You are expected to respond to all other customer requests within five days.
Amazon sets the price of your application. Typical prices are just what youâd expect: $.99 or $1.99. On the other hand, Amazon runs a frequent promotion during which it gives applications away at no cost. It might choose to include your app in this promotion. You should consider whether you expect the app sale price to cover the cost of backend services that will support such promotions.
In most marketplaces, you sign your application with a key that only you have. When customers install your application, they are assured that they are getting the exact bits that you, the developer, posted. For better or worse, you are solely responsible. This is not the case with the Amazon Appstore. Amazon wraps your code, and uses keys associated with your developer account to sign applications you sell through its store. Amazon requires this so that it can change your applicationâs code to collect and report analytic usage data. It does provide a service that allows you to sign an application with your own, private keyâbut only after Amazon has modified it.
Amazon also provides a Digital Rights Management service. You can, at no charge, by checking a box during the submissions process, protect your application with Amazonâs DRM system. Amazon claims that a protected application will run only on devices that also have the Amazon Appstore installed and then only if the Appstore can verify a valid license for the application.
Once you have submitted your app, Amazon will review it for quality and content. Its standards with respect to content are, again, probably about what youâd expect: it may choose to apply an appropriate rating to your app, or refuse it completely if its content is illegal, pornographic, or malicious. When the review process is complete, your app will become available to Amazonâs enormous customer base.
A Google Maps API key, combined with the keys you use for signing applications, identifies you to Google and enables Google to enforce the terms of service for Google Maps. Google Maps relies on information Google collects and buys at significant expense, and must be protected from misappropriation and other misuse.
If you have been developing an application using the Google Maps API, you will have obtained an API key linked to the debug signature for your application. You canât use this API key when you ship your application. The Google Maps API, and the requirements for using it, are described at http://code.google.com/android/maps-api-signup.html.
When you ship your application, you will
need a Google Maps API key linked to the signing key you used for
distributing your application. That is, you will need a new API key that is made using an MD5
fingerprint of your signing key. Using the keytool commandâs list option, you can get the MD5 fingerprint of
your signing key thusly:
keytool -list -keystore my-release-key.keystore
You will get this key the same way you got the API key for use with your debug signature, by visiting the Android Maps API Key Signup page at http://code.google.com/android/maps-api-signup.html and using the MD5 fingerprint of your signing key in the form, as shown in Figure 4-6.

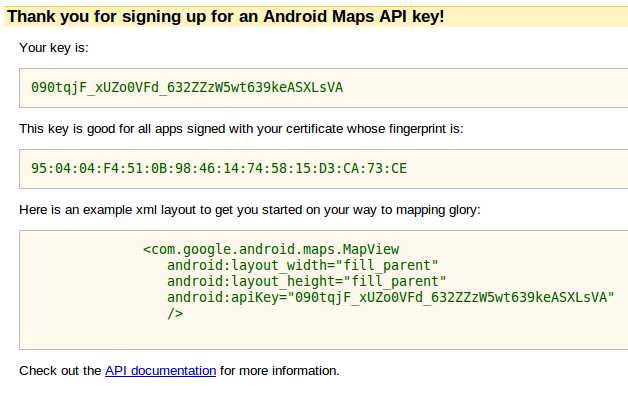
When you click the Generate API Key button, you will get a web page showing the API key generated from your signing certificateâs fingerprint, as shown in Figure 4-7.
At any one time, multiple versions of Android can be available, and not all the prospective users of your application will have the most recent version. By specifying application compatibility in the manifest, you can control which Android systems can install your application, preventing its use in systems that are incompatible with the APIs you are using.
In the example in Making an Android Project, the same API level is specified for the build target as for the Min SDK Version field. This means the program will run only on systems with the specified API level or higher.
Because you can detect the API level at runtime, there may be cases where you want to ship one application for systems with a lower API level than you use, and to test for the API level and only use methods and classes of higher API levels if they are available. In these cases, you would specify a higher build target API level than the Min SDK Version.
Android was built to accommodate multiple screen sizes and changes in screen orientation. The best way to accommodate screen size differences among Android devices is to enable your layouts to be as flexible as possible. The images your application uses may not look optimal in very large or unusually small configurations, but it is possible to specify layouts that are usable at screen sizes ranging from the smallest screen of moderate resolution up to a 1920 Ã 1080 HD display.
In other words, donât handle screen differences by trying to design a specific layout for each individual screen size. Instead, design a couple of layouts, each of which is flexible enough to cover a reasonable range of screens. By designing in this way, you prepare you application for any new device that might appear on the market.
Testing is key to ensuring screen compatibility. The SDK and AVD Manager provides configurations for a range of screen sizes that cover all the smartphones on which Android runs. As described in Making an Android Virtual Device (AVD), you can specify preset and custom screen sizes when creating an AVD.
Once you have layouts that can handle the majority of cases, you may want to improve the way your application looks on specific displays. You may need to use separate layouts in cases where you want to take advantage of greater screen real estate other than by just spreading a layout across the screen (a separate preview pane, for example). In these cases, or in cases of specialized apps that might be used for unusually small displays, you can design layouts for specific situations using resource qualifiers.
Resource qualifiers are a set of naming rules for resource directories that enable you to provide alternative resources for the conditions specified by the qualifier, such as high or low, pixel density, language, country, and certain hardware resource availability. The full range of resource qualifiers is described at http://developer.android.com/guide/topics/resources/providing-resources.html#AlternativeResources.
Get Programming Android, 2nd Edition now with the O’Reilly learning platform.
O’Reilly members experience books, live events, courses curated by job role, and more from O’Reilly and nearly 200 top publishers.

