52.2. Add-In Wizard
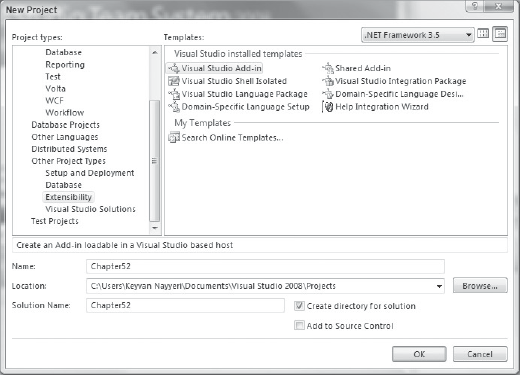
The first step in creating an add-in project, as you might expect, is using the New Project dialog to get started. In this dialog you need to open the Extensibility node located in Other Project Types in order to see Visual Studio templates related to its extensibility (Figure 52-1). Here you will see the Visual Studio Add-in template, which is a built-in template for Visual Studio. You may or may not see some templates that are shown in Figure 52-1, such as the Visual Studio Shell Isolated template. Both the Visual Studio Add-in and Shared Add-in templates are built-in parts of the Visual Studio installation.
Figure 52.1. Figure 52-1
After choosing a name for the project, a wizard dialog appears called the Add-in Wizard. This wizard helps you to get started with your add-in through an initial code that is generated for you. This wizard consists of six pages and a welcome page.
Here you can see a walkthrough of this wizard and read a description about each step. As a general note, you need to know that this wizard has buttons to the next and previous steps and to cancel the wizard. At any step you can go back and forth between steps.
There is a welcome page at the start, which gives a short description of the wizard (Figure 52-2).
Figure 52.2. Figure 52-2
In the first step of the Add-in Wizard (Figure 52-3) you need to choose a development language for ...
Get Professional Visual Studio® 2008 now with the O’Reilly learning platform.
O’Reilly members experience books, live events, courses curated by job role, and more from O’Reilly and nearly 200 top publishers.

