Any person who interacts with your Zendesk instance, in one way or another, will have a user profile. The extent to which your customers use their user profile will differ greatly. Some customers like to log in to the Zendesk web portal and customize their profile when they’re getting support from your company. Others prefer to log in, but don’t care to update their name or upload a photo. Other customers may never log in to your web portal, and prefer to interact using one of the external channels, such as Email, Twitter, Facebook or Voice.
Regardless of the level of interaction, every person who interacts will have a user profile, and that user profile will be classified as either an end-user, an agent or an administrator. Each of these levels are described in this chapter.
All user management is done from the People administration page in Zendesk, with just a few links at the top of the page (shown in Figure 4-1). The section at the top of the page can also be used to search for users and to filter the results shown on the People administration page.

Every new Zendesk instance is created with one administrator user account. The details of that account (name and email address) must be entered by the person who originally set up the Zendesk instance. The first administrator is also called the Account Owner of the Zendesk instance, and they are the only user who can make changes to the billing details and plan of the instance. If you’d like to change the account owner of your Zendesk instance, you must contact the Zendesk support team.
To add an administrator in the product, you’ll need to select the "user" link from the People administration page, then select Administrator as the user type. If you’re on the Enterprise plan the process will differ slightly, which is described in Adding an Agent on the Enterprise Plan.
Agents are the people on your team who will be providing support to your customers. Every agent is a paid account in the system, and every agent will have greater permissions in your Zendesk instance than your customers. Agents are trusted with the privacy and security of your customers, but most importantly, they are trusted with the reputation of customer service at your company.
Groups are a simple way to collect agent accounts together, for a wide range of purposes that will become obvious as examples are given throughout this book. Agents can belong to several groups, and the choice of groups is made when you add an agent. It’s also possible for an administrator to add or remove agents from groups at any time.
Adding a group is very simple. In fact, there are almost no configurable options when adding a group. The reason is that group configurations are spread throughout the product, not the other way around. As an example, visibility of Views can be limited to only a specific group. Another example is one of the Triggers that would assign new tickets to a specific group according to relevant criteria. Another example, and probably the most common, is that groups will appear in the assignee field on the ticket screen as a funnel into a subset of agents to which the ticket should be assigned.
Tip
Zendesk doesn’t support hierarchies of groups, but it’s possible for every agent to belong to more than one group. For example, if you create a group for "Support" and another group for "Level 2 Support", you cannot categorize the latter as a sub-group of the former, but it is possible to add an agent to both groups.
To create a new group, open the People administration page, then click the "group" link beside the word "add" in the top-right corner of the page. The user creation form will ask for the name of the group and allow you to select which agents should be added into the group. Select "Create group" when you’re finished. This will immediately create the group, which is ready to be used in some of the ways just listed.
Just like most email applications, Zendesk allows all agents to include a unique signature at the end of every comment that they add to tickets. From an administrator’s perspective, it is often important to build a level of consistency into the format of these signatures, which is a setting that is configured on the Agents administration page.
Because Zendesk supports only plaintext comments, the agent signature will always be plaintext. This does not mean that you can’t include URLs in your signature, but they might not be clickable for the reader.
Tip
The agent signature will be visible in the web portal as well as outgoing email correspondence, but it will not be appended to comments added to tickets created via the Twitter or Facebook channels.
To configure the standard template for your agents' signatures, you will need to edit the Signature option on the Agents administration page. By default, this field contains the placeholder {{agent.signature}}. This is another example of a Placeholder (described in more detail in the Placeholders section), where the code shown here will be replaced by the individual agent’s signature. It is the administrator’s responsibility to add the extra pieces of text that are not included in the individual agent’s signature.
A very common example would be the company slogan, or some useful information about hours of support, for example "Phone support offered 9-5 Monday through Friday, email support at other times". Again, this information will appear at the bottom of every comment added to a ticket, and it’s very likely that your customers will read this information.
Warning
I’ve seen advertisements used in this space, but you should be careful not to make customers feel like you don’t take their support requests seriously. Customers can be very frustrated during the support process, and telling them about the new 3D version of your widget might just frustrate them more.
The steps that you’ll follow to create an agent account on the Starter, Regular and Plus plans will differ slightly from the steps on the Enterprise plan. The topics in this section cover the first method.
Firstly, the pricing model of Zendesk requires you to pay a fee for every agent account in your instance. End-user accounts are free. So basically, you should create an agent account only if you really think that this person will be logging into the system and answering support requests, or if they will be publishing content to your forums, or they will be running reports as a manager. Also, administrator accounts are counted as agent accounts for the purposes of billing.
To create an agent account, open the People administration page, then click the "user" link beside "add" in the top-right corner of the page. Most of the options on this page, such as Name, Phone, Time zone, Language, Details and Notes are self-explanatory. If you’re using the Plus or Enterprise plans there will be a field labeled Alias, which is the name that will be displayed to end-users instead of using the agent’s real name. This feature is provided mostly for privacy of the agent, and some customers use this field to abbreviate the agent’s last name. For example, my name Stafford Vaughan might have an alias in Zendesk of "Stafford V".
To ensure that this new user account is an agent, select the "Agent" option in the Role section. The other alternatives are administrator and end-user.
Warning
The "role" listed on the user creation page is different from the "role" functionality available on the Enterprise plan, which is explained in Enterprise Agent Roles and Light Agents.
After you select "Agent" as the user type, you’ll be presented with a small number of options. The options include a list of groups of which the agent will be a member, as well as the option for the agent to publish comments that are visible to your customers, and whether they have forum moderator privileges. Forum moderators are users who can edit or delete any topic in your forums. The option to restrict agent access to tickets will be discussed in the Restricting Agent Access to Tickets section, but my general recommendation is that agents "Have access to" all tickets.
One of the best features of the Enterprise plan is the ability to configure agent permissions at a more granular level than the Starter, Regular or Plus plans. This feature is known as Agent Roles (or sometimes just Roles). The process of adding a new agent to your Zendesk instance on the Starter, Regular and Plus plans provides the administrator with four different options (listed in the last topic), but the Agent Roles feature on the Enterprise plan extends this list to 20 different options, each of which is described in the Configuration Options for Agent Roles section. To make the management of this list of 20 options more convenient, Zendesk captures the selected options in a single role, which can then be assigned to a specific set of agents.
Out of the box, Zendesk comes with five roles already defined. To find these roles, click the "roles" link beneath the search box on the People administration page. A quick summary of each of these roles is as follows:
- Administrator
- This is a special role that replaces the administrator user type on the other plans. On the Enterprise plan, the options for the Administrator role cannot be customized.
- Light Agent
- Like Administrator, this is a special role with limited options for customization. The purpose of this role is to allow team members outside the support team at your organization to log in and assist the support process. Light Agents can never update the fields in a ticket, which means that they cannot solve a ticket, assign a ticket, add tags, or anything else. The only task that can be performed by a Light Agent is to add a private comment to a ticket, which is a comment that will only be visible to other members of your support organization. A common situation in which you’d use this feature would be when you involve your development team in the process of solving a customer’s support inquiry, especially if it was related to a bug in your software. Another example is a finance team, who would provide status updates on financial matters. In both of these cases, private comments will be added to a ticket by the development and finance teams, and it is the responsibility of the support agent to pass on the relevant information to the customer, and maintain the status of the ticket.
- Staff
- This is the standard role that you would assign to your support team. I find that the default configuration of this role is quite restrictive, so I usually change some of the default settings for this role. In particular, I would change this role from restricting access to tickets in the agent’s groups to allowing access to all tickets instead.
- Team Leader
- This is not a special role, and seems to be mostly added for example purposes. This role is useful for someone who should have slightly higher access than most support team members, which would usually be, as the name suggests, a team leader.
- Advisor
- This is also a role that is mostly for example purposes, but might typically be used for an agent who should have some administrative privileges, but not all. This is typically someone who will not be solving support requests, but who would be assisting administrators define business rules, etc. Unless you have a large team of administrators or an extremely large customer service team, you probably don’t need to use the Advisors role and can simply delete it.
- Legacy Agent
- This is a special role for organizations that upgrade from the Starter, Regular or Plus plans to the Enterprise plan. When you upgrade, Zendesk does not automatically assume that all of your agents should be granted one of the Enterprise roles listed in this section. Instead, all existing agents are assigned to the Legacy Agent role, and will have the same permissions as the previous plan. I recommend that after you upgrade, you immediately open your agent profiles and move your agents onto one of the dedicated roles in Enterprise, if for no reason other than to take advantage of the granularity of those roles. Once you moved your agents onto one of the newer roles, it’s impossible to move them back onto the Legacy Agent role.
Tip
Agents using the Light Agent role are completely free, which I consider to be the very best feature of the Enterprise plan. Since these accounts are free, Enterprise customers often add every member of their organization as a Light Agent inside Zendesk, which means that all conversations about support tickets will stay inside Zendesk, rather than conversations with the development or finance team being scattered in email.
For each role, there are approximately 20 individual options to be configured. Most of the options are self-explanatory, but the decision process for each option is not always so obvious. I’ve explained some of the more common considerations to make for the options below, in the context of the other features explained in this book.
- What kind of tickets can this agent access?
- This option is discussed in the Restricting Agent Access to Tickets section.
- Agent can assign to any group
- If you specifically select the "All within the agent’s group(s)" option in the "What kind of tickets can this agent access" select list, a new option will pop up that allows you to determine whether the agent can assign a ticket to groups other than those of which they are a member. By default, this is unchecked. The problem with leaving it unchecked is that the agent cannot escalate a ticket to whichever group is necessary. On the other hand, leaving it unchecked prevents agents from lobbing tickets away from their group, if they don’t want to take care of it themselves. I would err on the side of the first choice, which is to enable this option to give more control to agents, and trust them to make a wise decision as to whether the ticket is suited for their group. Perhaps those are famous last words.
- What type of comments can this agent make?
- To put it simply, some people just shouldn’t be making publicly visible comments on tickets. You’ve probably met someone like this—the person who is not-so-diplomatic with difficult customers. Most customer service team members have the necessary skills to be polite or, at the very least, professional. If you’ve opened up your Zendesk instance to other teams such as your development team, finance, or marketing, those customer service skills may not necessarily exist. I don’t want to stereotype, but I do encourage you to limit direct customer access to the pros, and enable public comments just for your trained customer service team.
- Can edit ticket properties
- This option can be used to restrict agents to read-only access on tickets. The functionality is very similar to the Light Agent role, but if create a custom role for this purpose instead of using Light Agents, the benefit is that you can provide other privileges to the user. If this option is disabled, the next three options in this list will not be enabled. If you’ve disabled this option, you should also consider allowing these agents to only add private comments (see the previous item in this list), which means that the agent is restricted to communicate internally within your organization only.
- Can delete tickets
- This option does exactly what it suggests. You should be aware that there is no audit trail of deleted tickets in Zendesk, so this privilege should be given sparingly.
- Can merge tickets
- There aren’t many compelling reasons to prevent agents from merging tickets, because merging a ticket is a relatively innocuous task. As a side effect of merging tickets, one ticket will be closed for further comments, but it’s still possible to create a follow-up for that ticket.
- Can edit ticket tags
- Some organizations elect to link specific tags very closely to strict business processes, and therefore the tags should not be editable by agents. For example, a tag of "vip" might be so important to your organization that it would be damaging to allow an agent to add this tag to arbitrary tickets. If this is the case, you should disable the tagging privilege using this checkbox. Otherwise, I think that agent tagging is a very useful feature that supports a great many useful functions in the product, and I would encourage you to enable this feature for your agents.
- What access does this agent have to end-user profiles?
- If there is a very strict list of end-users to whom you should provide support, you might want to use this option to prevent agents from creating new end-user accounts arbitrarily. On the Starter, Regular, and Plus plans, agents are trusted to be able to create end-user accounts. If you’re on the Enterprise plan and have access to the roles function, you could use this option to prevent agents from adding new user profiles.
- May this user view lists of user profiles?
- It’s not possible to block agents from viewing the details of individual end-user profiles, regardless of the plan you’re using. Using this option, it is possible to prevent agents from finding user profiles en masse, or prevent them from searching for user profiles. If you disable this option, agents may only use the user’s profile link on a ticket as a channel to find out further information about the user.
- Can add or modify groups & organizations
- If the option "What access does this agent have to end-user profiles" is configured to give agents the privilege to create new user profiles in Zendesk, the option to also modify groups and organizations will appear to the administrator. The organization portion of this option is particularly useful, because it allows agents to create organizations to categorize end-users. It also allows the agent to add groups and include fellow agents into those groups, so there’s a high amount of trust involved in granting this privilege to agents.
- What can this agent do in forums?
- On the Starter, Regular, and Plus plans, the option to create new categories and forums is given to Zendesk administrators only. This means that if you’re the manager of the public side of your Zendesk instance, on those plans you’ll need full administrator access to be able to manage the forums. The "What can this agent do in forums" option in Enterprise roles is my second favorite option in the list, because it allows you to delegate all of those forum privileges to a member of your team, without giving them administrative access to any other parts of Zendesk. The select list item to grant full forum administrative privileges to your agents is the last one, labeled "Add, edit, and reorder all forum content".
- Can access organization-restricted forums
- As you start to publish content in your forums, you might use the privacy features described in Forum Access Restrictions to restrict user access to certain forums. The reasons may be simply that the information is relevant only to a certain group of people, or it could be due to serious privacy or security concerns. If it’s the latter, you should consider these concerns before giving your agents access to all information in all forums with this option.
- What can this agent do with reports?
- Zendesk has a reporting feature that shows simple reports to agents and administrators. I like the idea of sharing this information with agents, because it allows them to make informed decisions, particularly if there is a spike in a certain area. A high-level view of the status of your customer service team might be more information than you’re willing to share though, and if it is, you can use this option to prevent agents from viewing reports. This option is also linked to the search and forum analytics features, which means that if you select the "Cannot view" option, agents don’t have access to any of these features.
- What can this agent do with views/macros?
- I’ve grouped the separate options for views and macros into the same item here, because the same principles apply to both. They share first place for my favorite option for roles. Basically, they allow administrators to delegate the responsibility of creating agent rules to the agents themselves. Later in this book, in Shared Views and Adding a Shared Macro, I explain how to share these features with your agents if you’re an administrator, but if you’re on the Enterprise plan, these rules are instantly democratized for your agents.
- Can access dynamic content
- If you have a small list of agents whom you trust to publish reusable content for all users, this option allows you to grant that privilege to those agents. Dynamic content was explained earlier in Dynamic Content for Text Translation, but I mentioned that it’s typically the domain of the administrators to create new strings of text. If you enable this option, you’re effectively allowing your agents to assist with the translation process.
- Can answer chat requests
- For the same reasons described earlier when restricting agent access to public comments, it might be worth preventing some of your agents from taking chat requests. This just ensures that the right people for the job are interacting with your customers directly.
- Can access Twitter saved searches
- Since Twitter is a very public communication medium, it’s generally a good idea to restrict Twitter access to users who have demonstrated an understanding of its sensitive nature. As described in Twitter, an accidentally published tweet can have very negative consequences for your brand’s reputation.
- Can manage Facebook Pages
- If you’ve set up a group of agents who will be managing your social media presence but you’d prefer not to give those users full administrative privileges to your Zendesk instance (for similar reasons as described above in the forum options), this option will support this goal.
- Can answer phone calls
- Similar to the concept of chat and public comments, this feature allows you to restrict phone privileges to only certain agents. Some people are just better on the phone than other people.
- Can manage business rules
- If you trust some of your users to manage your customer service workflow but would rather not give them full administrative access to your Zendesk instance, enabling this option for those users is a good compromise. By using this option to give workflow access to your users, it allows you and the other administrators to focus on more important features of your Zendesk instance such as security.
- Can manage channels, and extensions
- If you have some team members that are technical in nature and who manage the integrations on your Zendesk instance, then you might decide to give them this privilege, without giving them full administrative access. Just like the option above, this is a compromise, and supports the idea of spreading the administrative load without foregoing control over the security of your system.
Now that you’ve configured your roles and selected the options for each role, the process to add an agent on the Enterprise plan is quite similar to adding an agent on the other plans. The first step is to click the "user" link next to the "add" section on the People administration page. The big difference between this process on the Enterprise plan and the other plans is that instead of scrolling down and choosing between end-user, agent, and administrator, on the Enterprise plan there are only two radio buttons near the top of the page: End-user and Agent. When you select the Agent option, you will be presented with a select list of the available roles, and once you’ve selected the role, you can click Create to create the new agent account.
End-users are usually your customers (although in the case of an internal customer support environment, they may be colleagues), and they will be the people who are seeking help. It’s possible in Zendesk to grant end-users access to more than just their own tickets, though there are important considerations around privacy to be made before enabling this setting.
The most common method used to create end-users is that the person will create their own account via the "sign up" link on the Zendesk web portal. Alternatively, end-user accounts may be automatically created when a new email is received in your Zendesk instance. For the situations in which the person has not created their own account, this section will explain how to create an end-user account as an administrator.
Just like creating an agent and administrator, creating an end-user involves clicking the "user" link next to the "add" section on the People administration page. There is a slight difference with adding end-users, which is that some agents—depending on their permissions—can perform this function as well as administrators. All of the end-user fields are the same as agents, with the exception of the Alias field, which will not appear for end-users. End-users are also much more likely to have a value in the "Organization" field, which is explained in Organizations.
Tip
An shortcut method of creating end-user accounts is available to agents during the process of adding a ticket, which is very convenient when the ticket requester does not already exist in the system. This process presents only a few core fields to the agent, just for the sake of simplicity. If an end-user is created using this method, it’s always a good practice to visit the end-user’s profile again at a later date and ensure that all fields for this user account have been set correctly.
When you’re using multiple channels to provide support to your customers, you’ll occasionally have a situation where the same person submits a ticket for a single topic using several different channels. As an example, your customer might start by tweeting their concern, then escalate their inquiry by sending an email, then call into your Voice phone number if they do not receive a timely response with the other channels. Since each channel is different, each new submission from the same customer will be a separate ticket with a separate ticket ID, and—if the user profile does not exist in Zendesk already—the requester of each of these tickets will also be a different user profile in the system. This becomes difficult to manage from an agent’s perspective because they must search through several user accounts to find tickets from the same person, and it’s a problem for customers because they could potentially have tickets scattered throughout various user accounts and not know which one to use when logging in.
To solve the problem of multiple end-user accounts for the same person, Zendesk has a feature that allows you to merge end-user accounts together. When you merge these accounts, Zendesk has a concept of a source and a target user account (also called the winner and the loser, but the first phrasing sounds more polite). The idea is that the details of the source user account will be merged into the target, and any tickets requested by the source will also be merged into the target. Once the process is complete, the source user profile will be deleted entirely and only a single user profile will remain.
Tip
The Zendesk Voice channel is a very common example of when merging users will be valuable, because often your customers will have an existing profile without a phone number. When they call in to your support team for assistance, a new profile will be created for the phone number from which they are calling. By merging this new user profile with an existing profile that has an email address, it’s possible for your agents to continue the support conversation using email.
Because Zendesk allows only a single value for some of the user profile fields—such as name, phone number, and time zone selection—only the values on the target user account will be retained (hence the expression "winner"). In the case of other fields that support multiple values—such as email—all values will be kept from both user profiles.
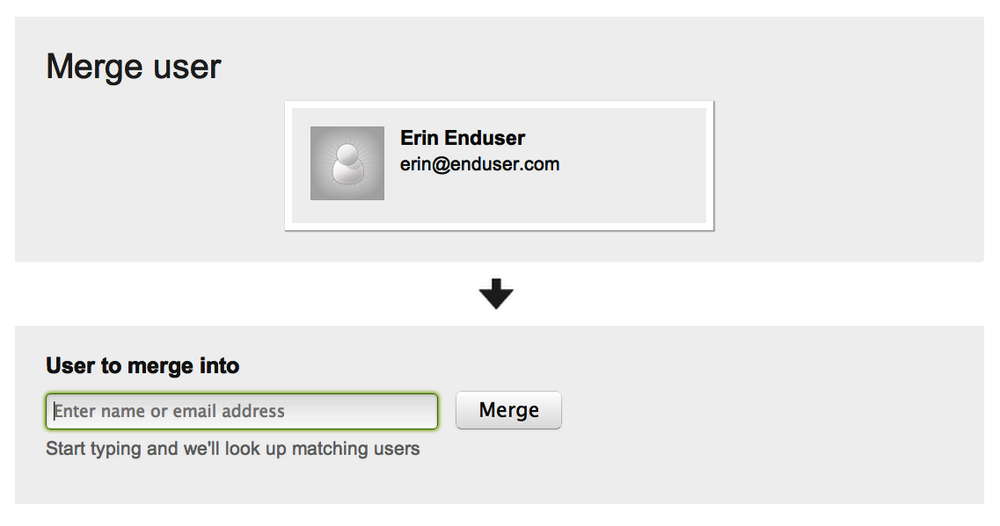
To merge an end-user account, the first step is to find the user and view their profile. When you click the "User options" link for this user, one of the options is "Merge into another user". The dialog box to merge end-user accounts has two sections as shown in Figure 4-2. The top section represents the source user profile and the bottom represents the target user profile. An arrow is used to make this visually explanatory. To find the target user you’ll need to start typing their name and Zendesk will auto-predict the user based on a text search. Once you’ve selected the user, follow the prompts and the user accounts will be merged.
Warning
It’s not possible to undo the process of merging users.
Occasionally, emails will get past the suspended ticket filters, or someone will log in to your Zendesk instance and create a ticket when they really shouldn’t. There are dozens of examples of situations in which this would happen, but common examples are spam or solicitation. If this situation occurs, it’s possible for you as an administrator, or your agents, to suspend that end-user. If you’re an administrator you can also suspend agent accounts, though this function is used less frequently.
There are two ways to suspend a user. Outside the context of a specific ticket, you can suspend a user account by clicking their name to open their profile, then selecting the "Suspend access" option from the user actions menu. This will suspend the user immediately without a confirmation screen. It’s possible to immediately unsuspend the user by selecting the "Unsuspend access" option in the same menu.
Rather than suspending a user from their profile screen, you’ll want more often to suspend a user from a specific ticket. To perform this function from a ticket screen, select the user’s profile name from the navigation at the top of the page, then select "Suspend access" from the user options menu. This will immediately suspend the user, which prevents them from logging in to Zendesk or submitting further tickets via any other channel.
The Organization feature is an easy way to collect your end-user profiles together, then apply specific rules to those profiles. This particular feature is generally useful only if you’re operating a Business-to-Business (B2B) support service, where you are aware of the organizations that you are supporting. If you are Business-to-Consumer (B2C) and you are generally unaware of your customer list, or your list of customer organizations are extremely diverse, it doesn’t make as much sense to use the Organizations feature (although there are a few exceptions).
The first step to set up organizations is to visit the People administration page, and click the "organization" link next to "add" in the top-right corner of the screen. The organization creation page has a number of fields to be completed. The Name of the organization is a required field, and would typically be the business name or brand of the organization. This name will be visible to agents when they are answering support requests. The Details and Notes fields are optional pieces of information that you can add to the organization, again for the reference of support agents.
To make it easier to link end-user accounts to organizations, Zendesk allows you to specify the email domains that are associated with that organization. The option is labeled "Map email domains to organization". If you add several domain names to this field (separated by spaces), Zendesk will retroactively find all user accounts with an email addresses that matches that domain name, and automatically add the users to the organization. Whenever a new user account is created, Zendesk will also check the email address of the user against known domain names, and add them to an organization if there is a valid match.
On a basic level, organizations are useful to support agents because they will identify to which organization their ticket requester belongs. On a more advanced level, rules can be set up that will allow escalations based on certain organizations SLAs, or triage tickets automatically based on rules defined for certain organizations. Many of these examples will be explained later in this book.
Warning
Unfortunately, I meet many customers who confuse Organizations with Groups. The difference is simple. Organizations are for end-users (customers), and Groups are for agents (customer service staff). End-users cannot be added be added to Groups. Agents can technically be added to an Organization, but there are so few examples of where this is useful, that it’s definitely the exception more than the rule. One situation on which it is useful to add an Agent to an Organization is explained in Restricting Agent Access to Tickets.
For privacy reasons, it’s generally best to restrict end-users to only accessing their own tickets. In some unique situations, it might be useful to allow a person from an organization to read tickets submitted by other people at the same organization. This feature is known as Shared Organizations, and is useful only if you are using the Organizations feature from the previous topic.
Shared organizations can be enabled on an organization-wide basis or an individual user basis. You can enable it on an organization-wide basis by selecting the "Shared organization" checkbox when adding or editing the organization. This setting will immediately add a link to the navigation on the web portal of end-users, which is labeled as the name of their organization. An example of this is shown in Figure 4-3, where my profile is associated with the "Zendesk" organization on the CustomWare support portal. Clicking the "Zendesk" link in the screenshot will show the tickets from other end-users in this organization.

Warning
In general, I don’t recommend sharing an organization unless you are completely sure that your users will not have privacy issues. It’s risky to assume that an end-user won’t accidentally publish a credit card number or password in their ticket, or that an HR person will not publish sensitive details about an employee, which could result in other users at the same organization accessing that information.
The alternative to the organization-wide sharing setting is to allow only certain users at an organization to view tickets requested by other users at that organization. An example for this would be a situation where an organization has a primary point of contact, or a senior staff member who needs access to all tickets. This person should be trusted with sensitive information within the organization. To enable this setting on the Starter, Regular and Plus plans, change "Has access to" to "Tickets from user’s organization" when adding or editing an end-user. If the organization-wide sharing setting has been disabled, the setting on the individual user’s account will override the organization-wide setting, and the end-user will have full access to tickets from the organization. If the organization-wide sharing setting has been enabled, the setting on the individual end-user is redundant. On the Enterprise plan the same principles apply, but the setting is a checkbox labeled "Allow access to tickets in end-user’s organization" when defining the agent roles.
Get Practical Zendesk Administration now with the O’Reilly learning platform.
O’Reilly members experience books, live events, courses curated by job role, and more from O’Reilly and nearly 200 top publishers.

