TMTOWTDI (sometimes pronounced "tim toady“), an acronym for “There’s More Than One Way To Do It,” is the main motto of Perl. In other words, you can reach the same goal (usually a working product) by coding in many different styles, using different modules and deploying the same modules in different ways.
However, when you come to the point where performance is the goal, you might have to learn what’s efficient and what’s not. This may mean that you will have to use an approach that you don’t really like, that’s less convenient, or that requires changing your coding habits.
This section is about performance trade-offs. For almost every comparison, we will provide the theoretical difference and then run benchmarks to support the theory. No matter how good the theory is, it’s the numbers we get in practice that matter.
We also would like to mention that the code snippets used in the benchmarks are meant to demonstrate the points we are making and are intended to be as short and easy to understand as possible, rather than being real-world examples.
In the following benchmarks, unless stated differently, mod_perl is tested directly, and the following Apache configuration has been used:
MinSpareServers 10
MaxSpareServers 20
StartServers 10
MaxClients 20
MaxRequestsPerChild 10000
At some point you have to decide whether to use
Apache::Registry or similar handlers and stick to
writing scripts only for content generation, or to write pure Perl
handlers.
Apache::Registry
maps a
request to a file and generates a package and the handler(
) subroutine to run the code contained in that file. If you
use a mod_perl handler instead of
Apache::Registry, you have a direct mapping from
request to subroutine, without the steps in between. The steps that
Apache::Registry must go through include:
Run the
stat( )system call on the script’s filename ($r->filename).Check that the file exists and is executable.
Generate a Perl package name based on the request’s URI (
$r->uri).Change to the directory in which the script resides (
chdirbasename$r->filename).Compare the file’s last-modified time to the compiled subroutine’s last modified time as stored in memory (if it has already been compiled).
If modified since the last compilation or not yet compiled, compile the subroutine.
Change back to the previous directory (
chdir
$old_cwd
).
If you remove these steps, you cut out some overhead, plain and simple. Do you need to cut out that overhead? Maybe yes, maybe no: it depends on your performance requirements.
You should also take a look at the sister
Apache::Registry modules (e.g.,
Apache::RegistryBB) that don’t
perform all these steps, so you can still stick to using scripts to
generate the content. The greatest added value of scripts is that you
don’t have to modify the configuration file to add
the handler configuration and restart the server for each newly
written content handler.
Another alternative is the
Apache::Dispatch
module (covered in Appendix B), which allows you to add new handlers and run
them without modifying the configuration.
Now let’s run some benchmarks and compare.
We want to see the overhead that
Apache::Registry
adds compared to a custom handler
and whether it becomes insignificant when used for heavy and
time-consuming code. In order to do this we will run two benchmark
sets: the first, the light set, will use an
almost empty script that sends only a basic header and one word of
content; the second will be the heavy set, which
adds some time-consuming operation to the script and handler code.
For the light set we will use the registry.pl
script running under Apache::Registry (see Example 13-1).
Example 13-1. benchmarks/registry.pl
use strict;
print "Content-type: text/plain\n\n";
print "Hello";
And we will use the equivalent content-generation handler, shown in Example 13-2.
Example 13-2. Benchmark/Handler.pm
package Benchmark::Handler;
use Apache::Constants qw(:common);

sub handler {
    $r = shift;
    $r->send_http_header('text/plain');
    $r->print("Hello");
    return OK;
}
1;
We will add these settings to httpd.conf:
PerlModule Benchmark::Handler
<Location /benchmark_handler>
    SetHandler perl-script
    PerlHandler Benchmark::Handler
</Location>
The first directive preloads and compiles the
Benchmark::Handler module. The remaining lines
tell Apache to execute the subroutine
Benchmark::Handler::handler when a request with
the relative URI /benchmark_handler is made.
We will use the usual configuration for
Apache::Registry scripts, where all the URIs
starting with /perl are mapped to the files
residing under the /home/httpd/perl directory:
Alias /perl /home/httpd/perl
<Location /perl>
    SetHandler perl-script
    PerlHandler +Apache::Registry
    Options ExecCGI
    PerlSendHeader On
</Location>
We will use Apache::RegistryLoader to preload and
compile the script at server startup as well, so the benchmark is
fair and only processing time is measured. To accomplish the
preloading we add the following code to the
startup.pl file:
use Apache::RegistryLoader ( );
Apache::RegistryLoader->new->handler(
            "/perl/benchmarks/registry.pl",
 "/home/httpd/perl/benchmarks/registry.pl");
To create the heavy benchmark set, let’s leave the preceding code examples unmodified but add some CPU-intensive processing operation (e.g., an I/O operation or a database query):
my $x = 100;
my $y = log ($x ** 100)  for (0..10000);
This code does lots of mathematical processing and is therefore very CPU-intensive.
Now we are ready to proceed with the benchmark. We will generate 5,000 requests with a concurrency level of 15. Here are the results:
------------------------------
    name        | avtime   rps
------------------------------
light handler   |     15   911
light registry  |     21   680
------------------------------
heavy handler   |    183    81
heavy registry  |    191    77
------------------------------
First let’s compare the results from the light set.
We can see that the average overhead added by
Apache::Registry (compared to the custom handler)
is about:
21 - 15 = 6 milliseconds
per request.
The difference in speed is about 40% (15 ms versus 21 ms). Note that this doesn’t mean that the difference in real-world applications would be so big. The results of the heavy set confirm this.
In the heavy set the average processing time is almost the same for
Apache::Registry and the custom handler. You can
clearly see that the difference between the two is almost the same as
in the light set’s results—it has grown from 6
ms to 8 ms (191 ms - 183 ms). This means that the identical heavy
code that has been added was running for about 168 ms (183 ms - 15
ms). However, this doesn’t mean that the added code
itself ran for 168 ms; it means that it took 168 ms for this code to
be completed in a multiprocess environment where each process gets a
time slice to use the CPU. The more processes that are running, the
more time the process will have to wait to get the next time slice
when it can use the CPU.
We have answered the second question as well (whether the overhead of
Apache::Registry is significant when used for
heavy code). You can see that when the code is not just the
hello script, the overhead added by
Apache::Registry is almost insignificant.
It’s not zero, though. Depending on your
requirements, this 5-10 ms overhead may be tolerable. If
that’s the case, you may choose to use
Apache::Registry.
An interesting observation is that when the server being tested runs on a very slow machine the results are completely different:
------------------------------
    name        | avtime   rps
------------------------------
light handler   |     50   196
light registry  |    160    61
------------------------------
heavy handler   |    149    67
heavy registry  |    822    12
------------------------------
First of all, the 6-ms difference in average processing time we saw
on the fast machine when running the light set has now grown to 110
ms. This means that the few extra operations that
Apache::Registry performs turn out to be very
expensive on a slow machine.
Secondly, you can see that when the heavy set is used, the time difference is no longer close to that found in the light set, as we saw on the fast machine. We expected that the added code would take about the same time to execute in the handler and the script. Instead, we see a difference of 673 ms (822 ms - 149 ms).
The explanation lies in the fact that the difference between the machines isn’t merely in the CPU speed. It’s possible that there are many other things that are different—for example, the size of the processor cache. If one machine has a processor cache large enough to hold the whole handler and the other doesn’t, this can be very significant, given that in our heavy benchmark set, 99.9% of the CPU activity was dedicated to running the calculation code.
This demonstrates that none of the results and conclusions made here should be taken for granted. Most likely you will see similar behavior on your machine; however, only after you have run the benchmarks and analyzed the results can you be sure of what is best for your situation. If you later happen to use a different machine, make sure you run the tests again, as they may lead to a completely different decision (as we found when we tried the same benchmark on different machines).
Apache::args,
Apache::Request::param
, and
CGI::param are the three most common ways to
process input
arguments
in mod_perl handlers and
scripts. Let’s
write three Apache::Registry scripts that use
Apache::args,
Apache::Request::param, and
CGI::param to process a form’s
input and print it out. Notice that Apache::args
is considered identical to Apache::Request::param
only when you have single-valued keys. In the case of multi-valued
keys (e.g., when using checkbox groups), you will have to write some
extra code. If you do a simple:
my %params = $r->args;
only the last value will be stored and the rest will collapse, because that’s what happens when you turn a list into a hash. Assuming that you have the following list:
(rules => 'Apache', rules => 'Perl', rules => 'mod_perl')
and assign it to a hash, the following happens:
$hash{rules} = 'Apache';
$hash{rules} = 'Perl';
$hash{rules} = 'mod_perl';
So at the end only the following pair will get stored:
rules => 'mod_perl'
With CGI.pm or Apache::Request,
you can solve this by extracting the whole list by its key:
my @values = $q->param('rules');In addition, Apache::Request and
CGI.pm have many more functions that ease input
processing, such as handling file uploads. However,
Apache::Request is theoretically much faster,
since its guts are implemented in C, glued to Perl using XS code.
Assuming that the only functionality you need is the parsing of key-value pairs, and assuming that every key has a single value, we will compare the almost identical scripts in Examples 13-3, 13-4, and 13-5 by trying to pass various query strings.
Example 13-3. processing_with_apache_args.pl
use strict;
my $r = shift;
$r->send_http_header('text/plain');

my %args = $r->args;
print join "\n", map {"$_ => $args{$_}" } keys %args;
Example 13-4. processing_with_apache_request.pl
use strict;
use Apache::Request ( );
my $r = shift;
my $q = Apache::Request->new($r);
$r->send_http_header('text/plain');

my %args = map {$_ => $q->param($_) } $q->param;
print join "\n", map {"$_ => $args{$_}" } keys %args;
Example 13-5. processing_with_cgi_pm.pl
use strict;
use CGI;
my $r = shift;
my $q = new CGI;
$r->send_http_header('text/plain');

my %args = map {$_ => $q->param($_) } $q->param;
print join "\n", map {"$_ => $args{$_}" } keys %args;
All three scripts and the modules they use are preloaded at server startup in startup.pl :
use Apache::RegistryLoader ( );
use CGI ( );
CGI->compile('param');
use Apache::Request ( );

# Preload registry scripts
Apache::RegistryLoader->new->handler(
                          "/perl/processing_with_cgi_pm.pl",
               "/home/httpd/perl/processing_with_cgi_pm.pl"
                  );
Apache::RegistryLoader->new->handler(
                          "/perl/processing_with_apache_request.pl",
               "/home/httpd/perl/processing_with_apache_request.pl"
                  );
Apache::RegistryLoader->new->handler(
                          "/perl/processing_with_apache_args.pl",
               "/home/httpd/perl/processing_with_apache_args.pl"
                  );
1;
We use four different query strings, generated by:
my @queries = (
    join("&", map {"$_=" . 'e' x 10}  ('a'..'b')),
    join("&", map {"$_=" . 'e' x 50}  ('a'..'b')),
    join("&", map {"$_=" . 'e' x 5 }  ('a'..'z')),
    join("&", map {"$_=" . 'e' x 10}  ('a'..'z')),
);
The first string is:
a=eeeeeeeeee&b=eeeeeeeeee
which is 25 characters in length and consists of two key/value pairs.
The second string is also made of two key/value pairs, but the values
are 50 characters long (a total of 105 characters). The third and
fourth strings are each made from 26 key/value pairs, with value
lengths of 5 and 10 characters respectively and total lengths of 207
and 337 characters respectively. The query_len
column in the report table is one of these four total lengths.
We conduct the benchmark with a concurrency level of 50 and generate 5,000 requests for each test. The results are:
---------------------------------------------
name   val_len pairs query_len |  avtime  rps
---------------------------------------------
apreq     10      2       25   |    51    945
apreq     50      2      105   |    53    907
r_args    50      2      105   |    53    906
r_args    10      2       25   |    53    899
apreq      5     26      207   |    64    754
apreq     10     26      337   |    65    742
r_args     5     26      207   |    73    665
r_args    10     26      337   |    74    657
cgi_pm    50      2      105   |    85    573
cgi_pm    10      2       25   |    87    559
cgi_pm     5     26      207   |   188    263
cgi_pm    10     26      337   |   188    262
---------------------------------------------
where apreq stands for
Apache::Request::param( ),
r_args stands for Apache::args(
) or $r->args( ), and
cgi_pm stands for CGI::param(
).
You can see that Apache::Request::param and
Apache::args have similar performance with a few
key/value pairs, but the former is faster with many key/value pairs.
CGI::param is significantly slower than the other
two methods.
These results also suggest that the processing gets progressively
slower as the number of key/value pairs grows, but longer lengths of
the key/value pairs have less of a slowdown impact. To verify that,
let’s use the
Apache::Request::param method and first test
several query strings made of five key/value pairs with value lengths
growing from 10 characters to 60 in steps of 10:
my @strings = map {'e' x (10*$_)} 1..6;
my @ae = ('a'..'e');
my @queries = ( );
for my $string (@strings) {
    push @queries, join "&", map {"$_=$string"} @ae;
}
The results are:
-----------------------------------
val_len query_len    |  avtime  rps
-----------------------------------
  10       77        |    55    877
  20      197        |    55    867
  30      257        |    56    859
  40      137        |    56    858
  50      317        |    56    857
  60      377        |    58    828
-----------------------------------
Indeed, the length of the value influences the speed very little, as we can see that the average processing time almost doesn’t change as the length of the value grows.
Now let’s use a fixed value length of 10 characters and test with a varying number of key/value pairs, from 2 to 26 in steps of 5:
my @az = ('a'..'z');
my @queries = map { join("&", map {"$_=" . 'e' x 10 } @az[0..$_]) }
    (1, 5, 10, 15, 20, 25);
The results are:
-------------------------------
pairs  query_len |  avtime  rps
-------------------------------
  2       25     |    53    906
  6       77     |    55    869
 12      142     |    57    838
 16      207     |    61    785
 21      272     |    64    754
 26      337     |    66    726
-------------------------------
Now by looking at the average processing time column, we can see that the number of key/value pairs makes a significant impact on processing speed.
As you probably know, this statement:
local $|=1;
disables buffering of the currently select( )ed
file handle (the default is STDOUT). Under
mod_perl, the STDOUT file handle is automatically
tied to the output socket. If STDOUT buffering is
disabled, each print( ) call also calls
ap_rflush( ) to flush Apache’s
output buffer.
When multiple print( ) calls are used
(bad style in generating output), or if there
are just too many of them, you will experience a degradation in
performance. The severity depends on the number of print(
) calls that are made.
Many old CGI scripts were written like this:
print "<body bgcolor=\"black\" text=\"white\">"; print "<h1>Hello</h1>"; print "<a href=\"foo.html\">foo</a>"; print "</body>";
This example has multiple print( ) calls, which
will cause performance degradation with $|=1. It
also uses too many backslashes. This makes the code less readable,
and it is more difficult to format the HTML so that it is easily
readable as the script’s output. The code below
solves the problems:
print qq{
<body bgcolor="black" text="white">
<h1>Hello</h1>
<a href="foo.html">foo</a>
</body>
};You can easily see the difference. Be careful, though, when printing
an
<html> tag.
The correct way is:
print qq{<html>
<head></head>
};You can also try the following:
print qq{
<html>
<head></head>
};but note that some older browsers expect the first characters after
the headers and empty line to be <html> with
no spaces before the opening left angle bracket.
If there are any other characters, they might not accept the output
as HTML might and print it as plain text. Even if this approach works
with your browser, it might not work with others.
Another approach is to use the here document style:
print <<EOT; <html> <head></head> EOT
Performance-wise, the qq{ } and here document
styles compile down to exactly the same code, so there should not be
any real difference between them.
Remember that the closing tag of the here document style
(EOT in our example) must be
aligned to the left side of the line, with no spaces or other
characters before it and nothing but a newline after it.
Yet another technique is to pass the arguments to print(
) as a list:
print "<body bgcolor=\"black\" text=\"white\">",
"<h1>Hello</h1>",
"<a href=\"foo.html\">foo</a>",
"</body>";This technique makes fewer print( ) calls but
still suffers from so-called backslashitis
(quotation marks used in HTML need to be prefixed with a backslash).
Single quotes can be used instead:
'<a href="foo.html">foo</a>'
but then how do we insert a variable? The string will need to be split again:
'<a href="',$foo,'.html">', $foo, '</a>'
This is ugly, but it’s a matter of taste. We tend to
use the qq
operator:
print qq{<a href="$foo.html">$foo</a>
Some text
<img src="bar.png" alt="bar" width="1" height="1">
};What if you want to make fewer print( ) calls, but
you don’t have the output ready all at once? One
approach is to buffer the output in the array and then print it all
at once:
my @buffer = ( ); push @buffer, "<body bgcolor=\"black\" text=\"white\">"; push @buffer, "<h1>Hello</h1>"; push @buffer, "<a href=\"foo.html\">foo</a>"; push @buffer, "</body>"; print @buffer;
An even better technique is to pass print( ) a
reference to the string. The print( ) used under
Apache overloads the default CORE::print( ) and
knows that it should automatically dereference any reference passed
to it. Therefore, it’s more efficient to pass
strings by reference, as it avoids the overhead of copying.
my $buffer = "<body bgcolor=\"black\" text=\"white\">"; $buffer .= "<h1>Hello</h1>"; $buffer .= "<a href=\"foo.html\">foo</a>"; $buffer .= "</body>"; print \$buffer;
If you print references in this way, your code will not be backward
compatible with mod_cgi, which uses the CORE::print(
) function.
Now to the benchmarks. Let’s compare the printing techniques we have just discussed. The benchmark that we are going to use is shown in Example 13-6.
Example 13-6. benchmarks/print.pl
use Benchmark;
use Symbol;
my $fh = gensym;
open $fh, ">/dev/null" or die;
my @text = (
"<!DOCTYPE HTML PUBLIC \"-//IETF//DTD HTML//EN\">\n",
"<HTML>\n",
" <HEAD>\n",
" <TITLE>\n",
" Test page\n",
" </TITLE>\n",
" </HEAD>\n",
" <BODY BGCOLOR=\"black\" TEXT=\"white\">\n",
" <H1>\n",
" Test page \n",
" </H1>\n",
" <A HREF=\"foo.html\">foo</A>\n",
"text line that emulates some real output\n" x 100,
" <HR>\n",
" </BODY>\n",
"</HTML>\n",
);
my $text = join "", @text;
sub multi {
my @copy = @text;
my_print($_) for @copy;
}
sub single {
my $copy = $text;
my_print($copy);
}
sub array {
my @copy = @text;
my_print(@copy);
}
sub ref_arr {
my @refs = \(@text);
my_print(@refs);
}
sub concat {
my $buffer;
$buffer .= $_ for @text;
my_print($buffer);
}
sub my_join {
my $buffer = join '', @text;
my_print($buffer);
}
sub my_print {
for (@_) {
print $fh ref($_) ? $$_ : $_;
}
}
timethese(100_000, {
join => \&my_join,
array => \&array,
ref_arr => \&ref_arr,
multi => \&multi,
single => \&single,
concat => \&concat,
});
timethese(100_000, {
'array /b' => sub {my $ofh=select($fh);$|=0;select($ofh); array( ) },
'array /u' => sub {my $ofh=select($fh);$|=1;select($ofh); array( ) },
'ref_arr/b' => sub {my $ofh=select($fh);$|=0;select($ofh); ref_arr( )},
'ref_arr/u' => sub {my $ofh=select($fh);$|=1;select($ofh); ref_arr( )},
'multi /b' => sub {my $ofh=select($fh);$|=0;select($ofh); multi( ) },
'multi /u' => sub {my $ofh=select($fh);$|=1;select($ofh); multi( ) },
'single /b' => sub {my $ofh=select($fh);$|=0;select($ofh); single( ) },
'single /u' => sub {my $ofh=select($fh);$|=1;select($ofh); single( ) },
'concat /b' => sub {my $ofh=select($fh);$|=0;select($ofh); concat( ) },
'concat /u' => sub {my $ofh=select($fh);$|=1;select($ofh); concat( ) },
'join /b' => sub {my $ofh=select($fh);$|=0;select($ofh); my_join( )},
'join /u' => sub {my $ofh=select($fh);$|=1;select($ofh); my_join( )},
});Under Perl 5.6.0 on Linux, the first set of results, sorted by CPU clocks, is:
Benchmark: timing 100000 iterations of array, concat, multi, ref_array...
single: 6 wallclock secs ( 5.42 usr + 0.16 sys = 5.58 CPU)
join: 8 wallclock secs ( 8.63 usr + 0.14 sys = 8.77 CPU)
concat: 12 wallclock secs (10.57 usr + 0.31 sys = 10.88 CPU)
ref_arr: 14 wallclock secs (11.92 usr + 0.13 sys = 12.05 CPU)
array: 15 wallclock secs (12.95 usr + 0.26 sys = 13.21 CPU)
multi: 38 wallclock secs (34.94 usr + 0.25 sys = 35.19 CPU)single string print is obviously the fastest; join, concatination of string, array of references to string, and array of strings are very close to each other (the results may vary according to the length of the strings); and print call per string is the slowest.
Now let’s look at the same benchmark, where the printing was either buffered or not:
Benchmark: timing 100000 iterations of ... single /b: 10 wallclock secs ( 8.34 usr + 0.23 sys = 8.57 CPU) single /u: 10 wallclock secs ( 8.57 usr + 0.25 sys = 8.82 CPU) join /b: 13 wallclock secs (11.49 usr + 0.27 sys = 11.76 CPU) join /u: 12 wallclock secs (11.80 usr + 0.18 sys = 11.98 CPU) concat /b: 14 wallclock secs (13.73 usr + 0.17 sys = 13.90 CPU) concat /u: 16 wallclock secs (13.98 usr + 0.15 sys = 14.13 CPU) ref_arr/b: 15 wallclock secs (14.95 usr + 0.20 sys = 15.15 CPU) array /b: 16 wallclock secs (16.06 usr + 0.23 sys = 16.29 CPU) ref_arr/u: 18 wallclock secs (16.85 usr + 0.98 sys = 17.83 CPU) array /u: 19 wallclock secs (17.65 usr + 1.06 sys = 18.71 CPU) multi /b: 41 wallclock secs (37.89 usr + 0.28 sys = 38.17 CPU) multi /u: 48 wallclock secs (43.24 usr + 1.67 sys = 44.91 CPU)
First, we see the same picture among different printing techniques.
Second, we can see that the buffered print is always faster, but only
in the case where print( ) is called for each
short string does it have a significant speed impact.
Now let’s go back to the $|=1
topic. You might still decide to disable buffering, for two reasons:
You use relatively few
print( )calls. You achieve this by arranging forprint( )statements to print multiline text, not one line perprint( )statement.You want your users to see output immediately. If you are about to produce the results of a database query that might take some time to complete, you might want users to get some feedback while they are waiting. Ask yourself whether you prefer getting the output a bit slower but steadily from the moment you press the Submit button, or having to watch the “falling stars” for a while and then getting the whole output at once, even if it’s a few milliseconds faster—assuming the browser didn’t time out during the wait.
An even better solution is to keep buffering enabled and call
$r->rflush( )
to flush the buffers when needed.
This way you can place the first part of the page you are sending in
the buffer and flush it a moment before you perform a lengthy
operation such as a database query. This kills two birds with the
same stone: you show some of the data to the user immediately so she
will see that something is actually happening, and you
don’t suffer from the performance hit caused by
disabling buffering. Here is an example of such code:
use CGI ( );
my $r = shift;
my $q = new CGI;
print $q->header('text/html');
print $q->start_html;
print $q->p("Searching...Please wait");
$r->rflush;

# imitate a lengthy operation
for (1..5) {
    sleep 1;
}

print $q->p("Done!");
The script prints the beginning of the HTML document along with a nice request to wait by flushing the output buffer just before it starts the lengthy operation.
Now let’s run the web
benchmark and compare
the performance of buffered versus unbuffered printing in the
multi-printing code used in the last benchmark. We are going to use
two identical handlers, the first handler having its
STDOUT stream (tied to socket) unbuffered. The
code appears in Example 13-7.
Example 13-7. Book/UnBuffered.pm
package Book::UnBuffered;
use Apache::Constants qw(:common);
local $|=1; # Switch off buffering.
sub handler {
    my $r = shift;
    $r->send_http_header('text/html');
    print "<!DOCTYPE HTML PUBLIC \"-//IETF//DTD HTML//EN\">\n";
    print "<html>\n";
    print "  <head>\n";
    print "    <title>\n";
    print "      Test page\n";
    print "    </title>\n";
    print "  </head>\n";
    print "  <body bgcolor=\"black\" text=\"white\">\n";
    print "    <h1> \n";
    print "      Test page \n";
    print "    </h1>\n";
    print "    <a href=\"foo.html\">foo</a>\n" for 1..100;
    print "    <hr>\n";
    print "  </body>\n";
    print "</html>\n";
    return OK;
}
1;
The following httpd.conf configuration is used:
#################################
### Buffered output
#################################
<Location /buffering>
    SetHandler perl-script
    PerlHandler +Book::Buffered
</Location>

#################################
### UnBuffered output
#################################
<Location /unbuffering>
    SetHandler perl-script
    PerlHandler +Book::UnBuffered
</Location>
Now we run the benchmark, using ApacheBench, with concurrency set to 50, for a total of 5,000 requests. Here are the results:
name        |   avtime completed failed  RPS
---------------------------------------------
unbuffering |     56      5000      0    855
buffering   |     55      5000      0    865
As you can see, there is not much difference when the overhead of other processing is added. The difference was more significant when we benchmarked only the Perl code. In real web requests, a few percent difference will be felt only if you unbuffer the output and print thousands of strings one at a time.
Let’s revisit the various approaches of munging with strings, and compare the speed of using lists of strings versus interpolation. We will add a string concatenation angle as well.
When the strings are small, it almost doesn’t matter whether interpolation or a list is used (see Example 13-8).
Example 13-8. benchmarks/join.pl
use Benchmark;
use Symbol;
my $fh = gensym;
open $fh, ">/dev/null" or die;

my($one, $two, $three, $four) = ('a'..'d');

timethese(1_000_000, {
     interp => sub {
         print $fh "$one$two$three$four";
     },
     list => sub {
         print $fh $one, $two, $three, $four;
     },
     conc => sub {
         print $fh $one . $two . $three . $four;
     },
});
Here’s the benchmarking result:
 Benchmark: timing 1000000 iterations of conc, interp, list...
    conc:  3 wallclock secs ( 3.38 usr +  0.00 sys =  3.38 CPU)
  interp:  3 wallclock secs ( 3.45 usr + -0.01 sys =  3.44 CPU)
    list:  2 wallclock secs ( 2.58 usr +  0.00 sys =  2.58 CPU)
The results of the concatenation technique are very similar to those of interpolation. The list technique is a little bit faster than interpolation. However, when the strings are large, lists are significantly faster. We saw this in the previous section, and Example 13-9 presents another benchmark to increase our confidence in our conclusion. This time we use 1,000-character strings.
Example 13-9. benchmarks/join_long.pl
use Benchmark;
use Symbol;
my $fh = gensym;
open $fh, ">/dev/null" or die;

my($one, $two, $three, $four) = map { $_ x 1000 } ('a'..'d');

timethese(500_000, {
     interp => sub {
         print $fh "$one$two$three$four";
     },
     list => sub {
         print $fh $one, $two, $three, $four;
     },
     conc => sub {
         print $fh $one . $two . $three . $four;
     },
});
Here’s the benchmarking result:
Benchmark: timing 500000 iterations of interp, list...
   conc:  5 wallclock secs ( 4.47 usr +  0.27 sys =  4.74 CPU)
 interp:  4 wallclock secs ( 4.25 usr +  0.26 sys =  4.51 CPU)
   list:  4 wallclock secs ( 2.87 usr +  0.16 sys =  3.03 CPU)
In this case using a list is about 30% faster than interpolation. Concatenation is a little bit slower than interpolation.
Let’s look at this code:
$title = 'My Web Page';
print "<h1>$title</h1>";         # Interpolation (slow)
print '<h1>' . $title . '</h1>'; # Concatenation (slow)
print '<h1>',  $title,  '</h1>'; # List (fast for long strings)
When you use "<h1>$title</h1>“, Perl
does interpolation (since “” is an operator in
Perl)—it parses the contents of the string and replaces any
variables or expressions it finds with their respective values. This
uses more memory and is slower than using a list. Of course, if there
are no variables to interpolate it makes no difference whether you
use "string" or 'string‘.
Concatenation is also potentially slow, since Perl might create a temporary string, which it then prints.
Lists
are
fast because Perl can
simply deal with each element in turn. This is true if you
don’t run join( ) on the list at
the end to create a single string from the elements of the list. This
operation might be slower than directly appending to the string
whenever a new string springs into existence.
Please note that this optimization is a pure waste of time, except maybe in a few extreme cases (if you have even 5,000 concatenations to serve a request, it won’t cost you more than a few milliseconds to do it the wrong way). It’s a good idea to always look at the big picture when running benchmarks.
Another aspect to look at is the size of the generated code. For example, lines 3, 4, and 5 in Example 13-10 produce the same output.
Example 13-10. size_interp.pl
$uri = '/test';
$filename = '/test.pl';
print "uri => ",  $uri,  " filename => ",  $filename,  "\n";
print "uri => " . $uri . " filename => " . $filename . "\n";
print "uri => $uri filename => $filename\n";
1; # needed for TerseSize to report the previous line's size
Let’s look at how many bytes each line compiles
into. We will use B::TerseSize for this purpose:
panic% perl -MO=TerseSize size_interp.pl | grep line
size_interp.pl syntax OK
[line 1 size: 238 bytes]
[line 2 size: 241 bytes]
[line 3 size: 508 bytes]
[line 4 size: 636 bytes]
[line 5 size: 689 bytes]
The code in line 3, which uses a list of arguments to print(
), uses significantly less memory (508 bytes) than the code
in line 4, which uses concatenation (636 bytes), and the code in line
5, which uses interpolation (689 bytes).
If there are no variables to interpolate, it’s obvious that a list will use more memory then a single string. Just to confirm that, take a look at Example 13-11.
Example 13-11. size_nointerp.pl
print "uri => ",  "uri",  " filename => ",  "filename",  "\n";
print "uri => " . "uri" . " filename => " . "filename" . "\n";
print "uri => uri filename => filename\n";
1; # needed for TerseSize to report the previous line's size

panic% perl -MO=TerseSize size_nointerp.pl | grep line
size_nointerp.pl syntax OK
[line 1 size: 377 bytes]
[line 2 size: 165 bytes]
[line 3 size: 165 bytes]
Lines 2 and 3 get compiled to the same code, and its size is smaller than the code produced by line 1, which uses a list.
Since mod_perl processes tend to consume a lot of memory as the number of loaded modules and scripts grows during the child’s lifetime, it’s important to know how to keep memory usage down. Let’s see what should be kept in mind when writing code that will be executed under mod_perl.
Perl IO:: modules
are very convenient,
but let’s see what it costs to use them. The
following command (Perl 5.6.1 on Linux) reveals that when we
use IO we also load the
IO::Handle, IO::Seekable,
IO::File, IO::Pipe,
IO::Socket, and IO::Dir
modules. The command also shows us how big they are in terms of code
lines. wc(1) reports how many lines of code are
in each of the loaded files:
panic% wc -l `perl -MIO -e 'print join("\n", sort values %INC, "")'`
  124 /usr/lib/perl5/5.6.1/Carp.pm
  602 /usr/lib/perl5/5.6.1/Class/Struct.pm
  456 /usr/lib/perl5/5.6.1/Cwd.pm
  313 /usr/lib/perl5/5.6.1/Exporter.pm
  225 /usr/lib/perl5/5.6.1/Exporter/Heavy.pm
   93 /usr/lib/perl5/5.6.1/File/Spec.pm
  458 /usr/lib/perl5/5.6.1/File/Spec/Unix.pm
  115 /usr/lib/perl5/5.6.1/File/stat.pm
  414 /usr/lib/perl5/5.6.1/IO/Socket/INET.pm
  143 /usr/lib/perl5/5.6.1/IO/Socket/UNIX.pm
   52 /usr/lib/perl5/5.6.1/SelectSaver.pm
  146 /usr/lib/perl5/5.6.1/Symbol.pm
  160 /usr/lib/perl5/5.6.1/Tie/Hash.pm
   92 /usr/lib/perl5/5.6.1/base.pm
 7525 /usr/lib/perl5/5.6.1/i386-linux/Config.pm
  276 /usr/lib/perl5/5.6.1/i386-linux/Errno.pm
  222 /usr/lib/perl5/5.6.1/i386-linux/Fcntl.pm
   47 /usr/lib/perl5/5.6.1/i386-linux/IO.pm
  239 /usr/lib/perl5/5.6.1/i386-linux/IO/Dir.pm
  169 /usr/lib/perl5/5.6.1/i386-linux/IO/File.pm
  612 /usr/lib/perl5/5.6.1/i386-linux/IO/Handle.pm
  252 /usr/lib/perl5/5.6.1/i386-linux/IO/Pipe.pm
  127 /usr/lib/perl5/5.6.1/i386-linux/IO/Seekable.pm
  428 /usr/lib/perl5/5.6.1/i386-linux/IO/Socket.pm
  453 /usr/lib/perl5/5.6.1/i386-linux/Socket.pm
  129 /usr/lib/perl5/5.6.1/i386-linux/XSLoader.pm
  117 /usr/lib/perl5/5.6.1/strict.pm
   83 /usr/lib/perl5/5.6.1/vars.pm
  419 /usr/lib/perl5/5.6.1/warnings.pm
   38 /usr/lib/perl5/5.6.1/warnings/register.pm
14529 total
About 14,500 lines of code! If you run a trace of this test code, you will see that it also puts a big load on the machine to actually load these modules, although this is mostly irrelevant if you preload the modules at server startup.
CGI.pm suffers from the same problem:
panic% wc -l `perl -MCGI -le 'print for values %INC'`
  313 /usr/lib/perl5/5.6.1/Exporter.pm
  124 /usr/lib/perl5/5.6.1/Carp.pm
  117 /usr/lib/perl5/5.6.1/strict.pm
   83 /usr/lib/perl5/5.6.1/vars.pm
   38 /usr/lib/perl5/5.6.1/warnings/register.pm
  419 /usr/lib/perl5/5.6.1/warnings.pm
  225 /usr/lib/perl5/5.6.1/Exporter/Heavy.pm
 1422 /usr/lib/perl5/5.6.1/overload.pm
  303 /usr/lib/perl5/5.6.1/CGI/Util.pm
 6695 /usr/lib/perl5/5.6.1/CGI.pm
  278 /usr/lib/perl5/5.6.1/constant.pm
10017 total
However, judging the bloat by the number of lines is misleading, since not all the code is used in most cases. Also remember that documentation might account for a significant chunk of the lines in every module.
Since we can preload the code at server startup, we are mostly interested in the execution overhead and memory footprint. So let’s look at the memory usage.
Example 13-12 is the perlbloat.pl script, which shows how much memory is acquired by Perl when you run some code. Now we can easily test the overhead of loading the modules in question.
Example 13-12. perlbloat.pl
#!/usr/bin/perl -w

use GTop ( );

my $gtop = GTop->new;
my $before = $gtop->proc_mem($$)->size;

for (@ARGV) {
    if (eval "require $_") {
        eval { $_->import; };
    }
    else {
        eval $_;
        die $@ if $@;
    }
}

my $after = $gtop->proc_mem($$)->size;
print "@ARGV added " . GTop::size_string($after - $before) . "\n";
The script simply samples the total memory use, then evaluates the code passed to it, samples the memory again, and prints the difference.
Now let’s try to load IO:
panic% ./perlbloat.pl 'use IO;'
use IO; added  1.3M
“Only” 1.3 MB of overhead. Now
let’s load CGI.pm (v2.79) and
compile its methods:
panic% ./perlbloat.pl 'use CGI; CGI->compile(":cgi")'
use CGI; CGI->compile(":cgi") added 784k
That’s almost 1 MB of extra memory per process.
Let’s compare CGI.pm with its
younger sibling, whose internals are implemented in C:
%. /perlbloat.pl 'use Apache::Request'
use Apache::Request added   36k
Only 36 KB this time. A significant difference,
isn’t it? We have compiled the
:cgi group of the CGI.pm
methods, because CGI.pm is written in such a way
that the actual code compilation is deferred until some function is
actually used. To make a fair comparison with
Apache::Request, we compiled only the methods
present in both.
If we compile :all
CGI.pm
methods, the memory bloat is much bigger:
panic% ./perlbloat.pl 'use CGI; CGI->compile(":all")'
use CGI; CGI->compile(":all") added  1.9M
The following numbers show memory sizes in KB (virtual and resident)
for Perl 5.6.0 on four different operating systems. Three calls are
made: without any modules, with only -MCGI, and
with -MIO (never with both). The rows with
-MCGI and -MIO are followed by
the difference relative to raw Perl.
  OpenBSD      FreeBSD       RedHat         Linux        Solaris
              vsz   rss     vsz   rss     vsz   rss    vsz    rss
  Raw Perl    736   772     832  1208    2412   980    2928  2272

  w/ CGI     1220  1464    1308  1828    2972  1768    3616  3232
  delta      +484  +692    +476  +620    +560  +788    +688  +960

  w/ IO      2292  2580    2456  3016    4080  2868    5384  4976
  delta     +1556 +1808   +1624 +1808   +1668 +1888   +2456 +2704
Which is more important: saving enough memory to allow the machine to serve a few extra concurrent clients, or using off-the-shelf modules that are proven and well understood? Debugging a reinvention of the wheel can cost a lot of development time, especially if each member of your team reinvents in a different way. In general, it is a lot cheaper to buy more memory or a bigger machine than it is to hire an extra programmer. So while it may be wise to avoid using a bloated module if you need only a few functions that you could easily code yourself, the place to look for real efficiency savings is in how you write your code.
Imported
symbols act just like global
variables; they can add up memory quickly. In addition to polluting
the namespace, a process grows by the size of the space allocated for
all the symbols it imports. The more you import (e.g.,
qw(:standard) versus qw(:all)
with CGI.pm), the more memory will be used.
Let’s say the overhead is of size Overhead. Now take the number of scripts in which you deploy the function method interface—let’s call that Scripts. Finally, let’s say that you have a number of processes equal to Processes.
You will need Overhead × Scripts × Processes of additional memory. Taking an insignificant Overhead of 10 KB and, adding in 10 Scripts used across 30 Processes, we get 10 KB × 10 × 30 = 3 MB! The 10-KB overhead becomes a very significant one.
Let’s assume that we need to use strtol(
) from the POSIX package. Under Perl
5.6.1 we get:
panic% ./perlbloat.pl 'use POSIX ( ); POSIX::strtol(_ _PACKAGE_ _, 16)'
use POSIX ( ) added  176k

panic% ./perlbloat.pl 'use POSIX; strtol(_ _PACKAGE_ _, 16)'
use POSIX added  712k
The first time we import no symbols, and the second time we import
all the default symbols from POSIX. The difference
is 536 KB worth of aliases. Now let’s say 10
different Apache::Registry scripts 'use
POSIX;' for strftime( ), and we have 30
mod_perl processes:
536KB × 10 × 30 = 160MB
We have 160 MB of extra memory used. Of course, you may want to import only needed symbols:
panic% ./perlbloat.pl 'use POSIX qw(strtol); strtol(_ _PACKAGE_ _, 16);'
use POSIX qw(strftime) added  344k
Still, using strftime( ) uses 168 KB more memory.
Granted, POSIX is an extreme case—usually
the overhead is much smaller for a single script but becomes
significant if it occurs in many scripts executed by many processes.
Here is another example, now using the widely deployed
CGI.pm module. Let’s compare
CGI.pm’s object-oriented and
procedural interfaces. We’ll use two scripts that
generate the same output, the first (Example 13-13)
using methods and the second (Example 13-14) using
functions. The second script imports a few functions that are going
to be used.
After executing each script in single server mode
(-X), we can see the results with the help of
Apache::Status, as explained in Chapter 9.
Here are the results of the first script:
Totals: 1966 bytes | 27 OPs

handler 1514 bytes | 27 OPs
exit     116 bytes |  0 OPs
The results of the second script are:
Totals: 4710 bytes | 19 OPs

handler  1117 bytes | 19 OPs
basefont  120 bytes |  0 OPs
frameset  120 bytes |  0 OPs
caption   119 bytes |  0 OPs
applet    118 bytes |  0 OPs
script    118 bytes |  0 OPs
ilayer    118 bytes |  0 OPs
header    118 bytes |  0 OPs
strike    118 bytes |  0 OPs
layer     117 bytes |  0 OPs
table     117 bytes |  0 OPs
frame     117 bytes |  0 OPs
style     117 bytes |  0 OPs
Param     117 bytes |  0 OPs
small     117 bytes |  0 OPs
embed     117 bytes |  0 OPs
font      116 bytes |  0 OPs
span      116 bytes |  0 OPs
exit      116 bytes |  0 OPs
big       115 bytes |  0 OPs
div       115 bytes |  0 OPs
sup       115 bytes |  0 OPs
Sub       115 bytes |  0 OPs
TR        114 bytes |  0 OPs
td        114 bytes |  0 OPs
Tr        114 bytes |  0 OPs
th        114 bytes |  0 OPs
b         113 bytes |  0 OPs
As you see, the object-oriented script uses about 2 KB of memory while the procedural interface script uses about 5 KB.
Note that the above is correct if you didn’t
precompile all of CGI.pm’s
methods at server startup. If you did, the procedural interface in
the second test will take up to 18 KB, not 5 KB.
That’s because the entire CGI.pm
namespace is inherited, and it already has all its methods compiled,
so it doesn’t really matter whether you attempt to
import only the symbols that you need. So if you have:
use CGI qw(-compile :all);
in the server startup script, having:
use CGI qw(header);
or:
use CGI qw(:all);
is essentially the same. All the symbols precompiled at startup will
be imported, even if you request only one symbol. It seems like a
bug, but it’s just how CGI.pm
works.
Which form of subroutine call is more efficient: object methods or function calls? Let’s look at the overhead.
Let’s do some benchmarking. We will start by using empty methods, which will allow us to measure the real difference in the overhead each kind of call introduces. We will use the code in Example 13-15.
Example 13-15. bench_call1.pl
package Book::LightSub;

use strict;
use Benchmark;

sub bar { };

timethese(1_000_000, {
    method   => sub { Book::LightSub->bar( )                 },
    function => sub { Book::LightSub::bar('Book::LightSub');},
});
The two calls are equivalent, since both pass the class name as their
first parameter; function does this explicitly,
while method does this transparently.
Here’s the benchmarking result:
Benchmark: timing 1000000 iterations of function, method...
function:  2 wallclock secs ( 1.36 usr +  0.05 sys =  1.41 CPU)
  method:  3 wallclock secs ( 2.57 usr + -0.03 sys =  2.54 CPU)
We see that the function call is almost twice as fast as the method call: 1.41 CPU clocks compared to 2.54. Why is this? With a function call we give Perl the fully qualified function name and set up its call stack ourselves by passing in the package (class) name. With a method call Perl must work out the package (class) name for itself, then search the inheritance tree to find the required method, then set up the call stack. So in the case of a method call Perl must do a lot more work and is therefore slower.
Perl 5.6.0 and higher do better method caching than older Perl
versions. Book::LightSub->method( ) is a little
bit faster (as it does better constant-folding magic), but not
Book::LightSub->$method( ). The improvement
does not address the @ISA lookup that still
happens in either case.
The above results don’t mean that you shouldn’t use methods. Generally your functions do something, and the more they do the less significant the overhead of the call itself becomes. This is because the calling time is effectively fixed and usually creates a very small overhead in comparison to the execution time of the method or function itself. This is demonstrated by the next benchmark (see Example 13-16).
Example 13-16. bench_call2.pl
package Book::HeavySub;

use strict;
use Benchmark;

sub bar {
    my $class = shift;

    my ($x, $y) = (100, 100);
    $y = log ($x ** 10)  for (0..20);
};

timethese(100_000, {
    method   => sub { Book::HeavySub->bar( )                 },
    function => sub { Book::HeavySub::bar('Book::HeavySub');},
});
We get a very close benchmark!
panic% ./bench_call2.pl
function:  5 wallclock secs ( 4.42 usr +  0.02 sys =  4.44 CPU)
  method:  5 wallclock secs ( 4.66 usr +  0.00 sys =  4.66 CPU)
Let’s make the subroutine bar
even heavier, by making the for( ) loop five times
longer:
sub bar {
    my $class = shift;

    my ($x, $y) = (100, 100);
    $y = log ($x ** 10) for (0..100);
};
The result is:
function: 18 wallclock secs (17.87 usr +  0.10 sys = 17.97 CPU)
  method: 19 wallclock secs (18.22 usr +  0.01 sys = 18.23 CPU)
You can see that in the first and second benchmarks the difference between the function and method calls is almost the same: 0.22 and 0.26 CPU clocks, respectively.
In cases where functions do very little work, the overhead might
become significant. If your goal is speed you might consider using
the function form, but if you write a large and
complicated application, it’s much better to use the
method form, as it will make your code easier to
develop, maintain, and debug. Saving programmer time over the life of
a project may turn out to be the most significant
cost factor.
Some modules’
APIs are
misleading—for example, CGI.pm allows you to
execute its subroutines as functions or as methods. As you will see
in a moment, its function form of the calls is slower than the method
form because it does some voodoo behind the scenes when the function
form call is used:
use CGI;
my $q = new CGI;
$q->param('x', 5);
my $x = $q->param('x');
versus:
use CGI qw(:standard);
param('x', 5);
my $x = param('x');
Let’s benchmark some very light calls (see Example 13-17) and compare. We would expect the methods to be slower than functions, based on the previous benchmarks.
Example 13-17. bench_call3.pl
use Benchmark;

use CGI qw(:standard);
$CGI::NO_DEBUG = 1;
my $q = new CGI;
my $x;
timethese(2_000_000, {
    method   => sub {$q->param('x',5); $x = $q->param('x'); },
    function => sub {    param('x',5); $x =     param('x'); },
});
The benchmark is written in such a way that all initializations are done at the beginning, so that we get as accurate performance figures as possible:
panic% ./bench_call3.pl
function: 21 wallclock secs (19.88 usr +  0.30 sys = 20.18 CPU)
  method: 18 wallclock secs (16.72 usr +  0.24 sys = 16.96 CPU)
As you can see, methods are faster than functions, which seems to be
wrong. The explanation lies in the way CGI.pm is
implemented. CGI.pm uses some fancy tricks to make
the same routine act both as a method and as a plain function. The
overhead of checking whether the arguments list looks like a method
invocation or not will mask the slight difference in time for the way
the function was called.
If you are intrigued and want to investigate further by yourself, the
subroutine you should explore is called
self_or_default. The first line of this function
short-circuits if you are using object methods, but the whole
function is called if you are using the function-call forms.
Therefore, the function-call form should be slightly slower than the
object form for the CGI.pm module, which you
shouldn’t be using anyway if you have
Apache::Request and a real templating system.
When you call stat( )
(or its variants -M,
-e, etc.), the returned information is cached
internally. If you need to make an additional check on the same file,
assuming that it hasn’t been modified, use the
_ magic file handle and save the overhead an
unnecessary stat( ) call. For example, when
testing for existence and read permissions, you might use:
my $filename = "./test";
# three stat( ) calls
print "OK\n" if -e $filename and -r $filename;
my $mod_time = (-M $filename) * 24 * 60 * 60;
print "$filename was modified $mod_time seconds before startup\n";
or the more efficient:
my $filename = "./test";
# one stat( ) call
print "OK\n" if -e $filename and -r _;
my $mod_time = (-M _) * 24 * 60 * 60;
print "$filename was modified $mod_time seconds before startup\n";
Two stat( ) calls were saved!
If you need to stat( ) the mod_perl script that is
being executed (or, in a handler, the requested filename in
$r->filename), you can save this stat(
) system call by passing it $r->finfo
as an argument. For example, to retrieve the user ID of the
script’s owner, use:
my $uid = (stat $r->finfo)[4];
During the default translation phase, Apache calls stat(
) on the script’s filename, so later on we
can reuse the cached stat( ) structure, assuming
that it hasn’t changed since the stat(
) call. Notice that in the example we do call
stat( ), but this doesn’t invoke
the system call, since Perl resuses the cached data structure.
Furthermore, the call to $r->finfo stores its
result in _ once again, so if we need more
information we can do:
print $r->filename, " is writable" if -e $r->finfo and -w _;
If you need to know the time at which the
request started, you can either install
PerlPostReadRequestHandler, which adjusts the
special Perl variable $^T to store that time:
$^T = time( );
and subsequently use that variable in the code, or you can use
$r->request_time, which stores the exact
request’s start time and saves the extra system call
to time( ).
To send a complete file from disk, without applying any modifications first, instead of:
my $filename = "/tmp/foo";
my $fh = Apache::gensym( );  # generate a new filehandle
open $fh, $filename or return NOT_FOUND;
print <$fh>;
close $fh;
it’s better to write:
my $filename = "/tmp/foo";
my $fh = Apache::gensym( );  # generate a new filehandle
open $fh, $filename or return NOT_FOUND;
$r->send_fd($fh);
close $fh;
The former implementation uses more memory and it’s slower, because it creates a temporary variable to read the data in and then print it out. The latter uses optimized C code to read the file and send it to the client.
In some situations, you may have data that is expensive to generate but must be created on the fly. If the data can be reused, it may be more efficient to cache it. This will save the CPU cycles that regenerating the data would incur and will improve performance (at the expense of using more memory to cache the results).
If the data set is final, it can be a good idea to generate this data set at server startup and then share it with all the child processes, thus saving both memory and time.
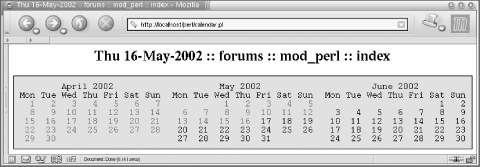
We’ll create a calendar example similar to the ones many online services use to allow their users to choose dates for online forms or to navigate to pages specific to a particular date. Since we are talking about dynamic pages, we cannot allow the calendar to be static.
To make our explanations easier, let’s assume that we are trying to build a nice navigation system for forums, but will implement only the temporal navigation. You can extend our code to add the actual forums and interface elements to change presentation modes (index, thread, nested) and to change forums (perl, mod_perl, apache).
In Figure 13-1, you can see how the calendar looks if today is May 16, 2002 and the user has just entered the site. You can see that only day numbers before this date are linked to the data for those dates. The current month appears between the previous month, April, and the next to come, June. June dates aren’t linked at all, since they’re in the future.
We click on April 16 and get a new calendar (see Figure 13-2), where April is shown in the middle of the two adjacent months. Again, we can see that in May not all dates are linked, since we are still in the middle of the month.
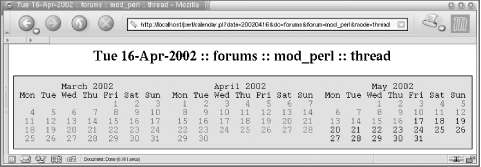
In both figures you can see a title (which can be pretty much anything) that can be passed when some link in the calendar is clicked. When we go through the actual script that presents the calendar we will show this in detail.
As you can see from the figures, you can move backward and forward in time by clicking on the righthand or lefthand month. If you currently have a calendar showing Mar-Apr-May, by clicking on some day in March, you will get a calendar of Feb-Mar-Apr, and if you click on some day in May you will see Apr-May-Jun.
Most users will want to browse recent data from the forums—especially the current month and probably the previous month. Some users will want to browse older archives, but these users would be a minority.
Since the generation of the calendar is quite an expensive operation, it makes sense to generate the current and previous months’ calendars at server startup and then reuse them in all the child processes. We also want to cache any other items generated during the requests.
In order to appreciate the results of the benchmark presented at the end of this section, which show the benefits of caching for this application, it’s important to understand how the application works. Therefore, let’s explain the code first.
First we create a new package and load Date::Calc:
package Book::Calendar;
use Date::Calc ( );
Date::Calc, while a quite bloated module, is very
useful for working with dates.
We have two caches, one for one-month text calendars
(%TXT_CAL_CACHE, where we will cache the output of
Date::Calc::Calendar( )), and the other for
caching the real three-month HTML calendar components:
my %HTML_CAL_CACHE = ( );
my %TXT_CAL_CACHE = ( );
The following variable controls the last day the current month’s calendar was updated in the cache. We will explain this variable (which serves as a flag) in a moment.
my $CURRENT_MONTH_LAST_CACHED_DAY = 0;
The debug constant allows us to add some debug statements and keep them in the production code:
use constant DEBUG => 1;
All the code that is executed if DEBUG is true:
warn "foo" if DEBUG;
will be removed at compile time by Perl when DEBUG
is made false (in production, for example).
This code prebuilds each month’s calendar from three months back to one month forward. If this module is loaded at server startup, pre-caching will happen automatically and data will be shared between the children, so you save both memory and time. If you think that you need more months cached, just adjust this pre-caching code.
my ($cyear,$cmonth) = Date::Calc::Today( );
for my $i (-3..1) {
    my($year, $month) =
        Date::Calc::Add_Delta_YMD($cyear, $cmonth, 1, 0, $i, 0);
    my $cal = '';
    get_html_calendar(\$cal, $year, $month);
}
The get_text_calendar function wraps a retrieval
of plain-text calendars generated by Date::Calc::Calendar(
), caches the generated months, and, if the month was
already cached, immediately returns it, thus saving time and CPU
cycles.
sub get_text_calendar{
    my($year, $month) = @_;
    unless ($TXT_CAL_CACHE{$year}{$month}) {
        $TXT_CAL_CACHE{$year}{$month} = Date::Calc::Calendar($year, $month);
        # remove extra new line at the end
        chomp $TXT_CAL_CACHE{$year}{$month};
    }
    return $TXT_CAL_CACHE{$year}{$month};
}
Now the main function starts.
sub get_html_calendar{
    my $r_calendar = shift;
    my $year   = shift || 1;
    my $month  = shift || 1;
get_html_calendar( ) is called with a reference to
a final calendar and the year/month of the middle month in the
calendar. Remember that the whole widget includes three months. So
you call it like this, as we saw in the pre-caching code:
my $calendar = '';
get_html_calendar(\$calendar, $year, $month);
After get_html_calendar( ) is called,
$calendar contains all the HTML needed.
Next we get the current year, month, and day, so we will know what days should be linked. In our design, only past days and today are linked.
my($cur_year, $cur_month, $cur_day) = Date::Calc::Today( );
The following code decides whether the
$must_update_current_month_cache flag should be
set or not. It’s used to solve a problem with
calendars that include the current month. We cannot simply cache the
current month’s calendar, because on the next day it
will be incorrect, since the new day will not be linked. So what we
are going to do is cache this month’s day and
remember this day in the
$CURRENT_MONTH_LAST_CACHED_DAY variable, explained
later.
my $must_update_current_month_cache = 0;
for my $i (-1..1) {
    my($t_year, $t_month) =
        Date::Calc::Add_Delta_YMD($year, $month, 1, 0, $i, 0);
    $must_update_current_month_cache = 1
        if $t_year =  = $cur_year and $t_month =  = $cur_month
            and $CURRENT_MONTH_LAST_CACHED_DAY < $cur_day;
    last if $must_update_current_month_cache;
}
Now the decision logic is simple: we go through all three months in
our calendar, and if any of them is the current month, we check the
date when the cache was last updated for the current month (stored in
the $CURRENT_MONTH_LAST_CACHED_DAY variable). If
this date is less than today’s date, we have to
rebuild this cache entry.
unless (exists $HTML_CAL_CACHE{$year}{$month}
        and not $must_update_current_month_cache) {
So we enter the main loop where the calendar is HTMLified and linked. We enter this loop if:
There is no cached copy of the requested month.
There is a cached copy of the requested month, but it includes the current month and the next date has arrived; we need to rebuild it again, since the new day should be linked as well.
The following is the debug statement we mentioned earlier. This can
help you check that the cache works and that you actually reuse it.
If the constant DEBUG is set to a true value, the
warning will be output every time this loop is entered.
warn "creating a new calendar for $year $month\n" if DEBUG;
When we load this module at server startup, the pre-caching code we
described earlier gets executed, and we will see the following
warnings (if DEBUG is true):
creating a new calendar for 2000 9
creating a new calendar for 2000 10
creating a new calendar for 2000 11
creating a new calendar for 2000 12
creating a new calendar for 2001 1

        my @cal = ( );
Now we create three calendars, which will be stored in
@cal:
for my $i (-1..1) {
    my $id = $i+1;
As you can see, we make a loop (-1,0,1) so we can
go one month back from the requested month and one month forward in a
generic way.
Now we call Date::Calc::Add_Delta_YMD( ) to
retrieve the previous, current, or next month by providing the
requested year and month, using the first date of the month. Then we
add zero years, $i months, and zero days. Since
$i loops through the values
(-1, 0, 1),
we get the previous, current, and next months:
my ($t_year, $t_month) =
    Date::Calc::Add_Delta_YMD($year, $month, 1, 0, $i, 0);
Next, we get the text calendar for a single month. It will be cached
internally by get_text_calendar( ) if it
wasn’t cached already:
$cal[$id] = get_text_calendar($t_year, $t_month);
The following code determines whether the requested month is the
current month (present), a month from the past, or the month in the
future. That’s why the decision variable has three
possible values: -1, 0, and
1 (past, present, and future, respectively). We
will need this flag when we decide whether a day should be linked or
not.
my $yearmonth = sprintf("%0.4d%0.2d", $t_year, $t_month);
my $cur_yearmonth = sprintf("%0.4d%0.2d", $cur_year, $cur_month);

# tri-state: ppf (past/present/future)
my $ppf = $yearmonth <=> $cur_yearmonth;
  # If    $yearmonth =  = $cur_yearmonth, $ppf = 0;
  # elsif $yearmonth < $cur_yearmonth,  $ppf = -1;
  # elsif $yearmonth > $cur_yearmonth,  $ppf = 1;
This regex is used to substitute days in the textual calendar
returned by Date::Calc::Calendar( ) with links:
$cal[$id] =~ s{(\s\d|\b\d\d)\b}
              {link_days($1, $yearmonth, $ppf, $cur_day)}eg;
It means: “Find a space followed by a digit, or find
two digits (in either case with no adjoining digits), and replace
what we’ve found with the result of the
link_days( ) subroutine call.”
The e option tells Perl to execute the
substitution expression—i.e., to call link_days(
)—and the g option tells Perl to
perform the substitution for every match found in the source string.
Note that word boundaries are zero-width assertions (they
don’t match any text) and are needed to ensure that
we don’t match the year digits. You can see them in
the first line of the calendar:
           May 2002
  Mon Tue Wed Thu Fri Sat Sun
            1   2   3   4   5
    6   7   8   9  10  11  12
   13  14  15  16  17  18  19
   20  21  22  23  24  25  26
   27  28  29  30  31
The link_days( ) subroutine will add HTML links
only to dates that aren’t in the future.
This line closes the for loop:
}
This code constructs an HTML table with three calendars and stores it
in the cache. We use <pre> ... </pre>
blocks to preserve the textual layout of the calendar:
# cache the HTML calendar for future use
$HTML_CAL_CACHE{$year}{$month} =
qq{
 <table border="0" cellspacing="0"
  cellpadding="1" bgcolor="#000000">
   <tr>
     <td>
       <table border="0" cellspacing="0"
        cellpadding="10" bgcolor="#ccccff">
         <tr>
           <td valign="top"><pre>$cal[0]</pre></td>
           <td valign="top"><pre>$cal[1]</pre></td>
           <td valign="top"><pre>$cal[2]</pre></td>
         </tr>
       </table>
     </td>
   </tr>
 </table>
};
If the $must_update_current_month_cache flag was
turned on, the current month is re-processed, since a new day just
started. Therefore, we update the
$CURRENT_MONTH_LAST_CACHED_DAY with the current
day, so that the next request in the same day will use the cached
data:
# update the last cached day in the current month if needed
$CURRENT_MONTH_LAST_CACHED_DAY = $cur_day
    if $must_update_current_month_cache;
This line signals that the conditional block where the calendar was created is over:
}
Regardless of whether the calendar is created afresh or was already cached, we provide the requested calendar component by assigning it to a variable in the caller namespace, via the reference. The goal is for just this last statement to be executed and for the cache to do the rest:
$$r_calendar = $HTML_CAL_CACHE{$year}{$month};

  } # end of sub calendar
Note that we copy the whole calendar component and
don’t just assign the reference to the cached value.
The reason for doing this lies in the fact that this calendar
component’s HTML text will be adjusted to the
user’s environment and will render the cached entry
unusable for future requests. In a moment we will get to
customize_calendar( ), which adjusts the calendar
for the user environment.
This is the function that was called in the second part of the regular expression:
sub link_days {
    my ($token, $yearmonth, $ppf, $cur_day) = @_;
It accepts the matched space digit or two digits. We kept the space character for days 1 to 9 so that the calendar is nicely aligned. The function is called as:
link_days($token, 200101, $ppf, $cur_day);
where the arguments are the token (e.g., ' 2' or
'31' or possibly something else), the year and the
month concatenated together (to be used in a link), the
past/present/future month flag, and finally the current
date’s day, which is relevant only if we are working
in the current month.
We immediately return unmodified non-days tokens and break the token
into two characters in one statement. Then we set the
$fill variable to a single space character if the
token included days below 10, or set it to an empty string.
$day actually includes the date (1-31).
return $token unless my($c1, $c2) = $token =~ /^(\s|\d)(\d)$/;
my ($fill, $day) = ($c1 =~ /\d/) ? ('', $c1.$c2) : ($c1, $c2) ;
The function is not supposed to link days in future months, or days in this month that are in the future. For days in the future the function returns the token unmodified, which renders these days as plain text with no link.
# don't link days in the future
return $token if $ppf =  = 1 or ($ppf =  = 0 and $day > $cur_day);
Finally, those tokens that reach this point get linked. The link is
constructed of the [URL] placeholder, the date
arguments, and the [PARAMS] placeholder. The
placeholders will be replaced with real data at runtime.
return qq{$fill<a href="[URL]?date=$yearmonth}.
       sprintf("%0.2d", $day).
       qq{&[PARAMS]" class="nolink">$day</a>};
The a tag’s
nolink class attribute will be used by the client
code to render the links with no underlining, to make the calendar
more visually appealing. The nolink class must be
defined in a Cascading Style Sheet (CSS). Be careful,
though—this might not be a very good usability technique, since
many people are used to links that are blue and underlined.
This line conludes the link_days( ) function:
} # end of sub link_days
The customize_calendar( ) subroutine takes a
reference to a string of HTML (our calendar component, for example)
and replaces the placeholders with the data we pass it. We do an
efficient one-pass match and replace for both placeholders using the
hash lookup trick. If you want to add more placeholders later, all
that’s needed is to add a new placeholder name to
the %map hash:
# replace the placeholders with live data
# customize_calendar(\$calendar,$url,$params);
#######################
sub customize_calendar {
    my $r_calendar = shift;
    my $url        = shift || '';
    my $params     = shift || '';
    my %map = (
        URL    => $url,
        PARAMS => $params,
    );
    $$r_calendar =~ s/\[(\w+)\]/$map{$1}/g;

} # end of sub calendar
The module ends with the usual true statement to make
require( ) happy:
1;
The whole Book::Calendar package is presented in
Example 13-18.
Example 13-18. Book/Calendar.pm
package Book::Calendar;

use Date::Calc ( );

my %HTML_CAL_CACHE = ( );
my %TXT_CAL_CACHE = ( );
my $CURRENT_MONTH_LAST_CACHED_DAY = 0;

use constant DEBUG => 0;

# prebuild this month's, 3 months back and 1 month forward calendars
my($cyear, $cmonth) = Date::Calc::Today( );
for my $i (-3..1) {
    my($year, $month) = Date::Calc::Add_Delta_YMD($cyear, $cmonth, 1, 0, $i, 0);
    my $cal = '';
    get_html_calendar(\$cal, $year, $month); # disregard the returned calendar
}

# $cal = create_text_calendar($year, $month);
# the created calendar is cached
######################
sub get_text_calendar {
    my($year,$month) = @_;
    unless ($TXT_CAL_CACHE{$year}{$month}) {
        $TXT_CAL_CACHE{$year}{$month} = Date::Calc::Calendar($year, $month);
        # remove extra new line at the end
        chomp $TXT_CAL_CACHE{$year}{$month};
    }
    return $TXT_CAL_CACHE{$year}{$month};
}

# get_html_calendar(\$calendar,1999,7);
######################
sub get_html_calendar {
    my $r_calendar = shift;
    my $year   = shift || 1;
    my $month  = shift || 1;

    my($cur_year, $cur_month, $cur_day) = Date::Calc::Today( );

    # should requested calendar be updated if it exists already?
    my $must_update_current_month_cache = 0;
    for my $i (-1..1) {
        my ($t_year, $t_month) =
            Date::Calc::Add_Delta_YMD($year, $month, 1, 0, $i, 0);
        $must_update_current_month_cache = 1
            if $t_year =  = $cur_year and $t_month =  = $cur_month
                and $CURRENT_MONTH_LAST_CACHED_DAY < $cur_day;
        last if $must_update_current_month_cache;
    }

    unless (exists $HTML_CAL_CACHE{$year}{$month}
            and not $must_update_current_month_cache) {

        warn "creating a new calendar for $year $month\n" if DEBUG;

        my @cal = ( );

        for my $i (-1..1) {
            my $id = $i+1;

            my ($t_year, $t_month) =
                Date::Calc::Add_Delta_YMD($year, $month, 1, 0, $i, 0);

            # link the calendar from passed month
            $cal[$id] = get_text_calendar($t_year, $t_month); # get a copy
            my $yearmonth = sprintf("%0.4d%0.2d", $t_year, $t_month);
            my $cur_yearmonth = sprintf("%0.4d%0.2d", $cur_year, $cur_month);

            # tri-state: ppf (past/present/future)
            my $ppf = $yearmonth <=> $cur_yearmonth;

            $cal[$id] =~ s{(\s\d|\b\d\d)\b}
                          {link_days($1, $yearmonth, $ppf, $cur_day)}eg;
        }

        # cache the HTML calendar for future use
        $HTML_CAL_CACHE{$year}{$month} =
        qq{
         <table border="0" cellspacing="0"
          cellpadding="1" bgcolor="#000000">
           <tr>
             <td>
               <table border="0" cellspacing="0"
                cellpadding="10" bgcolor="#ccccff">
                 <tr>
                   <td valign="top"><pre>$cal[0]</pre></td>
                   <td valign="top"><pre>$cal[1]</pre></td>
                   <td valign="top"><pre>$cal[2]</pre></td>
                 </tr>
               </table>
             </td>
           </tr>
         </table>
        };

        $CURRENT_MONTH_LAST_CACHED_DAY = $cur_day
            if $must_update_current_month_cache;

    }

    $$r_calendar = $HTML_CAL_CACHE{$year}{$month};

} # end of sub calendar

#
# link_days($token,199901,1,10);
###########
sub link_days {
    my($token, $yearmonth, $ppf, $cur_day) = @_;
    # $cur_day relevant only if $ppf =  = 0

    # skip non-days (non (\d or \d\d) )
    return $token unless my ($c1, $c2) = $token =~ /(\s|\d)(\d)/;

    my($fill, $day) = ($c1 =~ /\d/) ? ('', $c1.$c2) : ($c1, $c2) ;

    # don't link days in the future
    return $token if $ppf =  = 1 or ($ppf =  = 0 and $day > $cur_day);

    # link the date with placeholders to be replaced later
    return qq{$fill<a href="[URL]?date=$yearmonth}.
           sprintf("%0.2d",$day).
           qq{&[PARAMS]" class="nolink">$day</a>};

} # end of sub link_days


# replace the placeholders with live data
# customize_calendar(\$calendar,$url,$params);
#######################
sub customize_calendar {
    my $r_calendar = shift;
    my $url        = shift || '';
    my $params     = shift || '';
    my %map = (
        URL    => $url,
        PARAMS => $params,
    );
    $$r_calendar =~ s/\[(\w+)\]/$map{$1}/g;

} # end of sub calendar

1;
Now let’s review the code that actually prints the page. The script starts by the usual strict mode, and adds the two packages that we are going to use:
use strict;
use Date::Calc ( );
use Book::Calendar ( );
We extract the arguments via $r->args and store
them in a hash:
my $r = shift;
my %args = $r->args;
Now we set the $year, $month,
and $day variables by parsing the requested date
(which comes from the day clicked by the user in the calendar). If
the date isn’t provided we use today as a starting
point.
# extract the date or set it to be today
my ($year, $month, $day) =
    ($args{date} and $args{date} =~ /(\d{4})(\d\d)(\d\d)/)
    ? ($1, $2, $3)
    : Date::Calc::Today( );
Then we retrieve or use defaults for the other arguments that one might use in a forum application:
my $do    = $args{do}    || 'forums';
my $forum = $args{forum} || 'mod_perl';
my $mode  = $args{mode}  || 'index';
Next we start to generate the HTTP response, by setting the
Content-Type header to
text/html and sending all HTTP headers:
$r->send_http_header("text/html");The beginning of the HTML page is generated. It includes the
previously mentioned CSS for the calendar link, whose class we have
called nolink. Then we start the body of the page
and print the title of the page constructed from the arguments that
we received or their defaults, followed by the selected or current
date:
my $date_str = Date::Calc::Date_to_Text($year, $month, $day);

my $title = "$date_str :: $do :: $forum :: $mode";
print qq{<html>
<head>
  <title>$title</title>
  <style type="text/css">
    <!--
    a.nolink { text-decoration: none; }
    -->
  </style>
</head>
<body bgcolor="white">
<h2 align="center">$title</h2>
};
Now we request the calendar component for $year
and $month:
my $calendar = '';
Book::Calendar::get_html_calendar(\$calendar, $year, $month);
We adjust the links to the live data by replacing the placeholders,
taking the script’s URI from
$r->uri, and setting the paramaters that will
be a part of the link:
my $params = "do=forums&forum=mod_perl&mode=index";
Book::Calendar::customize_calendar(\$calendar, $r->uri, $params);
At the end we print the calendar and finish the HTML:
print $calendar;
print qq{</body></html>};
The entire script is shown in Example 13-19.
Example 13-19. calendar.pl
use strict;
use Date::Calc ( );
use Book::Calendar ( );

my $r = shift;
my %args = $r->args;

# extract the date or set it to be today
my($year, $month, $day) =
    ($args{date} and $args{date} =~ /(\d{4})(\d\d)(\d\d)/)
    ? ($1, $2, $3)
    : Date::Calc::Today( );

my $do    = $args{do}    || 'forums';
my $forum = $args{forum} || 'mod_perl';
my $mode  = $args{mode}  || 'index';

$r->send_http_header("text/html");

my $date_str = Date::Calc::Date_to_Text($year, $month, $day);

my $title = "$date_str :: $do :: $forum :: $mode";
print qq{<html>
<head>
  <title>$title</title>
  <style type="text/css">
    <!--
    a.nolink { text-decoration: none; }
    -->
  </style>
</head>
<body bgcolor="white">
<h2 align="center">$title</h2>
};

my $calendar = '';
Book::Calendar::get_html_calendar(\$calendar, $year, $month);

my $params = "do=forums&forum=mod_perl&mode=index";
Book::Calendar::customize_calendar(\$calendar, $r->uri, $params);
print $calendar;
print qq{</body></html>};
Now let’s analyze the importance of the caching that
we used in the Book::Calendar module. We will use
the simple benchmark in
Example 13-20 to get the average runtime under
different conditions.
Example 13-20. bench_cal.pl
use strict;
use Benchmark;
use Book::Calendar;

my ($year, $month) = Date::Calc::Today( );

sub calendar_cached {
    ($year, $month) = Date::Calc::Add_Delta_YMD($year, $month, 1, 0, 0, 0);
    my $calendar = '';
    Book::Calendar::get_html_calendar(\$calendar, $year, $month);
}
sub calendar_non_cached {
    ($year, $month) = Date::Calc::Add_Delta_YMD($year, $month, 1, 0, 1, 0);
    my $calendar = '';
    Book::Calendar::get_html_calendar(\$calendar, $year, $month);
}

timethese(10_000,
          {
           cached     => \&calendar_cached,
           non_cached => \&calendar_non_cached,
          });
We create two subroutines: calendar_cached( ) and
calendar_non_cached( ). Note that we
aren’t going to remove the caching code from
Book::Calendar; instead, in the
calendar_non_cached( ) function we will increment
to the next month on each invocation, thus not allowing the data to
be cached. In calendar_cached( ) we will request
the same calendar all the time.
When the benchmark is executed on an unloaded machine, we get the following results:
panic% perl calendar_bench.pl
 Benchmark: timing 10000 iterations of cached, non_cached...
    cached:  0 wallclock secs ( 0.48 usr +  0.01 sys =  0.49 CPU)
non_cached: 26 wallclock secs (24.93 usr +  0.56 sys = 25.49 CPU)
The non-cached version is about 52 times slower. On the other hand, when a pretty heavy load is created, which is a common situation for web servers, we get these results:
panic% perl calendar_bench.pl
 Benchmark: timing 10000 iterations of cached, non_cached...
    cached:  3 wallclock secs ( 0.52 usr +  0.00 sys =  0.52 CPU)
non_cached: 146 wallclock secs (28.09 usr +  0.46 sys = 28.55 CPU)
We can see that the results of running the same benchmark on machines with different loads are very similar, because the module in question mostly needed CPU. It took six times longer to complete the same benchmark, but CPU-wise the performance is not very different from that of the unloaded machine. You should nevertheless draw your conclusions with care: if your code is not CPU-bound but I/O-bound, for example, the same benchmark on the unloaded and loaded machines will be very different.
If you have
a subroutine with simpler logic, where a
returned value is solely a function of an input, you can use the
Memoize module, which does the caching
automatically for you. The gist of its usage is giving the name of
the function to be memoize( )d:
use Memoize;
memoize('slow_function');
slow_function(arguments);
Remember that in our case we had two caches: one for the text
versions of the calendars and the other for HTML components. The
get_text_calendar( ) function is responsible for
populating the text calendar’s cache. It depends
only on inputs, so we could rewrite it as:
use Memoize;
memoize('get_text_calendar');
sub get_text_calendar {
    my($year,$month) = @_;
    warn "$year,$month\n" if DEBUG;
    my $cal = Date::Calc::Calendar($year, $month);
    chomp $cal;
    return $cal;
}
We have added another debug warning to check that the cache is
actually working. If you want to test it under mod_perl, set
DEBUG to a true value, start the server in
single-process mode (-X), and issue requests to
the calendar registry script we just discussed.
You can also control the size of the cache and do other automatic
cache manipulations with Memoize. See its manpage
for more information.
The get_html_calendar( ) subroutine cannot be
memoize( )d because the returned value depends on
the relation between the requested date and the current date, in
addition to the normal input/output relation.
Perl is commonly used for web scripting because it is quick and easy to write, and very easy to change. Compiled languages usually take a lot more time and effort to write and debug and can be time-consuming to change. But compiled code often runs faster (sometimes a lot faster) than bytecode-interpreted languages such as Perl or Java. In most projects it is programmer time that is paramount, because programmers are expensive, but some projects demand performance above all other considerations. How do we compare the performance of a Perl script to that of a C program?
We know we can use the Benchmark module to compare
Perl code. There are equivalent tools for C also, but how are we
going to use two different tools and keep the comparison fair? Since
Perl is a glue language in addition to its own merits, we can glue
the C code into Perl and then use the Benchmark
module to run the benchmark.
To simplify the task, we are going to demonstrate only the fact that C is more suitable than Perl for mathematical and memory-manipulation tasks. The purpose is to show how to use the best of both worlds.
We will use a very simple task that we will implement in Perl and C: the factorial function written both recursivly and iteratively. If you have ever taken a basic programming course you will be familiar with this example.
In mathematical language, we define the factorial function as follows:
1! = 1
N! = N * (N-1)!
So if we start from 1 and go up, we get these numbers:
1! =                1
2! = (2)(1)       = 2
3! = (3)(2)(1)    = 6
4! = (4)(3)(2)(1) = 24
... and so on.
The factorial grows very fast—e.g., 10! = 3,628,800 and 12! = 4.790016e+08 (479 million)—so you can imagine that the calculation of the factorial of large numbers is a memory-intensive operation.
Now since we have a recursive definition of the solution:
fact(1) = 1;
fact(N) = N * fact(N-1)
the easiest way to implement it is to write a recursive function. In Perl we just reproduce the definition:
sub factorial_recursive_perl {
    return 1 if $_[0] < 2;
    return $_[0] * factorial_recursive_perl($_[0] - 1);
}
Computer science teaches us that while recursive functions are often
easy to write they are usually slower to run than their iterative
equivalents. The iterative implementation is as easy as the recursive
one in our example, and it should run much faster, since there is no
function-call overhead. This is the iterative algorithm to calculate
fact(N):
result = 1
for (i = 2; i <= N; i++) {
    result *= i;
}
By adjusting it to use idiomatic Perl, we get the following function:
sub factorial_iterative_perl {
    my $return = 1;
    $return *= $_ for 2..$_[0];
    return $return;
}
The implementations in C are again similar to the algorithm itself:
double factorial_recursive_c(int x) {
    if (x < 2)  return 1;
    return x * factorial_recursive_c(x - 1);
}

double factorial_iterative_c(int x) {
    int i;
    double result = 1;
    for (i = 2; i <= x; i++)
        result *= i;
    return result;
}
To jump ahead, when we run the final benchmark we get the following results:
Benchmark: timing 300000 iterations of iterative_c, iterative_perl,
           recursive_c, recursive_perl...
   iterative_c:  0 wallclock secs ( 0.47 usr +  0.00 sys =  0.47 CPU)
   recursive_c:  2 wallclock secs ( 1.15 usr +  0.00 sys =  1.15 CPU)
iterative_perl: 28 wallclock secs (26.34 usr +  0.00 sys = 26.34 CPU)
recursive_perl: 75 wallclock secs (74.64 usr +  0.11 sys = 74.75 CPU)
All functions under test were executing 100!, which is 9.33262154439441e+157 using scientific notation.
The iterative implementation is about two and a half times as fast in C and three times as fast in Perl, where function calls are more expensive. Comparing C to Perl, the iterative implementation in C is about 56 times faster than the same algorithm implemented in Perl, and in the case of the recursive algorithm, C is 65 times faster.
There are at least three approaches to embedding other languages into
Perl: XS, SWIG, and Inline.pm. We will implement
the C functions we’ve written using the XS and
Inline.pm techniques in the following sections.
While SWIG is easier to use than XS for simple tasks,
it’s not as powerful as XS and it’s
not bundled with Perl. If you work on code that may later be
distributed on CPAN, you’d better use XS
or
Inline.pm.
Perl comes with a nifty utility called h2xs that builds a skeleton for a new module. It’s useful whether you are going to write a module with extensions in C/C++ or just in plain Perl.
When you run this utility it creates a new directory named after the module, and a skeleton of the Makefile.PL, test.pl, Module.xs, Module.pm, Changes, and MANIFEST files. If you have a C header file, it tries to guess the XS code based on it and write the correct XS file. Depending on how complicated your interface is, it may or may not do the right thing, but it helps anyway since it creates a boilerplate (which saves quite a lot of work).
First we prepare a C source file and its header file (see Examples 13-21 and 13-22).
Example 13-22. factorial.c
double factorial_recursive_c(int x) {
    if (x < 2)  return 1;
    return x * factorial_recursive_c(x - 1);
}

double factorial_iterative_c(int x) {
    int i;
    double result = 1;
    for (i = 2; i <= x; i++)
        result *= i;
    return result;
}
It’s easy to get lost in directories when creating a new module; therefore, we will show the exact directory we are in, using the prompt:
/home/stas/dev/fact>
Assuming that we work in this directory, we will save both files in this working directory. Let’s check:
/home/stas/dev/fact> find /home/stas/dev/fact -type f
/home/stas/dev/fact/factorial.c
/home/stas/dev/fact/factorial.h
Now we are ready to create the skeleton of the new module:
/home/stas/dev/fact> h2xs -n Book::Factorial -A -O -x \
  -F '-I ../..' factorial.h
Scanning typemaps...
Scanning /usr/lib/perl5/5.6.1/ExtUtils/typemap
Scanning factorial.h for functions...
Scanning factorial.h for typedefs...
Writing Book/Factorial/Factorial.pm
Writing Book/Factorial/Factorial.xs
Writing Book/Factorial/Makefile.PL
Writing Book/Factorial/README
Writing Book/Factorial/test.pl
Writing Book/Factorial/Changes
Writing Book/Factorial/MANIFEST
We’ll explain the h2xs arguments we used:
-n Book::Factorial specifies the name of the new module. It is also used to create the base directory (in our case, Book/Factorial/).
-A omits all autoload facilities.
-O allows us to overwrite a directory with the new module if one already exists.
-x automatically generates XSUBs based on function declarations in the header file (factorial.h in our case).
-F `-I../..' specifies where the header file is to be found. When h2xs runs, it changes into the newly created directory (Book/Factorial/ in our example), so in order to see the header file, we have to tell h2xs to look two directories back. (You may also need to add -F '-I.' during the make stage.)
The header file (factorial.h in our case) comes last.
Our next step is to copy the C file and header into the newly created directory and cd into it:
/home/stas/dev/fact> cp factorial.c factorial.h Book/Factorial/
/home/stas/dev/fact> cd Book/Factorial/
Since we have a really simple header file with only two function declarations, we just need to adjust Makefile.PL to build the factorial.o object file and Factorial.o, the actual extension library. We adjust Makefile.PL by adding the following line:
'OBJECT' => 'Factorial.o factorial.o',
We fix the INC attribute to point to the current
directory so the copied include file will be
found.
Now Makefile.PL looks like Example 13-23 (remember that h2xs does most of the work for us).
Example 13-23. Makefile.PL
use ExtUtils::MakeMaker;
# See lib/ExtUtils/MakeMaker.pm for details of how to influence
# the contents of the Makefile that is written.
WriteMakefile(
    'NAME'              => 'Book::Factorial',
    'VERSION_FROM'      => 'Factorial.pm', # finds $VERSION
    'PREREQ_PM'         => {  }, # e.g., Module::Name => 1.1
    'LIBS'              => [''], # e.g., '-lm'
    'DEFINE'            => '', # e.g., '-DHAVE_SOMETHING'
    'INC'               => '-I .', # e.g., '-I/usr/include/other'
    'OBJECT'            => 'Factorial.o factorial.o',
);
Now we remove parts of the default module created by h2xs and add the Perl functions to Factorial.pm, since our module mixes pure Perl and C functions. We also write some simple documentation in POD format. After we add the Perl code and documentation and do some patching, Factorial.pm looks like Example 13-24.
Example 13-24. Book/Factorial.pm
package Book::Factorial;

require 5.006;
use strict;

use vars  qw($VERSION);
$VERSION = '0.01';

use base qw(DynaLoader);

bootstrap Book::Factorial $VERSION;

sub factorial_recursive_perl {
    return 1 if $_[0] < 2;
    return $_[0] * factorial_recursive_perl($_[0] - 1);
}

sub factorial_iterative_perl {
    my $return = 1;
    $return *= $_ for 2..$_[0];
    return $return;
}

1;
_ _END_ _

=head1 NAME

Book::Factorial - Perl and C, Recursive and Iterative Factorial
Calculation Functions

=head1 SYNOPSIS

  use Book::Factorial;
  $input = 5;
  $result = Book::Factorial::factorial_iterative_c(   $input);
  $result = Book::Factorial::factorial_recursive_c(   $input);
  $result = Book::Factorial::factorial_iterative_perl($input);
  $result = Book::Factorial::factorial_recursive_perl($input);

=head1 DESCRIPTION

This module provides functions to calculate a factorial using
recursive and iterative algorithms, whose internal implementation are
coded in Perl and C.

=head2 EXPORTS

None.

=head1 AUTHORS

Eric Cholet <email address> and Stas Bekman <email address>

=head1 SEE ALSO

perl(1).

=cut
If you’ve written pure Perl modules before, you’ll see that the only unusual part is the code:
use base qw(DynaLoader);

bootstrap Book::Factorial $VERSION;
The base pragma specifies that the package
Book::Factorial inherits from
DynaLoader. Alternatively, you can write this as:
require DynaLoader;
@Book::Factorial::ISA = qw(DynaLoader);
where @ISA is the array that’s
used when inheritance relations are specified.
bootstrap is the place where the C extension
Factorial.o is loaded, making the C functions
available as Perl subroutines.
It’s very important to document the module, especially when the package’s functions don’t reside within the module itself. Doing so will let you and your users know what functions are available, how they should be called, and what they return.
We have written very basic documentation. Usually it’s a good idea to document each method.
In our example we decided not to export any functions to the callers; therefore, you always need to prefix the functions with the package name if used outside of this module:
use Book::Factorial;
$result = Book::Factorial::factorial_iterative_c(5);
We are almost done. Let’s build the Makefile:
/home/stas/dev/fact/Book/Factorial> perl Makefile.PL
Checking if your kit is complete...
Looks good
Writing Makefile for Book::Factorial
Next we run make to compile the extension and get the module ready for testing:
/home/stas/dev/fact/Factorial> make
In addition to building the extension, make also renders the POD documentation in nroff format, which will be installed as a manpage when make install is run.
It’s now time to test that the C extension was successfully linked and can be bootstrapped. h2xs has already created test.pl, which does this basic testing:
/home/stas/dev/fact/Book/Factorial> make test
PERL_DL_NONLAZY=1 /usr/bin/perl -Iblib/arch -Iblib/lib
-I/usr/lib/perl5/5.6.1/i386-linux -I/usr/lib/perl5/5.6.1 test.pl
1..1
ok 1
As we can see, the testing phase has passed without any problems. Is that all? Not really. We actually have to test that the functions are working as well, so we extend the test suite with an exhaustive set of tests.
In product-validation terminology this is sometimes known as comparing the results from the good and the bad machine, where the good machine is known to produce a correct result. In our case the good machine is either our head or a simple calculator. We know that:
4! = = 24
So we know that if the function works correctly, for a given input of 4, the output should be 24. Of course, in some cases this test is not enough to tell a good function from a broken one. The function might work correctly for some inputs but misbehave for others. You may need to come up with more elaborate tests.
The testing procedure is based on printing the number of tests to be
run in the BEGIN block and, for each test,
printing either ok or not
ok, followed by the number of the current test. Example 13-25 is a modified test.pl
that exercises the bootstrapping (as provided by
h2xs), plus two C functions and two Perl
functions.
Example 13-25. test.pl
use Test;

BEGIN { plan tests => 5; }
use Book::Factorial;
ok 1; # module loaded OK

my $input = 4;
my $correct_result = 24; # the good machine: 4! = 24
my $result = 0;
my $s = 1;

# testing iterative C version
$result = Book::Factorial::factorial_iterative_c($input);
ok $result =  = $correct_result;

# testing recursive C version
$result = Book::Factorial::factorial_recursive_c($input);
ok $result =  = $correct_result;

# testing iterative Perl version
$result = Book::Factorial::factorial_iterative_perl($input);
ok $result =  = $correct_result;

# testing recursive Perl version
$result = Book::Factorial::factorial_recursive_perl($input);
ok $result =  = $correct_result;
Note the magic BEGIN block, which ensures that the
test reports failure if it failed to load the module.
Now we run the test again using our new test.pl:
/home/stas/dev/fact/Book/Factorial> make test
PERL_DL_NONLAZY=1 /usr/bin/perl -Iblib/arch -Iblib/lib
-I/usr/lib/perl5/5.6.1/i386-linux -I/usr/lib/perl5/5.6.1 test.pl
1..5
ok 1
ok 2
ok 3
ok 4
ok 5
Fortunately all the tests have passed correctly. Now all we have to do is to install the module in our filesystem and start using it. You have to be root to install the module into the system-wide area:
/home/stas/dev/fact/Book/Factorial# su
/home/stas/dev/fact/Book/Factorial# make install
Installing /usr/lib/perl5/site_perl/5.6.1/i386-linux/auto/Book/Factorial/Factorial.so
Installing /usr/lib/perl5/site_perl/5.6.1/i386-linux/auto/Book/Factorial/Factorial.bs
Installing /usr/lib/perl5/site_perl/5.6.1/i386-linux/Book/Factorial.pm
Installing /usr/lib/perl5/man/man3/Book::Factorial.3
That’s it. Neither very complicated nor very simple. We mentioned the XS macro language earlier but didn’t actually use it—this is because the code was simple, and h2xs wrote the Factorial.xs file (shown in Example 13-26) for us based on the header file we provided (factorial.h).
Example 13-26. Factorial.xs
#include "EXTERN.h"
#include "perl.h"
#include "XSUB.h"

#include <factorial.h>

MODULE = Book::Factorial        PACKAGE = Book::Factorial

double
factorial_iterative_c(x)
  int x

double
factorial_recursive_c(x)
  int x
This file actually implements the real gluing specification. During
the make phase it was macro-processed by the
xsubpp subroutine into the C code version
Factorial.c, which was then compiled into the
Factorial.o object file and finally converted
into the Factorial.so loadable object and
installed in the architecture-dependent module library tree
(/usr/lib/perl5/site_perl/5.6.1/i386-linux/auto/Book/Factorial
on our machine).
When a more complicated C interface is used, the glue code might be much more involved and require knowledge of the XS language. XS is explained in the perlxs manpage. The following manpages might be useful too:
perlembed   Perl ways to embed Perl in your C or C++ application
perlapio    Perl internal I/O abstraction interface
perldebguts Perl debugging guts and tips
perlxs      Perl XS application programming interface
perlxstut   Perl XS tutorial
perlguts    Perl internal functions for those doing extensions
perlcall    Perl calling conventions from C
perlapi     Perl API listing (autogenerated)
perlintern  Perl internal functions (autogenerated)
The POD documentation format is explained in the perlpod manpage.
You may also want to read Advanced Perl Programming, by Sriram Srinivasan (O’Reilly), which covers XS and SWIG, and Extending and Embedding Perl, by Tim Jenness and Simon Cozens (Manning Publications).
We are now ready to write the benchmark code. Take a look at Example 13-27.
Example 13-27. factorial_benchmark.pl
use strict;
use Benchmark;
use Book::Factorial ( );

my $top = 100;

timethese(300_000, {
  recursive_perl => sub {Book::Factorial::factorial_recursive_perl($top)},
  iterative_perl => sub {Book::Factorial::factorial_iterative_perl($top)},
  recursive_c    => sub {Book::Factorial::factorial_recursive_c($top)   },
  iterative_c    => sub {Book::Factorial::factorial_iterative_c($top)   },
});
As you can see, this looks just like normal Perl code. The
Book::Factorial module is loaded (assuming that
you have installed it system-wide) and its functions are used in the
test.
We showed and analyzed the results at the beginning of our discussion, but we will repeat the results here for the sake of completeness:
panic% ./factorial_benchmark.pl
Benchmark: timing 300000 iterations of iterative_c, iterative_perl,
           recursive_c, recursive_perl...
   iterative_c:  0 wallclock secs ( 0.47 usr +  0.00 sys =  0.47 CPU)
   recursive_c:  2 wallclock secs ( 1.15 usr +  0.00 sys =  1.15 CPU)
iterative_perl: 28 wallclock secs (26.34 usr +  0.00 sys = 26.34 CPU)
recursive_perl: 75 wallclock secs (74.64 usr +  0.11 sys = 74.75 CPU)
If you want to do the benchmarking after the module has been tested
but before it’s installed, you can use the
blib pragma in the build directory:
panic% perl -Mblib factorial_benchmark.pl
Using XS
and
SWIG may seem like a lot of time and work, especially for something
as simple as our factorial benchmark. Fortunately, there is a new
module called Inline.pm that makes using Perl with
C almost as easy as writing Perl by itself.
Inline.pm allows you to put the source code of
other programming languages directly inside your Perl script or
module. It currently supports C, C++, Python, Tcl, and Java. The idea
is that you can write functions, subroutines, or methods in these
languages, and Inline.pm will automatically do
whatever it takes to make them callable by Perl. It will analyze your
code, compile it if necessary, bind the appropriate routines, and
load all the required components. This means that you can simply run
your code as if it were any other Perl program.
For example, the entire factorial benchmark program can be written as shown in Example 13-28.
Example 13-28. factorial_benchmark_inline.pl
use strict;
use Benchmark;
use Inline 'C';

my $top = 150;

timethese(500000,
      {
       recursive_perl => sub {factorial_recursive_perl($top)},
       iterative_perl => sub {factorial_iterative_perl($top)},
       recursive_c    => sub {factorial_recursive_c(   $top)},
       iterative_c    => sub {factorial_iterative_c(   $top)},
      });

sub factorial_recursive_perl {
    return 1 if $_[0] < 2;
    return $_[0] * factorial_recursive_perl($_[0] - 1);
}

sub factorial_iterative_perl {
    my $return = 1;
    $return *= $_ for 2..$_[0];
    return $return;
}

_ _END_ _

_ _C_ _

double factorial_recursive_c(int x) {
    if (x < 2)  return 1;
    return x * factorial_recursive_c(x - 1);
}

double factorial_iterative_c(int x) {
    int i;
    double result = 1;
    for (i = 2; i <= x; i++) result *= i;
    return result;
}
That’s all there is to it. Just run this Perl
program like any other, and it will work exactly as you expect. The
first time you run it, Inline.pm takes time to
compile the C code and build an executable object. On subsequent
runs, Inline.pm will simply load the precompiled
version. If you ever modify the C code, Inline.pm
will detect that and recompile automatically for you.
The results of this benchmark should be similar to the benchmark of
the XS version of Book::Factorial, developed in
the previous section.
Example 13-29 is an example of a simple mod_perl
handler using Inline.pm with C.
Example 13-29. Apache/Factorial.pm
package Apache::Factorial;
use strict;

use Apache::Constants qw(:common);

use Inline 'Untaint';
use Inline Config => DIRECTORY => '/tmp/Inline';
use Inline 'C';
Inline->init;

sub handler {
    my $r = shift;
    $r->send_http_header('text/plain');
    printf "%3d! = %10d\n", $_, factorial($_) for 1..10;
    return OK;
}
1;

_ _DATA_ _

_ _C_ _

double factorial(int x) {
    int i;
    double result = 1;
    for (i = 2; i <= x; i++) result *= i;
    return result;
}
This handler will list out all of the factorial numbers between 1 and
10. The extra Inline.pm commands are needed
because of mod_perl’s unique environment
requirements. It’s somewhat tricky to make
Inline.pm work with mod_perl because of the file
permissions. The best approach is to force
Inline.pm to compile the module before starting
the server. In our case, we can do:
panic% mkdir /tmp/Inline
panic% perl -I/home/httpd/perl -MApache::Factorial \
-e 'Apache::Factorial::handler'
Now all we need is for the /tmp/Inline directory
to be readable by the server. That’s where
Inline.pm has built the loadable object and where
it’s going to read from.
Inline.pm is an extremely versatile tool and can
be used instead of XS in almost any application. It also has features
that go well beyond the capabilities of XS. Best of all, you can get
an Inline.pm program up and running in minutes.
The Inline.pm distribution comes with copious
documentation, including a cookbook of common C-based recipes that
you can adapt to your taste. It is also actively supported by the
inline@perl.org mailing list.
Just like with XS, you can prepare a package with
Makefile.PL and a test suite for a distribution
on CPAN. See the Inline.pm manpage for
more
details.
We have presented two techniques to extend your Perl code with the
power of other languages (the C language in particular, but
Inline.pm lets you embed other languages as well).
If you find that some sections of your code are better written in other languages that may make them more efficient, it may be worth experimenting. Don’t blindly use Perl to solve all your problems—some problems are better solved in other languages. The more languages you know, the better.
Because Perl is so good at gluing other languages into itself, you don’t necessarily have to choose between Perl and other languages to solve a problem. You can use Perl and other languages together to get the best out of them all.
perlguts, perlxs, and perlxstut manpages
Dean Roehrich’s XS CookBookA and CookBookB: http://search.cpan.org/search?dist=CookBookA and http://search.cpan.org/search?dist=CookBookB
A series of articles at PerlMonth.com by Steven McDougall:
http://world.std.com/~swmcd/steven/perl/pm/xs/intro/index.html
http://world.std.com/~swmcd/steven/perl/pm/xs/tools/index.html
http://world.std.com/~swmcd/steven/perl/pm/xs/modules/modules.html
Chapters 18-20 in Advanced Perl Programming, by Sriram Srinivasan (O’Reilly)
Extending and Embedding Perl, by Tim Jenness and Simon Cozens (Manning Publications Company)
The perl-xs mailing list on http://www.perl.org/ (email perl-xs-subscribe@perl.org)
SWI G: http://www.swig.org/
Chapter 9 (“Tuning Apache and mod_perl”) in mod_perl Developer’s Cookbook, by Geoffrey Young, Paul Lindner, and Randy Kobes (Sams Publishing).
Mastering Regular Expressions: Powerful Techniques for Perl and Other Tools, Second Edition, by Jeffrey E. F. Friedl (O’Reilly)
Get Practical mod_perl now with the O’Reilly learning platform.
O’Reilly members experience books, live events, courses curated by job role, and more from O’Reilly and nearly 200 top publishers.

