Chapter 4. Connecting PHP to MySQL
Now that you’ve seen a bit of the power both of PHP and MySQL, it’s time to bring these two juggernauts together. With many programming languages, anytime you want to talk to a database, you have to download and install extra code, or install little plug-in models that give your programs support for talking to that database. PHP isn’t like that though; it comes ready to connect to MySQL from the moment you run the php command.
Even though you’ve only recently begun your journey to PHP mastery, you’re ready to use a database from your scripts. You just need to learn a few new commands and how to deal with the problems that can come up when you’re working with a database. In fact, you’re going to build a simple form that lets you enter SQL and run it against your MySQL database. When you’re a PHP programmer you can go beyond the mysql command-line tool.
Then, to put a cherry on top of your towering sundae of PHP and MySQL goodness, you’ll write another script. This script will take all the information from the forms you’ve built, add that information to a database, and then add one more form to let your users search for another user by name. All that in one chapter? Yes indeed.
Writing a Simple PHP Connection Script
No matter how simple or advanced your PHP scripts, if they talk to a database, they’ll begin with the same few steps:
Connect to a MySQL installation.
USE the right MySQL database.
Send SQL to the database.
Get the results back.
Do something with the results.
Steps 3, 4, and 5 will change depending on what you’re doing. A script that creates tables looks a little different from a script that searches through existing tables.
But those first couple of steps—connecting to MySQL and using the right database—are always the same, no matter how fancy your script. Just think, then: the code you’re about to write is the same code that programmers making $150 or $200 an hour are writing somewhere. (They’re just writing that code in much fancier houses with robots serving them iced tea as they lounge by the pool.)
Connecting to a MySQL Database
First, you have to tell your PHP script how to connect to a database. This process is basically telling PHP to do what you did when you started up your MySQL command-line client (MySQL on Mac OS X). When you connected to your web server’s database, you probably used a command like the followng:
bmclaugh@akila:~$ mysql --host=dc2-mysql-02.kattare.com
                        --user=bmclaugh --password
You need those same pieces of information to give PHP so it can connect: your database host, your username, and a password.
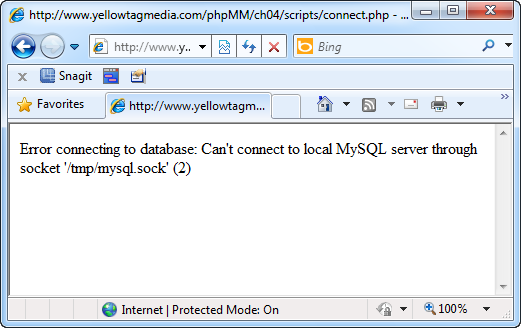
Fire up your text editor and create a new script; call it connect.php. This script will be as simple as possible, because all you need it to do is connect to your database, USE the right database, and then run a sample SQL query to make sure things are working correctly.
In your script, type the following lines:
<?php
  mysql_connect("your.database.host",
                "your-username", "your-password")
    or die("<p>Error connecting to database: " .
           mysql_error() . "</p>");

  echo "<p>Connected to MySQL!</p>";
?>
Note
If you’re running your database on the same machine as your PHP and web-serving files, your database hostname is usually localhost. localhost is just a way to say “the local machine.”
It’s really that simple! And like most of the other PHP scripts you’ve been writing, although there are some new commands, you probably already know almost exactly what’s going on here.
First, there’s a new command: mysql_connect. This command simply takes in a database host, a username, and a password, and connects. It’s exactly as if you’re running your mysql tool and connecting to a remote database.
Note
Make sure you change your.database.host, your-username, and your-password to the values for your own database.
But what about the die bit? Sounds a little gruesome (like Lord of the Flies gruesome, not Twilight teen-angst gruesome). In fact, it is a bit nasty: you use die when something may go wrong in your script. Think of die as saying, “If my code dies, then do something less nasty than tossing out an error code to my user. In this case, die prints an error message that won’t scare off your users.
But before you can understand die, you have to know a little bit about the inner workings of mysql_connect. When mysql_connect runs, it either creates or reuses an existing connection to your database. It then returns that connection to your PHP program, and makes available all the other PHP-to-MySQL commands you’ll learn about soon. But if mysql_connect can’t create that connection—for example, if your database isn’t running or you’ve got a bad host or username—mysql_connect returns a very different value: false.
So what’s really happening in your script is something like this:
<?php
  // This isn't working code, but you get the idea
  if (i_can_connect_to_mysql_with("my.database.host",
                                 "my-username", "my-password"))
    go_do_cool_database_stuff();
  else
    send_error_to_user_using_die
?>
But that's a lot of typing, so PHP lets you shorten it to the following:
<?php
  mysql_connect("your.database.host",
                "your-username", "your-password")
    or die("<p>Error connecting to database: " .
           mysql_error() . "</p>");

  echo "<p>Connected to MySQL!</p>";
?>
Not only is this script shorter, but it flips things around a bit. It basically says, try to connect (using mysql_connect), and if the result isn’t true (the or part of the code), then die. die prints out an error message, but it also “dies.” In other words, it ends your script. So if mysql_connect returns false, and die runs, your script will exit. Your users won’t ever see the “Connected to MySQL!” line because the script will have stopped running. It’s dead on the server room floor, in search of a working database connection. (See the box on Everybody Dies at Some Point for more detail on the die command.)
Not only that, but mysql_connect sets up another function when it can’t connect. It makes the errors it ran into in trying to connect available through another command, mysql_error. So you can call mysql_error as part of your die statement to show what really happened.
Note
Technically, mysql_connect, mysql_error, and die are all examples of functions. A function is a block of code, usually with a name assigned to it, which you can call from your own code anytime you need that block. It’s a lot quicker and better to call a function by name than to rewrite the block of code that function represents over and over again.
Don’t worry about functions for now, though. Just use them like any old PHP command. Before long, not only will you understand functions better, but you’ll be writing your own.
If mysql_connect connects without any problems, it returns that connection. PHP will skip the die line, and then execute this line:
echo "<p>Connected to MySQL!</p>";
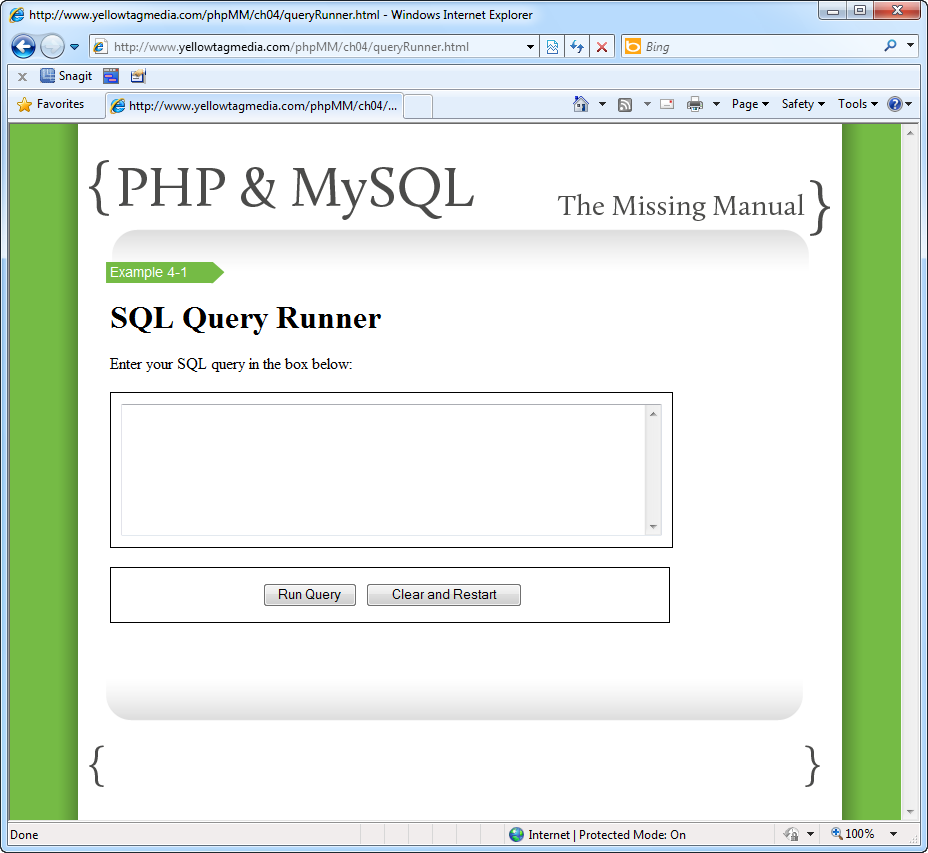
To see this command in action, create a simple HTML form, and call it connect.html. You can use this HTML to get you going:
<html>
<head>
<link href="../css/phpMM.css" rel="stylesheet" type="text/css" />
</head>
<body>
<div id="header"><h1>PHP & MySQL: The Missing Manual</h1></div>
<div id="example">Example 4-1</div>
<div id="content">
<h1>SQL Connection test</h1>
<form action="scripts/connect.php" method="POST">
<fieldset class="center">
<input type="submit" value="Connect to MySQL" />
</fieldset>
</form>
</div>
<div id="footer"></div>
</body>
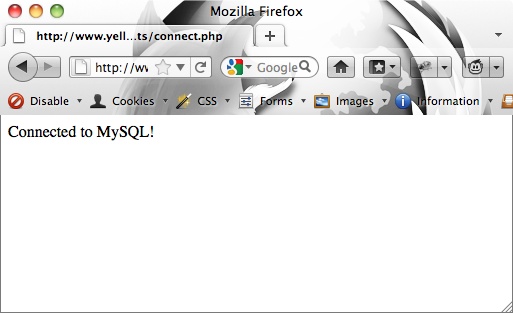
</html>This script is about as simple as it gets: it builds a form, drops a single button into place, and attaches that button to your new connect.php script. Load up your form in a browser (see Figure 4-1), and click “Connect to MySQL.”
Hopefully, you see one of the simplest, happiest messages of your burgeoning PHP and MySQL programming career: you’re connected! Check out Figure 4-2 for the sweet sight of success.

Selecting the Database to USE
There’s something wonderful waiting around the programming corner now: almost all the mysql_ family of functions works the same: you give them some values, and they return something useful. If something bad happens, you usually get back either false or a nonexistent object (something most programmers call null or nil).
So now you need to tell MySQL which database your PHP script wants to use. There’s a function for that: mysql_select_db.
Note
There’s an extended family of mysql_ functions. You might want to bookmark their documentation page: www.php.net/manual/en/ref.mysql.php. If you ever get stuck, head over there and see if a function might do what you need.
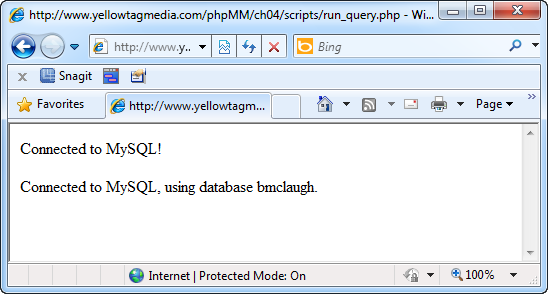
You give mysql_select_db a database name, and—you guessed it—it USEs that database, or returns false. So update connect.php to USE the right database:
<?php
  mysql_connect("your.database.host",
                "your-username", "your-password")
    or die("<p>Error connecting to database: " .
           mysql_error() . "</p>");

  echo "<p>Connected to MySQL!</p>";

  mysql_select_db("your-database-name")
    or die("<p>Error selecting the database bmclaugh: " .
           mysql_error() . "</p>");

  echo "<p>Connected to MySQL, using database bmclaugh.</p>";
?>
You should already see the pattern. die makes sure that if bad things happen, your script reports an error, your users read that error, and then the script exits. If things do go well, another happy message should get printed.
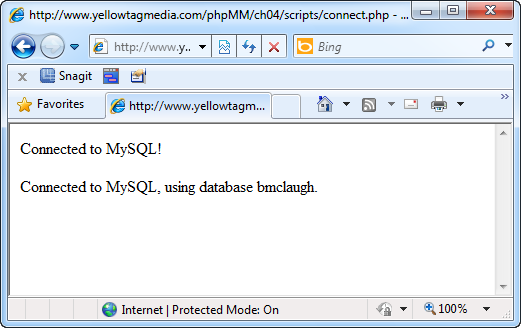
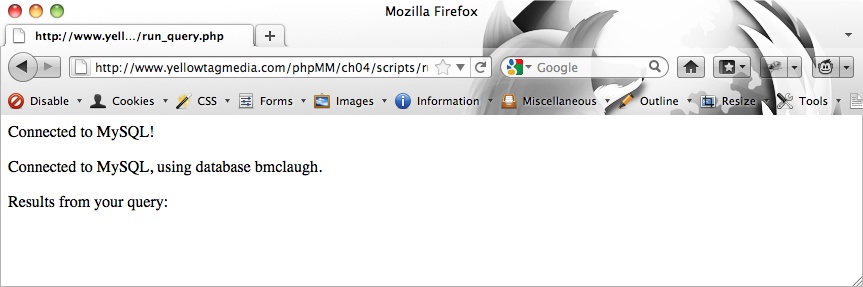
Try this new version out. Visit connect.html again and try and connect (and now USE) your database. You want to see something like Figure 4-3. Next up: talking SQL to your database.
SHOW Your Database’s Tables
Now that you’ve got a connection, and you’re tied in to the right database, you should see just what you’ve got to work with. In your MySQL tool, one of the first things you did was see what tables existed, and then start creating tables of your own. There’s some more work to do in creating tables, and you’ll do that in a bit, with a new HTML form and a new script.
But before diving into that, you can easily have your script see which tables are available in your database. Open up connect.php again, and add the following line:
<?php
  // All your existing database connection code

  $result = mysql_query("SHOW TABLES;");
?>
Here’s another new PHP-to-MySQL function: mysql_query. You’ll become very, very familiar with this one; it’s the key to passing SQL in to your database. This function takes in SQL, and you’ve given it some really simple SQL:
SHOW TABLES;
This command is exactly like typing SQL into your command-line tool.
Handling Errors By Seeing If Your Results are Not
But what about die? What about error handling? There’s none of that, and by now, you know there should be. But there’s something different about this line: whatever comes back from mysql_query is stuffed into a variable called $result.
So it’s really $result that you want to examine. It should either have a list of tables, from SHOW TABLES, or it’s reporting an error of some sort. And if it’s reporting an error, then $result is false, because the mysql_ functions return false when there’s a problem.
You know how to check for a false value, though, so you can add this code to handle problems:
<?php
  // All your existing database connection code

  $result = mysql_query("SHOW TABLES;");

  if ($result === false) {
    die("<p>Error in listing tables: " . mysql_error() . "</p>");
  }
?>
Now, this works, but it’s really not how most PHP programmers do things. The === is a fairly unusual thing to use in PHP, at least for checking to see whether a variable is false. What’s more common—and the way it’s usually done in PHP—is to use the negation operator (also called the bang operator), which is an exclamation point: !. So if you want to see if a variable called $some-variable is false, you can say if (!$some-variable). And that ! says something like, “see whether $some-variable is false.”
Even better, think of ! as being “not.” So what you really want to say in your code is, “If not $result, then die.” Accordingly, you can rewrite your code to look like this:
<?php
  // All your existing database connection code

  $result = mysql_query("SHOW TABLES;");

  if (!$result) {
    die("<p>Error in listing tables: " . mysql_error() . "</p>");
  }
?>
This kind of code is much better PHP, and now you’ve got any problems covered.
Note
It may seem weird to hear about “the way it’s done in PHP.” If code works, then it works, right? Well, yes…but have you ever heard someone who’s just learning English speak? Often, their words are correct, but the order, usage, and idiom are wrong. Try and explain why more than one sheep is still just “sheep,” and you’ve got the idea.
Programming languages are the same. There’s writing code that works, and there’s writing code that looks like you know the language. Sometimes this is called being eloquent. There are actually some great books for “speaking properly” in JavaScript and Ruby called Eloquent JavaScript (Marijn Haverbeke; No Starch Press) and Eloquent Ruby (Russ Olsen; Addison Wesley). It’s worth learning not just how to write working PHP, but to write PHP that looks natural.
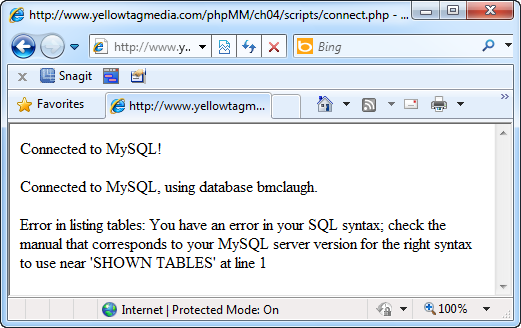
In fact, just to make sure your code deals with errors, change your SQL query to have a misspelling:
<?php
  // All your existing database connection code

  $result = mysql_query("SHOWN TABLES;");

  if (!$result) {
    die("<p>Error in listing tables: " . mysql_error() . "</p>");
  }
?>
Now load up connect.html in a browser, and run your connection test. Figure 4-4 is similar to what you should see: still a little cryptic, but clearly a case where your code realized there was a problem and handled it with an error message rather than a massive meltdown.
Printing Out Your SQL Results
Errors are handled, problems are reported, and now you can finally deal with what’s actually in $result when things don’t go wrong. Unfortunately, things get a little trickier here. $result is actually not a PHP type you’ve used, or even one that you’ll need to learn how to work with directly. It’s something called a resource, which is PHP-speak for a special variable that’s related to something outside of PHP.
Think about it like this: In the case of mysql_query, you’ve asked for the SQL results from running the query SHOW TABLES. But while PHP can talk to MySQL, it really doesn’t know how to interpret SQL. So it can’t know that $result should hold a list of rows, each of which with one value: a table name. All it knows is that something else—your MySQL database—is getting a query through the mysql_query function. And think about it: depending on what query you pass mysql_query, $result might hold rows with multiple pieces of information, like a first name and Facebook URL, or just an indication of whether a CREATE TABLE statement worked or not.
So in these cases, you usually end up with a PHP resource. That resource means something; it’s just that PHP doesn’t really know what that something is. So your PHP needs help. What it needs is something that knows about MySQL and can figure out how to work with $result. That’s exactly what you get with another MySQL function, mysql_fetch_row. You pass this function in a resource returned from mysql_query, and it lets you cycle through each row in the results returned from your SQL query.
Here’s the basic pattern:
Write your SQL query, and store it in a string or a variable.
Pass your query into mysql_query and get back a PHP resource.
Pass that resource into mysql_fetch_row to get back rows of results, one at a time.
Cycle through those rows and pull out the information you need.
Buy a really nice guitar with all the cash you’re making.
You’ve got a resource in $result, so now pass it in to mysql_fetch_row, like this:
<?php
  // All your existing database connection code

  $result = mysql_query("SHOW TABLES;");

  if (!$result) {
    die("<p>Error in listing tables: " . mysql_error() . "</p>");
  }

  echo "<p>Tables in database:</p>";
  echo "<ul>";
  while ($row = mysql_fetch_row($result)) {
    // Do something with $row
  }
  echo "</ul>";

?>
Warning
If you changed your SQL to SHOWN TABLES to produce an error as described on Handling Errors By Seeing If Your Results are Not, be sure and change it back to working SQL: SHOW TABLES.
Even though PHP doesn’t know what to do with the resource returned from mysql_query, mysql_fetch_row does. It takes in your $result resource and starts spitting out rows, one at a time, in an array.
And then there’s that while loop, which is also new, but probably makes sense to you already. A while loop continues to loop as long as something is true. In this case, the loop keeps looping while $row—which is the next row of results from your SQL query—is getting a value from mysql_fetch_row($result). When there are no more result rows, mysql_fetch_row doesn’t return anything, so $row is empty, and the while loop says, “Ok, I’m done. I’ll stop looping now.”
And, you’ve got a nice unordered list (ul) ready to spit out each row, so there’s just one thing left to add:
<?php
  // All your existing database connection code

  $result = mysql_query("SHOW TABLES;");

  if (!$result) {
    die("<p>Error in listing tables: " . mysql_error() . "</p>");
  }

  echo "<p>Tables in database:</p>";
  echo "<ul>";
  while ($row = mysql_fetch_row($result)) {
    echo "<li>Table: {$row[0]}</li>";
  }
  echo "</ul>";

?>
This code should start looking familiar again. Each time mysql_fetch_row returns $row, it’s actually returning an array, something you’ve see before (The $_REQUEST Variable). That array has all the different pieces of information from your SQL query. For SHOW TABLES, that’s just one thing, at $row[0]: the table name. Pretty soon, you’ll write some more complex queries, and you may need to grab the value in $row[1] or $row[2] or even $row [10].
So in this case, you get back $row, you grab the table name by getting the first item in the array, at index 0, and then you print that with echo. There’s just one other wrinkle here: those curly braces inside the string passed to echo. What’s up with those?
Well, you could rewrite this line like this:
while ($row = mysql_fetch_row($result)) {
  echo "<li>Table: " . $row[0] . "</li>";
}
Nothing wrong there, except all the extra quotation marks and period to stick strings together.
Note
Major nerd points if you remembered that mashing strings together was called concatenation (Combining Text).
But PHP is pretty savvy, and the folks that wrote the language are programmers, too. They realized, like you, that you’re constantly having to drop variables into the middle of strings. So instead of constantly ending a string and adding a variable, you can just wrap a variable inside of { }, and PHP will print the value of that variable instead of “$row[0]”. It makes for a lot simpler code, and that’s a good thing.
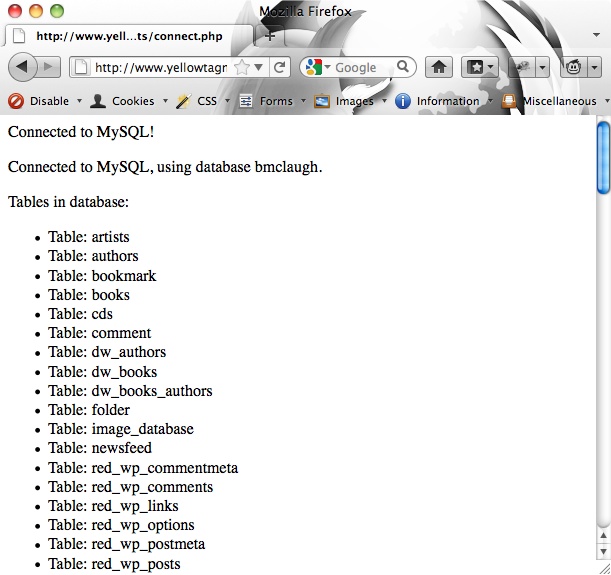
Save connect.php, revisit connect.html in your browser, and see what tables you’ve got in your database. Figure 4-5 is connect.php running against a database with a lot of tables. You may just have one or two, and that’s fine. Just make sure you see a list of your tables.
Cleaning Up Your Code with Multiple Files
Even if you don’t realize it yet, there’s something problematic about your connect.php script. Look at the first few MySQL calls you make:
<?phpmysql_connect("your.database.host","your-username", "your-password")or die("<p>Error connecting to database: " . mysql_error() . "</p>"); echo "<p>Connected to MySQL!</p>";mysql_select_db("your-database-name")or die("<p>Error selecting the database bmclaugh: " . mysql_error() . "</p>"); echo "<p>Connected to MySQL, using database bmclaugh.</p>"; // And so on... ?>
You’re manually typing your database host, your username, your password, and your database name into your script. Now suppose you have 10 scripts and you’re typing that 10 times. The chance of a typo is pretty high.
Not only that, what happens when you change your password? Or you upgrade to a better hosting plan to handle all the web traffic your apps are generating, and you need to change your database host? You’ve got to track down every place you put that information, in every PHP script. That’s a nightmare, and keeps you from actually writing new code and making more cash. Not good.
You need a way to abstract out those pieces of information. Abstraction is a programming term that means hiding the implementation, the way something (like a password) works, from the programs that uses it. You basically have a symbol, or a name, and that name refers to something else with a lot more detail. And even if that detail changes, the name still points to the right thing.
It’s like saying “Leigh,” and meaning my wife, without having to say, “that hot 34-year old woman with short blond hair and great legs.” And the beauty of “Leigh” is that every birthday, you can keep saying, “Leigh,” instead of changing your description.
Replacing Hand-Typed Values with Variables
So suppose you want your code to look more like this (actually, you really do want it to look more like this):
<?phpmysql_connect($database_host, $username, $password)or die("<p>Error connecting to database: " . mysql_error() . "</p>"); echo "<p>Connected to MySQL!</p>";mysql_select_db($database_name)or die("<p>Error selecting the database bmclaugh: " . mysql_error() . "</p>"); echo "<p>Connected to MySQL, using database bmclaugh.</p>"; // And so on... ?>
All you’re doing is writing something that looks a bit like a variable in place of hand-typing the username or database name. Now you can define those variables up above your connection code:
<?php$database_host = "your.database.host";$username = "your-username";$password = "your-password";$database_name = "your-database-name";// Database connection code ?>
But is this really that much better? Not yet; you’ve still got these same values hand-typed into your script. You want to stick the values in a file so no human has to type them. Read on.
Abstracting Important Values into a Separate File
Your goal is to get these values out of connect.php, into some place that all your PHP scripts can access them with no typing from you. Open up a new file, and call it app_config.php. Now drop your variables into this new file:
<?php
// Database connection constants
$database_host = "your.database.host";
$username = "your-username";
$password = "your-password";
$database_name = "your-database-name";

?>
Note
Be sure and save app_config.php somewhere that makes sense for all your application’s scripts to access it. In this book’s examples, app_config.php is in the root of the site, under scripts/. So if you’re in the ch04/scripts/ directory, you’d access this file at ../../scripts/app_config.php, or [site_root]/scripts/app_config.php. You can save the file wherever you want, as long as you get the path right in your PHP scripts that reference it.
When you move to a production version of your application, you probably want to place this file outside of the site root. That way, web users can’t simply type the path to your configuration script and get all your passwords. Alternatively, you could add security to this directory, although simply getting it out of the web-serving directories altogether is usually easiest.
Now, you can have all your different PHP scripts use these shared variables. Change a variable here in app_config.php, and that change affects all your PHP scripts that use these shared variables.
But how do you actually access these variables? Go back to connect.php, and remove where you defined these variables yourself. If you try and access connect.php through connect.html now, though, you’ll get a nasty error, as shown in see Figure 4-6.
The error occurs because connect.php now has no idea what $username or $password refers to. You need to inform PHP that before it tries to do anything in connect.php, it’s required to load app_config.php. And that’s (almost) exactly what you type in your script:
<?php

  require '../../scripts/app_config.php';

  // Database connection code
?>
Now, PHP loads the file ../../scripts/app_config.php before it runs your mysql_connect function. In effect, require says, “Hey PHP, if you can’t load the file I’m giving, then throw a nasty error, because nothing else is going to work.”
Warning
Make sure the path and filename you give require matches where you actually put app_config.php, or you’ll see the error that require produces up close and personal.
Try and run your connection script again, and you should see your table listing, which means things are working well again.
Variables Vary, But Constants Stay Constant
There’s just one more nagging little problem with your code: you’re still using variables for your username and password, along with the database host and database name. And what’s a variable? Something that varies or changes. Accordingly, PHP happily lets you write the following code in connect.php:
mysql_connect($database_host, $username, $password)
  or die("<p>Error connecting to database: " . mysql_error() . "</p>");

// This is allowed, but some bad mojo
$password = "hijinks";
So what happens when some other script—which also requires app_config.php—tries to connect with mysql_connect? It’s going to use $password, but now $password isn’t correct anymore. It’s set to “hijinks,” and chaos will ensue.
What you really want is for those values in app_config.php to be constant, and never change. You can do this with the special define function. Open up app_config.php and change your code:
<?php // Database connection constantsdefine("DATABASE_HOST", "your.database.host");define("DATABASE_USERNAME", "your-username");define("DATABASE_PASSWORD", "your-password");define("DATABASE_NAME", "your-database-name");?>
You define the name of a constant and the value for that constant, and PHP creates a new constant. That way, you can type DATABASE_HOST into your code, and PHP really sees “your.database.host”. Perfect! And since this is a constant, it can’t be changed anywhere along the line.
Constants are typed in all-uppercase letters. Caps aren’t required, but it’s another one of those “speak like a PHP programmer” things. You want constants to look different from variables, and using all uppercase names is one way to do that. Constants also don’t have the $ before their name, which is yet another way to differentiate a constant from a variable.
Now you need to make some quick changes to connect.php to use these new capitalized names of constants:
<?php require '../../scripts/app_config.php';mysql_connect(DATABASE_HOST, DATABASE_USERNAME, DATABASE_PASSWORD)or die("<p>Error connecting to database: " . mysql_error() . "</p>"); echo "<p>Connected to MySQL!</p>";mysql_select_db(DATABASE_NAME)or die("<p>Error selecting the database ". DATABASE_NAME .mysql_error() . "</p>");echo "<p>Connected to MySQL, using database " . DATABASE_NAME . "</p>";// SQL query-running goodness proceeds... ?>
Warning
You can’t use the { } inside your quotes to print constants. It’s only when you surround a variable (which starts with $) with { } that PHP prints the value of that variable. Instead, use the normal string concatenation approach where you end your string and add the constants using the dot (.), as discussed on Combining Text.
Try connect.php again. You should get a perfectly good list of table names. But this time, you’ve got constants for your important information, safely tucked away in a file separated out of connect.php.
Note
It’s also a good idea to add some additional security to app_config.php, and any other scripts that contain special values like passwords. You can set the permissions on the file to be more restrictive, or move the file to some place your PHP script can access, but your web users can’t. Ask your web or server admin for help if you’re not sure how to do that.
Building a Basic SQL Query Runner
Now that you can connect to SQL, you’re ready to take on something more ambitious: building your own version of a MySQL command-line tool. Of course, you’re a PHP developer and programmer now, so mentally scratch out “command-line” and replace it with “web-based.”
It turns out that you’ve already got most of the tools you need. You can easily build an HTML form that lets you and your users enter in a SQL query, you know how to connect to MySQL and select a database, and you can run a query. All that’s left is to figure out how to interpret that PHP resource that mysql_query returns when it’s not a list of table names.
Creating an HTML Form with a Big Empty Box
Before getting to mysql_query and its results, though, start with what you know: an HTML form. Keep things simple for now, and just create a form with a single text area into which you can type queries, and a few basic buttons.
Open up your text editor, and create queryRunner.html:
<html>
 <head>
  <link href="../css/phpMM.css" rel="stylesheet" type="text/css" />
 </head>

 <body>
  <div id="header"><h1>PHP & MySQL: The Missing Manual</h1></div>
  <div id="example">Example 4-2</div>

  <div id="content">
    <h1>SQL Query Runner</h1>
    <p>Enter your SQL query in the box below:</p>
    <form action="scripts/run_query.php" method="POST">
      <fieldset>
        <textarea id="query_text" name="query"
                  cols="65" rows="8"></textarea>
      </fieldset>
      <br />
      <fieldset class="center">
        <input type="submit" value="Run Query" />
        <input type="reset" value="Clear and Restart" />
      </fieldset>
    </form>
  </div>

  <div id="footer"></div>
 </body>
</html>
Fire up your favorite browser, and make sure things look like Figure 4-7.
Connecting to Your Database (Again)
You know what’s next: you need to connect to MySQL and then USE your database. This code should be pretty familiar by now; open up run_query.php and go to work:
<?php
  require '../../scripts/app_config.php';

  mysql_connect(DATABASE_HOST, DATABASE_USERNAME, DATABASE_PASSWORD)
    or die("<p>Error connecting to database: " .
           mysql_error() . "</p>");

  echo "<p>Connected to MySQL!</p>";

  mysql_select_db(DATABASE_NAME)
    or die("<p>Error selecting the database " . DATABASE_NAME .
           mysql_error() . "</p>");

  echo "<p>Connected to MySQL, using database " . DATABASE_NAME . "</p>";
?>
But wait…this is familiar. You’ve written this code before, back on Selecting the Database to USE, and in fact, you have to write it every single time you connect to MySQL. That sort of duplication isn’t good. That’s why you moved your database constants into app_config.php: you wanted to be able to keep code that is always the same in a single place, rather than ten or a hundred places.
You’ve seen how easy it is to require a file (Abstracting Important Values into a Separate File), and pull in some constant values. You can do the same thing with your database connection code. Open up a new file, and call it database_connection.php. Save this new script right alongside app_config.php, and type the following code:
<?php
  require 'app_config.php';

  mysql_connect(DATABASE_HOST, DATABASE_USERNAME, DATABASE_PASSWORD)
    or die("<p>Error connecting to database: " .
           mysql_error() . "</p>");

  echo "<p>Connected to MySQL!</p>";

  mysql_select_db(DATABASE_NAME)
    or die("<p>Error selecting the database " .
           DATABASE_NAME . mysql_error() . "</p>");

  echo "<p>Connected to MySQL, using database " .
       DATABASE_NAME . ".</p>";
?>
Note
Make sure your path to app_config.php matches where you stored that file. If you’re saving data-base_connection.php in the same directory as app_config.php, you just need the file name, without any directory paths.
Now you’ve got all your database code tucked nicely away, which means you can radically overhaul run_query.php:
<?php
  require '../../scripts/database_connection.php';
?>
How’s that for short code? Also notice that you no longer have a reason to require app_config.php. Your script requires database_connection.php, and it’s data-base_connection.php that handles bringing in app_config.php. Your code is much nicer and neater now.
Just to make sure this works, you should visit your queryRunner.html page and click Run Query. You should get something like Figure 4-8—all without anything but a single require in your main script!
Running Your User’s SQL Query (Again)
At this point, you finally get to combine what you know about PHP and what you know about SQL. You already have anything the user puts into the big text area on your form through the $REQUEST variable, which as you remember is an array (The $_REQUEST Variable). And you also can use mysql_query to run a query.
You just need to put those two things together:
<?php require '../../scripts/database_connection.php';$query_text = $_REQUEST['query'];$result = mysql_query($query_text);if (!$result) {die("<p>Error in executing the SQL query " . $query_text . ": " .mysql_error() . "</p>");}echo "<p>Results from your query:</p>";echo "<ul>";while ($row = mysql_fetch_row($result)) {echo "<li>{$row[0]}</li>";}echo "</ul>";?>
Just grab the appropriate field from the input from your HTML form, pass it to mysql_query, and you’re good to go. You can then pass in the returned PHP resource, $result, to an error-handling if statement, and finally to mysql_fetch_row to print out the results from the query.
The script looks pretty good, so now you’re ready to actually try things out.
Entering Your First Web-Based Query
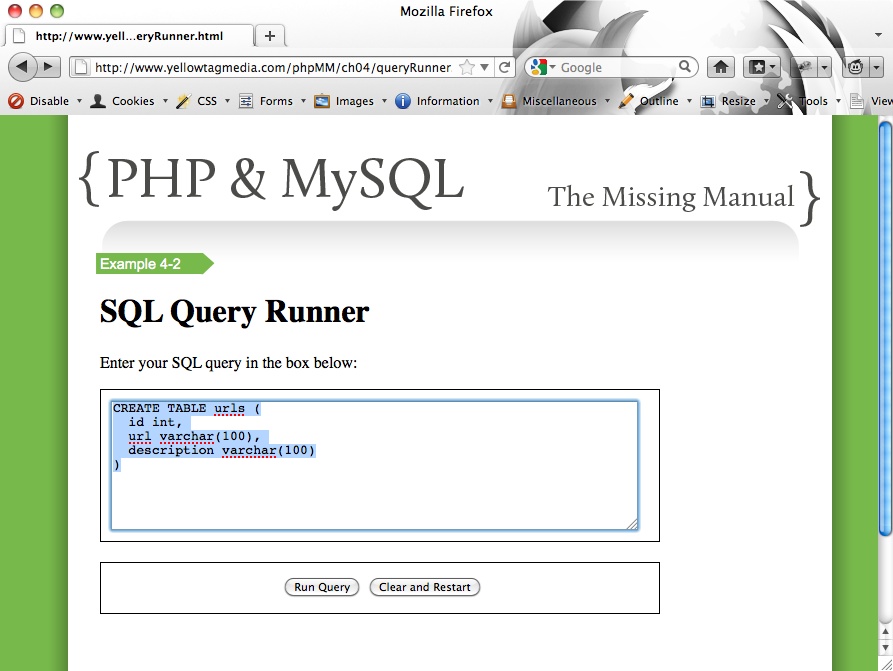
You probably don’t have much in your database at this point, so start by creating a new table called urls. Here’s the SQL you’ll need:
CREATE TABLE urls (id int, url varchar(100), description varchar(100));
Of course, since you’ve got a nice big text area, you could also spread that out:
CREATE TABLE urls ( id int, url varchar(100), description varchar(100) )
Either way, you want a form that looks something like Figure 4-9.
Now click Run Query. What did you get? Well, you’re probably staring at a surprising screen, sort of like the one shown in Figure 4-10.
Well, what happened? If you want to really get confused, click the Back button on your browser, and run your CREATE query again. You’ll see a message like the one shown in Figure 4-11.
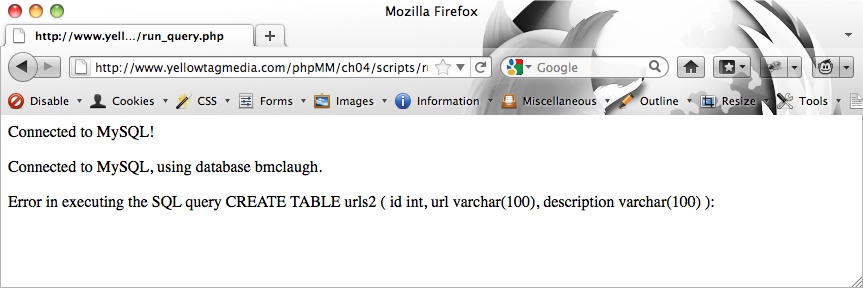
The first time you ran the CREATE TABLE query on Making Tables with CREATE, you got nothing—no results at all. The next time, MySQL tells you the urls table already exists! In fact, if you hop to your command-line tool, you see that, yes, the table does exist in your database:
mysql> describe urls; +-------------+--------------+------+-----+---------+-------+ | Field | Type | Null | Key | Default | Extra | +-------------+--------------+------+-----+---------+-------+ | id | int(11) | YES | | NULL | | | url | varchar(100) | YES | | NULL | | | description | varchar(100) | YES | | NULL | | +-------------+--------------+------+-----+---------+-------+ 3 rows in set (0.00 sec)
Look carefully at your code again:
<?php
  require '../../scripts/database_connection.php';

  $query_text = $_REQUEST['query'];
  $result = mysql_query($query_text);

  if (!$result) {
    die("<p>Error in executing the SQL query " . $query_text . ": " .
        mysql_error() . "</p>");
  }

  echo "<p>Results from your query:</p>";
  echo "<ul>";
  while ($row = mysql_fetch_row($result)) {
    echo "<li>{$row[0]}</li>";
  }
  echo "</ul>";
?>The if (!$result) code block is not running, so clearly $result came back as something other than false. But the while loop never ran; you never saw any results.
But wait a second. Your query was a CREATE query. What rows would be returned from that sort of query? There wouldn’t be any rows, because you weren’t asking for rows. You were just asking MySQL to create a table; in fact, a place to put rows.
Handling Queries That Don’t SELECT Information
The secret here is that mysql_query is happy to take in a CREATE statement. It even does what you asked, which is why the second time you entered that query, MySQL gave you an error, saying that the urls table was already created. When mysql_query gets a CREATE statement, it returns false if there was an error—which your script handles—but true if there’s not an error. And if there’s not an error, it doesn’t return any rows. You get a true value in $result, but nothing else. And that’s where things went wrong.
When mysql_query gets most of the SQL statements that don’t select data, like CREATE, INSERT, UPDATE, DELETE, DROP, and a few others, it just returns true (if things worked) or false (if they didn’t).
Note
A few of those SQL commands, like UPDATE and DELETE, may look new to you. Don’t worry, though. They do just what they look like they do: UPDATE updates information in a table, and DELETE removes it. And when you need to use those functions in this book, you’ll get a lot more detail about exactly how to use each of them.
Fortunately, now that you know what’s going on, it’s not too hard to deal with the problem. You just need your script to find out whether the SQL query string the user supplied has one of these special words. If so, you must handle it differently. And it just so happens you’re plenty comfortable with searching through strings.
So think this through; what you really want is something like this:
Grab the user’s query from the HTML form.
Pass the query into mysql_query, and store the result in a variable.
Determine whether the result is false, which is bad no matter what type of SQL got passed in.
If the result is not false, see whether the query has one of the special keywords in it: CREATE, INSERT, UPDATE, DELETE, or DROP. (There are others, but these are the most common ones to check for.)
If the query has one of these special words, see whether the result of running the query was true, and let the user know things went well.
If the query does not have one of these words, try and print out the result rows like you’ve already been doing.
You’ve already got a lot of this code, so you need to only add an if (or maybe a few ifs, actually), and some searching:
$return_rows = false;
$location = strpos($query_text, "CREATE");
if ($location === false) {
  $location = strpos($query_text, "INSERT");
  if ($location === false) {
    $location = strpos($query_text, "UPDATE");
    if ($location === false) {
      $location = strpos($query_text, "DELETE");
      if ($location === false) {
        $location = strpos($query_text, "DROP");
        if ($location === false) {
          // If we got here, it's not a CREATE, INSERT, UPDATE,
          //   DELETE, or DROP query. It should return rows.
          $return_rows = true;
        }
      }
    }
  }
}
Warning
Be sure to use that triple-equals sign (===) in your if statements to check whether $location is false.
This code may appear tricky, but it’s straightforward if you walk through it line by line. Basically, you have the same if statement, repeated over and over, with each of those having another nested if statement:
$location = strpos($query_text, "SEARCH_STRING");
if ($location === false) {
  // Try again with another SEARCH_STRING
}
Finally, if all the if statements fail, then you don’t have CREATE, INSERT, UPDATE, DELETE, or DROP anywhere in the query string:
// This is the innermost if statement
if ($location === false) {
  // If we got here, it's not a CREATE, INSERT, UPDATE,
  //   DELETE, or DROP query. It should return rows.
  $return_rows = true;
}
But why is this so complex? The problem here is that you really want to search the user’s query string, not just for a single matching word, like CREATE or INSERT, but for several matching words. That’s a little tricky, so you’ve got to work with one call to strpos at a time.
Note
Make sure you understand this code, but don’t get too attached to it. It’s really ugly, and in the next chapter, you’re going to add an extremely new tool to your PHP programming kit, and rework this code to be a lot slimmer and sleeker.
At each step, if the search string is found, the user has put in one of those special SQL keywords that doesn’t return rows, so the variable $return_rows is set to false, different from its original value, true.
Finally, at the end of this curly-brace love fest, the if statements unwind back to the main program, and either $returns_rows has a value of true because none of the searches matched, or false because one of them did.
Now you’re ready to use $returns_rows to print a result:
<?php // require and database connection code // run the query // handle errors in the result // see if the query has result rows or notif ($return_rows) {// We have rows to show from the queryecho "<p>Results from your query:</p>";echo "<ul>";while ($row = mysql_fetch_row($result)) {echo "<li>{$row[0]}</li>";}echo "</ul>";} else {// No rows. Just report if the query ran or notif ($result) {echo "<p>Your query was processed successfully.</p>"echo "<p>{$query_text}</p>";}}?>
Note
Remember that if ($return_rows) is just the same as if ($return_rows === true). The same goes for if ($result).
Most of this script is familiar. All the code you’ve been using to print out rows stays the same. That code just moves inside the if ($return_rows) block, because it only applies if the user put in something like a SELECT that returns (potentially) lots of results.
Then, in the else to that if, your script just reports whether or not things went OK. As an additional help, this section of the if prints out the original query so the user can know what was executed.
Now, technically, you don’t really need that if ($result). Since you tested earlier to see if $result is false, if your script gets to this last bit, you know that $result is true, so you can simplify things at the end a bit:
if ($return_rows) {
  // We have rows to show from the query
  echo "<p>Results from your query:</p>";
  echo "<ul>";
  while ($row = mysql_fetch_row($result)) {
    echo "<li>{$row[0]}</li>";
  }
  echo "</ul>";
} else {
  // No rows. Just report if the query ran or not
  echo "<p>Your query was processed successfully.</p>"
  echo "<p>{$query_text}</p>";
}
This script is getting to be a little long, but you know what every single line is doing at this point. Go ahead and try it out.
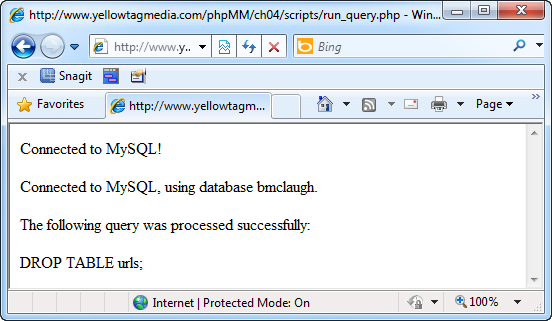
You probably created the urls table (Entering Your First Web-Based Query)—even though your PHP script didn’t let you know that. So try entering DROP TABLE urls; as your SQL query. Then run your query, and this time, you should get a helpful message back, specific to your rowless query, as you can see in Figure 4-12.
Dealing with Humans
Unfortunately, there’s still a problem in one of the lines in the code in the previous section. Right now, if your user types the following query, what happens?
DROP TABLE urls;
Your set of if statements understands that DROP is part of the query, realizes it has no return rows, and does the right thing: reports that the query either ran without problems, or that an error occurred.
But what about this query? Do you see where the problem is?
drop table urls;
Here’s the statement that should indicate a match:
$location = strpos($query_text, "DROP");
if ($location === false) {
  // this should return true, and so there are no return rows
}
But that line searches for DROP, which doesn’t match “drop” at all. strpos searches for strings, but it sees a lowercase letter, like “d”, as a different letter from an uppercase “D”. So that search finds “DROP” but not “drop” or “dRoP”.
And, as always, you’ve got humans using your app, not robots. You can’t just assume that those humans will be good SQL citizens and always use capital letters. You could put a little message on the form: Please type your SQL in all capital letters, but humans will be humans, and they tend to ignore instructions like this.
You’ll spend at least as much of your time dealing with the human factor in your code as writing code that handles the so-called normal flow of operation. In fact, once you add real people to your line of thinking, you’ll realize that “normal” isn’t a very useful concept. Instead, your code simply has to deal with as many possibilities as you can imagine (and some you can’t).
Fixing the lowercase and uppercase issue turns out to be fairly simple: you can simply convert $query_string to all capital letters before starting to search through it:
$return_rows = false;
$query_text = strtoupper($query_text);
$location = strpos($query_text, "CREATE");
// All the nested if blocks.
Now, if a user types drop table urls or DROP table UrLS, the search string is DROP TABLE URLS, and searching for “DROP” will return a match.
But there’s another problem! Before you read on, see if you can figure out what it is.
Avoid Changing User Input Whenever Possible
To spot this potential problem with your query script, take a look at the last bit of your code that’s run if the user enters a rowless query like DROP or INSERT:
// No rows. Just report if the query ran or not
echo "<p>Your query was processed successfully.</p>"
echo "<p>{$query_text}</p>";
Run this code, and you’ll get something like you see in Figure 4-13.
Note
If you’re following along, you may need to DROP TABLE urls; before you can CREATE it again, or CREATE the table before you can DROP it.
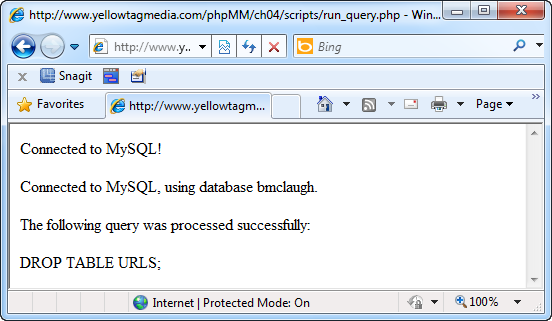
Carefully compare the code in Figure 4-12 and Figure 4-13. In Figure 4-13, you’ll notice everything is in uppercase. That makes sense, because to make searching easier, you added this line to your script:
$query_text = strtoupper($query_text);
Then, when you output $query_text at the end, the output is shown in all uppercase letters. Is this a big deal? Well, it doesn’t seem to be, at least not here. But it does reveal something: after that $query_text string is converted to uppercase, any time it’s used, it’s coming back with all uppercase letters. So suppose the original query was something like this:
SELECT *
  FROM users
 WHERE last_name = "MacLachlan";
Now consider this same query, turned into all uppercase letters:
SELECT *
  FROM USERS
 WHERE LAST_NAME = "MACLACHLAN";
Believe it or not, these are not the same query. SELECT—and most of the other SQL queries—are going to treat a last name of “MacLachlan” as being totally different from “MACLACHLAN.” So those two queries are not identical at all.
At the moment, this doesn’t create any trouble. Your script never re-runs the query, and mysql_query runs with $query_text before its turned into its uppercase version. But this is a problem waiting to happen.
In general, you want to try to avoid directly changing input from a user. That’s because you get exactly this sort of problem: you may need to use that input again, and once you’ve changed it, you can’t go back.
Luckily, the remedy is simple: instead of changing the user’s input, you instead use a new variable to store the uppercase version of the query:
$return_rows = false;
$uppercase_query_text = strtoupper($query_text);
$location = strpos($query_text, "CREATE");
You should use this new variable in all your string comparisons:
$return_rows = false; $uppercase_query_text = strtoupper($query_text);$location = strpos($uppercase_query_text, "CREATE");if ($location === false) {$location = strpos($uppercase_query_text, "INSERT");if ($location === false) {$location = strpos($uppercase_query_text, "UPDATE");if ($location === false) {$location = strpos($uppercase_query_text, "DELETE");if ($location === false) {$location = strpos($uppercase_query_text, "DROP");if ($location === false) { // If we got here, it's not a CREATE, INSERT, UPDATE, // DELETE, or DROP query. It should return rows. $return_rows = true; } } } } }
As small a change as that is, it protects you in case you ever need to use that query string again.
And just like that you’ve actually got a tool that will execute any SQL query you throw at it. But there’s work still to do. All that search code really does clutter up your script, and there’s just no getting around it: your script is pretty hard to understand at first (and even second) glance. In the next chapter, you’ll tackle all this, taking your form from a basic handy form to a really nice exercise of your PHP muscle.
Get PHP & MySQL: The Missing Manual now with the O’Reilly learning platform.
O’Reilly members experience books, live events, courses curated by job role, and more from O’Reilly and nearly 200 top publishers.

