Elements is such a cool program and so much fun to use, but figuring out how to make it do what you want is another matter. The manual that comes with Elements 6 is more like a quick reference guide and doesn't go into as much depth as you might want. The Elements Help files are very good, but of course you need to know what you're looking for to use them to your best advantage.
You'll find a slew of Elements titles at your local bookstore, but most of them assume that you know quite a bit about the basics of photography and/or digital imaging. It's much easier to find good intermediate books about Elements than books designed to get you going with the program.
Which is where the Missing Manual comes in. This book is intended to make learning Elements easier by avoiding technical jargon as much as possible, and explaining why and when you'll want to use (or avoid) certain features in the program. That approach is as useful to people who are advanced photographers as it is to those who are just getting started with their first digital camera.
Note
This book periodically recommends other books, covering topics that are too specialized or tangential for a manual about Elements. Careful readers may notice that not every one of these titles is published by Missing Manual parent O'Reilly Media. While we're happy to mention other Missing Manuals and books in the O'Reilly family, if there's a great book out there that doesn't happen to be published by O'Reilly, we'll still let you know about it.
You'll also find tutorials throughout the book that refer to files you can download from the Missing Manual Web site (www.missingmanuals.com) so you can practice the techniques you're reading about. And throughout the book, you'll find several different kinds of sidebar articles. The ones labeled "Up to Speed" help newcomers to Elements do things or explain concepts that veterans are probably already familiar with. Those labeled "Power Users' Clinic" cover more advanced topics that won't be of much interest to casual photographers.
Note
Since Elements 6 works in both Windows Vista and Windows XP, you'll see screenshots from both operating systems in this book. Most things work exactly the same way in both programs; only the styles of some windows are different. In a few instances, the file paths for certain program files aren't exactly the same. If that's the case, you'll be given the directions for both operating systems.
This book is divided into six parts, each focusing on a certain kind of task you may want to do in Elements.
The first part of this book helps you get started with Elements. Chapter 1 shows you how to navigate Elements' slightly confusing layout and mishmash of programs within programs. You learn how to decide which window to start from, as well as how to set up Elements so it best suits your own personal working style. You also learn about some important basic keyboard shortcuts and where to look for help when you get stuck. Chapter 2 covers how to get photos into Elements, the basics of organizing them, and how to open files and create new images from scratch, as well as how to save and back up your images. Chapter 3 explains how to rotate and crop your photos, and includes a primer on that most important digital imaging concept—resolution.
Chapter 4 tells you how to use the Quick Fix window to dramatically improve your photos. Chapter 5 and Chapter 6 cover two key concepts—making selections and layers—that you'll use throughout the book.
Having Elements is like having a darkroom on your computer. In Chapter 7, you'll learn how to make basic corrections, such as fixing exposure, adjusting color, sharpening an image, and removing dust and scratches. Chapter 8 covers topics unique to people who use digital cameras, like RAW conversion and batch processing your photos. In Chapter 9, you'll move on to some more sophisticated fixes, like changing the light, using the clone stamp for repairs, making a photo livelier by adjusting the color intensity and light and shadows in an image. Chapter 10 shows you how to convert your photos to black and white, and how to tint and colorize black-and-white photos. Chapter 11 helps you to use Elements' Photomerge feature to create a panorama from several photos and to make perspective corrections to your images.
This part covers the fun stuff—painting on your photos and drawing shapes (Chapter 12), using filters and effects to create a more artistic look (Chapter 13), and adding type to your images (Chapter 14).
Once you've created a great image in Elements, you'll want to share it, so this part is about how to get the most out of your printer (Chapter 16), how to create images for the Web and email (Chapter 17), how to make slideshows and Web Galleries with your photos (Chapter 18), and all the fun projects you can create with Elements 6 (Chapter 15).
There are literally hundreds of plug-ins and additional styles, brushes, and other fun stuff you can get to customize your copy of Elements and increase its abilities; the Internet and your local bookstore are chock-full of additional information. Chapter 19 offers a look at some of these, as well as information about using a graphics tablet in Elements and some resources for after you've finished this book.
There's a lot of information in this book, and if you're new to Elements you don't need to try to digest it all at once, especially if you've never used any kind of photo-editing software before. So what do you need to read first? Here's a simple five-step way to use the book if you're brand-new to photo editing:
Read all of Chapter 1.
That's important for understanding how to get around in Elements.
If your photos aren't on your computer already, read about the Photo Downloader.
The Downloader gets your photos from your camera's memory card into Elements. It's explained in Chapter 2.
If you want to organize your photos, read about the Organizer.
It doesn't matter where your photos are right now. If you want to use the Organizer to tag and keep track of them, read Chapter 2.
When you're ready to edit your photos, read Chapter 3 and Chapter 4.
Chapter 3 explains how to adjust the view of your photos in the Editor. Chapter 4 shows you how to use the Elements Quick Fix window to easily edit and correct your photos. Guided Edit (page xx) can also be very helpful when you're just getting started. If you skipped Chapter 2 because you're not using the Organizer, go back there now and read the parts about saving your photos, so you don't lose your work.
When you're ready to print or share your photos, flip to the chapters on sharing your images.
Chapter 16 covers printing, both at home and from online services. Chapter 17 explains how to email photos.
That's all you need to get started. You can come back and pick up the rest of the information in the book as you get more comfortable with Elements and want to explore more of the wonderful things it can do for your photos.
This book assumes that you know how to perform basic activities on your computer like clicking and double-clicking your mouse and dragging objects onscreen. Here's a quick refresher: to click means to move the point of your mouse or track-pad cursor over an object on your screen and press the left mouse or trackpad button once. To right-click means to press the right mouse button once, which produces a menu of special features. To double-click means to press the left button twice, quickly, without moving the mouse between clicks. To drag means to click an object and use the mouse to move it while holding down the left button so you don't let go of it. Most selection buttons onscreen are pretty obvious, but you may not be familiar with radio buttons: To choose an option, you click one of these little empty circles that are arranged like a list. If you're comfortable with basic concepts like these, you're ready to get started with this book.
In Elements, you'll often want to use keyboard shortcuts to save time, and this book gives keyboard shortcuts when they exist (and there are a lot of them in Elements). So if you see "Press Ctrl+S to save your file," that means to hold down the Control key while pressing the S key.
Throughout Photoshop Elements 6: The Missing Manual (and in any Missing Manual, for that matter) you'll see arrows that look like this: "Go to Editor → Filter → Artistic → Paint Daubs."
This is a shorthand way of helping you find files, folders, and menu choices without having to read through excruciatingly long, bureaucratic-style instructions. So, for example, the sentence in the previous paragraph is a short way of saying: "Go to the Editor component of Elements. Click the Filter choice in the menu bar. In that menu, choose the Artistic section, and then go to Paint Daubs in the pop-out menu." Figure 1 shows you an example in action.
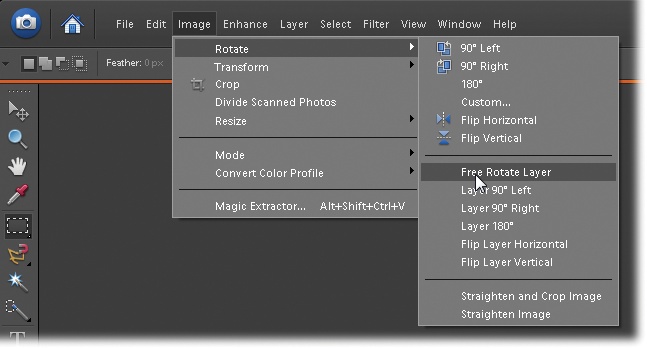
Figure 1. In a Missing Manual, when you see "Image → Rotate → Free Rotate Layer," that's a quicker way of saying "Go to the menu bar and click Image, and then slide down to Rotate and choose Free Rotate Layer from the pop-up menu."
File paths are shown in the conventional Windows style, so if you see "Go to C:\ Documents and Settings\<your user name>\My Documents\My Pictures," that means to go to your C drive, open the Documents and Settings folder, and look for your user account folder and find the My Documents folder. In that folder, open the My Pictures folder that's inside it. When there are different file paths for Vista and Windows XP, you'll find them both listed.
If you head on over to the Missing Manual Web site (www.missingmanuals.com), you can find links to downloadable images for the tutorials mentioned in this book, if you want to practice without using your own photos. (Or maybe you never take pictures that need correcting?)
A word about the image files for the tutorials: To make life easier for folks with dial-up Internet connections, the file sizes have been kept pretty small. This means you probably won't want to print the results of what you create (since you'll end up with a print about the size of a match book). But that doesn't really matter because the files are really meant for onscreen use. You'll see notes throughout the book about which images are available to practice on for any given chapter.
At the Web site, you can also find articles, tips, and updates to the book. If you click the Errata link, you'll see any corrections to the book's content, too. If you find something you think is wrong, feel free to report it by using this link. Each time the book is printed, we'll update it with any confirmed corrections. If you want to be certain that your own copy is up to the minute, this is where to check for any changes. And thanks for reporting any errors or suggesting corrections.
When you see a Safari® Books Online icon on the cover of your favorite technology book, that means the book is available online through the O'Reilly Network Safari Bookshelf.
Safari offers a solution that's better than e-books. It's a virtual library that lets you easily search thousands of top tech books, cut and paste code samples, download chapters, and find quick answers when you need the most accurate, current information. Try it for free at http://safari.oreilly.com.
Get Photoshop Elements 6: The Missing Manual now with the O’Reilly learning platform.
O’Reilly members experience books, live events, courses curated by job role, and more from O’Reilly and nearly 200 top publishers.

