In addition to the Organizer, the other main section of Elements is what Adobe now calls the Editor. If you've used Elements in the past, this is the Elements you're used to, although it also has some added features in this version, most notably a hugely improved Quick Fix window.
Photo editing is exactly the same whether you're using Windows or Mac OS X. There are some differences in what you can do from the File Browser, which is where you can start projects like panoramas on a Mac, but otherwise there's not a jot of difference in how you edit a photo. You can see how much alike they are in Figure 1-6.
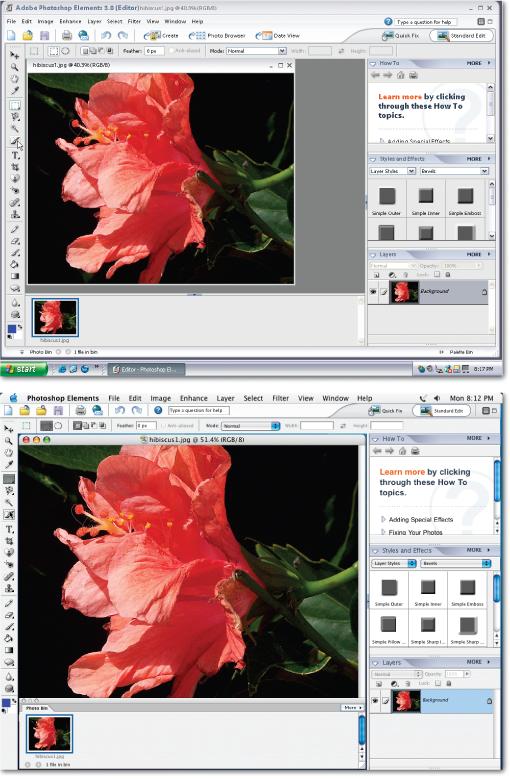
Figure 1-6. As you can see, there's almost no difference between the Standard Edit window in Windows (top) and Mac OS X (bottom), except for the basic differences between the two operating system controls. Your tools are exactly the same and so are the techniques for using them. The long, skinny strip down the extreme left side of the screen is the Toolbox.
You can operate the Editor in either of two different modes:
Quick Fix. For many beginners, this may end up as your main workspace. Adobe has gathered together the basic tools you need to improve most photos and it's the one place in Elements where you can have a before-and-after view while you work. Chapter 4 discusses using the Quick Fix in detail.
Standard Edit. The Standard Edit window gives you access to Elements' most sophisticated tools. There are far more ways to work on your photo in Standard Edit than in the Quick Fix, and if you're fussy, it's where you'll do most of your retouching work. Most of the Quick Fix commands are also available via menus in the Standard Edit window.
The rest of this chapter covers some of the basic concepts and key tools you'll come across in the Editor.
Elements gives you an amazing array of tools to use when working on your photo. You get almost two dozen primary tools to help you select, paint on, and otherwise manipulate your photos, and many of the tools have as many as four subtools hiding beneath them (see Figure 1-7). Bob Vila's workshop probably isn't any better stocked than the Elements' virtual toolbox.
Tip
If you want to explore every cranny of Elements, you need to open a photo (in the Editor, choose File â Open). Lots of the menus are grayed out if there's no file opened.
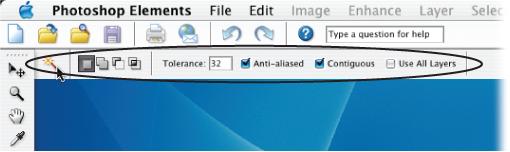
The long, skinny strip on the left side of the Standard Edit window is the main Elements Toolbox, as you can see in Figure 1-6. It stays perfectly organized so that you can always find what you want without ever having to lift a finger to straighten it up. And what's more, if you should forget what a particular tool does, just hold your mouse over the tool's icon and a label appears. You activate a tool by clicking on it, as shown in Figure 1-7. And any tool that you select comes with its own collection of options, as shown in Figure 1-8.
Other windows in Elements, like the Quick Fix and the RAW converter (see Chapter 8) also have toolboxes, but none are as complete as the one in Standard Edit.
Don't worry about learning the names of every tool right now. It's easier to remember what a tool is once you've used it. And don't be concerned about how many tools there are. You probably have a bunch of allen wrenches in your garage toolbox that you don't use more than a couple of times a year, and you'll find that you tend to use certain Elements tools more than others.
Tip
You can activate any tool with a keyboard shortcut, thereby saving a ton of time, since you don't have to interrupt what you're doing to trek over to the Toolbox. To see a tool's shortcut key, hover your mouse over the icon. It's the letter in parentheses in the tooltip's text that pops up.
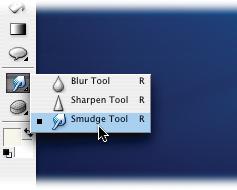
Figure 1-7. Like any good toolbox, the Elements Toolbox has lots of hidden drawers tucked away in it. Many of the Elements tools are actually groups of tools, which are represented by tiny black triangles on the lower-right side of the tool icon. Clicking these triangles brings out the hidden subtools. The little black square next to the Smudge tool means it's the active tool right now.
POWER USERS' CLINICDoubling Up
Old Elements hands: If you prefer the double-columned Toolbox you're used to from previous versions, good news: tear the Toolbox loose from its moorings and collapse it into a double row by grabbing its top edge and pulling it off the Options bar. But keep in mind that a double-columned Toolbox is a bit of a quirky creature. If you put it too close to the left edge of the screen, it springs back to its original form.
In Windows, the Toolbox behavior also changes depending on whether you're in Maximize view.
In the Editor, the two big space-consuming objects hogging the bottom and right side of your screen are called bins. The Photo bin, as shown in Figure 1-9, helps you keep track of which images are currently open.
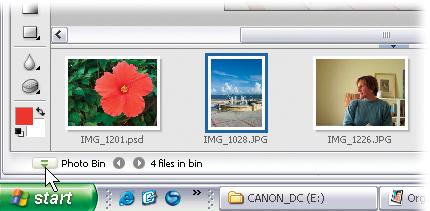
Figure 1-9. The Photo bin runs across the bottom of your screen. It holds a thumbnail for every photo you have open. If you happen to have 73 photos open at once, you can scroll the bin to the left and to the right by clicking on either of the two triangle arrow buttons. To change which photo is active, just click the thumbnail of the one you want and it will open in the Editor.
The Photo bin is a useful feature, but unless you have a gigantic monitor, you might rather have the space for your editing work. To close the bin, click the Minimize button, just to the left of the phrase Photo Bin. (On the Mac: click the red button to close it, or click the green button to minimize it.) One very cool thing about the Windows Photo bin is that even when it's closed, you can use the left and right arrows (the ones to the right of the Minimize button) to rotate through the open photos until you find the one you want
The long wide strip down the right side of your screen is the Palette bin. Elements stores palettes in this bin to let you do things like keep track of what you've done to your photo (Undo History) and apply special effects to your images (Styles and Effects).
It's possible that you'll like the Palette bin, but many people don't. Most people find it wastes too much desktop acreage, and in Elements, you need all the working room you can get. Fortunately, you don't have to keep your Palettes in the bin; you can close the bin and just keep your Palettes floating around on your desktop or minimize them.
You open and close the bin by clicking the Palette Bin button at the bottom of your screen (in Windows) or you can click on the Palette Bin's left edge (anywhere along the thin vertical bar). You can also pull palettes out of the bin by dragging the tab of any palette. Figure 1-10 shows how to make your palettes even smaller once they're out of the bin. Freestanding palettes can also be combined with each other, as shown in Figure 1-11.
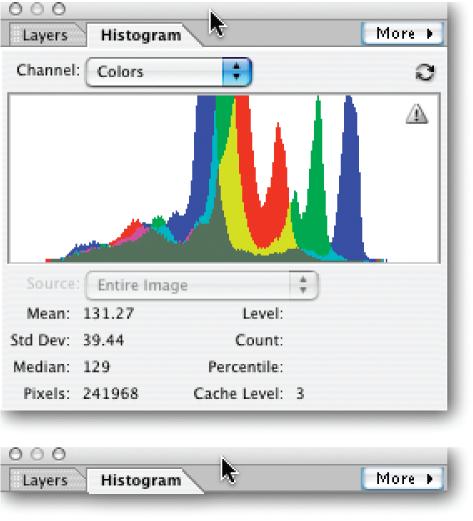
Figure 1-10. You can free up even more space by collapsing your palettes, accordion-style, once they're out of the bin. To do so, double-click the palette's top bar (top). In Windows, you can also toggle back and forth between expanded and contracted views by clicking the palette's Minimize button. On a Mac, you can do the same thing by clicking the palette's green circle. The bottom figure shows a shrunken palette.
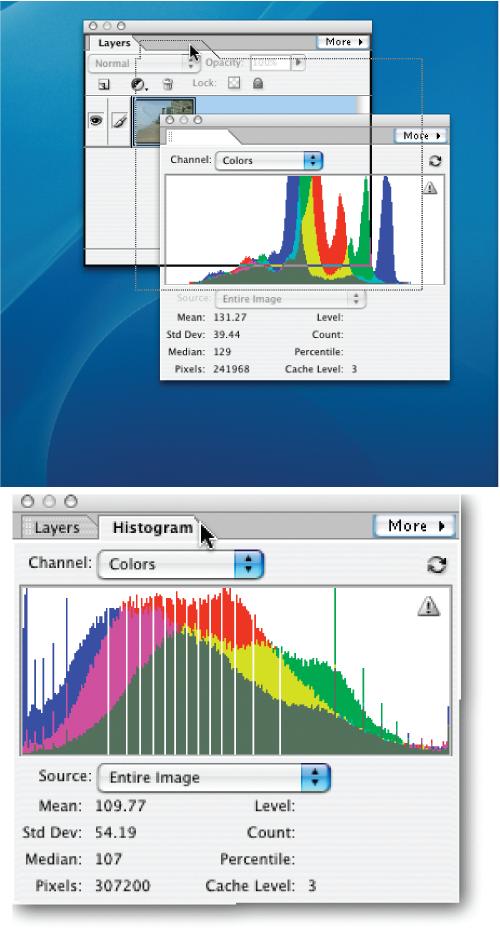
Figure 1-11. You can combine two or more palettes together once you've dragged them out of the bin.Top: The Histogram palette is being pulled into, and combined with, the Layers palette. (Note that as you drag a palette, its name temporarily disappears.) To combine palettes, drag one of them (by clicking on the palette's name tab) and drop it onto the other palette (notice the dark black border that appears on the Layers palette, signaling it's "ready" to accept the Histogram palette).Bottom: To switch from one palette to another after they're grouped, just click the tab of the one you want to use. To remove a palette from a group, just drag it off the palette window. If you want to return everything to how it looked when you first launched Elements, go to Window â Reset Palette Locations.
Only three palettes are in the Palette bin to start with (How To, Layers, and Styles and Effects). To see how many more palettes you actually have, check out the Window menu. When you select a new palette, by choosing it in the Window menu, it may appear in the bin first. If you've hidden the bin, it jumps back out at you with the new palette on display, and you'll have to haul the palette out if you don't want to use the bin. Some palettes, like Undo History, show up already floating and you have to drag them into the bin if you want to corral them there.
Note
If you've been going crazy because you're trying to get rid of one of the bin's original palettes, but every time you close it, it just hops back into the bin, click the More button in the upper-right corner of the palette, and turn off "Place in Palette bin." Next time you close the palette, it goes away and won't return till you choose it again from the Window menu.
Note
Elements 3 has one palette-related quirk. In the Window menu, visible palettes should have a check next to their names. But if you collapse a palette, even though the palette's name stays on your desktop, it is unchecked in the Window menu. If you lose a collapsed palette (they tend to get hidden behind the Options bar when you switch back and forth from Standard Edit to Quick Fix or the Organizer), just select the palette's name again in the list to bring the palette back to the front where you can reach it. If all else fails, choosing Reset Palette Locations in the Window menu puts everything back to its original position.
Wherever Adobe found a stray corner in Elements, they stuck some help into it. You can't move anywhere in this program without being offered some kind of guidance. Here are some of the ways you can summon assistance if you need it:
Options bar. Click the Question Mark button or enter a search term in the Help box, as shown in Figure 1-12.
Tooltips. The text that pops up under your mouse as you move around Elements is linked to the appropriate section in Elements Help. Click a tooltip for more information about whatever your mouse is hovering over.
Dialog box links. Most dialog boxes have links to Elements Help. If you get confused about what the settings for a filter do, for instance, just click the blue link text for a reminder.
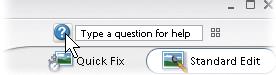
Figure 1-12. Click the Question Mark button to bring up the Elements Help files, or type a search term into the box. In the Help window, you can also browse a topic list and a glossary.
If you need help figuring out where to begin a project, the Editor's How To palette gives instructions for lots of things you're likely to want to do in Elements (Figure 1-13). You can get directions for everything from making a photo look old-fashioned to creating fancy warped text effects.
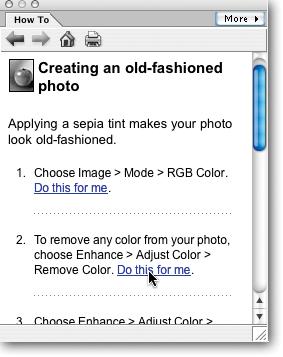
Figure 1-13. When you click "Do this for me" Elements runs the show while you just sit there and watch. It's always helpful to be able to watch an expert at work. (Sometimes, instead of doing the work for you, Elements just gives you very explicit directions for something you have to do yourself.)
Photoshop Elements has a couple of really wonderful features to help you keep from making irrevocable screw-ups: the Undo command and the Undo History palette. After you've gotten used to them, you'll probably wish it were possible to use these tools in all aspects of your life, not just Elements.
No matter where you are in Elements, you can almost always change your mind about what you just did. Just press Ctrl+Z (â-Z) and the last change you made goes away. This works even if you've just saved your photo but only while it's still open. (If you close your picture, your changes are permanent.) Keep pressing Ctrl+Z (â-Z) and you keep undoing your work, step by step.
If you want to redo what you just undid, just press Ctrl+Y (â-Y). These keystroke commands are great for toggling changes on and off while you decide whether you really want to keep them.
In the Standard Edit window, you get even more control over the actions you can undo, thanks to the Undo History palette (Figure 1-14), which you open by choosing Window â Undo History.
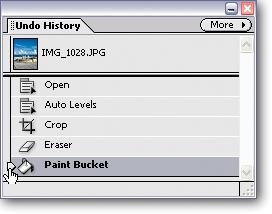
Figure 1-14. For a little time travel, just slide the pointer up and watch your changes disappear one by one. You can only go back sequentially. Here, for instance, you can't go back to Crop without first undoing the Paint Bucket and the Eraser. Slide the pointer forward to redo your work.
This palette holds a list of the changes you've made since the last time you saved your image. Just push the slider up and watch your changes disappear one by one as you go. Undo History even works if you've saved your file: as long as you haven't closed your file, the palette tracks every action you take.
Be careful, though. You can only back up as many steps as you've set Elements to remember. Elements lets you keep track of as many as 1,000 actions. You can regulate this number in Preferences, as explained in Figure 1-15.
As you're probably beginning to see, Elements lets you work in lots of different ways. What's more, most people who use Elements will approach projects in different ways. What works for your neighbor with his pictures may be quite different from how you would choose to work on the very same shots.
However, there's one suggestion you'll hear from almost every Elements veteran, and it's an important one: Never, ever work on your original. Always, always, always make a copy of your image and work on that.
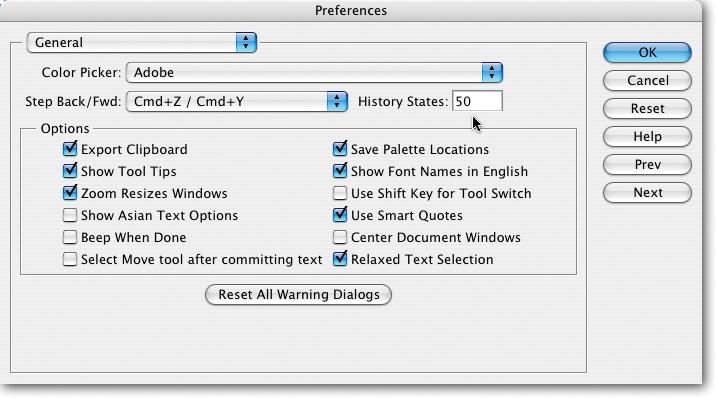
Figure 1-15. You can set the number of steps the Undo History palette remembers in Edit â Preferences â General. Elements initially sets it to 50 by default, but it can be set as high as 1,000. Beware, thoughâremembering even 100 steps may slow your system to a crawl if you don't have a super-powered processor, plenty of memory, and loads of disk space. If Elements runs slowly on your machine, reducing the number of history states it remembers (try 20) may speed things up a bit.
If you have your original safely put away, you can go to town with your edits and know that you can always start over again if you want to.
Adobe recognizes the value of working from a copy. Elements does this automatically when you edit a photo that's cataloged in the Organizer, so that you can always revert to your original. iPhoto does something similar, but without the refinements of the Organizer's versions, which are explained in Figure 1-16.
If you store your photos in the Organizer, you don't need to worry about accidentally trashing your original. If you don't, or if you're using a Mac, the safest approach is to make a copy of your photo before you begin making any changes.
To make a copy of your image in Elements:
Right-click the title bar of the Image window and choose Duplicate (Windows) or go to File â Duplicate (Windows or Mac).
The Image window is the small window within the Editor where your photo appears.
Name the duplicate, and click the close button on the original.
Now the original's safely tucked out of harm's way.
Save the duplicate, using Ctrl+S (â-S).
Choose Photoshop (.psd) as the file format when you save it. (You may want to choose another format after you've read Chapter 3 and understand more about your different format options.)
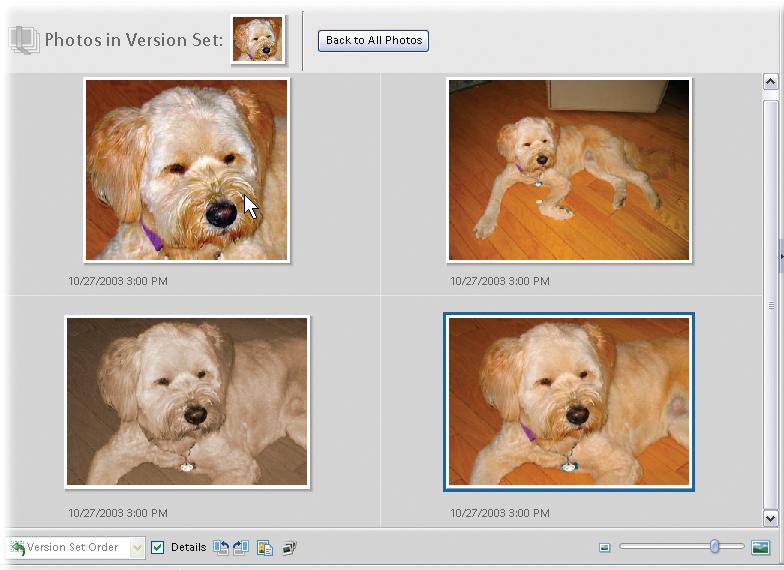
Figure 1-16. In the Windows version of Elements, if you turn on the "Save in Version Set with Original" option, the Organizer will stack up as many copies of the different states of your photo as you want to save. You can choose to open any version at any time. See page 435 for more about Version sets.
Now you don't have to worry about making a mistake or changing your mind, because you can always start over if you want to.
Get Photoshop Elements 3: The Missing Manual now with the O’Reilly learning platform.
O’Reilly members experience books, live events, courses curated by job role, and more from O’Reilly and nearly 200 top publishers.

