Introduction
When Photoshop Elements was first released back in 2001, it became a runaway success. It’s easy to see why: Elements gives people all the tools they need to get the very best from their photographs. It lets you take a ho-hum shot and give it some wow. If you run a graphics studio or a large professional photography business, then you definitely need the full version of Photoshop. But for most people who aren’t creating images for commercial printing, Elements offers a very useful toolkit at an appealing price.
Since 2001, there’s been a new version of the program released almost every year, and each time Adobe has tried to add new features to make the program more valuable. The problem was that just cramming all that extra stuff into the original program eventually started to make things pretty unwieldy, and Elements was already a tad intimidating to real beginners with no background in working with digital images.
So with Elements 11, Adobe introduces a significant re-imagining of the program, designed to make it easier to use. If you’ve used Elements before, you may be taken aback the first time you see the stripped-down design of the new version. Not to worry—all your favorite Editor features are still there, although it may take a little looking around to find them. There are plenty of interesting new features, too. Elements also includes a photo-organizing program (called the Organizer, logically enough), which is where Adobe has made the biggest changes. In fact, the changes to Elements 11 are probably the biggest since the Organizer was first included back in Elements 3. But regardless of whether you’re a complete newbie or have been using Elements for the past decade, this book will quickly get you up to speed on Elements 11.
Why Photoshop Elements?
Adobe Photoshop is the granddaddy of all image-editing programs. It’s the Big Cheese, the industry standard against which everything else is measured. Every photo you’ve seen in a book or magazine in the past 15 years or so has almost certainly passed through Photoshop on its way to being printed. You just can’t buy anything that gives you more control over pictures than Photoshop does.
But Photoshop has some big drawbacks: It’s darned hard to learn, it’s horribly expensive, and many of the features in it are just plain overkill if you don’t work on pictures for a living.
For several years, Adobe tried to find a way to cram many of Photoshop’s marvelous powers into a package that normal people could use. Finding the right formula was a slow process. First came PhotoDeluxe, a program that was lots of fun but came up short when you wanted to fine-tune how the program worked. Adobe tried again with Photoshop LE, which many people felt included all the difficulty of full Photoshop, but still gave too little of what you needed to do top-notch work.
Finally—sort of like “Goldilocks”—Adobe got it just right with Photoshop Elements, which took off like crazy because it offers so much of Photoshop’s power in a program that almost anyone can learn. With Elements, you, too, can work with the same wonderful tools that the pros use. Elements has been around for quite a while now and, in each new version, Adobe has added lots of push-button-easy ways to correct and improve your photos.
What You Can Do with Elements 11
Elements not only lets you make photos look great, but it also helps you organize your photos and gives you some pretty neat projects in which to use them. The program even comes loaded with lots of easy ways to share photos. The list of what Elements can do is pretty impressive. You can use it to:
Enhance photos by editing, cropping, and color-correcting them, including fixing exposure and color problems.
Add all kinds of special effects to images, like turning a garden-variety photo into a drawing, painting, or even a tile mosaic.
Combine photos into a panorama or montage.
Move someone from one photo to another, and even remove people (your ex?) from last year’s holiday photos.
Repair and restore old and damaged photos.
Organize your photos and assign keywords to them so you can search by subject or name.
Add text to images and turn them into things like greeting cards and flyers.
Create slideshows to share with friends, regardless of whether they use Windows, a Mac, or even just a cellphone.
Automatically resize photos so they’re ready to send either as regular email attachments or in specially designed emails.
Create digital artwork from scratch, even without a photo to work from.
Create and share incredible online albums and email-ready slideshows that will make your friends actually ask to see your vacation photos.
Create and edit graphics for websites.
Create wonderful projects like collages and calendars that you can print or digitally share with friends. Scrapbookers—get ready to be wowed.
It’s worth noting, though, that there are still a few things Elements can’t do. While the program handles text quite competently, at least as photo-editing programs go, it’s still no substitute for QuarkxPress, InDesign, or any other desktop-publishing program. And Elements can do an amazing job of fixing problems in photos, but only if you give it something to work with. If your photo is totally overexposed, blurry, and the top of everyone’s head is cut off, there’s a limit to what even Elements can do to salvage it. (C’mon, be fair.) The fact is, though, you’re more likely to be surprised by what Elements can fix than by what it can’t.
What’s New in Elements 11
There are plenty of new features in Elements 11. It would take pages to list all the changes, but here are some of the highlights:
Lighter color scheme. If you’ve been hanging onto your old copy of Elements 5 or earlier because you couldn’t stand the dark color scheme in Elements versions 6 through 10, you’ll be thrilled to know that in Elements 11, Adobe has opted for light gray instead.
Major changes to the Organizer. If you’ve been using the Organizer’s system of tags and categories to manage your photos, you’re in for a pretty wild ride with the new Organizer’s system of People, Places, and Events. Adobe is taking the first steps toward a more automated system of categorizing photos in Elements 11.
No more Photoshop.com. Adobe has eliminated the tie-in to Photoshop.com for backing up and syncing your photos. If you already have images stored there, you can still use your Photoshop.com account via a web browser, but in Elements 11, the only free uploading is to Adobe’s Photoshop Showcase (Editing Your Photos), where you can post your projects to share them but not back up your photos. Instead, Adobe is emphasizing its new program Revel (Editing Your Photos).
Actions panel. For the first time, Elements lets you install and run actions as easily as you can in Photoshop. Actions (The Cookie Cutter Tool) are little scripts, like macros, that automate complicated processes. You still can’t create actions in Elements, but there are thousands of actions available on the Internet, and now it’s much, much simpler to use them.
Updated Refine Edge. This is another popular feature brought over from Photoshop. If you’ve used Elements before, you know how vexing it is to try to extract fuzzy animals or people with flyaway hair from photos without having horrible, cut-out looking edges. Elements 11 includes a more deluxe version of the Refine Edge dialog box (Refining Selection Edges), which makes it easy to get the most complicated fine detail in your selections.
Easier to add extra content. People love to add stuff to Elements, like brushes, layer styles (Adding Layer Styles), actions, and effects (Effects), but for several years it’s been a huge headache to do this. In Elements 11, it’s a snap to add these extras.
New Guided Edits. Elements 11’s Guided Edit mode—where the program walks you through various photo projects and editing tasks—includes a bunch of popular new choices: High Key, Low Key, Vignette, and Tilt-Shift (a.k.a. miniature effect).
New Filters. Elements 11 brings three wonderful new Sketch filters for making photos look like illustrations: Comic, Graphic Novel, and “Pen and Ink” (see Filter Categories). And the new Lens Blur filter lets you create a shallower depth of field in your images (Lens Blur: Creating Depth of Field).
Raw Converter 7. If you shoot your photos in Raw format (The Raw Converter), you’ll be delighted to know that Adobe has finally made the wonderful advances in version 7 of the Raw Converter available in Elements. (Elements still doesn’t have as many features in its Raw Converter as Lightroom 4 and Photoshop do, but now you can use the processes from the new version in the Elements Converter.)
Online Content. In Elements 11, very few of the graphics, album templates, and so on are installed on your computer when you install Elements. Instead, they’re stored online, and you need an Internet connection the first time you use them (once Elements downloads them, you can use them anytime, whether you’re connected to the Internet or not).
Elements vs. Photoshop
You could easily get confused about the differences between Elements and the full version of Adobe Photoshop. Because Elements is so much less expensive, and because many of its more advanced controls are tucked away, a lot of Photoshop aficionados tend to view Elements as some kind of toy version of their program (and probably even more will now, given the stripped-down appearance of Elements 11 the first time you open it). They couldn’t be more wrong: Elements is Photoshop, but it’s Photoshop adapted for use with a home printer and the Web.
The most important difference between Elements and Photoshop is that Elements doesn’t let you work or save in CMYK mode, which is the format used for commercial color printing. (CMYK stands for Cyan, Magenta, Yellow, and blacK. Your inkjet printer also uses those ink colors to print, but it expects you to give it an RGB file, which is what Elements creates. Don’t worry—this is all explained in Chapter 7.)
Elements also lacks several tools that are basic staples in any commercial art department, like the extra color control you can get from Selective Color Adjustment layers and the Pen tool’s special talent for creating vector paths. Also, for some special effects, like creating drop shadows and bevels, the tool you’d use—layer styles—doesn’t have as many settings in Elements as it does in Photoshop. The same holds true for a handful of other Elements tools.
And although Elements is all most people need to create graphics for the Web, it doesn’t come with the advanced tools in Photoshop, which let you do things like automatically slice images into smaller pieces for faster web display. If you use Elements, then you have to look for another program to help with that.
The Key to Learning Elements
Elements may not be quite as powerful as Photoshop, but it’s still a complex program, filled with more features than most people ever use. The good news is that the Quick Fix window (Chapter 4) lets you get started right away, even if you don’t understand every last option Quick Fix presents you with. And you also get Guided Edit mode (Getting Help), which provides step-by-step walkthroughs of some popular editing tasks, like sharpening a photo or cropping it to fit on standard photo paper.
As for the program’s more complex features, the key to learning how to use Elements—or any other program, for that matter—is to focus only on what you need to know for the task you’re currently trying to accomplish.
For example, if you’re trying to use Quick Fix to adjust the color of your photo and crop it, don’t worry that you don’t get the concept of layers yet. You won’t learn to do everything in Elements in a day or even a week. The rest will wait until you need it, so take your time and don’t worry about what’s not important to you right now. You’ll find it much easier to master Elements if you go slowly and concentrate on one thing at a time.
If you’re totally new to the program, then you’ll find only three or four big concepts in this book that you really need to understand if you want to get the most out of Elements. It may take a little time for some concepts to sink in—resolution and layers, for instance, aren’t the most intuitive concepts in the world—but once they click, they’ll seem so obvious that you’ll wonder why they were confusing at first. That’s perfectly normal, so persevere. You can do this, and there’s nothing in this book that you can’t understand with a little bit of careful reading.
The very best way to learn Elements is just to dive right in and play with it. Try all the different filters to see what they do. Add a filter on top of another filter. Click around on all the different tools and try them. You don’t even need to have a photo to do this. See Creating a New File to learn how to make an image from scratch in Elements, and keep an eye out for the many downloadable practice images you’ll find at this book’s companion website, www.missingmanuals.com/cds. Get crazy—you can stack up as many filters, effects, and layer styles as you want without crashing the program.
About This Book
Elements is a cool program and lots of fun to use, but figuring out how to make it do what you want is another matter. Elements’ Help files are very good, but of course you need to know what you’re looking for to use them to your best advantage. (Elements’ Help files are online; you can download a PDF of them from Adobe’s Elements support pages at www.adobe.com/support/photoshopelements.)
You’ll find a slew of Elements titles at your local bookstore, but most of them assume that you know quite a bit about the basics of photography and/or digital imaging. It’s much easier to find good intermediate books about Elements than books designed to get you going with the program.
That’s where this book comes in. It’s intended to make learning Elements easier by avoiding technical jargon as much as possible, and explaining why and when you’ll want to use (or avoid) certain features of the program. That approach is as useful to people who are advanced photographers as it is to those who are just getting started with their first digital cameras.
Note
This book periodically recommends other books, covering topics too specialized or tangential for a manual about Elements. Careful readers may notice that not all of these titles are published by Missing Manual parent O’Reilly Media. While we’re happy to mention other Missing Manuals and books in the O’Reilly family, if there’s a great book out there that doesn’t happen to be published by O’Reilly, we’ll still let you know about it.
You’ll also find instructions throughout this book that refer to files you can download from the Missing Manual website (www.missingmanuals.com/cds) so you can practice the techniques you’re reading about. And in various spots, you’ll find several different kinds of short articles (a.k.a. boxes). The ones labeled “Up to Speed” help newcomers to Elements do things, or they explain concepts with which veterans are probably already familiar. Those labeled “Power Users’ Clinic” cover more advanced topics that won’t be of much interest to casual photographers.
A Note About Operating Systems
This book covers using Elements with both Windows computers and Macs, and you’ll see both platforms represented in the illustrations. (Frankly, you’ll see more Mac screenshots here, simply because some things are easier to read in the Mac version of the program. For example, pop-out menus are more likely to have a white background on a Mac instead of a dark one.) The Editor (the part of Elements where you tweak photos) works exactly the same way regardless of what kind of computer you’re using, but there are some differences in the Organizer and the projects available to you, and those are noted as necessary. Also, most of the keyboard shortcuts you use to run commands are different in Windows and on Macs; page xxii explains how those shortcuts are listed in this book.
Note
Alas, the version of Elements sold in the Mac App Store wasn’t available when this book was written, and certain things are unique about that version, like many of the file paths to the various pieces of the program. If you have the App Store version, head to this book’s Missing CD page at www.missingmanuals.com/cds for info about any differences between your version of the program and the standard version.
So remember: It doesn’t matter which version of the program is shown in the illustrations; unless the book says otherwise, the differences are just slight cosmetic ones, like the fact that you close Mac program windows by clicking a button on their left, whereas in Windows the button is on the right.
Note
Adobe’s video-editing program, Premiere Elements, also uses the Elements Organizer, and if you install both programs, your Photoshop Elements menus will show a lot of Premiere Elements choices, too. These are normally turned off when you install only Photoshop Elements, but if they get turned on by mistake, you can turn most of them off if you don’t care to see them by going to Organizer→Edit→Preferences→Editing/Adobe Elements 11 Organizer→Preferences→Editing. (Appendix B, available at www.missingmanuals.com/cds, explains all the Organizer’s menus. Appendix C, also online, covers the Editor’s menus.)
About the Outline
This book is divided into seven parts, each focusing on a certain kind of task:
Part One. The first part of this book helps you get started with the program. Chapter 1 shows how to navigate Elements’ slightly confusing layout and mish-mash of programs within programs. You’ll learn how to decide where to start from and how to customize Elements so it best suits your working style. You’ll also read about some important keyboard shortcuts, and where to look for help when you get stuck. Chapter 2 covers how to get photos into Elements, the basics of organizing them, and how to open files and create new images from scratch. You’ll also find out how to save and back up images. Chapter 3 explains how to rotate and crop photos, and includes a primer on that most important digital imaging concept—resolution.
Part Two. Chapter 4 shows how to use the Quick Fix window to dramatically improve your photos. Chapter 5 and Chapter 6 cover two key concepts that you’ll use throughout this book: making selections and working with layers.
Part Three. Having Elements is like having a darkroom on your computer. In Chapter 7, you’ll learn how to make basic corrections, such as fixing exposure, adjusting color, sharpening images, and removing dust and scratches. Chapter 8 covers topics unique to people who use digital cameras, like Raw conversion and batch-processing photos. In Chapter 9, you’ll move on to more sophisticated fixes, like using the Clone Stamp to make repairs, making photos livelier by adjusting their color intensity, and adjusting light and shadows in images. Chapter 10 shows you how to convert color photos to black and white, and how to tint and colorize black-and-white photos. Chapter 11 explains how to use Elements’ Photomerge feature to create a panorama from several photos, and to correct perspective problems in images.
Part Four. This part covers the fun stuff: painting on photos and drawing shapes (Chapter 12), using filters and effects to create more artistic looks (Chapter 13), and adding text to images (Chapter 14).
Part Five. Once you’ve created a great image in Elements, you’ll want to share it, so this part is about how to create fun projects like photo books (Chapter 15), how to get the most out of your printer (Chapter 16), how to create files to use on the Web and in email (Chapter 17), and how to make slideshows and share them online (Chapter 18).
Part Six. You can get hundreds of plug-ins and additional styles, brushes, and other nifty tools to customize your copy of Elements and increase its abilities; the Internet and your local bookstore are chock-full of additional info. Chapter 19 offers a look at some of these resources, as well as information about using a graphics tablet with Elements, and suggests some places to turn after you finish this book.
Part Seven. Appendix A helps you get your copy of Elements up and running, and suggests what to do if it starts misbehaving. Appendixes B and C—which you can download from this book’s Missing CD page (see About the Online Resources)—cover all the menu items in the Organizer and Editor, respectively.
For Newcomers to Elements
This book contains a lot of information, and if you’re new to Elements, it can be a little overwhelming. But you don’t need to digest it all at once, especially if you’ve never used any kind of photo-editing software before. So what do you need to read first? Here’s a simple five-step way to use this book if you’re brand new to photo editing:
Read all of Chapter 1.
That’s important for understanding how to get around in Elements.
If your photos aren’t on your computer already, then read about the Photo Downloader in Chapter 2.
The Downloader gets photos from your camera’s memory card into Elements.
If you want to organize your photos, then read about the Organizer (also in Chapter 2).
It doesn’t matter where your photos are right now. If you want to use the Organizer to label and keep track of them, then read Chapter 2.
When you’re ready to edit your photos, read Chapters Chapter 3 and Chapter 4.
Chapter 3 explains how to adjust your view of photos in the Editor. Chapter 4 shows you how to use the Quick Fix window to easily edit and correct photos. Guided Edit (Getting Help) can also be very helpful when you’re just getting started. If you skipped Chapter 2 because you’re not using the Organizer, then go back there and read the part about saving photos (Searching by Metadata) so you don’t lose your work.
When you’re ready to print or share your photos, flip to the chapters on sharing images.
Chapter 16 covers printing, both at home and from online services. Chapter 17 explains how to email photos, and Chapter 18 teaches you how to create slide-shows and post them to the Photoshop Showcase website.
That’s all you need to get started. You can come back and pick up the rest of the info in the book as you get more comfortable with Elements and want to explore more of the wonderful things you can do with it.
The Very Basics
This book assumes that you know how to perform basic activities on your computer like clicking and double-clicking your mouse buttons and dragging objects onscreen. Here’s a quick refresher: To click means to move the point of your mouse or trackpad cursor over an object on your screen, and then to press the left mouse or trackpad button once. To right-click means to press the right mouse button once, which calls up a menu of special features. To double-click means to press the left button twice, quickly, without moving the mouse between clicks. To drag means to click an object and then to hold down the left button while you use the mouse to move the object.
Most onscreen selection buttons are pretty obvious, but you may not be familiar with radio buttons: To choose an option, click the little empty circle next to it.
In Elements, you’ll often want to use keyboard shortcuts to save time, and this book tells you about keyboard shortcuts when they exist (and Elements has a lot). In this book, unless otherwise specified, keyboard shortcuts are always presented as Windows keystroke/Mac keystroke. So if you see a sentence like, “Press Ctrl+S/⌘-S to save your file,” that means that if you use Windows, you should hold down the Control key while pressing the S key, and if you have a Mac, you should hold down the ⌘ key while pressing the S key. There’s one slight exception to this: When you see “right-click/Control-click,” if you have a Mac and a two-button mouse, you can right-click. But if you have a one-button mouse, you can Control-click instead—that means to press the Control key on your keyboard and then press your mouse button once.
If you’re comfortable with basic concepts like these, then you’re ready to get started with this book.
About→These→Arrows
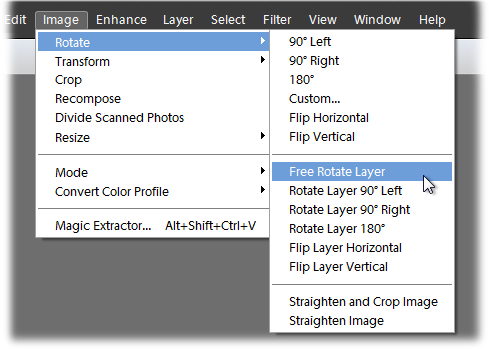
Throughout this book (and the Missing Manual series, for that matter) you see sentences like this: “In the Editor, select Filter→Artistic→Paint Daubs.” This is a shorthand way of helping you find files, folders, and menu items without having to read through excruciatingly long, bureaucratic-style instructions. So the sample sentence above is a short way of saying this: “In the Editor component of Elements, in the menu bar at the top of the screen, click the word ‘Filter.’ In the menu that appears, choose the Artistic section, and then go to Paint Daubs in the pop-out menu.” Figure 1 shows you an example in action.
Mac file paths are shown using the same arrows. Windows file paths, on the other hand, are shown in the conventional Windows style, so if you see, “Go to C:\Documents and Settings\<your user name>\My Documents\My Pictures,” that means you should go to your C drive, open the Documents and Settings folder, look for your user account folder, and then find the My Documents folder. In that folder, open the My Pictures folder that’s inside it.
When there are different file paths for Windows 7, Vista, and Windows XP, you’ll find them all listed in this book. Like keyboard shortcuts, file paths are shown as Windows file path/Mac file path when all versions of Windows use the same file path. Otherwise, all the different versions are specified.
If you’re using a Mac that’s running OS X 10.7 (Lion) or 10.8 (Mountain Lion), there’s one special challenge finding some of the files mentioned in this book; specifically, the ones located in the Library folders. (Figure 2 explains.) Also, if you buy Elements from the Mac App Store, all the files are actually inside the application itself, which means your file paths will be different. (This book covers the version of Elements that was released in September 2012, so you won’t see so much information about App Store–version file paths, since that information wasn’t available when this book was written. Check this book’s Missing CD page at www.missingmanuals.com/cds for updated information after the App Store version is released.)
Note
The keyboard shortcuts given in this book are the official Adobe shortcuts. However, if you have a Mac with an abbreviated keyboard (without a 10-key section on the right), like a laptop keyboard or the smaller Bluetooth keyboards, you need to add the fn key to shortcuts that use the F-keys on the top row of your keyboard. So, for instance, while the shortcut for Full Screen View in the Organizer is ⌘-F11, on a MacBook Pro, you would use fn-⌘-F11.

Note
If you’re using a 64-bit version of Windows, you have two folders labeled Program Files. Windows puts 64-bit programs into the folder simply named Program Files, but Elements, like many programs you may install, is a 32-bit program, and Windows puts 32-bit programs into a folder named Program Files (x86). If you have a folder named Program Files (x86), then that’s where you should always look for Elements’ files. This book includes a reminder note every time this applies, such as, “Go to C:\Program Files [Program Files (x86) if you have a 64-bit system]\Adobe\Elements 11 Organizer.”
About the Online Resources
As the owner of a Missing Manual, you’ve got more than just a book to read. Online, you’ll find example files so you can get some hands-on experience. You can also communicate with the Missing Manual team and tell us what you love (or hate) about the book. Head over to www.missingmanuals.com/cds, or go directly to one of the following sections.
Missing CD
This book doesn’t have a CD pasted inside the back cover, but you’re not missing out on anything. Go to www.missingmanuals.com/cds to download sample files mentioned in this book, as well as a few tutorials and two additional appendixes. And so you don’t wear down your fingers typing long web addresses, this book’s Missing CD page also offers a list of clickable links to the websites mentioned in these pages.
Registration
If you register this book at oreilly.com, you’ll be eligible for special offers—like discounts on future editions of Photoshop Elements 11: The Missing Manual. Registering takes only a few clicks. To get started, type http://oreilly.com/register into your browser to hop directly to the Registration page.
Feedback
Got questions? Need more information? Fancy yourself a book reviewer? On our Feedback page, you can get expert answers to questions that come to you while reading, share your thoughts on this Missing Manual, and find groups for folks who share your interest in Elements. To have your say, go to www.missingmanuals.com/feedback.
Errata
In an effort to keep this book as up to date and accurate as possible, each time we print more copies, we’ll make any confirmed corrections you’ve suggested. We also note such changes on the book’s website, so you can mark important corrections into your own copy of the book, if you like. To report an error or view existing corrections, go to http://missingmanuals.com/library.html, click the title of this book, and then click the “View/Submit Errata” link on the right side of the page that appears.
Safari® Books Online
Safari Books Online is an on-demand digital library that lets you easily search over 7,500 technology and creative reference books and videos to find the answers you need quickly.
With a subscription, you can read any page and watch any video from our library online. Read books on your cellphone and mobile devices. Access new titles before they’re available for print, and get exclusive access to manuscripts in development and post feedback for the authors. Copy and paste code samples, organize your favorites, download chapters, bookmark key sections, create notes, print out pages, and benefit from tons of other time-saving features.
Get Photoshop Elements 11: The Missing Manual now with the O’Reilly learning platform.
O’Reilly members experience books, live events, courses curated by job role, and more from O’Reilly and nearly 200 top publishers.

