Chapter 1. Photoshop CS5 Guided Tour
Photoshop CS5 is bursting with amazing features that’ll help you edit and create your very own digital masterpieces. If this is your first foray into the world of Photoshop, all these features will be new to you. If you’re an experienced pixel pusher, there are some surprises waiting for you, too. If you skipped the previous version and are leapfrogging from Photoshop CS3 to CS5, Adobe introduced major changes to the work environment in CS4, and while these changes make Photoshop easier to use, they take some time to get used to.
Throughout the rest of this book, you’ll dive much deeper into specific tools and techniques, but this chapter gives you a good, solid foundation on which to build your Photoshop skills. You’ll learn how to work with the Application Frame and Application bar, plus how to wrangle document windows and panels. Once you’ve gotten them placed just right, you’ll learn how to save your setup as a custom workspace. If you’re a beginner, the section on using Undo commands and history states will show you how to fix mistakes and back out of almost anything you’ve done. Finally, you’ll learn how to fine-tune Photoshop’s behavior through preferences and built-in tools (called presets) that let you personalize your work environment even more.
Meet the Application Frame
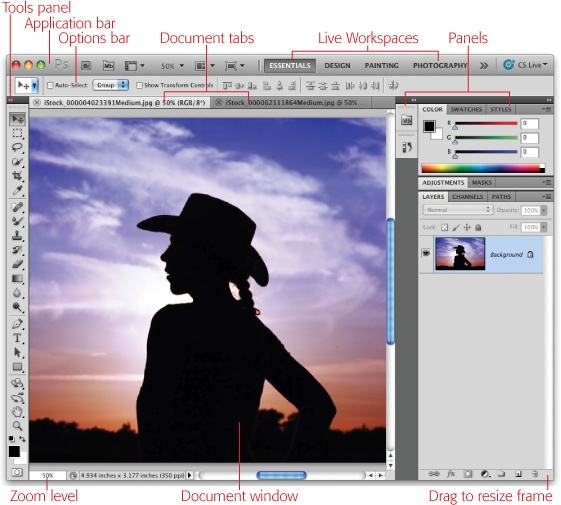
When you launch Photoshop CS5 for the first time, you’ll be greeted by the Application Frame shown in Figure 1-1 (although if you’re restarting Photoshop after deleting your preferences as described in Appendix B, online, it’ll be turned off). It’s part of Adobe’s effort to consolidate your work environment and lessen clutter; the frame confines all things Photoshop to a single resizable and movable window. You can grab the whole mess—documents, panels, and all—and move it to one side of your screen (or better yet, to another monitor) so it’s out of the way. If you open more than one document, they’re displayed in handy tabs that you can rearrange by dragging.
Tip
If you need to do some work on your desktop or in another program, you can temporarily hide Photoshop. On a Mac, press ⌘-H or click the yellow dot at the top left of the Application Frame. Your workspace disappears, but Photoshop keeps running in the background. To bring it back to the forefront, click its shrunken icon in the Dock. In Photoshop CS5, the first time you press ⌘-H, a dialog box appears asking if you’d like to reassign that keyboard shortcut to hide Photoshop instead of hiding selections. (To change it back, you can edit your keyboard shortcuts, as explained in the box on Customizing Keyboard Shortcuts and Menus, or delete Photoshop’s preferences as described in Appendix B, online at www.missingmanuals.com/cds.)
If you’re on a PC, you can minimize the program by clicking the upper-right – sign button and Windows tucks the program down into your taskbar. To get it back, click its taskbar icon.
The Application Bar
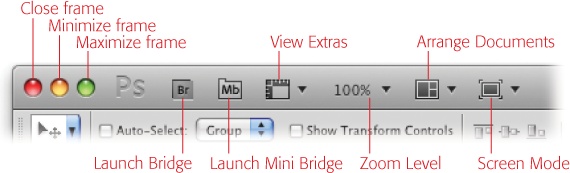
At the very top of the Application Frame is a row of tools called the Application bar (Figure 1-2), which gives you one-click access to handy stuff like Adobe Bridge (covered in Appendix C, online), extras (guides, grids, and rulers), zoom controls, and more. The real gems, though, are the Arrange Documents menu and the new Live Workspace buttons (shown in Figure 1-1 and discussed on Customizing Your Workspace). The Arrange Documents menu lets you organize your open documents so you can see them all at one time, which is handy for evaluating before and after versions of images or just managing a bunch of open windows (more on that in Chapter 2!). A new option in CS5 is the CS Live button on the far right, which gives you access to the new CS Review system mentioned back on page 4.
Note
In CS4, the Hand and Rotate Canvas tools also roosted in the Application bar. However, in CS5 Adobe took them out in order to make room for the new Live Workspace buttons shown in Figure 1-1. Flip to Customizing Your Workspace for to learn how to customize your workspace.
The Almighty Options Bar
Lording over your document window is the Options bar, which lets you customize the settings for nearly every tool in the Tools panel (see Figure 1-3 top). This bar automatically changes to show settings related to the tool you’re currently using. Unfortunately, its labels are fairly cryptic, so it can be hard to figure out what the heck all that stuff does. Luckily, you can hover your cursor over any item to see a little yellow pop-up description called a tooltip (you don’t need to click—just don’t move your mouse for a couple seconds). When you move your cursor away from the item, the tooltip disappears.
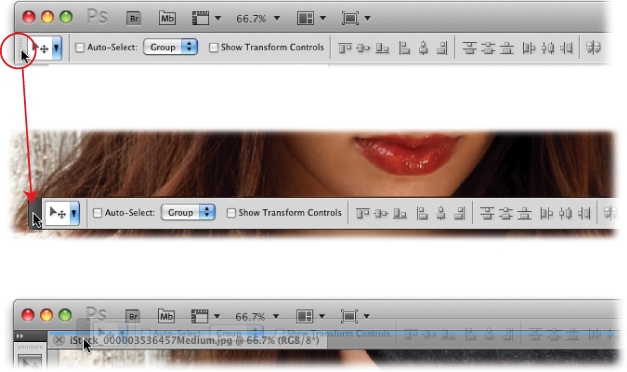
When you first install Photoshop, the Options bar is perched near the top of the screen, beneath the Application bar. If you’d rather put it somewhere else, grab its left end and drag it wherever you want, as shown in Figure 1-3 middle. If you decide to put it back later (also called docking), drag it to the top of the screen (see Figure 1-3 bottom).
Swapping Screen Modes
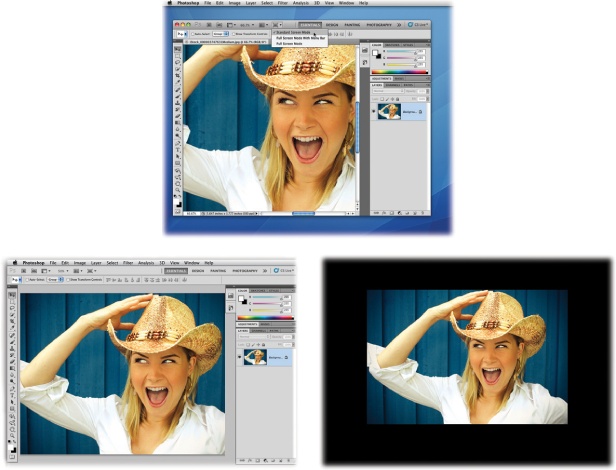
Photoshop also includes three different screen modes for your document-viewing pleasure. Depending on what you’re doing, one will suit you better than another. For example, you can make your image take up your whole screen (with or without the Application and Options bars), you can hide your panels, and so on (see Figure 1-4).
It’s a snap to jump between modes—just press the F key repeatedly (as long as you’re not using the Type tool—if you are, you’ll type a bunch of fs) or use the Screen Mode pop-up menu in the Application bar (see Figure 1-2). Your choices are:
Standard Screen Mode is the view you see when you launch Photoshop for the first time. This mode shows menus, the Application Frame, the Application bar, panels, and document windows. Use this mode when the Application Frame is active and you need to scoot the whole Photoshop application—windows and all—around on your monitor.
Full Screen Mode With Menu Bar completely takes over your screen, puts your currently open document in the center on a gray background, and attaches any open panels to the left and right edges of your monitor. This mode is great for day-to-day editing because you can see all your tools and menus without being distracted by the files and folders on your desktop. The gray background is also easy on your eyes and a great choice when color-correcting your images (a brightly colored desktop can affect your color perception).
Full Screen Mode hides all of Photoshop’s menus and panels, centers the document on your screen, and puts it on a black background. This mode is great for displaying and evaluating your work or for editing distraction-free. And the black background really makes images pop off the screen!
Tip
You can free up precious screen real estate by pressing the Tab key to hide menus and panels. This trick is a great way to get rid of distracting elements when you’re editing, especially if you’ve got a small monitor. Pressing Shift-Tab hides everything except the Tools panel, Options bar, and Application bar. To show the panels again, press Tab or mouse over to the edge of your monitor where the panels should be; when you move your mouse away from the panels, they’ll disappear again.
Customizing Your Workspace
The folks at Adobe understand that once you arrange your panels just so, you want to keep ‘em that way. That’s why Photoshop lets you save your setup as a workspace using the Workspace menu at the top right of the Application bar. Once you’ve created a workspace, it appears as a clickable button in the Application bar (see Figure 1-5). To swap workspaces, click one of the new Live Workspace presets (built-in settings) to make Photoshop rearrange your panels accordingly. Straight from the factory, you see four clickable preset buttons: Essentials, Design, Painting, and Photography; however, if you click the Workspace menu—or drag the little dividing line next to Essentials leftward—you’ll see even more.

To save your own custom workspace, first get things looking the way you want. (The next section has details on working with panels.) Next, click the Workspace menu and choose New Workspace (it’s at the bottom of the menu). In the resulting dialog box, give your workspace a meaningful name and turn on the options for the features you want to include. You can pick from panel locations, keyboard shortcuts, and menu settings; just be sure to turn on the options for all the features you changed or they won’t be included in your custom workspace. After you click Save, your custom workspace shows up as the leftmost option in the Live Workspaces area, as well as in the Workspace menu.
If you’ve created some custom workspaces that you’ll never use again, you can send ‘em packin’. First, make sure the workspace you want to delete isn’t active. Next, choose Delete Workspace from the Workspace menu and, in the resulting Delete Workspace dialog box, pick the offending workspace and then click Delete. Photoshop will ask if you’re sure, so you have to click OK to finish it off.
Working with Panels
The far right side of the Application Frame is home to a slew of small windows called panels (years ago they were called palettes), which let you work with commonly used features like colors, adjustments, layers, and so on. Panels don’t have to live alone; you can link them together in groups, which you can then move around. Feel free to organize the panels however you like and position them anywhere you want. Panels can be free floating or docked (attached) to the left, top, or right side of your screen.
Photoshop starts you off with three docked panel groups filled with the panels it thinks you’ll most likely need first. The first group includes the Colors, Swatches, and Styles panels; the second group includes Adjustments and Masks; and the third includes Layers, Channels, and Paths (there’s more on docked panels coming up shortly).
To work with a panel, select it by clicking its tab. Panels are like Silly Putty—they’re incredibly flexible. You can collapse, expand, move, and resize them or swap ‘em for other panels (the Windows menu lists all the panels in Photoshop). Here’s how:
Collapse or expand panels. If the panels are encroaching on your editing space, you can shrink them both horizontally and vertically so they look and behave like buttons (see Figure 1-6). To collapse a panel horizontally into a button nestled against the side of another panel (or the edge of your screen), click the tiny double arrow in its top-right corner (click this same button again to expand the panel). To collapse a panel vertically against the bottom of the panel above it, double-click a blank spot in the dark gray area near the panel’s tab to make it roll up like a window shade (double-click it again to roll it back down). To adjust a panel’s width, hover your cursor over its left edge and, when your cursor turns into a double-headed arrow, drag left or right to make the panel bigger or smaller. Collapsing and expanding panel groups works exactly the same way.
Figure 1-6. Here you can see the difference between expanded (left) and collapsed (right) panels. Double-click the medium gray bar at the top of a panel to collapse it vertically (circled on the left), rolling it up like a window shade; double-click the bar again to expand it. You can also collapse a panel horizontally by clicking the double arrows at the top right of the panel (circled, right), at which point it turns into a small square button.Note
In Photoshop CS4, you accomplished this panel collapsing and expanding business with a single-click; in CS5, it takes a double-click. Flip back to What’s New in Photoshop CS5 to learn why.
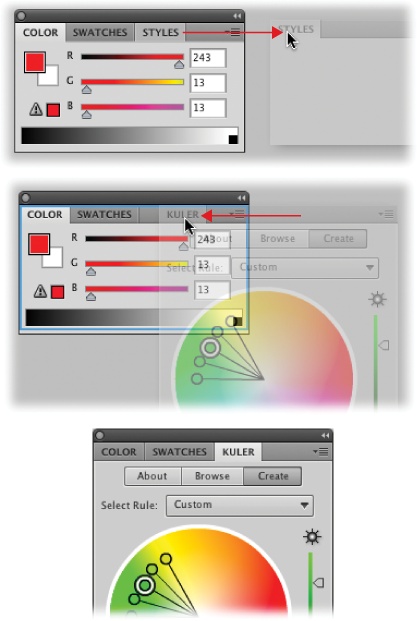
Modify panel groups. As mentioned earlier, Photoshop clumps frequently used panels into panel groups. If you don’t use a certain panel in a group, you can replace it with one you do use. To remove a panel, click its tab and drag it out of the panel group to a different area of your screen (see Figure 1-7 top); then click the tiny circle in the panel’s top-left corner to close it. (On a PC, click the X button in the panel’s top-right corner instead.) Don’t worry—the panel isn’t gone forever; if you want to reopen it, simply choose it from the Windows menu.
To add a panel to a group, first make sure the panel is open (if not, select it from the Windows menu). Then grab the top of the panel near its tab and drag it into the group you want to add it to; when you see a blue outline appear around the panel group, release your mouse button (see Figure 1-7 middle).
Figure 1-7. Top: You can remove panels you don’t use to free up space. For example, if you never use the Styles panel (and you probably won’t use it much), drag it out of the panel group and close it. Middle: When you’re dragging a panel into a panel group, wait until you see a blue line around the inside of the group before you release your mouse button. Here the Kuler panel is being added to a panel group. Bottom: When you release your mouse button, the new panel becomes part of the group. To rearrange panels within a group, drag their tabs left or right.Dock and undock panels. The first time you open Photoshop, it docks three sets of panel groups to the right side of your screen (or Application Frame). But you’re not stuck with your panels glued to this spot; you can set them free by turning them into floating panels. To liberate a panel, grab its tab, pull it out of the group it’s in, and then move it anywhere you want. When you let go of your mouse button, the panel appears where you put it—all by itself.
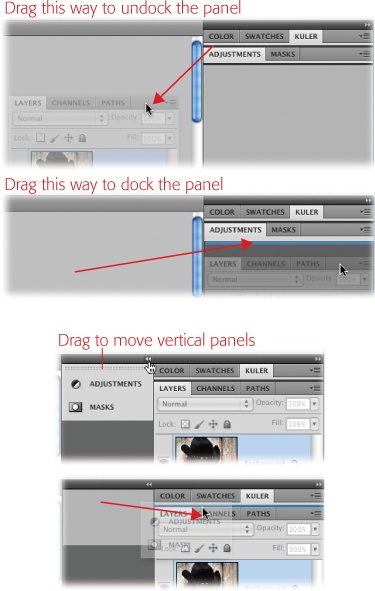
To undock a whole panel group, click an empty spot in the group’s tab area and drag it out of the dock (Figure 1-8 top). Once you release your mouse button, you can drag the panel group around by clicking the same empty spot in the tab area. Or, if the group is collapsed, click the tiny dotted lines at the top of the group, just below the dark gray bar (Figure 1-8 bottom). To dock the panel (or panel group) again, drag it back to the right side of your screen.
Figure 1-8. Top: To undock a panel or panel group, grab a free area to the right of the tabs at the top of the panel and drag it somewhere else on your screen. To dock it again, drag it to the right side of your screen—on top of the other panels. When you see a thin blue line appear where you want the panel or group to land, release your mouse button. Bottom: You can move vertically collapsed panels in the same way, but you grab them by the row of tiny dots that appears at the top (shown here).Getting the hang of undocking, redocking, and arranging panels takes a little practice because it’s tough to control where the little buggers land. When the panel you’re dragging is about to join the dock area at the right side of your screen (or a different panel group), a thin blue line appears showing you where the panel or group will go. Unfortunately, the line can be tough to spot because it’s so thin and light colored.

Tip
If the thin blue highlight lines are hard to see when you’re trying to group or dock panels, try dragging the panels more slowly. When you drag the panel into a group or dockable area, the blue highlight hangs around longer and the panel itself becomes momentarily transparent.
Using the Tools Panel
One of the panels you’ll frequent the most is named Tools (Figure 1-9 left); it serves as home base for all of Photoshop’s editing tools. When you first launch the program, you’ll see the Tools panel on the left side of your screen, but you can drag it anywhere you want by clicking the double row of dots near its top (Figure 1-9 right).
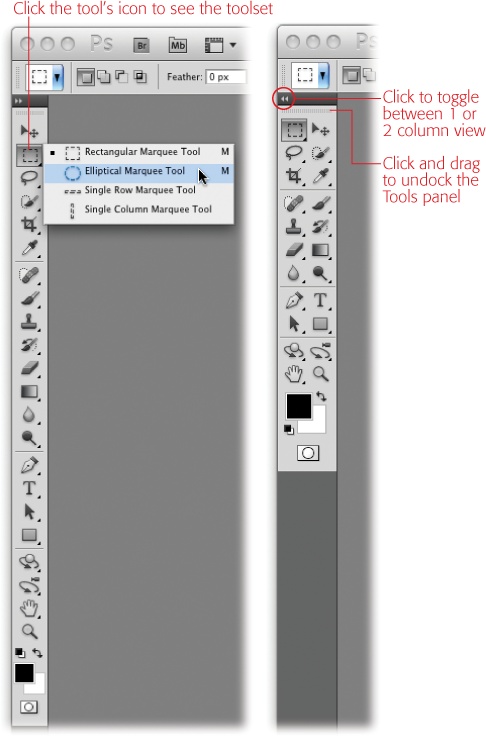
Once you expand a toolset, you’ll see the tool’s keyboard shortcut listed to the right of its name. These shortcuts are great timesavers because they let you switch between tools without moving your hands off the keyboard. To access a tool that’s hidden deep within a toolset, add the Shift key to the tool’s shortcut and you’ll cycle through all the tools in that toolset. For example, to select the Elliptical Marquee tool, press Shift-M repeatedly until that tool appears in the Tools panel.
Tip
If you need to switch tools temporarily—for a quick edit—you can use the spring-loaded tools feature. Just press and hold a tool’s keyboard shortcut to switch to that tool and then perform your edit. As soon as you release the key, you’ll jump back to the tool you were using before. For example, if you’re painting with the Brush and suddenly make an error, press and hold E to switch to the Eraser and fix your mistake. Once you release the E key, you’re back to using the Brush tool. Sweet!
For an overview of all the tools in this panel, check out Appendix D, online. For a quick reminder of what each tool does, hover your cursor over its icon for a couple of seconds and Photoshop displays a handy tooltip that includes the tool’s name and keyboard shortcut (you have to keep your mouse perfectly still).
Foreground and background color chips
Photoshop can handle millions of colors, but its tools let you work with only two at a time: a foreground color and a background color. Each of these is visible as a square color chip near the bottom of the Tools panel (in Figure 1-9 they’re black and white, respectively). Photoshop uses your foreground color when you paint or fill something with color. It uses your background color to do things like set the second color of a gradient (a smooth transition from one color to another, or to transparency) and erase parts of a locked Background layer (Restacking Layers); it’s also helpful when you’re running special effects like the Clouds filter (Render). In other words, the foreground color is where most of the action is. If you want to change either color, click its color chip once to make Photoshop open the Color Picker (Choosing Individual Colors), which lets you select another color for that particular color chip. To swap your foreground and background colors, click the double-headed arrow just above the two chips or press X. (Remember this shortcut; it’s extremely handy when you work with layer masks, which are discussed in Chapter 3.)
Colors
In the upper-right part of your screen is the Color panel, which also displays your current foreground and background color chips. This panel lets you pick a new color for either chip without having to open the just-mentioned Color Picker (which means Photoshop won’t pop open a big dialog box that hides part of your image). The Color panel is discussed in Chapter 12 on The Color Panel.
Tip
If you’re using the Brush tool, you can summon Photoshop CS5’s new onscreen Color Picker (Painting from Scratch). Instead of being inside a dialog box, it appears to sprout from within your image! To see it for yourself, press B to grab the Brush tool and then press and hold Ctrl-Option-⌘ (right-click+Alt+Ctrl on a PC).
Swatches
The Swatches panel holds miniature samples of colors, giving you easy access to them for use in painting or colorizing your images. This panel also stores a variety of color libraries like the Pantone Matching System (special inks used in professional printing). You’ll learn all about the Swatches panel in Chapter 12 on The Swatches Panel.
Styles
Styles are special effects created with a variety of layer styles (Layer Styles). For example, if you’ve created a glass-button look by using several layer styles, you can save the whole lot of ‘em as a single style—which means you can apply it with a single click (instead of adding each layer style individually). You can also choose from tons of built-in styles; they’re all discussed starting on Using the Styles Panel.
Adjustments
The Adjustments panel gives you one-stop access to all of Photoshop’s Adjustment layers, as well as their various presets. Instead of making color and lighting changes to your original image, you can use Adjustment layers to make the change on a separate layer, giving you all kinds of editing flexibility and keeping your original image out of harm’s way. They’re explained in detail in Chapter 3 (The Layers Panel) though you’ll see ‘em used throughout this book.
Masks
This panel lets you create and fine-tune layer masks. You’ll dive headfirst into masks in Chapter 3 (Layer Masks: Digital Masking Tape), but, for now, you can think of them as digital masking tape that lets you hide the contents of a layer, whether it’s an adjustment of some sort (a color or lighting change) or parts of an image. This panel also gives you access to several ways to fine-tune a mask once you’ve created it.
Layers
The Layers panel is the single most important panel in Photoshop. Layers let you work with your images as if they were a stack of transparencies, so you can create one image from many. By using layers, you can resize, adjust the opacity, and add layer styles to each item independently. Understanding layers is the key to Photoshop success, and you’ll learn all about them in Chapter 3.
Channels
Channels are where Photoshop stores the color information your images are made from, whether that’s RGB (red, green, blue), CMYK (cyan, magenta, yellow, black), grayscale, and so on. Channels are extremely powerful, and you can use them to edit the individual colors in your image, which is helpful in sharpening images, creating selections (telling Photoshop which part of an image you want to work with), and so on. Chapter 5 has the scoop on channels.
Paths
Paths are the outlines you make with the Pen and Shape tools. But these aren’t your average, run-of-the-mill lines—they’re made up of points and paths instead of pixels, so they’ll always print perfectly crisp. You can also make them bigger or smaller without losing any quality. You’ll learn all about paths in Chapter 13.
Navigator
Think of the Navigator panel as a map. It displays a mini version of your image with a frame around the area you’re currently zoomed in on. You can use this panel to move around in your document and change your zoom level. The Navigator panel is especially useful when you’re working with huge images and you’re zoomed in to work on fine details. To see it in action, flip to Chapter 2, Zooming with the Navigator Panel.
Histogram
A histogram is a mountainous-looking graph that represents the color and brightness info contained in your image. The left side of the graph shows how much of the image falls into the darkest range of colors (shadows), the far right shows the lightest range (highlights), and the area in the middle represents colors in between (midtones). Histograms are crucial when you’re color-correcting images, and they’re discussed at length in Chapter 9, beginning on Using Levels.
Info
The Info panel is your command center for general info about the image you’re working on. It shows you the color values of certain pixels, your cursor’s location within the document, image size, and other useful bits of, well, image info. It changes on the fly to show info that relates to the currently selected tool and gives you a handy tip about using that tool (provided you have that option turned on). You can find out more on pages 401 and 404.
The Power of Undo
Thankfully, Photoshop is extremely forgiving: It’ll let you back out of almost anything you do, which is muy importante when you’re first learning.
You’ve got several ways to retrace your steps, including the lifesaving Undo command—just choose Edit→Undo or press ⌘-Z (Ctrl+Z on a PC). Unfortunately, the Undo command lets you undo only the last edit you made.
If you need to go back more than one step, use the Step Backward command—choose Edit→Step Backward or press ⌘-Option-Z (Ctrl+Alt+Z on a PC). Out of the box, this command lets you undo the last 20 things you did, one at a time. If you want to go back even further, you can change that number by digging into Photoshop’s preferences, as the next section explains. You can step forward through your edit history, too, by choosing Edit→Step Forward or ⌘-Shift-Z (Shift+Ctrl+Z on a PC).
Note
Photoshop lets you undo up to 20 changes, back to the point when you first opened the document, meaning you can’t close a document and then undo changes you made before you closed it.
Changing How Far Back You Can Go
If you think you might someday need to go back further than your last 20 steps, you can make Photoshop remember up to 1,000 steps by changing the program’s preferences. Here’s how:
Open the Preferences dialog box.
On a Mac, choose Photoshop→Preferences and then, in the resulting dialog box, click Performance in the left-hand column to see the history preferences.
On a PC, choose Edit→Preferences and, from the resulting submenu, choose Performance.
Look for the History States field in the upper right corner of the Preferences dialog box and then pick the number of Undo steps you want Photoshop to remember.
You can enter any number between 1 and 1,000. While increasing the number of history states might help you sleep better, doing so means Photoshop has to keep track of that many versions of your document, which requires memory and processing power. If you increase this setting and notice that the program is running like molasses, try lowering it.
Turning Back Time with the History Panel
The History panel is like your very own time machine. Whereas the Undo and Step Backward commands let you move back through changes one step at a time, the History panel (see Figure 1-10) kicks it up a notch and lets you jump back several steps at once. (You can step back through as many history states as you set in Photoshop’s preferences.) The History panel is much quicker than undoing a long list of changes one by one, and it gives you a nice list of exactly what you’ve done to your image—in chronological order from top to bottom—letting you pinpoint the exact state you want to jump back to. You can also take snapshots of your image at various points in the editing process to make it easier to jump back to the state you want (as explained in a moment).
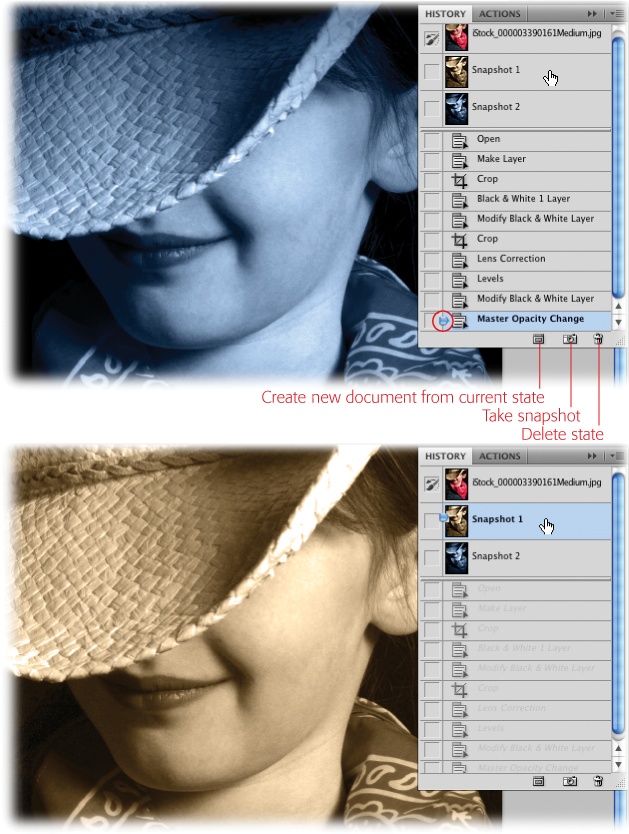
After you make a few changes to your image, pop open the History panel by choosing Window→History to see a list of everything you’ve done to the image, including opening it. To jump back in time, click the step you want to go back to and Photoshop returns your image to the way it looked at that point. The tiny pointer in the panel’s left column (circled in Figure 1-10, top) shows which step you selected (and the step itself is highlighted). If you stepped back further than you meant to, just pick a more recent step in the list.
If you’d like to see a thumbnail preview at the top of the History panel showing what your image looks like every time you save your document, choose History Options from the History panel’s menu, and then turn on Automatically Create New Snapshot When Saving. Clicking the thumbnail is a fast and easy way to jump back to the last saved version of your document without having to close and reopen it.
Tip
You can also get back to the last saved version of your document by choosing File→Revert (Revert Command).
Taking snapshots of your image along the way lets you mark key points in the editing process. A snapshot is more than a preview of your image because it also includes all the edits you’ve made up to that point. Think of snapshots as milestones in your editing work: When you reach a critical point that you may want to return to, take a snapshot so you can easily get back to that particular version of your document. To take a snapshot, click the little camera icon at the bottom of the History panel (shown in Figure 1-10). Photoshop adds the snapshot to the top of the panel, just below the saved-state thumbnail. The snapshots you take appear in the list in the order you took them.
Note
History states don’t hang around forever: As soon as you close your document, they’re history (ha!). If you think you’ll ever want to return to an earlier version of your document, use the “Create new document from current state” button at the bottom of the History panel. That way, you’ve got a brand-new document to return to so you don’t have to recreate it.
The History Brush
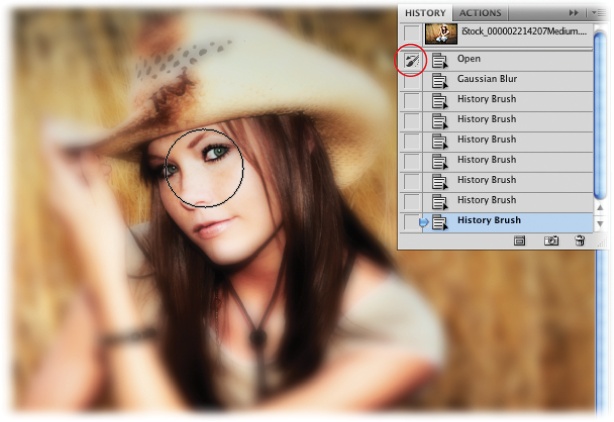
The History Brush takes the power of the History panel and lets you focus it on specific parts of your image. Instead of sending your entire image back in time, you can use this brush to paint your edits away selectively, revealing the previous state of your choosing. For example, you could blur the heck out of a portrait with the Gaussian Blur filter (Skin Softeners) and then use the History Brush to revert to the original, sharp version of your subject’s face, as shown in Figure 1-11. Of course, you paint away other edits, too, like color changes, filter effects, or any other changes you made in between.
Note
The Art History Brush works similarly, but it adds bizarre, stylized effects as it returns your image to a previous state, as shown in the box on The Art History Brush.
Here’s how to use the History Brush to undo a serious Gaussian Blur you’ve applied:
Open an image—in this example, a photo of a person—and run the Gaussian Blur filter.
You’ll learn all about opening images on Opening an Existing Document, but, for now, choose File→Open and then navigate to where the image lives on your computer. Then choose Filter→Blur→Gaussian Blur. (Chapter 15 tells you all about using filters.)
In the resulting dialog box, enter a radius of 20 and then click OK.
Depending on the size of your image, this setting blurs your image pretty severely, giving you a lot to undo with the History Brush.
Grab the History Brush by pressing Y and then choose a brush from the Options bar.
Once you’ve grabbed the History Brush, hop up to the Brush Preset picker in the Options bar and pick a large, soft-edged brush (one that’s pretty big and blurry around the edges). You’ll learn about brushes in Chapter 12.
Open the History panel (choose Window→History) and then click a saved state or snapshot.
This is where you pick which version of the image you want to go back to. Since all you’ve done is open the image and run the Gaussian Blur filter, choose the Open state. Just click within the panel’s left-hand column next to that state to pick it (you’ll see the History Brush’s icon appear in the column).
Mouse over to your image and paint over the person’s eyes to reveal the unblurred eyes of the original image.
If you keep painting in the same place, you’ll expose more and more of the original image (it’s a gradual change). For example, a quick swipe over the eyes reveals traces of the original while a good scrubbing back and forth in one area reveals the original in its full glory.
As you can see, you can use the History Brush to easily undo anything you’ve done; just pick the state you want to revert to in the History panel and then paint away!
Revert Command
If you’ve taken your image down a path of craziness from which you can’t rescue it by using Undo or the History panel, you can revert back to its most recent saved state by choosing File→Revert. This command opens the previously saved version of your image, giving you a quick escape route back to square one.
Tweaking Photoshop’s Preferences
As you learned earlier in this chapter, Photoshop is pretty darn customizable. In addition to personalizing the way your tools behave and how your workspace looks, you can make lots of changes using the program’s preferences, which control different aspects of Photoshop and let you turn features on or off, change how tools act, and fine-tune how the program performs on your computer.
To open the Preferences dialog box, choose Photoshop→Preferences (Edit→Preferences→General on a PC), or press ⌘-K (Ctrl+K). When you choose a category on the left side of the dialog box, you see tons of settings related to that category appear on the right. In the following pages, you’ll get an idea of the kind of goodies each category contains.
General
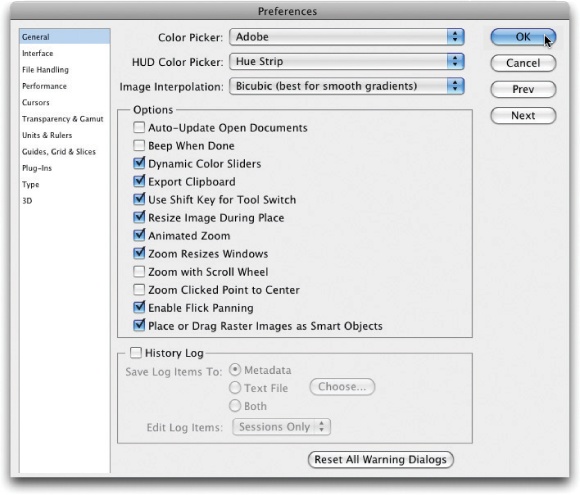
The General section in the Preferences dialog box (Figure 1-12) is a sort of catchall for preferences that don’t fit anywhere else. Most of these options are either self-explanatory (Beep When Done, for example) or covered elsewhere in this book. A few, however, are worth taking a closer look at.
Unless you tell it otherwise, Photoshop displays the Adobe Color Picker (see Choosing Individual Colors) anytime you choose a color. If you’re more comfortable using your operating system’s color picker instead, you can select it from the Color Picker pop-up menu. If you download and install third-party color pickers like Painter’s Picker (Choosing Individual Colors), they show up in this menu, too. However, since the Adobe Color Picker is designed to work with Photoshop and all its built-in options, using another color picker may mean losing quick access to critical features like Color Libraries (The Eyedropper Tool).
Note
Trashing Photoshop’s preferences file can be a useful troubleshooting technique. Download Appendix B, online, for step-by-step details.
Note
Photoshop CS5 has two new options in the General section: Pop-up menu control over the new Heads Up Display (HUD) Color Picker that you’ll learn about on Painting from Scratch, and the option to “Place or Drag Raster Images as Smart Objects”. As you’ll learn on Using Smart Objects, you’ll want to leave the latter option turned on for good!
Another notable option in this dialog box involves a couple of cool features called animated zoom and flick-panning (both covered in Chapter 2). If your computer is running at a snail’s pace, try turning off one or both features by turning off their checkboxes (both features can really tax slower video cards).
Interface
The Interface preferences control how Photoshop looks on your screen. You can squeeze a little more performance out of slower computers by setting the Border pop-up menus at the top of the dialog box to None. That way, Photoshop won’t waste any processing power generating those pretty drop shadows around your images or around the Photoshop window itself.
Also, if you’re familiar with all of Photoshop’s tools and don’t care to see the little yellow tooltips that appear when you hover over tools and field labels (The Almighty Options Bar), turn off the Show Tool Tips checkbox in the middle of the dialog box below the pop-up menus. If you’d like new documents to open in separate windows instead of in new tabs, turn off the “Open Documents as Tabs” checkbox.
Note
If you use Photoshop on a Mac laptop, there’s a new setting in the Interface section that’ll make you jump for joy. Gesture support for Mac trackpads (Zooming In and Out) was a new and coveted feature in CS4; however, with no way to turn it off, folks were constantly zooming and rotating their canvases with their trackpads by accident. The only fix was to download a plug-in to disable it and few people even knew that existed. Happily, all you have to do in CS5 is turn off the Enable Gestures checkbox in the Interface preferences. Yay!
File Handling
The File Handling settings control how Photoshop opens and saves files. If you’re a Mac person and you plan on working with images that’ll be opened on both Macs and PCs, make sure Append File Extension is set to Always and that Use Lower Case is turned on. These settings improve the chances that your files will open on either type of computer without a hassle. (PC users can leave their File Handling settings alone because Mac users can open their Photoshop files just fine.)
Straight from the factory, Photoshop is set to display a dialog box each time you save a file that asks if you want to save your images for maximum compatibility with PSD and PSB files (the native Photoshop format and the format for really big files, respectively; see Opening an Existing Document). Saving your documents with maximum compatibility improves the chances that they can be understood by other programs like Adobe InDesign. If that pesky dialog box annoys you, change the “Maximize PSD and PSB File Compatibility” pop-up menu to Always and you’ll never see the dialog box again (plus you’ll have the peace of mind that comes with knowing your images will play nice with other programs).
Another handy option lies at the very bottom of the dialog box where you can change the number of documents Photoshop remembers in its Recent files menu (found by choosing File→Open Recent). This field is automatically set to 10, but feel free to change it.
Performance
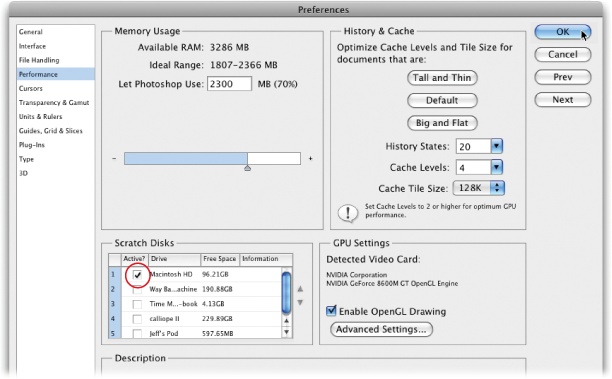
The Performance preferences (Figure 1-13) control how efficiently Photoshop runs on your computer. For example, the amount of memory the program has to work with affects how well it performs. In the Memory Usage section’s Let Photoshop Use field, Photoshop’s factory setting tells the program to use up to 70 percent of your machine’s available memory. If you’re tempted to increase it to 100 percent for better performance, don’t. Other programs need to use your computer’s memory, too, and leaving it set to 70 percent ensures that all of them get their fair share (after Photoshop takes the biggest chunk, of course).
Note
A new feature of Photoshop CS5 is that you can let the program set optimal Cache Levels and Tile Sizes for you. All you have to do is pick the kind of document you work on the most. Your options include “Tall and Thin”, “Default”, and “Big and Flat”.
The Performance category is also where you can change the number of history states that Photoshop remembers, as explained on Changing How Far Back You Can Go. If your computer’s hard drive is running low on space, consider adding another drive that Photoshop can use as a scratch disk—the place where it stashes the bazillions of temporary files it makes when you’re editing images like those various history states. (If you don’t have a separate scratch disk, Photoshop stores those temporary files on your computer’s hard drive, taking up space you could be using for other documents.) When you add a new internal hard drive or plug in an external drive, that drive appears in the Scratch Disks list shown in Figure 1-13. You can give Photoshop the green light to use it by putting a checkmark in the disk’s “Active?” column, and dragging it upward into the first position. If you go this route, Photoshop will run a little zippier because it’ll have two hard drives reading and writing info instead of one!
If you need to squeeze a little more performance out of your machine, turn off the Enable OpenGL Drawing checkbox (see the box on Understanding OpenGL). The drawback to turning off this setting is that you won’t be able to use features that rely on it like flick-panning (Moving Around in Your Image) and Rotate View (Zooming with the Navigator Panel).
Note
When it comes to Photoshop’s scratch disk, speed matters, and faster is better. Since the speed at which the disk spins plays a big role in scratch disk performance, stick with disks rated 7200 RPM (revolutions per minute) or faster. Slower 5400 RPM disks can take a toll on Photoshop’s performance, and 4200 RPM drives slow…Photoshop…to…a…crawl.
Cursors
These preferences control how your cursors look when you’re working with images. There are no right or wrong choices for you to make here, so try out the different cursor styles and see what works for you. Photoshop includes two types of cursors: painting cursors and everything else. When you choose different options, Photoshop shows you a preview of what each cursor looks like. At the bottom of the dialog box is a Brush Preview color swatch that controls the color of the brush preview when you resize your brush by Ctrl-Option-dragging (Alt+right-click+dragging on a PC) to the left or right. To change the swatch’s color, click the color chip, choose a new color from the Color Picker dialog box, and then click OK. (See Controlling the Brush Cursor’s Appearance to learn how these options affect the Brush tool.)
Transparency & Gamut
The Transparency settings let you fine-tune what the Background layer looks like when part of your image is transparent. Like the cursor settings, these options are purely cosmetic, so feel free to experiment. (You’ll learn more about transparency and the Background layer in Chapter 3.) The Gamut Warning option lets you set a highlight color showing where colors in your image fall outside the safe range for the color mode you’re working in or the printer you’re using. (Chapter 16 has more about all these advanced color issues.)
Units & Rulers
The Units & Rulers preferences (Figure 1-14) let you determine the unit of measurement Photoshop uses. The Rulers pop-up menu, not surprisingly, controls the units displayed in your document’s rulers (see Rulers and Guiding Lines); your choices are pixels, inches, centimeters, millimeters, points, picas, and percent. If you work on a lot of documents destined for print, inches or picas are probably your best bet. If you create images primarily for the Web, choose pixels. Leave the Type pop-up menu set to points unless you need to work with type measured in pixels or millimeters, which can be handy if you need to align text for a web page layout.

The Column Size settings are handy when you’re designing graphics to fit into specific-sized columns in a page layout program like Adobe InDesign. Just ask the person who’s creating the InDesign layout which measurements to use.
Guides, Grid & Slices
These preferences let you choose the colors for your guides (Guides, Grids, and Rulers), gridlines (Smart Guides), and slice lines (Slicing an Existing Image). You can also set your gridlines’ spacing and the number of subdivisions that appear between each major gridline with the “Gridline every” and Subdivisions fields, respectively.
Plug-ins
You can make Photoshop do even more cool stuff by installing third-party programs called plug-ins. There are so many useful plug-ins that this book has an entire chapter devoted to them (Chapter 19). The preferences in this category let you store plug-ins somewhere other than the Photoshop folder, which can help you avoid losing your plug-ins if you have to reinstall Photoshop. Leave both checkboxes in the Extension Panels section turned on so Photoshop can connect to the Internet if a plug-in or panel needs to grab information from a website. For example, the Kuler panel (Using the Kuler Panel) lets you use color themes posted on the Web by folks in the Kuler community. If you turn off these checkboxes, Photoshop can’t connect to the Internet and you can’t use Kuler!
Type
Photoshop has an amazing type engine under its hood, and you’ll learn all about it in Chapter 14. The preferences here let you toggle Smart Quotes (the curly kind) on or off, as well as control the Font Preview Size used in the Options bar’s font menu and in the Character panel (The Character Panel). Because seeing a font in its typeface is so handy when you’re choosing fonts, in CS5 this option is turned on right out of the box. If you don’t want to see typeface previews, turn off Font Preview Size to make Photoshop display only the typeface names (yawn).
If you work with Asian characters, turn on the Show Asian Text Options checkbox and make sure the Enable Missing Glyph Protection checkbox is also turned on. That way you won’t end up with weird symbols or boxes if you try to use a letter or symbol that isn’t installed on your machine.
The Preset Manager
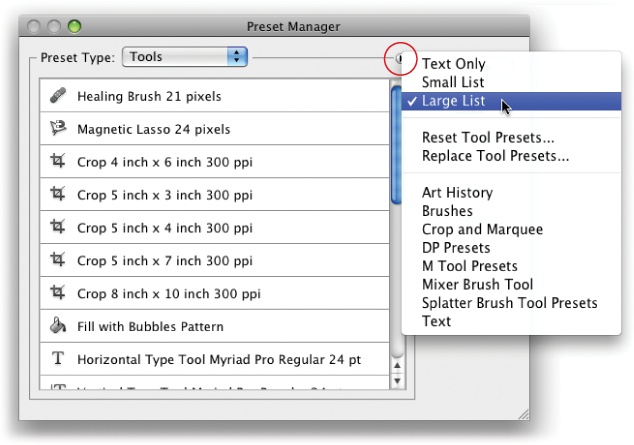
Once you get comfortable in Photoshop, you can customize most every tool in the Tools panel: the Crop tool, selection tools, healing brushes, the Type tool, gradients, and so on. The Preset Manager handles loading, saving, and storing your personalized goodies, as well as all the presets (built-ins which you can think of as tool recipes, such as gradients, patterns, and so on) that came with the program. You can open it by choosing Edit→Preset Manager or by clicking the right-facing triangle at the top right of any tool’s Preset picker menu in the Options bar, and then choosing Preset Manager. (You can also open a tool’s Preset picker by choosing Window→Tool Presets.)
Each group of settings, like a category of brushes, is called a preset library. To see a certain preset library, choose it from the Preset Type pop-up menu at the top of the Preset Manager dialog box (Figure 1-15).
Clicking the button that’s circled in Figure 1-15 lets you set the category of presets you’re viewing to the factory-fresh settings (choose “Reset [name of category]” and then click OK). You can make these adjustments when you’re using the tools themselves, but the Preset Manager gives you a bigger preview space, which makes these organizational chores a little more tolerable.
Note
In CS5, brushes have a brand-spankin’ new preset panel of their very own. Flip ahead to Meet the Mixer Brush to see it in action!
Sharing Presets
Once you’ve made your own recipes for tools, styles, or what have you, feel free to share them with the masses. You can share them with other computers (which is handy when the whole team needs to use the same color swatches or brushes) and upload them to the Web (for the whole world to download).
To create a preset library of your own, open the Preset Manager and click the Save Set button. In the resulting Save dialog box, give your custom library a name. Photoshop automatically saves it in the folders where it stores all custom settings unless you pick a different location on your hard drive (which is handy if you plan on sharing the library with other folks). When everything looks good, click Save.
Tip
If you’re saving a custom preset to share with others, save it in a spot that’s easy for you to find. For example, if you plan on emailing your preset library, your desktop may be a good option. If you’re sharing your presets with coworkers who work in the same office, your local file server works well.
Once you’ve saved your custom preset library, you can email it to folks or upload it to a website for others to download. If you’re uploading to the Web, make sure the file doesn’t have any spaces in its name. For example, instead of calling your file “Dragon Scales Brush”, name it “DragonScalesBrush”.
If you’re on the receiving end of a new preset library, open the Preset Manager by choosing Edit→Preset Manager and then click the Load button. Navigate to where the library lives and click Load. The next time you use a tool that has custom presets, you’ll see the new library’s options in the tool’s Preset picker menu.
To add to the fun, you can also rename preset libraries. In the Preset Manager dialog box, select the relevant library from the Preset Type pop-up menu and click Rename; type a new name in the Name field and click OK. To delete a preset library you never use, select it from the Preset Manager’s Preset Type pop-up menu and click Delete.
Tip
If you’ve managed to mess up one of Photoshop’s built-in preset libraries by adding items that don’t work the way you want, you can easily restore the original libraries: Open the Preset Manager and choose the library you want to reset. From the panel’s menu (click the button that’s circled in Figure 1-15), choose “Reset [type of preset]”. Photoshop asks if you want to replace the current brushes or append (add to) them instead. Click OK to replace the brushes and you’ll be back to the factory-fresh settings.
Get Photoshop CS5: The Missing Manual now with the O’Reilly learning platform.
O’Reilly members experience books, live events, courses curated by job role, and more from O’Reilly and nearly 200 top publishers.

