Using Smart Objects
A smart object is a very special layer that protectively wraps its content, which can be raw files (Working with Raw Files), vectors (drawings) from programs like Adobe Illustrator (Chapter 13), other layers, and even a whole PSD document, among other things. Smart objects are smart because Photoshop protects what you put into them by applying your edits to the wrapper instead of what’s inside of it. This lets you do the following:
Transform or resize it without losing quality. Instead of resizing the content inside a smart object, Photoshop resizes the wrapper. In the blink of an eye, Photoshop updates your document with the newly resized content without making it look blocky (so long as you don’t exceed the file’s original dimensions too much—unless it’s vector-based). You can also use the full range of transform tools (The Transformers) on smart objects repetitively without losing quality.
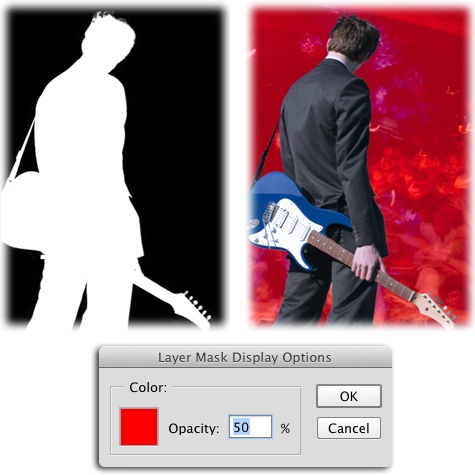
Figure 3-34. Left: To get inside a layer mask and edit it in full grayscale glory—handy for ensuring your subject is fully revealed—Option-click (Alt-click on a PC) the mask’s thumbnail in the Layers panel. Once you’re inside the mask, you can then copy and paste pixels—including text—right into it. (Page 661 has a cool example involving snatching texture from a photo and pasting it into a mask to add it to text.) When you’re finished editing the mask, click the layer’s thumbnail. ...
Get Photoshop CC: The Missing Manual, 2nd Edition now with the O’Reilly learning platform.
O’Reilly members experience books, live events, courses curated by job role, and more from O’Reilly and nearly 200 top publishers.

