As you learned earlier in this chapter, Photoshop is pretty darn customizable. In addition to personalizing the way its tools behave and how your workspace looks, you can make lots of changes using the program’s preferences, which control different aspects of Photoshop and let you turn features on or off, change how tools act, and fine-tune how the program performs.
Tip
Tooltips work on preference settings, too! So if you forget what a setting does, just point your cursor at it for a second or two and you’ll get a tiny yellow explanation.
To open the Preferences dialog box, choose Photoshop→Preferences→General (Edit→Preferences→General on a PC), or press ⌘-K (Ctrl+K). When you choose a category on the left side of the dialog box, tons of settings related to that category appear on the right. The following pages give you an idea of the kinds of goodies in each category, and you’ll find guidance on tweaking preferences sprinkled throughout this book.
Tip
You can cycle through the preferences categories by pressing and holding the ⌘ key (Ctrl on a PC) while tapping the up and down arrow keys on your keyboard.
The General pane of the Preferences dialog box (Figure 1-12) is a sort of catchall for settings that don’t fit anywhere else. Most of these options are either self-explanatory (Beep When Done, for example) or covered elsewhere in this book. A few, however, are worth taking a closer look at.
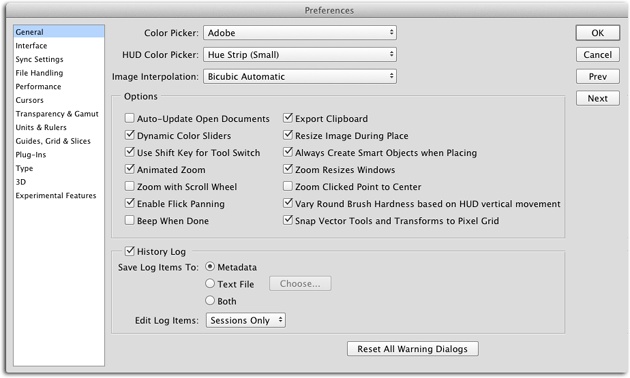
Figure 1-12. The General preferences include the incredibly powerful History Log settings. If you turn on History Log, Photoshop keeps track of everything you do to the document. This is an invaluable tool for folks who need to prove what they’ve done to an image in order to bill clients or produce legal documentation of all the edits they’ve made (think law enforcement professionals and criminal investigators). It’s also a great way to bring an assistant or coworker up to speed on your workflow.
Unless you tell it otherwise, Photoshop displays the Adobe Color Picker (see Choosing Individual Colors) anytime you choose a color. If you’re more comfortable using your operating system’s color picker instead, you can choose it from the Color Picker drop-down menu. If you download and install third-party color pickers, they show up in this menu, too. However, since the Adobe Color Picker is designed to work with Photoshop and all its built-in options, using another color picker may mean losing quick access to critical features like Color Libraries (Loading Color Libraries).
The HUD Color Picker setting refers to the on-image color picker you can summon when using a tool that paints, such as the Brush tool. (HUD is short for “heads-up display.”) It’s also available in a variety of shapes and sizes (strip or wheel in small, medium, and large), and you can choose among ’em here. See Painting from Scratch for more on using the HUD Color Picker.
The Image Interpolation menu controls the mathematical voodoo Photoshop performs when you resize an image with the Image Size dialog box (The Mighty Image Size Dialog Box) or the Crop tool (The Crop Tool). Back in CS6, Adobe added the Automatic option, which tells Photoshop to pick the method that it thinks will work best for your image. Will it always choose wisely? Only you can tell.
Other notable options here involve a couple of cool features: animated zoom and flick panning (both covered in Chapter 2). If your computer is running at a snail’s pace, try turning off one or both features (they can really tax slower video cards).
The other noteworthy options in the General preferences have to do with painting and drawing vectors (Chapters Chapter 12 and Chapter 13, respectively). For example, “Vary Round Brush Hardness based on HUD vertical movement” means that dragging up or down with your mouse while changing paint color with the on-image (HUD) color picker (Painting from Scratch) changes the brush’s hardness; if you’d rather have that motion change opacity instead, turn this checkbox off. “Snap Vector Tools and Transforms to Pixel Grid” causes new vector shapes and paths to automatically snap to Photoshop’s pixel grid, ensuring precise alignment when you’re designing graphics for the Web. Both these settings are turned on straight from the factory.
Note
Deleting Photoshop’s preferences file can be a useful troubleshooting technique. (Doing so resets all the preferences to what they were when you first installed the program.) Just choose Photoshop→Quit Photoshop (File→Exit on a PC), and then press and hold Shift-Option-⌘ (Shift+Alt+Ctrl) when you restart Photoshop. Online Appendix B (available from this book’s Missing CD page at www.missingmanuals.com/cds) has more about this procedure.
These preferences control how Photoshop looks on your screen. As you learned on Changing Photoshop’s Appearance, you can use the Color Theme swatches at the top of these settings to change Photoshop’s colors (click the light gray swatch to resurrect the color theme of CS5 and earlier versions). You can squeeze a little more performance out of slower computers by setting the three Border drop-down menus to None. That way, Photoshop won’t waste any processing power generating pretty drop shadows around your images or around the Photoshop window itself.
If you’re familiar with all of Photoshop’s tools and don’t care to see the little yellow tooltips that appear when you point your cursor at tools and field labels, turn off Show Tool Tips. And if you’d like new documents to open in separate windows instead of in new tabs, turn off “Open Documents as Tabs.”
One of the benefits of Adobe’s Creative Cloud (see the box on Meet the Creative Cloud) is the ability to store and thus access your custom settings on different machines—great if you happen to work in multiple locations. The Sync Settings preferences, shown in Figure 1-13, let you control which of your settings and preset goodies are stored on Adobe’s Creative Cloud. They also let you trigger the process of uploading or downloading them.
Photoshop displays your Adobe ID at the top of this preference pane, and you use a series of checkboxes to tell Photoshop exactly what you want to sync. From left to right, your options are preferences, workspaces (a recent addition), actions, brushes, swatches, styles, gradients, custom shapes, tool presets, patterns, and contours. Alternatively, you can leave the What To Sync menu set to Everything and, each time you click Upload, all the settings that can be uploaded will be.
Note
New in Photoshop CC 2014, if the Workspace checkbox is turned on, any keyboard shortcut or menu customizations you’ve made using the Keyboard Shortcuts dialog box (see the box on Customizing Keyboard Shortcuts and Menus) are included in your syncs. Nice!
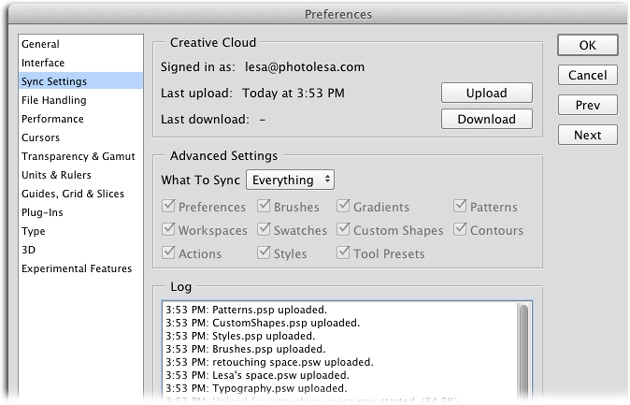
Figure 1-13. Adobe simplified the sync-settings process in the latest version of Photoshop, and added the ability to upload any custom workspaces that you’ve saved (page 12). Technically, you don’t really sync settings any more, you merely upload them to—or download them from—Creative Cloud using the handy buttons shown here. That’s it. Photoshop even keeps track of when your last upload occurred.
Once you’ve clicked the Upload button to store your settings on Creative Cloud, you can access them on another machine by signing in with your Adobe ID. To do it, get comfy in front of the new machine, launch Photoshop, choose Help→Sign Out [Adobe ID], and in the Creative Cloud dialog box, click Sign Out. Then choose Help→Sign In, enter your credentials, and then click Sign In. Next, choose Photoshop→[Adobe ID]→Download Settings (Edit→[Adobe ID]→Download Settings on a PC), or pop open the Sync Settings preferences pane and click Download. Either way, Photoshop grabs the custom goodies you uploaded from your other computer and loads ’em so they’re ready for you to use.
These preferences, visible in Figure 1-14, control how Photoshop opens and saves files. If you’re a Mac person and you plan on working with images that’ll be opened on both Macs and PCs, make sure the Append File Extension menu is set to Always and that Use Lower Case is turned on. These settings improve the chances that your files will open on either type of computer without a hassle. (PC users can leave their File Handling settings alone because file extensions are required in Windows, whereas on a Mac they can be turned off.)
Since CS6, you’ve had the ability to keep working while Photoshop saves your file in the background—meaning you don’t have to wait until it’s finished to do something else—plus the program automatically saves your document at regular intervals. (CC lets you save additional documents before the first one finishes; there’s more on that in Chapter 2.) The “Save in Background” setting lets you turn background saving on or off, and you can control how the Auto Recovery feature works. To have Photoshop save your file more often than every 10 minutes, pick another duration from the Automatically Save Recovery Information Every menu (your choices are 5, 10, 15, or 30 minutes, or 1 hour).
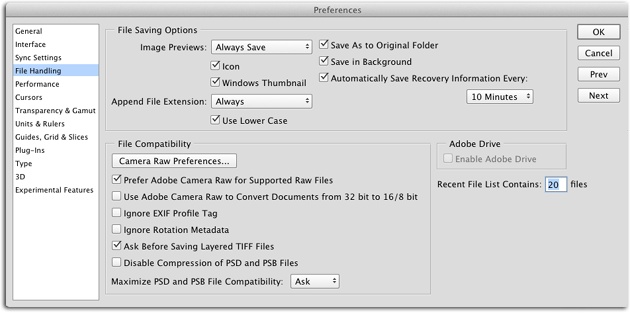
Figure 1-14. Photoshop’s File Handling preferences mostly deal with saving and document compatibility settings. This is also where you access the Adobe Camera Raw plug-in’s preferences (it’s installed with Photoshop, and you’ll learn all about in Part Two of this book). Click Camera Raw Preferences to see them.
Straight from the factory, Photoshop is set to display a dialog box each time you save a file that asks if you want to save the image for maximum compatibility with PSD and PSB files (the native Photoshop format and the format for really big files, respectively; see File Formats); doing so improves the chances that your files can be understood by other programs like Adobe InDesign or QuarkXPress. If that pesky dialog box annoys you, set the “Maximize PSD and PSB File Compatibility” menu to Always and you’ll never see the dialog box again (plus you’ll have the peace of mind that comes with knowing your images will play nice with other programs). You can also keep Photoshop from automatically compressing these files (to save ’em faster), but you’ll end up with bigger files. If speed is more important to you than file size, then turn on “Disable Compression of PSD and PSB Files.”
Note
The Adobe Drive option lets you connect to a digital asset management program (also called a DAM) in order to organize, track, and store files in a central location that other folks can access (so they can work on those files, too). Visit www.lesa.in/adobedrive for more info.
Another handy option is the Recent File List Contains setting, which lets you change the number of documents Photoshop lists in the Recent files menu (found by choosing File→Open Recent). This field is automatically set to 20, but feel free to change it if you frequently need to reopen the same documents.
The Performance preferences control how efficiently Photoshop runs on your computer. For example, the amount of memory the program has to work with affects how well it performs. In the Memory Usage section, the Let Photoshop Use field’s factory setting tells the program to use up to 60–70 percent of your machine’s available memory (the exact number may vary). If you’re tempted to increase it to 100 percent for better performance, don’t. Other programs need to use your computer’s memory, too, and leaving it set between 60 and 70 percent ensures that all of them get their fair share (after Photoshop takes the biggest chunk, that is).
The History & Cache section lets you change the number of history states that Photoshop remembers, as explained on Changing How Far Back You Can Go. You can also let the program set optimal cache levels and tile sizes for you; all you have to do is pick the kind of document you work on the most. Your options are “Tall and Thin,” “Default,” and “Big and Flat”; just click the one that’s closest to what you regularly use. Here’s why this matters: Cache levels controls how much image info is temporarily stored in your computer’s memory for things like screen and histogram refreshing (histograms are covered on Using Levels). The cache tile size is the amount of info Photoshop can store and process at one time (for example, larger tile sizes can speed things up if you work with documents with really large pixel dimensions). See? Now you appreciate Photoshop managing these settings for you!
If your computer’s hard drive is running low on space, consider adding another drive that Photoshop can use as a scratch disk—the place where it stashes the bazillions of temporary files it makes when you’re editing images (so that’s where those history states are stored!). If you don’t have a separate scratch disk, Photoshop stores those temporary files on your computer’s primary hard drive, taking up space you could be using for other documents. When you add a new internal hard drive or plug in an external drive, that drive appears in the Scratch Disks list shown in Figure 1-15.
To add one or more scratch disks, click the square in the “Active?” column next to each hard drive you want to use, and then drag the drives into the order you want Photoshop to use them. For the zippiest feel, use a solid-state drive (SSD) that’s at least 256 GB in size (and is separate from the one where your operating system is installed). Also, avoid using USB2-based drives, as they tend to be sluggish and can actually make Photoshop run slower (USB3-based drives work just fine).
Note
When it comes to Photoshop’s scratch disk, speed matters, and faster is better. Since the speed the disk spins plays a big role in a scratch disk’s performance, stick with disks rated at 7200 RPM (revolutions per minute) or faster. Slower 5400 RPM disks can take a toll on Photoshop’s performance, and 4200 RPM drives slow…Photoshop…to…a…crawl. Better yet, spend the extra money for a solid state drive (SSD), which has no moving parts and uses an electronic system to read and write data, making it much faster than its spinning cousins.
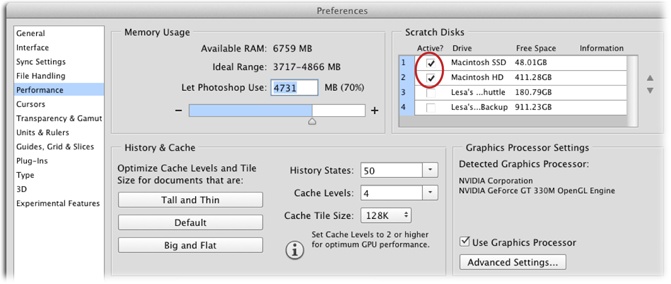
Figure 1-15. To give Photoshop the green light to use the new drive, put a checkmark in the disk’s “Active?” column, and then drag it up into the first position. After that, Photoshop will be a little zippier because it’ll have two hard drives reading and writing info instead of one.
More than ever before, Photoshop CC takes advantage of your computer’s built-in ability to draw and process graphics. This results in faster and smoother performance when you’re doing things like resizing images with Free Transform, rotating your canvas temporarily with Rotate View, and using the HUD Color Picker (you’ll learn about all these features throughout this book). If you turn off the Use Graphics Processor setting, you lose all these superpowers, though you might squeeze a little more performance out of your machine. If you’ve got a newer machine, be sure to leave this setting turned on. That said, you can control how much your graphics processor is being tapped by clicking Advanced Settings (your choices are Basic, Normal, and Advanced).
These preferences control how your cursor looks when you’re working with images. There are no right or wrong choices here, so try out the different styles and see what works best for you. Photoshop includes two types of cursors: painting cursors and everything else. When you choose different options here, Photoshop shows you a preview of each cursor. The Brush Preview color swatch controls the color of the brush preview that appears when you resize your brush by Control-Option-dragging (Alt+right-click+dragging on a PC) left or right. To change this color, click the color swatch, choose a new hue from the Color Picker dialog box, and then click OK. (See Controlling the Brush Cursor’s Appearance to learn how these options affect the Brush tool.)
Tip
If you press Caps Lock on your keyboard when you’re working with a tool that uses a brush cursor, Photoshop switches it to the precise cursor instead (it looks like a tiny crosshair). To switch back to the regular brush cursor, press Caps Lock again. This is a fantastic troubleshooting technique to remember!
The Transparency settings let you fine-tune what a layer looks like when part of it is transparent. Like the cursor settings, these options are purely cosmetic, so feel free to experiment. (You’ll learn more about transparency in Chapter 3.) The Gamut Warning section lets you set a highlight color that shows where colors in your image fall outside the safe range for the color mode you’re working in or the printer you’re using. (Chapter 16 has more about these advanced color concerns.)
The Units & Rulers preferences (Figure 1-16) let you pick which unit of measurement Photoshop uses. The Rulers menu, not surprisingly, controls the units displayed in your document’s rulers (though you can change them on the fly by right-clicking a ruler, as described on Guides, Grids, and Rulers); your choices are pixels, inches, centimeters, millimeters, points, picas, and percent. If you work on a lot of documents destined for print, inches, points, or picas are probably your best bet (in the USA, that is). If you create images primarily for the Web, choose pixels instead. Leave the Type menu set to Points unless you need to work with type measured in pixels or millimeters, which can be handy if you need to align text in a web page layout.
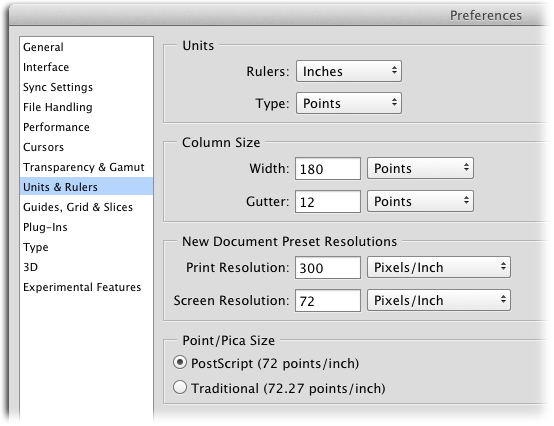
Figure 1-16. To really save some time, take a moment to adjust the settings in the New Document Preset Resolutions section (resolution, as you’ll learn on page 254, controls pixel size). From that point on, Photoshop automatically fills in the New Document dialog box with the settings you entered here (you’ll learn about creating documents beginning on page 38).
The Column Size settings are handy when you’re designing graphics to fit into specific-sized columns in a page-layout program like Adobe InDesign. Just ask the person who’s creating the InDesign layout what measurements to use.
These preferences let you choose the colors for your document guides (Guides, Grids, and Rulers), grid (Smart Guides), and slice lines (Slicing an Image). You can also set the grid’s spacing and the number of subdivisions that appear between each major gridline with the “Gridline every” and Subdivisions fields, respectively.
You can make Photoshop do even more cool stuff by installing third-party programs called plug-ins. There are several useful plug-ins out there, and this book has a whole chapter devoted to them (Chapter 19).
Note
These preferences used to let you store plug-ins somewhere other than your computer’s Photoshop folder, but Adobe recently removed that option. Evidently it was causing confusion as some folks used the same Plug-ins folder for multiple versions of the program, which resulted in a lot of crashes.
Photoshop comes with several built-in plug-ins, such as Adobe Camera Raw (Working with Raw Files) and most everything in the filter menu. And Photoshop CC 2014 sports a new plug-in named Generator, a JavaScript-based system used to create application programming interfaces (APIs). Generator’s capabilities will expand over time, but for now you can use it to generate (hence its name) GIF, PNG, JPG, or SVG files for the Web simply by naming layers or layer groups with specific tags (you don’t need to go near the File→Export or Save As commands). You’ll learn more about using Generator on Exporting Web Graphics with Generator, but this is where you turn it on.
The Filters & Extension Panels section lets you repopulate the Filter menu by turning on “Show all Filter Gallery groups and name” (Adaptive Wide Angle). Go ahead and leave both extension-related checkboxes in this section turned on so Photoshop can connect to the Internet if a plug-in or panel needs to grab information from a website. However, since Adobe removed Flash-based panels from this version of Photoshop (specifically, the Kuler, Mini Bridge, and Adobe Exchange panels), as of this writing, there aren’t any panels in the Window menu’s Extension category. (That said, if you download the HTML-based Kuler panel from the Adobe Add-Ons website, it shows up in the Extensions category. Other Color Scheme–Generating Tools has details.) Any changes you make in this section take effect after you restart Photoshop.
Photoshop has an amazing text engine under its hood that you’ll learn about in Chapter 14. The preferences here let you toggle smart quotes (the curly kind) on or off, as well as enable other languages. If you work with Asian characters, turn on the East Asian option and make sure Enable Missing Glyph Protection is also turned on. That way you won’t end up with weird symbols or boxes if you try to use a letter or symbol that isn’t installed on your machine. Photoshop can work with Middle Eastern and South Asian languages, too. (Any changes you make in the Choose Text Engine Options section take effect only after you restart Photoshop.)
Because seeing a font in its typeface is so handy when you’re choosing fonts, Adobe turned on font previews automatically back in CS5, and then in CS6 they removed the Font Preview Size from preferences altogether. These days, you adjust the preview size not in the Preferences dialog box, but by choosing Type→Font Preview Size, where you can pick among six handy options, from none to huge.
As you learned in the note on Note, Adobe merged the Extended and Standard versions of the program into Photoshop CC, meaning everyone now has access to the program’s 3D tools. (Chapter 21 teaches you how to get started creating and working with 3D objects.)
You can use the preferences in this section to adjust the amount of video card memory (VRAM) Photoshop can use while you’re working in the 3D environment, as well as the color and size of the various overlays you’ll encounter when creating or editing 3D text and objects. The options on the right side of the preference pane let you change how Photoshop displays 3D objects, their interactive controls, and how much detail the program displays when you load a 3D object that was created in another program. Unless you’re an expert in working with 3D objects, it’s best to leave most of these settings alone.
New in Photoshop 2014 is the ability to try new features before Adobe finalizes ’em. By doing so, you can give Adobe feedback that may help shape the final version of that particular feature. The list of experimental goodies available here will change over time, but as of this writing, it includes Enable Multitone 3D Printing (lets capable 3D printers print in more than one color), “Scale UI 200% for high-density displays (Windows only)” (uses a 200% zoom level for HiDPI displays), and “Use Touch Gestures (Windows only)” (allows gesturing on touchscreen monitors).
It’s up to you whether you want to live on the cutting edge. To try a new feature, turn on its checkbox, click OK, and then restart Photoshop. If you decide you don’t like that feature, pop open the Experimental Features preferences, turn the feature’s checkbox off, click OK, and (you guessed it) restart Photoshop.
Get Photoshop CC: The Missing Manual, 2nd Edition now with the O’Reilly learning platform.
O’Reilly members experience books, live events, courses curated by job role, and more from O’Reilly and nearly 200 top publishers.

