The more pictures you have in your Photos library, the harder it gets to find the ones you want. Even with all the automatic albums Photos makesâLast Import, Favorites, Videos, and so onâand the albums you can create yourself (Chapter 3), it can still be difficult to locate certain stuff. You may get frustrated to the point that youâre tempted to swear off digital photography altogetherâbut donât lose hope!
Photos has several features that can help. For example, you can add a favorite tag to certain images and Photos automatically rounds them up into a special album. And the programâs powerful search field lets you locate pictures and videos based on text or a date they include in their metadata (Photos for iOS). Another great way to find stuff is to add keywords to them that describe certain characteristics. And then there are Faces tags, which let you identify the people in your photographs (if you used iPhotoâs Faces feature, youâll appreciate Photosâ simplified version). Many of these methods really shine when you combine them with smart albums (Smart Albums).
In this chapter, youâll learn how to use all of these features, and get strategic suggestions for assessing the images you import.
Note
Unlike iPhoto, which had a five-star rating system, Photos has what you might call a three-level rating system: hidden (Hiding Thumbnails), normal, and favorites (Viewing Favorites). Perhaps Apple found that people didnât use all five stars, and that three levels provides all the photo-rating power most people need.
To find certain photos quickly, you can designate them as favorites. When you do, Photos adds a tiny white heart icon to their thumbnailsâ upper-left corners and includes the pictures or videos in the Favorites album. You can find this album in Albums view and in the Albums section of the sidebar (The Two Faces of Photos), if you turned it on.
The favorites feature is handy for marking the best pictures or videos you takeâsay, the best shot from your kidâs black-belt test, a family reunion, or your camel-riding adventure in Egypt. If you tag all your best photos during the year as favorites, for example, you can then easily trigger a year-in-review slideshow (Creating Instant Slideshows) that you can play on your Mac, iPad, or Apple TV (see the box on Viewing Slideshows on an Apple TV). Doing so also gives you a huge head start on assembling a yearly photo book, a calendar for the coming year, or a newsletter-style card (Chapter 9) that you mail each December.
Or you can use favorites to mark the best pictures from a recently imported batch of images so you can include them in an album (thereâs more on this on Designating Favorites). Favorites is a flexible feature that you can use however you like.
Tip
If you have an Apple TV, you can point it to the Favorites album and use that as a screensaver or slideshow. That way, as you add and remove favorites, your slideshow stays current with your favorite content. See the box on Viewing Slideshows on an Apple TV for details on how to access Photos from an Apple TV.
Photos makes it really easy to tag a picture or video as a favorite. You can do so just about anywhere in the program, in any view except Shared, either while viewing thumbnails or an open image. The only problem with the favorites feature is thatâafter a yearâs worth of happy-go-lucky favoritingâthe Favorites album can become bloated. To keep this album at a manageable size, itâs a good idea to periodically unfavorite pictures. (The alternative is to create smart albums whose criteria include âPhoto,â âis,â âfavorite,â and specifics such as album names, Faces tags, location, keywords or a date range. To learn more about smart albums, see Smart Albums.)
Hereâs how to favorite and unfavorite items in Photos for Mac:
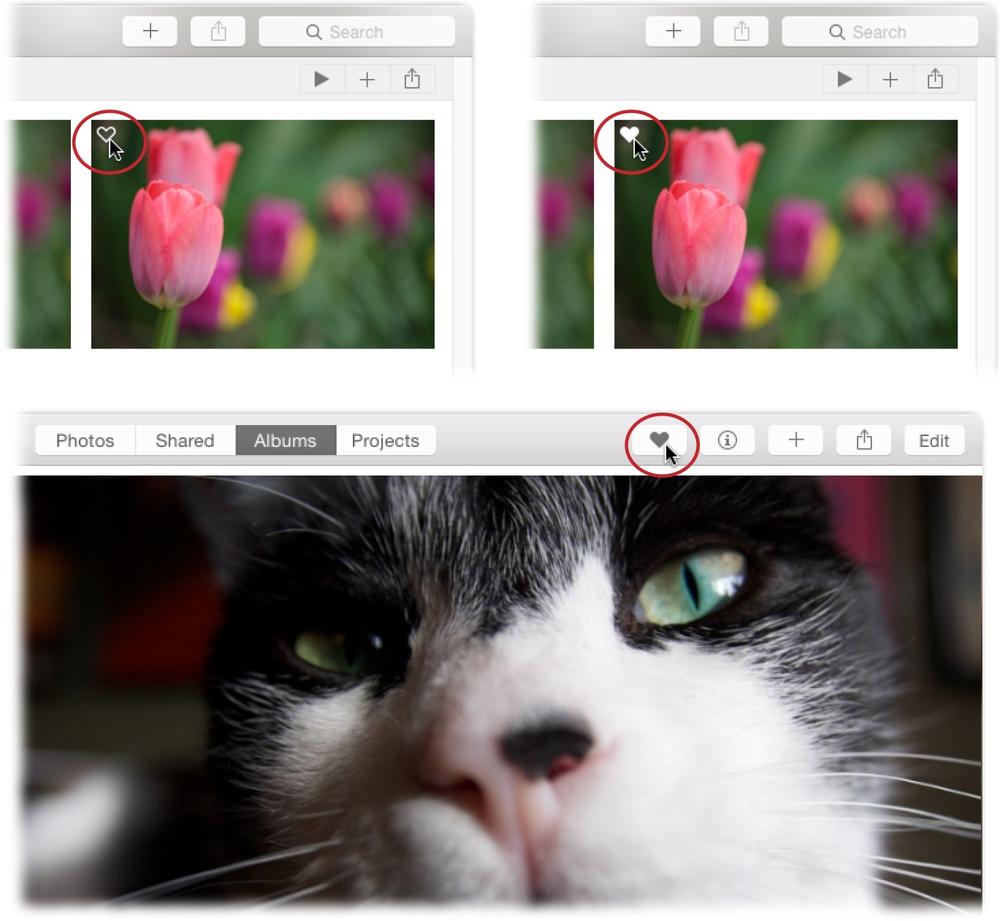
Click the Favorite icon on a thumbnail, in Photosâ toolbar, or in the Info panel. If youâre viewing thumbnails in, say, Moments view (Photos View), point your cursor at a thumbnail and click the heart outline that appears at upper left. Photos fills the outline with white (see Figure 4-1, top). If a picture or video is open in the preview area, click the heart button in Photosâ toolbar, and Photos fills the heart outline with gray to let you know your click was successful (see Figure 4-1, bottom). And if the Info panel (The Mighty Info Panel) is open, you can select a thumbnail or open an image, and then click the favorites icon at the panelâs upper right.
To unfavorite an item youâve favorited using one of these methods, simply repeat the process: click the heart icon on the thumbnail again, click the heart button in the toolbar, or click the heart icon in the Info panel.
Note
Photos doesnât let you favorite items in shared albums, regardless of whether you shared it or merely subscribe to it. Instead, you can use the Like button (see Downloading Shared Content).
Figure 4-1. Top Left: When you point your cursor at a thumbnail, you see a heart outline in the upper-left corner (circled). Top Right: When you click it, the heart turns white (circled) to let you know youâve favorited that image. Bottom: When viewing an open image, just click the Favorite button in the toolbar (circled) and Photos fills it with gray, as shown here.
Note
If you donât see the heart icon when you point your cursor at a thumbnail, then you must have turned off the setting that lets you see favorites. To turn it back on, choose ViewâMetadata and see if Favorite doesnât have a checkmark next to it. If it doesnât, then select Favorite again in this menu to turn it back on.
Choose ImageâAdd to Favorites. If you prefer using menus to tag favorites, select a thumbnail or open an image, and choose this menu command. To unfavorite the item, select or open it, and then choose ImageâRemove from Favorites.
Press the period key on your keyboard. If youâre more of a keyboard person, just tap the period key to mark a thumbnail or open picture or video as a favorite.
Tip
When a picture is open, you can use the left and right arrow keys on your keyboard to quickly navigate to the previous or next photo, and then favorite (or unfavorite) those shots by tapping the period key or clicking the heart button in Photosâ toolbar.
To favorite an item in Photos for iOS, tap a picture or video to open it, and then tap the blue heart outline at the bottom (iPhone) or upper right (iPad) of the screen. The heart turns solid blue to let you know this item is favorited, as shown in Figure 4-2. Tap the same icon to unfavorite the item, and the heart changes back to the sad, hollow version.
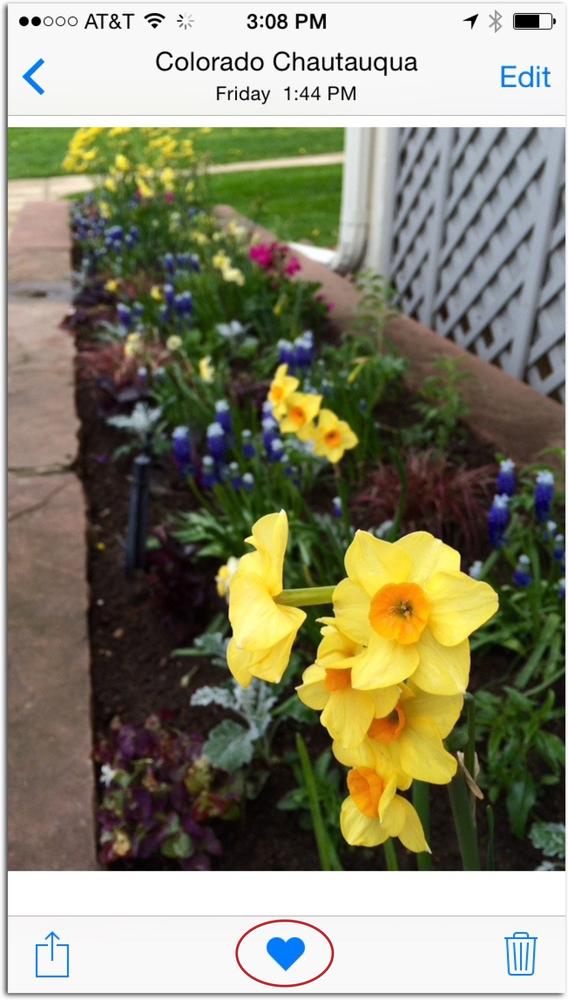
Figure 4-2. In Photos for iOS, you can mark an image as a favorite by tapping to open it, and then tapping the heart-shaped favorites icon at the bottom of your screen. When you do, the heart turns blue, as shown here. If you upgraded to Photos from iPhoto, you may want to favorite the items that you previously flagged or starred in iPhoto. As page 8 explains, Photos adds special keywords (page 91) to those items, so you can easily round them up by creating a smart album for anything that has the keyword 1 star, 2 star, 3 star, 4 star, 5 star, or flagged. Then you can open those smart albums and tag the best shots as favorites. Page 69 has the full scoop on using smart albums.
Using favorites to tag your cream-of-the-crop shots is but one strategy for this feature. As you can imagine, the Favorites album can quickly become too large to be usefulâunless you use favorites tags in conjunction with smart albums, as explained at the beginning of this section.
A different strategy is to favorite pictures you want to include in an album. For example, after importing some pictures, you can open the Last Import album and mark the best thumbnails as favorites. Next, pop into the Favorites album, press â-A to select them all, and then click the + icon in Photosâ toolbar and choose Album. Once the coveted captures are tucked into an album, you can unfavorite the (already) selected thumbnails by choosing ImageââRemove from Favorites.â The end result is an album of the best pictures from the last bunch you imported and an empty Favorites album. (The box on A Photo-Assessment Strategy has more on using Favorites in an image-assessment strategy.)
Which strategy is best? Thatâs up to you. Thereâs no right or wrong way to use favorites, and the only way to find out which strategy works best for you is to start using the feature.
Once youâve blessed at least one picture or video as a favorite, Photos creates a Favorites album that you can see in Albums view or in the Albums section of the sidebar (The Two Faces of Photos). This album (shown in Figure 4-3) is essentially a smart album that gathers all the items youâve tagged as favorites. In Photos for Mac, you can open it by double-clicking its icon in Albums view, or by selecting the album and then pressing Return. If you turned on the sidebar, youâll spot the Favorites album in the Albums section; just give it a single-click to open it. In Photos for iOS, go into Albums view, and then tap the Favorites album to open it.
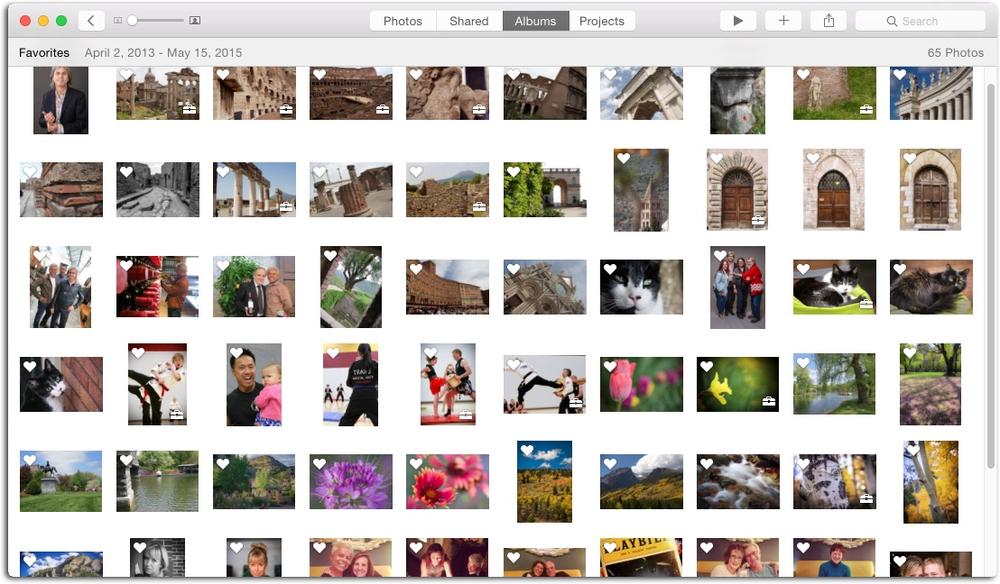
Figure 4-3. If you use favorite tags to mark your best shots, then the Favorites album contains quite a variety of thumbnails.
As with most albums that Photos automatically creates (Faces, Videos, and so on), you canât drag to rearrange the thumbnails it contains. The Favorites album is sorted by the date the picture was taken or, if your picture doesnât contain data metadata, by the date in which you imported it into Photos.
Tip
Once your Favorites album gets hugeâand it willâyou can create smart albums that find all the pictures and videos you favorited in a given year or specific date range. To do that, choose FileâNew Smart Album and set the first row of menus to âPhoto,â âis,â âfavorite.â Next, click the + icon to add another row of criteria and set the first menu to Date; use the other two menus in that row to drill down to the date you want. Finally, choose âallâ from the Match menu so Photos only finds items that include both these criteria.
A powerful way to find certain items is to search for text or date info that a picture or video includes. For example, if you add titles and descriptions to your digital goodies in Photos, you can search for a piece of text thatâs in either field. If you add Faces tags to your pictures (Getting the Most Out of Keywords), you can search for a personâs name. Or maybe you havenât done any of that stuff yet, but you (miraculously) remember the filename or the approximate time when you took the picture. If you snapped the shot on your iOS device or another camera with GPS capabilities, you may remember where you took it. In all of these situations, you can use Photosâ search field to locate your stuff.
To do this in Photos for Mac, click the search field at the right end of Photosâ toolbar. (If the search field isnât visible, click the Back button on the left side of Photosâ toolbar to back up one view level.) Enter any combination of words and characters. Photos tracks down only the items that contain all the wordsâor parts of wordsâyou enter, and displays a list of where that term occurs in each imageâs metadata (Photos for iOS). For example, the word âbeachâ may be in a pictureâs title, description, keyword list, Faces tags, filename, album name, city, street, or even neighborhood (whew!). Figure 4-4 has more.
Note
It doesnât matters which view youâre in when you use the search field. Whenever you use it, Photos searches your entire library, even if youâre viewing a specific album at the time.
You can enter multiple search terms; just be sure to separate them by spaces, not commas. (Entering commas makes Photos hunt for items that include commas in their metadata, which will get you zero results unless you added a comma in the Info panelâs description field). The more words you enter into the search field, the fewer results you get, because Photos searches for all the words. For example, if you enter kickboxing Boulder Vu Tran, Photos dutifully tracks down all the pictures and videos that include the word kickboxing and the location tag for Boulder and the faces tag for Vu Tran.
You can also use the search field to find items based on date, which saves you the trouble of scrolling through moments, collections, and years in Photos view (Photos View). Give it a whirl by clicking in the search field and entering a month and yearâsay, December 2002. Photos begins displaying matches as you type. When you finish typing, you see a list of all the items in your library that have both December and 2002 in their metadata. Just click a category in the search results to see the thumbnails it contains.
In Photos for iOS, the search field tries to be even more helpful. When you tap the magnifying-glassâshaped search icon, some prefab choices appear, including photos taken a year ago, your favorites, photos taken near your current location, and your recent searches. You also see an option for a seemingly random month from your library. You can tap one of these choices or type your search term(s).

Figure 4-4. Top: As you type, Photos displays a list of matching items, grouped into categories based on where in the imageâs metadata your search term occurs. To see all the thumbnails in a category, click the categoryâs name in the list. Bottom: The thumbnails appear clustered by date as shown here. To cancel your search and return to what you were previously viewing, click Cancel or the X on the right side of the search field. The search field is for simple text-based searches. For more complex hunting and gathering, use smart albums (page 69) instead. For example, you can use a smart album to search for nearly any combination of details, including some that the search field canât find. For example, smart albums let you search by metadataâthe photographic details like camera model, f-stop, flash status, exposure settings, and so onâand they let you set multiple search criteria. The more you use smart albums, the more youâll see how handy they are.
The only way to find content by location is to use the search field, as explained in the previous section. And even then, it only works if you used a camera that can capture GPS information, such as one of Canonâs newer PowerShots or your iPhone (your iPad can capture location info too, but only when itâs on a wireless network or using cellular data). Unfortunately, Photos doesnât let you add location info except in a map in a book project (Creating a Book Project), though the box on Adding Location Tags has a workaround.
As of this writing, Photos lacks the super-slick Places map of its predecessor iPhoto, which showed all the photos in your library plopped atop a big, glorious map. In Photos, you can view thumbnails on a map, though the most you can see is one yearâs worth of photos. You can also select a few thumbnails and view them on a map. Hereâs how to do that in Photos for Mac:
To see a map of all the photos that are in a moment, collection, or year, go into Photos view and click the location link thatâs to the right of the moment, collection, or yearâsay, Manhattan, NY or Rome, Italy (see Figure 4-5, top). When you click this link, a map appears in Photosâ main viewing area, with thumbnails on the spots where they were taken, as shown in Figure 4-5, bottom. If thereâs just one photo in a location, click it and it expands to fill the viewing area. If there are multiple photos in a location, a circled number appears on a stack of thumbnails to indicate how many there are. Click a thumbnail in the stack or the circled number to view all the thumbnails shot in that location.
Figure 4-5. Top: In Photos view, click a location link like the one circled here to view those thumbnails on a map. Bottom: In the map that appears, use the buttons at upper right (circled) to switch between standard view (shown here), satellite (topographic) view, and hybrid view (a mix of both). The buttons at lower right (also circled) let you zoom in and out of the map.
To see the locations of all the photos in your library that have GPS data, switch to Photos view and open the Info panel (â-I). The panelâs tiny map displays a red pin on each location, as Figure 4-6 shows. You canât resize the Info panel, so you need to scroll around the map by clicking and dragging.
To see the locations of the selected photo(s) or all the photos in an album or project, simply select the photo(s), album, or project, and then follow the instructions in the previous paragraph. (This maneuver is shown back in Figure 3-2.)

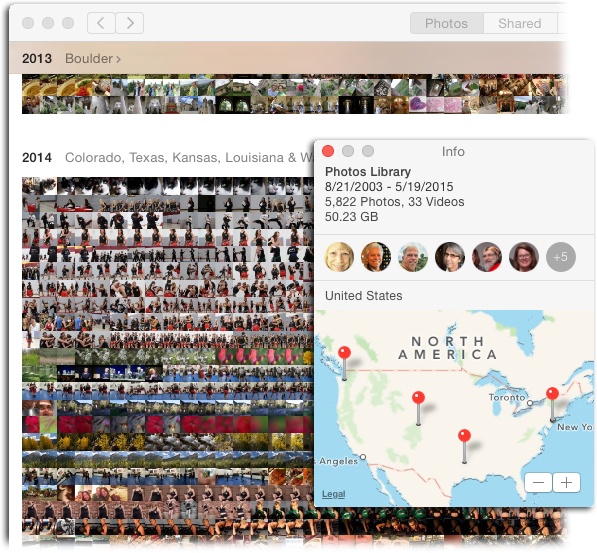
Figure 4-6. When youâre in Years view, the Info panel shows pins where all your location-tagged images were taken. You can double-click the map to zoom in or click the + button at lower right. To zoom out, Option-double-click the map or click the â button.
The only other place in Photos where you encounter maps is in a map layout in a book project, but those are dumb mapsâthey donât access the location tags in your photos. Instead, you have to manually add pins to indicate a location. Changing a Pageâs Layout has the scoop.
Alas, thereâs no way to view your digital mementos on a map in Photos for iOS. You canât see location labels in Photos view, nor is there an Info panel to open. Maps notwithstanding, Photos for iOS is still pretty darned cool.
Another handy use for smart albums (Smart Albums) is to find photos that include location tags. For example, you can use smart albums to find all the photos you took with a camera that can record GPS data, or all the ones you took in a specific spot. Figure 4-7 shows you how.
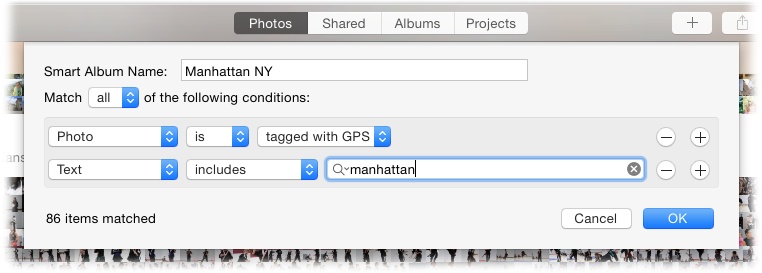
Figure 4-7. This smart album finds all the photos that contain GPS info and the text âManhattan.â With the Match menu set to âall,â only pictures that were taken in Manhattan, New York show up, which excludes all the pictures youâve taken that include the word âManhattanâ elsewhere in their metadataâsay, in a description of the famous cocktail you imbibed.
One of Photosâ most powerful features for tagging pictures is keywords, which let you apply descriptive words such as âfood,â âvacation,â or âkickboxingâ to images (you can create keywords for your pets, too). By searching for text included in the keywords you applyâusing the search field (Searching by Text and Date) or a smart album (Smart Albums)âyou can locate specific pictures and videos quickly, regardless of which album, moment, collection, or year theyâre in.
How are keywords different from albums? Generally speaking, keywords are great for describing characteristics of images that are also likely to appear in other images, whereas albums are better for grouping pictures for projects such as slideshows (Chapter 6), books, calendars, and cards (Chapter 9). Also, pictures that share a keyword can live in different albums.
Keywords are super easy to create and even simpler to apply to your digital goodies. You can apply multiple keywords (as many as you want), and then perform impressive stunts such as finding all the food pictures youâve ever taken while on vacation in Italy.
Note
Itâs pointless to use keywords to identify people in your pictures. That job is far better suited for Photosâ Faces tags (Getting the Most Out of Keywords). And if youâre shooting with a GPS-enabled camera, donât bother adding location keywords. However, if your camera canât capture location info and youâre not using one of the workarounds described in the box on Adding Location Tags, then applying location keywords makes perfect sense.
There are a couple of ways to start using keywords. You can go forth with careless abandon, entering any keyword you see fit into the Info panel, or you can handcraft a list using the Keyword Manager. The latter method also lets you edit and remove Photosâ built-in keywords. Hereâs how both methods work:
Tip
Photosâ keyword feature doesnât provide a way to see how many items youâve assigned a specific keyword to, but you can use a smart album to find out: Just choose that keyword when defining a smart album (Smart Albums). The running total of items matched at the bottom left of the sheet lets you know how many items use that keyword.
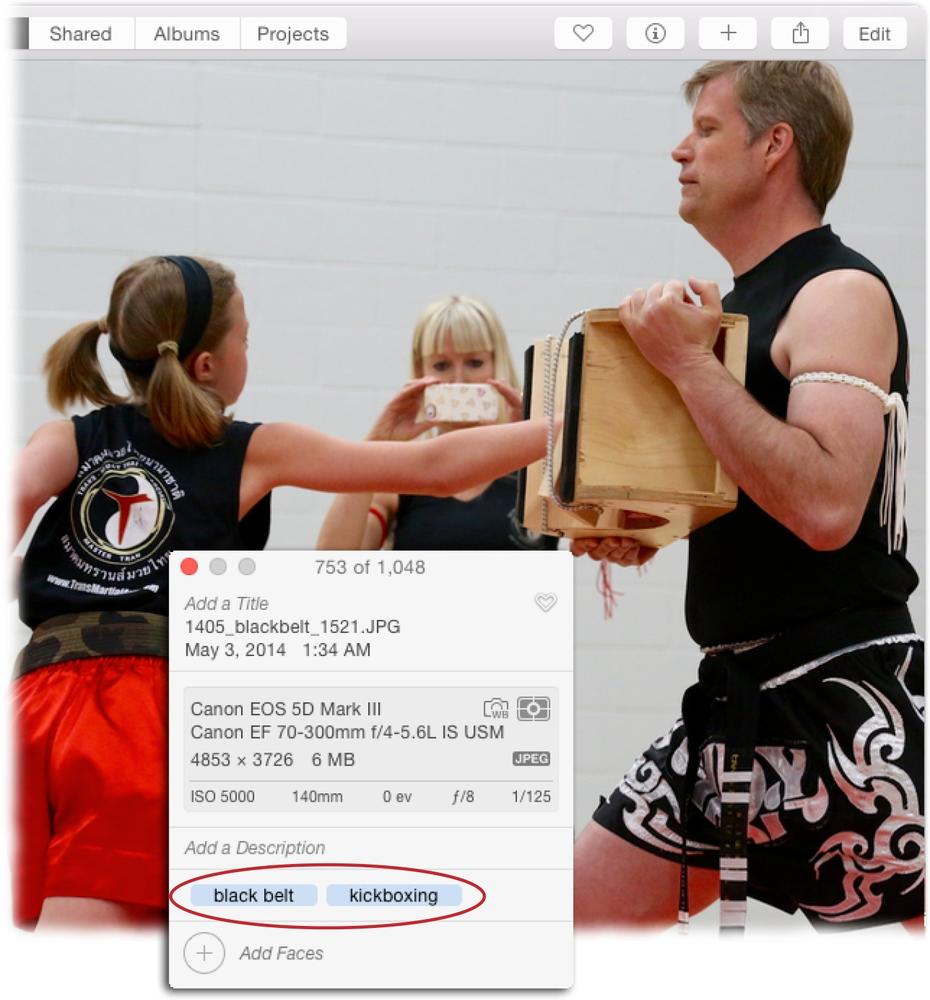
Using the Info panel. Select a thumbnail (or use the techniques described on Selecting and Hiding Files to select more than one), and then open the Info panel (Figure 4-8) by choosing WindowâInfo or pressing â-I. If you already opened a photo or video, you can also open the Info panel by clicking the circled-i icon in the toolbar. In the lower part of the Info panel, click âAdd a Keyword,â and then enter the keyword you want to assign. As you type, Photos makes suggestions based on keywords youâve used before or those assigned by other programs (think Aperture, Photoshop Elements, and so on). If you see the keyword you want in the list, click it, and then press Return. Otherwise, type what you want, and then press Return. To add multiple keywords to the selected image(s), type one keyword, type a comma or press Return, type the next keyword, and repeat until youâre satisfied. Click anywhere else when youâre finished adding keywords.
To remove a keyword, click it in the Info panel, and then press Delete on your keyboard.
Figure 4-8. If you use the Info panel to add a keyword youâve never used before, Photos adds it to your keyword list the second you press Return. To enter a keyword phrase such as black belt, type both words, and then press Return. Photos displays your keywords in alphabetical order in the Info panel regardless of the order you entered them. (Mr. Grace and his daughter are pictured here during her black-belt test in Muay Thai kickboxing.)
Note
If you import images into Photos from your hard drive (Importing Other Image Files), they may have keywords you didnât assign. These keywords can come either from the program you used to import the images from your camera, or from someone else (a stock photographer, say). For example, many apps, such as Adobe Photoshop Elements, automatically assign keywordsâRaw, Blurry, Closeup, Longshots, and so onâwhen they import and analyze images. Since that info is stored in the photos as part of their metadata (Photos for iOS), those keywords come along for the ride into Photos.
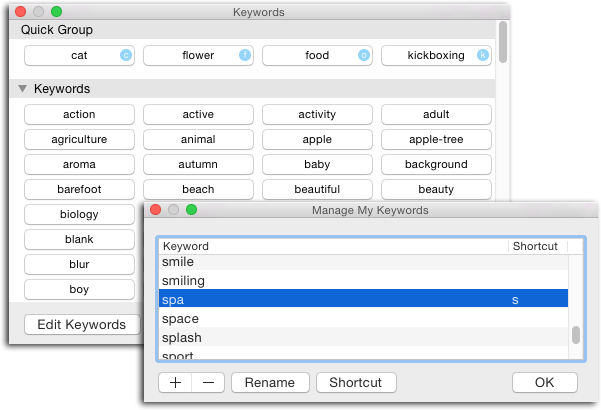
Using Keyword Manager. Select a thumbnail (or 10), and then open Keyword Manager by choosing WindowâKeyword Manager or pressing â-K. The window shown in the background of Figure 4-9 opens. It includes the built-in keywords âbirthday,â âfamily,â âkids,â and âvacation,â along with any keywords added by other programs (see the note on Note). To apply an existing keyword, click it in the list or press the keyboard shortcut for the one you want to apply (F for âflower,â for example). These single-letter shortcuts appear in a light blue circle to the right of the keywords in the Quick Group area of the Keyword Manager, as well as in the list that appears when you click Edit Keywords.
Note
When you apply a keyword via Keyword Manager, you get visual feedbackâthe keyword appears briefly in the center of the preview area when viewing thumbnails or atop the image itself when one is open.
To add your own keywords, click Edit Keywords, and Photos opens the Manage My Keywords window shown in the foreground in Figure 4-9. There, click the +, enter a keyword, and then click OK. (If the word you typed is already in your keyword list, Photos displays a message; you can then click OK to dismiss the message, and then enter something else.) The new keyword appears in Quick Group area at the top of the Manage My Keywords window, so itâs easy to find. Photos also assigns a one-letter keyboard shortcut to it, based on its first letter (or second or third letter, if the first or second letter is already taken by another keyword). The shortcut letter is displayed in a light blue circle to the right of the keyword. You can apply that keyword to a selected thumbnail by simply pressing that key on your keyboard anytime the Keyword Manager is open.
To edit an existing keyword, click Edit Keywords in the Keyword Manager to open the Manage My Keywords window. Select the keyword in question, and then click Rename. Type the name you want, and then press Return. Just keep in mind that any images you tagged with that keyword now display the edited version.
To add or change the keyboard shortcut for a keyword, click Edit Keywords in the Keyword Manager to open the Manage My Keywords window, select the keyword, click Shortcut, type your preferred shortcut, and then hit Return. If that shortcut is already in use by another keyword, Photos displays a message that lets you click OK to assign that shortcut to this keyword and remove it from the previous one, or click Cancel to dismiss the message and then enter something else. Once a shortcut is added to a keyword, it moves into the Quick Group area until you remove its shortcut. Since there are 26 lowercase letters, 26 uppercase letters, and 10 numbers from 0-9, you can assign up to 62 shortcutsâbut good luck remembering them all!
To delete a keyword altogether, click Edit Keywords in the Keyword Manager to open the Manage My Keywords window, select it and then click the â button at lower left. You can delete multiple keywords by Shift-clicking or (for nonconsecutive ones) â-clicking them in the list before clicking the â button. When youâre done editing, adding, and deleting keywords, click the OK button to close the Manage My Keywords window.
Note
When you delete a keyword, Photos also removes it from all the pictures and videos you applied it to.
Back in the Keywords window (Figure 4-9, background), to remove a keyword from an image, click the previously applied keywordâs button. When you do, the keyword briefly flashes in red in the middle of the preview area or on top of your photo, then âexplodesâ with the same animation you see when you remove an icon from your Macâs Dock. When youâre done playing with keywords, click the red dot at the top left of the Keywords window to close it.
Figure 4-9. Left: You can drag the keywords you use most to the Quick Group area. Not only are they easy to find up there, they also get their own single-letter keyboard shortcut. Right: To edit a keyword or its keyboard shortcut, double-click the entry in its respective column or select the keyword, and then click the appropriate button (Rename or Shortcut).
Note
Unlike its predecessor iPhoto, Photos doesnât let you use a smart album to gather all the pictures that donât have keywords applied. Why? Because Photosâ smart album criteria donât include a None option. Bummer!
It takes time to develop a great set of keywords, and some effort to assign them, but itâs worth it. Once you apply some, you can put them to good use in both smart albums (Smart Albums) and the search field (Searching by Text and Date).
Note
If you imported an iPhoto library that you used for ages, you may see a checkmark keyword. This checkmark can mean anything you wantâit only exists because old versions of iPhoto used it. Similarly, if you flagged items in iPhoto, you see a Flagged keyword in Photos, and all your previously flagged items will have this keyword assigned to them. While itâs a drag that Photos doesnât have a flagging feature, using a keyword to flag images is nearly as easy.
Once youâve tagged a few pictures with keywords, you can see the keywords assigned to those pictures in three ways:
In Keywords Manager, when you select a photo, its assigned keywords turn blue in the keywords list.
In the Info panel, when you select a photo, its assigned keywords appear in light blue in the Keywords section near the bottom of the panel.
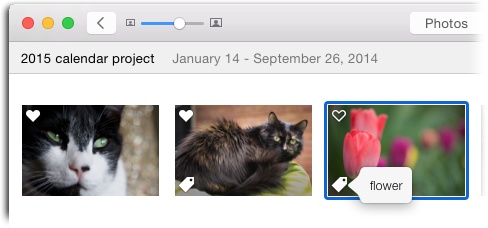
On the photo. If you have Keywords turned on in ViewâMetadata, a little white tag appears in the bottom left of every thumbnail that has at least one keyword assigned to it. Click the tag to see the assigned keywords, as shown in Figure 4-10.
If you diligently tag your photos with keywords, the big payoff arrives the second you need to find certain pictures. Here are some important points to remember when performing searches based on keywords:
If youâre using the search field, your search terms have to exactly match your keywords (although capitalization doesnât matter). You can unburden yourself of keyboard stress by copying them directly from the Keyword Manager itself. Just click Edit Keywords in the Keyword Manager, and then double-click the keyword you want to search for to highlight it. Press â-C to copy it, click Photosâ search field, press â-V to paste it, and then Return to start the search.
To find photos that match multiple keywords, repeat the copy-paste routine described above for each keyword. Be sure not to add commas between keywords in the search field. Instead, use a space between themâotherwise Photos will only find items that have commas in their metadata.
If you frequently search for the same keywords, create a smart album (Smart Albums) that gathers those images instead. That way, you find all the images that have those keywords as well as any future content you apply them to.
The takeaway here is that the more you use keywords, the more you can get out of them. In other words, applying keywords is a habit well worth forming.
You may not realize it, but Photos is looking at your pictures. Itâs not just glancing at them eitherâwhen it imports pictures, it takes a good long gander at them to see if they include people. If it finds any, Photos then tries to figure out who they are using its sophisticated facial-recognition powers.
Photos identifies people by noting attributes such as the distance between someoneâs eyes, their hair and skin color, the shape of their nose, and so on. After a brief, fun training period where you name people and confirm the faces Photos finds, Photosâ facial-recognition feature is on autopilot. The program creates an album named for each person you tell it about, and stores these albums inside the Faces album. As you import pictures in the future, Photos analyzes them and, when it finds a face it recognizes, tucks them into that personâs album. In other words, with minimal effort on your part, Photos maintains self-populating albums for each person in your photographic lifeâyour kids, parents, partner, buddies, and so on. Itâs almost magical.
To see all the faces Photos has located in your picturesâeven though theyâre unnamed for nowâgo into Albums view (Albums View) and double-click the Faces album (or select the album, and then press Return). If itâs the first time youâve opened this album, you see a few faces inside circles and a big, blue Get Started button. Click it and you see a screen similar to the one in Figure 4-11.
Note
If you shoot only scenery and not people, you wonât see a Faces album at all. It may sound obvious, but the fix is to start taking pictures that have people in them!

Figure 4-11. Ever wonder whoâs the most popular subject in your photographic life? The people who appear most in your pictures are displayed in large circles, while those who appear less frequently are displayed in smaller ones. Unidentified faces appear at the bottom of the window; scroll horizontally to see them all.
With the Faces album open, you can double-click a face to see a chronological list of all the pictures in your library that include that person. If Photos shows you the whole of every picture that person is in, you can switch to viewing a close-up of just the personâs face in those pictures by clicking Faces in Photosâ toolbar (to see entire pictures again, click Photos in the toolbar). To see pictures of someone else, enter their name into the search field at the upper right. As you type, the names of people you identified in Faces appears below itâjust click the personâs name in the list that appears, and then hit Return. When you do that, all the pictures you identified as that person in appear in the preview area. (The next section teaches you how to identify the people in your pictures.)
To get the most out of your Faces album, you need to spend some time identifying the faces Photos found so it can gather them into albums automatically. Thatâs what the next section is all about.
The most efficient way to identify the faces in your pictures is to train Photos to do it automatically, though you can also tag thumbnails yourself nearly anywhere in the program. Think of the training process as a game: It doesnât take all that long and itâs fun, plus thereâs a feeling of satisfaction that comes from knowing that youâre training the app to organize your library into albums for you.
The first step in introducing Photos to all the people in your pictures is to get comfy. Grab a beverage, turn on some music, and then follow these steps:
In Albums view, open the Faces album.
Click Albums in the toolbar, and then double-click the Faces album to open it. If the sidebar (The Two Faces of Photos) is showing, then you can also double-click the Faces album there.
Open the Suggested Faces drawer.
Unless youâve closed it, the Suggested Faces drawer is already open at the bottom of the window. If it isnât, just click the down-pointing arrow to its left.
Open a face album.
You can scroll horizontally in the drawer to see all the faces it contains. When you find the one you want to identify, double-click it.
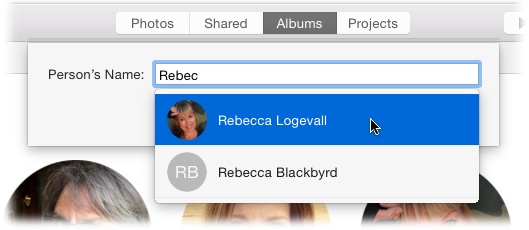
Enter the personâs name in the sheet that appears, and then click Continue.
As you type, Photos tries to match the name with entries in your Contacts app to guess who youâre identifying, as shown in Figure 4-12.
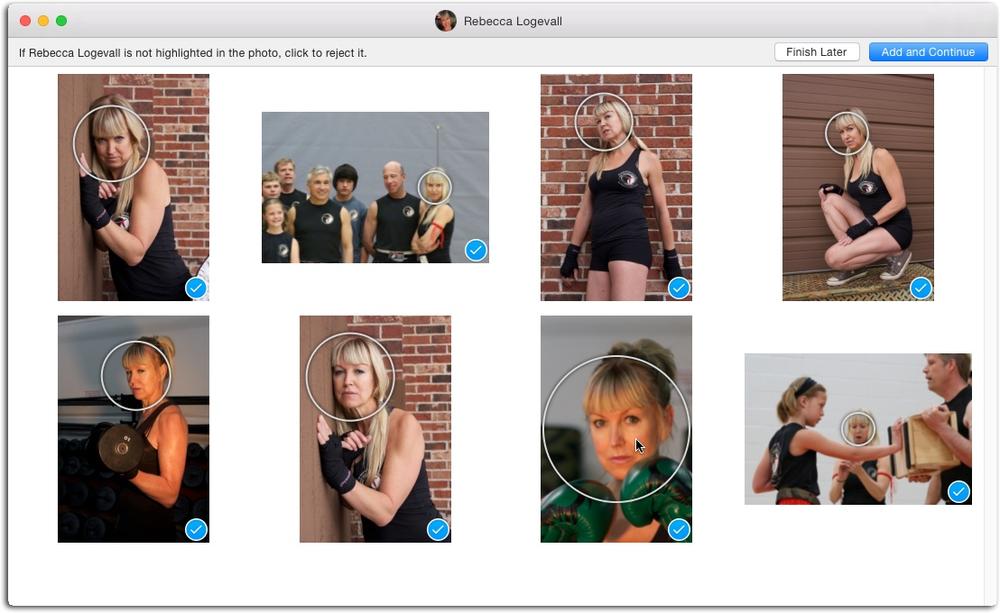
In the list of thumbnails that appears, reject the ones the person isnât in, and then click âAdd and Continue.â
Photos places a blue circle with a white checkmark at the lower right of any thumbnail it thinks contains the same face, as shown in Figure 4-13. If itâs wrong, click the thumbnail to let Photos know it. When you do, the icon disappears, the thumbnail turns gray, and you see the text âNot [personâs name]â across the bottom of the thumbnail. Photos keeps a running count of how many images it has added to the personâs face album and displays it at the upper left of their thumbnail.
Repeat step 5 until Photos doesnât show you any more thumbnails, and then click Done.
Photos keeps showing your pictures until it runs out of possible candidates for the face album you opened in step 3. If you lose steam and you want to pause the process, click Finish Later. When Photos runs out of candidates, you see a screen that tallies how many pictures you identified of that person.
Tip
If a face in the Suggested Faces drawer at the bottom of the main Faces window matches one youâve already identified, simply drag the suggested face icon onto an identified icon (in other words, onto one of the circles in the main preview area).
Thatâs all there is to training Photos to recognize faces. If youâre feeling frisky, you can double-click another album in the Suggested Faces drawer and keep on trucking, though feel free to take a break and pat yourself on the back. The more images you tag, the better Photos gets at identifying people. By making a habit of periodically opening the Faces album and dealing with the suggested face albums, you keep your library gloriously organized and up to date.
You can also tag pictures manually wherever you encounter thumbnails:
Turn on ViewâShow Face Names, and then point your cursor beneath any thumbnail to reveal the name field shown in Figure 4-14, top. Enter a name, and then press Return.
Double-click a thumbnail to open it and, if Photos detects a face, click the Unnamed tag that appears, and then enter the correct name. If Photos doesnât detect a face, choose WindowâInfo (or press â-I). In the Info panel that appears, click the + circled in Figure 4-14, bottom and Photos drops a gray circle onto your image. Keep clicking the + until youâve identified all the people in the picture.
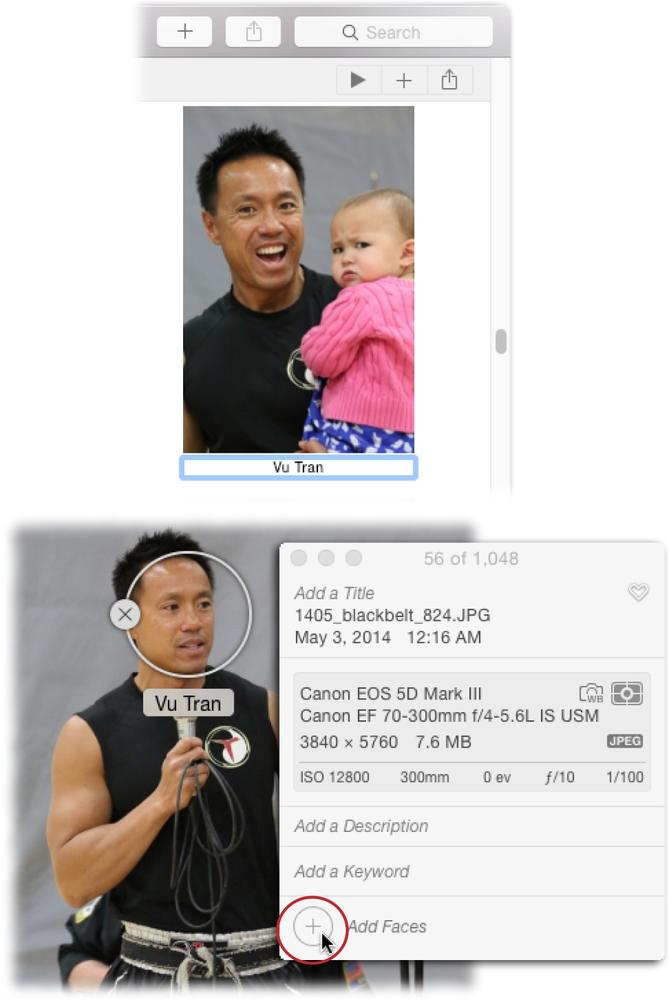
Figure 4-14. Top: If the person exists in your Contacts app, then as you type, you see a list of names you can choose from. Bottom: When it encounters a face or you click the + circled here, Photos adds a naming circle to your image. You can drag the circle to reposition it so itâs positioned over the face in your picture. If a naming circle appears in an area that isnât a face, click the X to delete it. As of this writing, you canât add other details to a face such as an email address, which means that the pictures you post onto Facebook using Photos arenât automatically tagged with the people in them.
Once youâve introduced Photos to the people in your life, you can do the following things to organize your Faces album the way you want:
Change the key photo. As you learned on Viewing an Album, key photos represent all of the pictures an album includes. To have Photos use a different picture, open that personâs faces album. When you find a picture you like, Ctrl-click it and then choose Make Key Photo from the shortcut menu.
Rearrange individual face albums. To reorder your faces, drag them where you want them. This works for the albums in the main preview area, but not for the ones in the Suggested Faces drawer. Unfortunately, you canât change the sorting order of the main Faces albumâsay, to make face albums appear in alphabetical order. Photos lists face albums according to how many times a person appears (and is tagged) in your pictures. It makes sense but is still frustrating.
Edit and correct Faces tags. If a misspelling or erroneous identification snuck into a face album, you can easily fix it. If you spot the error in Albums view while youâre perusing the contents of the Faces album, just click the name beneath the circle and enter the correct information. If youâre cruising through thumbnails in some other view (say, Photos), turn on face names by choosing ViewâShow Face Names, then open a picture to see the names appear on the picture itselfâjust click a name to edit it.
Combine face albums. Photos lets you combine face albums, which is handy when you prefer to have just one album for, say, the couples in your life. To do this, select a face album, and then â-click to select another. Then Control-click one of them and choose âCombine 2 Facesâ from the shortcut menu. Photos merges both face albums (or however many you selected) into a single album.
Tip
Think long and hard before you combine face albums. If thereâs a chance youâll want to access pictures of just one of those people down the road (for a slideshow, say), then leave their individual face albums intact, and instead create a smart album based on multiple face tags. To do that, choose FileâNew Smart Album and in the pane that appears, set the menus to Face, âis,â and then pick a face tag from the last menu. Click the + icon to add another line of criteria, and then choose the same menu options but pick another name. Repeat this process until youâve includes all the people you want in that smart album. (Faces in the Suggested Faces drawer arenât available in the smart album menus; you have to confirm some of them before they show up in the list.)
Delete a face tag. Photos is a little overzealous with its facial recognition, and frequently tries to tag faces it finds in statues, wall art, Star Trek action figures, and so on. In these cases, you can improve Photosâ recognition skills by deleting the tag (that way, Photos remembers not to try and tag pictures like that in the future). To do so, double-click the picture to open it, point your cursor at the desired face, then click the X on the white circle that appears.
Delete a face album. Alas, there are times when a person in your photographic life needs to take a hike. Whether the split is due to a break-up or a disagreement on which band will go down as the greatest in rock-and-roll history, you can easily delete peopleâs face albums. This doesnât delete any pictures the album contains, but at least you donât have to stare at the personâs face each time you pop into the Faces album. To delete a face album, select it, and then press the Delete key. In the confirmation pane that appears, click Delete. You can also Control-click an albumâs icon, and then choose âRemove 1 Person from Facesâ in the shortcut menu that appears. To delete a photo from the Suggested Faces drawer, Control-click it and choose âIgnore this face.â
Get Photos for Mac and iOS: The Missing Manual now with the O’Reilly learning platform.
O’Reilly members experience books, live events, courses curated by job role, and more from O’Reilly and nearly 200 top publishers.

