If youâre new to OS X or youâve never before used iPhoto, then you can breeze through this chapter in no time flat. Youâll learn how to get Photos (if you donât yet have it) and read an incredibly helpful overview of iCloud Photo Library (Meet the iCloud Photo Library), the Apple service you can use to back up and then sync your Photos library onto all of your Macs and iOS devices. This chapter also includes a wonderful strategy for managing Photos in a family situation (Photos for Families) so that your Photos world doesnât get out of hand. Feel free to skip everything else in this chapter and move to more exciting topics like importing your pictures and videos, which is covered in Chapter 2.
If, on the other hand, youâve been in the Mac universe for a while and youâve been using iPhoto or Aperture to manage your digital memories, there are some important things to consider before launching Photos. As youâll learn starting on Migrating from iPhoto or Aperture to Photos, thereâs a fair amount of preparation you need to do in order to smoothly migrate from those older programs to Photos. This chapter arms you with everything you need to know.
You may be wondering how much Photos costs. Good news: Itâs free! On both Macs and iOS devices, Photos is part of the operating system (the software that lets everything run). On Macs, the operating system is called OS X, and on iOS devices itâs called, well, iOS.
The Photos app is installed on every Mac sold since April 2015. Youâll find its circular, rainbow-colored icon in the Dock and in your Applications folder. (To open this folder, go to the Finder and press Shift-â-A or choose GoâApplications.)
If you bought your Mac before April 2015, you have to update your operating system to OS X 10.10.3 (a.k.a. Yosemite) or higher to get Photos. (As of this writing, the latest version of OS X Yosemite is 10.10.4. The box on Mac Requirements for Photos helps you determine whether your Mac can run this version of OS X.)
Note
Before updating your operating system, itâs a good idea to make a backup of everything on your Mac. See the box on A Super-Awesome Backup Strategy for a great backup strategy.
To update your operating system, click the ![]() menu at the upper left of your screen, choose App Store, and then click Updates at the top of the App Store window. You see a list of updated software patiently waiting to be installed on your machine. Locate the update named OS X Update Version 10.10.3 (or later) and click Update. Your Mac downloads the update, restarts, and installs the new version.
menu at the upper left of your screen, choose App Store, and then click Updates at the top of the App Store window. You see a list of updated software patiently waiting to be installed on your machine. Locate the update named OS X Update Version 10.10.3 (or later) and click Update. Your Mac downloads the update, restarts, and installs the new version.
OS X 10.10.3 weighs in at two gigabytes, so the download process can take a while. Of course, the speed of your Internet connection plays a big role in how long this takes. You can continue working until the download is finished and your Mac restarts. When the update is complete, you see the rainbow-colored Photos icon in your Macâs Dock and Applications folder.
Tip
If you donât have a high-speed Internet connection, updating your operating system can take a painfully long time and it may never fully download (say, if the connection times out). In that case, you can haul your Mac to the nearest Apple retail store, where theyâre more than happy to upgrade it to the latest and greatest version for you.
Your Mac isnât the only device that can have Photos funâthereâs a version of Photos for iOS, too. If youâre one of the billions who own an iPhone, iPad, or iPod Touch and the device is running iOS 8 or later, youâll spot the same Photos icon on your home screen (unless you moved it, that is). To see which version of iOS your device is running, fire it up, tap Settings, and then tap General. On the screen that appears, if you tap Software Update, you see your deviceâs current iOS version. If your device can run iOS 8, Software Update helpfully offers to install it. Youâre in good shape if you have an iPhone 4S or newer, an iPad 2 or newer, or an iPod Touch fifth generation or newer.
If youâre on a brand-new Mac (lucky you!) or you havenât previously used Appleâs older photo-related programs iPhoto and Aperture, then the first time you launch Photos, the program creates a new, empty file named Photos Library and plops it into your Pictures folder. (If youâre an iPhoto or Aperture veteran, jump to the next section.) A welcome screen appears that offers you a tour of your shiny new Photos app. When you click Get Started, the rather uninspiring screen shown in Figure 1-1 appears.
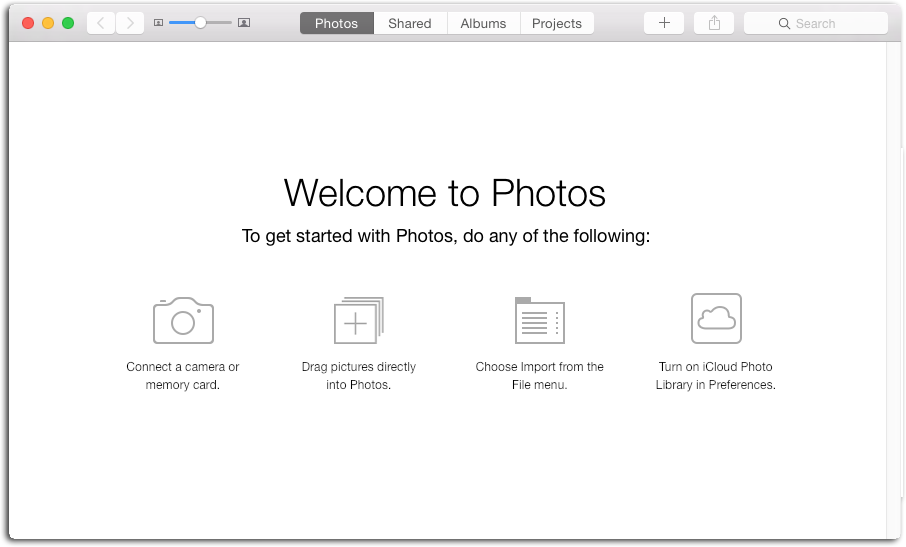
Figure 1-1. When you launch Photos for the first time, you get a sparkling clean and 100% empty library. Happily, you donât have to remember where your library lives; Photos opens it automatically when you launch the program.
UP TO SPEED: Mac Requirements for Photos
Because Photos is included with OS X 10.10.3 (a.k.a. Yosemite), your Mac has to be able to run OS X 10.10.3 in order for you to get Photos. If your Mac is included in the following list, youâre good to go:
iMac: Mid 2007 or newer
MacBook: Late 2008 aluminum or early 2009 or newer
MacBook Pro: 13-inch, Mid-2009 or newer; 15-inch, Mid/Late 2007 or newer; 17-inch, Late 2007 or newer
MacBook Air: Late 2008 or newer
Mac mini: Early 2009 or newer
Mac Pro: Early 2008 or newer
Hereâs how to find out which version of OS X your Mac is currently running: Click the ![]() at the top left of your screen and choose About This Mac. The window that appears prominently lists which version you have, such as âOS X Mavericks Version 10.9.5.â
at the top left of your screen and choose About This Mac. The window that appears prominently lists which version you have, such as âOS X Mavericks Version 10.9.5.â
If your Mac is running OS X 10.6.8 or higher, then the update to OS X 10.10.3 is free. If you have OS X 10.6 through 10.6.7, you must first update to OS X 10.6.8 before you can install OS X 10.10.3. If, on the other hand, youâre rolling retro with OS X 10.5 or 10.4, you have to pay Apple $19.99 for a DVD that you can use to update your Mac to OS X 10.6 (Snow Leopard); only then you can update to OS X 10.10.3. You can order the OS X 10.6 installer DVD online at http://store.apple.com or buy it at any Apple retail store.
To use OS X 10.10.3, your Mac needs to have at least two giga-bytes of memory (RAM) and eight gigabytes of available storage space on a hard drive or SSD (solid state drive). However, those are just the minimum requirements. Photos devours memory and storage space at an alarming rateâblame file sizes, not the programâso the more memory and storage you have, the more smoothly and speedily Photos will run (itâs common for a Photos library to reach over 100 gigabytes in size). Your Macâs processor speed also affects Photosâ performance, but if you have to choose, increasing your amount of memory makes a bigger impact than increasing your processor speed. Thatâs good news considering memory is more affordable than a new Mac!
At this point, you can skip ahead to Chapter 2 to learn about importing new content. However, it might be helpful to read the useful overview of iCloud Photo Library that starts on Meet the iCloud Photo Library, and youâll find a wonderful strategy for using Photos with family members on Photos for Familiesâhandy if you harbor multiple Mac- and iOS-using, picture-taking people under your roof. If youâre curious about using and maintaining multiple Photos libraries, then skip to Using Multiple Libraries.
If youâre a longtime Mac user, youâve probably been running iPhoto and/or Aperture for years. Alas, Apple has decided to stop updating those programs, so while itâs not urgent, your eventual best course of action is to switch over to using Photos. (Unless you relied on Aperture to edit parts of your photos, that is, in which case youâll want to switch to Adobe Photoshop Lightroom instead.) Hereâs what you should do to prepare for the transition to Photos:
Note
If you never update your Macâs operating system, the newest versions of iPhoto and Aperture will run forever. Even if you do update your Macâs operating system regularly, you can count on using iPhoto or Aperture for several more years.
Update iPhoto or Aperture to the latest version, and then open your library. To check for updates in iPhoto, open the iPhoto menu and choose âCheck for Updatesâ; in Aperture, head to the Aperture menu instead. (The latest version of iPhoto is 9.6.1, and the latest version of Aperture is 3.6.) Once youâve updated the program, open your library in it. By doing this, you ensure that all is well with your libraries and that theyâre organized in a way Photos can understand. In other words, shiny new programs usually communicate better with the latest versions of other programs.
Empty your iPhoto and Aperture Trash. Both iPhoto and Aperture are extremely careful with your pictures. When you instruct either app to delete an image, they move the file into the appâs own Trash, and thatâs where it stays until you empty the appâs Trash. Even then, those images are merely moved to your Macâs Trash. Itâs only when you empty the Finderâs Trash that the image is permanently deleted from your iPhoto or Aperture library.
This protective system is brilliant, save for the fact that most people forget to empty their app-specific Trash can; they simply assume the files are long gone. And even if they remember to take that step, they often neglect to empty their Macâs Trash. The result of upgrading a library in this state is like watching an episode of The Walking Deadâall those not-yet-deleted images come marching back to life in Photos.
Some of these zombie images are funneled into Photosâ Recently Deleted folder (FileâShow Recently Deleted) while others appear in the program with empty, ghost-like gray thumbnails. Appendix A teaches you how to deal with this problem (Upgrading and Importing), but itâs easy enough to avoid in the first place. Hereâs how:
In iPhoto, choose iPhotoâEmpty iPhoto Trash, and then click OK.
In Aperture, choose ApertureâEmpty Aperture Trash, and then click Delete.
In the Finder, choose FinderâEmpty Trash, and then click Empty Trash.
If you have multiple Aperture or iPhoto libraries, merge them or delete the ones you donât need. Merging iPhoto or Aperture Libraries and Deleting iPhoto or Aperture Libraries, respectively, have the details.
When youâre finished with these housekeeping tasks, do a happy dance and know that youâve done everything possible to ensure an easy transition to Photos.
When you first launch Photos, it searches for iPhoto and Aperture libraries on your internal hard drive and any external hard drives attached to your Mac. If Photos finds an existing library (or several), you see the Choose Library screen shown in Figure 1-2. (If it doesnât find one, you see the rather Spartan welcome screen shown in Figure 1-1.)
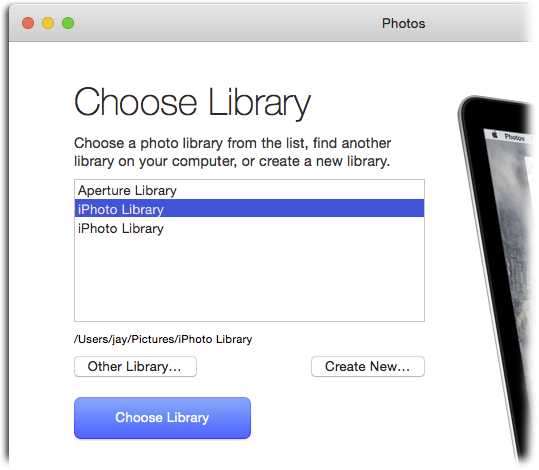
Figure 1-2. If Photos detects any iPhoto or Aperture libraries on your Mac, then this is the first screen you see. When you select a library, its location on your hard drive appears beneath the box.
If you pick a library from the list and click Choose Library, Photos sets about upgrading it for use in Photos. Your old library remains in its original location; Photos merely builds a new one and stores it in the same spot.
At this point, you may be getting a little panicky: âI donât have enough hard drive space to duplicate my entire image library!â The short answer is donât worryâPhotos doesnât duplicate your old libraries. Instead, Photos uses some seriously slick behind-the-scenes voodoo to link the contents of your old library to the new one that it creates. The box below has more info.
Now that you know your new Photos library wonât devour all your hard drive space, go ahead and pick your most important library, and then click Choose Library. When you do, Photos creates a new library for itself that contains everything from your iPhoto or Aperture library that it knows how to use. (See iPhoto and Aperture Edits Become Permanent for details on what does and doesnât get converted.)
In the next few sections, youâll find important info about upgrading iPhoto and Aperture libraries for use in Photos. Understanding this transitional stuff up front will put you at ease and better equip you for life in Photos.
If youâve worked with iPhoto or Aperture for any length of time, you know that whenever you edit a picture or video, the program merely keeps a running list of your edit requests; your originals remain fully intact. This is what powers the âRevert to Originalâ command in both programs. However, when you export content from either program, the exported version is a duplicate of your original with your changes permanently applied to it.
Photos makes use of this same system when it migrates your iPhoto or Aperture libraries: It applies all the edits you made in either program and creates a new original for each file youâve edited. Because of that, you canât use Photosâ âRevert to Originalâ command to revert all the way back to the real original in iPhoto or Apertureâyou can only revert to the original in Photos (which is the edited version delivered by iPhoto or Aperture).
For this reason, you may want to keep iPhoto or Aperture hanging around for a while, along with their respective libraries. That way, if you need to revert an image to its true original state, you can. To do that in iPhoto, find the image and choose FileâExport. In the dialog box that opens, pick Original from the Kind menu, and then click Export. To do that in Aperture, choose FileâExportâOriginal, set the export options, and then click Export Originals. Unfortunately, doing this strips the image of any custom metadata youâve added to it in iPhoto or Aperture, such as keywords, face and location tagging, and star ratings (fortunately, the metadata assigned by your camera remains intact).
When you upgrade your iPhoto or Aperture library, Photos maintains all the organizational details that it knows how to use. For example:
iPhoto albums and events. Photos preserves your albums, but since Photos doesnât use Events, they migrate to a folder named iPhoto Events in Albums view. Each of your iPhoto Events becomes an album in that folder, named after the Event itself.
iPhoto books, cards, and calendars. Most iPhoto projects are preserved and viewable in Photosâ Projects view. However, if a book, card, or calendar uses a theme that Photos doesnât have, it gets converted into an album instead.
Aperture albums and projects. Photos preserves any albums you made in Aperture, but all subfolders, as well as book and web projects, migrate to a folder named Aperture Projects in Albums view. (In early versions of Photos, these Aperture projects may inexplicably be placed in the iPhoto Events album, so have a look there as well.)
Slideshows. Happily, slideshows from both iPhoto and Aperture remain fully intact as slideshow projects, viewable in Projects view. That said, if a slideshow made in those programs uses a theme that Photos doesnât have, the Classic theme is substituted instead.
Smart albums. If your iPhoto or Aperture library has any smart albums that rely on features not included in Photosâsay, star ratings or Places tagsâPhotos appends â(modified)â to the end of their album names. Itâs then up to you to examine those albums to see how Photos has modified their criteria. Fortunately, Photos converts star ratings and Places tags to keywords (described next) and converts smart album criteria to look for that stuff instead. However, if your original smart album uses only conditions that Photos doesnât understand, such as âphotos edited in an external editor,â then that smart album doesnât show up in Photos at all.
Metadata. Photos preserves most metadata such as keywords and titles, but Photos converts most everything else to keywords. For example, star ratings become keywords (1 Star, 2 Star, and so on), as do iPhoto Places tags (say, âPlace is Mauiâ) and Aperture color labels (Green, Purple, and so on). Photos assigns the keyword âFlaggedâ to flagged images from either program and corrals them into a smart album named Flagged in Albums view. Unfortunately, custom Aperture metadata doesnât migrate to Photos at all.
In summary, take heart that most of your iPhoto and Aperture world gets ported into Photos albums, so youâll need to root around in Albums view to find much of your stuff. That said, slideshows stay intact in Projects view, which is really nice. Overall, the migration from iPhoto or Aperture to Photos isnât too painful, though the inability to back out of your previous edits in those programs is a galactic drag. While a few organization tools get converted to albums and keywords, thatâs better than not having those organizational goodies at all.
The truth is that switching to any program from iPhoto or Aperture, even the extremely capable Adobe Photoshop Lightroom, puts you in the exact same transitional boatâ¦if not worse.
As mentioned earlier in this chapter, upgrading an iPhoto or Aperture library for use with Photos doesnât move or replace it. Instead, Photos creates a duplicate library thatâs a fraction of the original libraryâs size, as the box on Duplicate Library Magic explains.
The takeaway here is that if iPhoto or Aperture has a beloved feature that you canât live without, you can keep using those programs. At least, you can for as long as you keep those libraries hanging around and your Macâs operating system can open those programs. Unfortunately, thereâs no way to know exactly how long that will be, but based on Appleâs history, you should be safe for several years.
Note
As of this writing, if you update to the latest version of OS X 10.10.3 before you update iPhoto to the latest version of 9.6.1, iPhoto flatly refuses to launchâeven if you have version 9.6. Worse yet, the iPhoto 9.6.1 update disappeared from the App Store so thereâs no way to get it. This is a tragedy of epic proportions and not something that Apple is likely to fix. Fortunately, Appendix A has a few solutions.
But think carefully about the consequences before embarking on this path. If you continue to use iPhoto or Aperture, Photos wonât know about any changes you make in those programs. As far as Photos is concerned, those libraries were frozen in time the moment you converted them. Similarly, donât expect iPhoto or Aperture to know about any changes you make in Photosâtheir libraries are completely separate. The best you can hope to accomplish by continuing to use iPhoto or Aperture is to export newly edited items, and then import them into Photos. If you find yourself in that situation, itâs helpful to create a smart album in iPhoto or Aperture that gathers up all the stuff youâve changed since you told Photos to convert your iPhoto or Aperture library.
Note
Unfortunately, if you create projects in iPhoto and Aperture after converting those libraries for Photos, you canât export those projects individually from iPhoto or Aperture, so youâll have to work with them in those older apps. And even if those apps could export a project, Photos can only import individual image and video files. Oh well!
While you can create multiple Photos libraries, as Chapter 10 explains, maintaining and merging them is a nightmare. So if you have multiple iPhoto or Aperture librariesâor if you created extras by accident because you have multiple user accounts on your Mac (see Photos for Families)âitâs best to merge them before you upgrade to Photos.
Fortunately, merging Aperture libraries is easy. To merge other libraries into the currently active one, launch Aperture and then choose FileâImportâLibrary. Navigate to where the other library lives, select it, and then click Import. In the resulting dialog box, choose whether youâd like to merge the two libraries to avoid duplicate images or whether youâd rather add all images from the imported library. Repeat this process for any additional Aperture libraries you wish to merge. When youâre finished, use Photos to upgrade the newly merged Aperture library to a new Photos library. Thatâs it!
Unfortunately, iPhoto doesnât have the ability to merge libraries, so you have two different ways to proceed:
If you have Aperture 3.3 or higher, you can use it to combine multiple iPhoto libraries into a single Aperture library that you can then upgrade to Photos. Before you begin, be sure to open each iPhoto library in the latest version of iPhoto (9.3 or higher) to ensure the iPhoto library is arranged in a way that Aperture understands.
Once youâve done that, launch Aperture and choose FileâSwitch to LibraryâOther/New. Use the library selector to highlight one of the iPhoto libraries youâd like to merge and click Choose. Next, choose FileâImportâLibrary, and then pick one of the other iPhoto libraries you want to merge with the first one you picked. Repeat this process for each additional iPhoto library that needs merging.
The result is an Aperture library that includes everything from the first iPhoto library you picked and from all the additional iPhoto libraries you imported. This new library exists in Appleâs unified library format, which means it can be shared between iPhoto and Aperture. You can now use Photos to upgrade the resulting merged library to a new Photos library.
You can buy a program to merge your iPhoto libraries, which is by far the most civilized approach. One such program is the $29.95 iPhoto Library Manager from Fat Cat Software (www.fatcatsoftware.com). Using it is a straightforward affair: Simply drag your iPhoto libraries onto its window, select some options for handling duplicate images, and let it rip. You can then upgrade the resulting merged iPhoto library to a new Photos library. As a bonus, iPhoto Library Manager includes PowerPhotos, which adds some slick features to Photos that it doesnât (yet) have.
Once youâve told Photos to create a new library from your iPhoto or Aperture libraries, it wonât ever look over its digital shoulder at those libraries again. After youâve confidently used Photos for a while, you can delete themâwith the following exceptions:
If you used iPhoto or Aperture to edit some pictures or videos, you should export those files before deleting their libraries. Afterward, you can import the exported goodies into Photos in myriad ways, as Chapter 2 explains.
If you created a project in iPhoto or Aperture that you canât easily duplicate in Photos, you may want to keep iPhoto or Aperture and their libraries available for future use. (You canât export and import projects such as cards, calendars, books, or slideshows into Photos.) Just be aware that in a few years OS X may be so far advanced that iPhoto or Aperture stop working.
Honestly, since your new Photos library wonât take up much hard drive spaceâat least, not until you delete the old ones, as the box on Duplicate Library Magic explainsâyou may want to keep the old libraries hanging around, just to be on the safe side.
That said, when you want to send your old libraries packinâ, locate them on your Macâtheyâre likely in the Pictures folderâsingle-click a library file you want to delete, and then choose FileâMove To Trash (you can also drag the file onto the trash icon in your Macâs dock). Either way, the file disappears from its original location (in the Pictures folder or wherever it was) and cools its heels in the Trash. To delete the file from your Mac, choose FinderâEmpty Trash. Your Mac will take some time to fetch all the pictures and videos that Photos needs from that library and move them to Photosâ library.
One of the main reasons Apple created Photos is to provide a better way to manage and access all your pictures and videos across your devices: your Macs, iOS devices, cameras, and so on. Part of Appleâs goal is to reduce the time you spend managing your digital memory collection so youâll have more time to be creative. Apple named their solution iCloud Photo Library.
Note
While the dynamic duo of Photos and iCloud Photo Library is more than adequate for most people, professional photographers need a more robust solution. In that case, consider using Adobe Photoshop Lightroom CC in conjunction with Lightroom Mobile instead.
The concept is brilliant: Once you turn on iCloud Photo Library, the pictures, videos and albums in your Photos library are uploaded to Appleâs iCloud servers. That content is then downloaded into the Photos app on your other devices (Macs and iOS gadgets included). Changes you make on one device are automatically synced to all your other devices. You can even view and manage your Photos library from any Internet-connected web browser. And thereâs more:
Itâs a space saver. You canât store all your photos and videos on all your devices; there just isnât enough storage space. iOS devices have limited space, and Appleâs newest MacBooks have less space than they used to because they sport SSD drives, which are smokinâ fast but lack the storage capacity of their traditional hard drive forebears.
iCloud Photo Library solves this storage conundrum by putting full-quality versions of all your pictures and videos on Appleâs iCloud servers. It then delivers smaller versions onto your iOS devices. When you need the full-quality version of an imageâsay, when you edit itâiCloud Photo Library delivers it to the device. As your device runs out of space, full-quality versions of the pictures and video you access the least are removed to make room for the new ones. As explained in the box on Optimizing iCloud Storage Space on Your Devices, you can choose to use smaller versions of files on your Mac, too.
It manages your albums. iCloud Photo Library manages all of the albums you make in Photos. For example, if you create or edit an album on one device, that change propagates to all your other devices. (Unfortunately, smart albumsâSmart Albumsâarenât included in the syncing party.)
Edit anything, anywhere. If you add, edit, or delete a picture or video on one device, the change happens on all your other devices, tooâas long as theyâre connected to the Internet. That means you can start editing a photo or video on one device and finish the job on another. And because editing in Photos doesnât mess with your originals, you can also revert to the imageâs original state on any device.
See your pictures and videos on any computer. You can log into your iCloud account from the web browser on any Internet-connected computer. Just go to iCloud.com and log in, and you can view and organize your entire photo and video library. How cool is that?
Itâs a backup system. By its very nature, iCloud Photo Library serves as an off-site backup for all your digital memories (at least, all the ones in your System Photo Library; thereâs more on that in the next section). If your Mac, iPhone, or iPad gets lost or destroyed, your pictures and video are safe on Appleâs iCloud servers. This includes everything you add to your Photos libraryâpictures from other digital cameras (including raw files), scans of old photos and documents, videos, screen captures from your iOS devicesâeverything.
What it costs. Everyone who registers their Mac or iOS device with Apple gets an Apple ID and five gigabytes of free storage space (Apple prompts you to register the minute you power up your new Apple device). While this is sufficient for backing up your iPhone, storing email, and saving a few Keynote files, snap-happy photographers will use up this space at warp speed. As of this writing, Appleâs monthly storage rates are 20 gigabytes for $0.99; 200 gigabytes for $3.99; 500 gigabytes for $9.99; and 1 terabyte for $19.99. These prices are per person, meaning that no one else can share the extra storage with you. In other words, each person with a Photos library is responsible for his or her own iCloud storage.
Note
While other cloud-based storage services such as Dropbox, Google Drive, Microsoft OneDrive, and Amazon Cloud Drive cost less per gigabyte of storage than iCloud, they donât offer the instant, automatic cross-device syncing of pictures and videos in your Photos library. So you pay a premium to use Appleâs system, but it greatly simplifies your Photos life.
If you pony up for more iCloud storage space but then stop paying, your devices keep the items that are already stored on them, but syncing between devices comes to a screeching halt and you no longer have a complete backup of all your stuff on the iCloud servers. (Apple doesnât say exactly when your content is deleted, but it does happen.) The result is that your Mac becomes the only device that has full-quality pictures and videos, and your iOS devices contain a mix of full-quality and smaller versions.
Alas, iCloud Photo Library isnât all peaches and cream. Aside from the monthly fee, uploading your library for the first time and syncing it to your iOS devices can take days. If youâre ready for that, then read on.
Note
By the time youâre reading this, itâs possible that Apple may have come up with a way to speed up the initial upload process. One can hope!
Before you turn on iCloud Photo Library as explained in Chapter 2, itâs helpful to understand exactly what Apple will upload. Apple doesnât want to shock (or extort) you the second you start using Photos, so turning on iCloud Photo Library is optionalâyouâre respectfully invited to do so when you create your first Photos library. Here are three key things to remember:
Only the content of your System Photo Library is uploaded to iCloud. If you maintain multiple Photos libraries (see Using Multiple Libraries), you can anoint only one of them your System Photo Library (Switching Between Libraries explains how)âiCloud ignores all your other libraries. You can think of the System Photo Library as the master library that gets used by all iCloud services: iCloud Photo Library, iCloud Photo Sharing, and My Photo Stream (thereâs more on those services in Chapter 8). Itâs also the library that iTunes pulls from to deliver photos and videos to your iOS devices and your Apple TV (see the box on Viewing Slideshows on an Apple TV).
If you change Photosâ normal behavior of copying your content into its libraryâby deselecting âCopy items to the Photos libraryâ in Photosâ preferences (see Copied vs. Referenced photos)âthen any items you add thereafter wonât be uploaded to your iCloud Photo Library. This is one of the many reasons why maintaining a single Photos library per Mac user account makes managing Photos a whole lot easier.
How it works. Since your iOS devices have limited storage space, iCloud Photo Library uses what Apple calls optimized storage, which provides each device with files that are optimized for its particular screen size. All your images are stored as thumbnails, while your most recent, favorite, and frequently accessed photos are also stored in high enough quality to be viewed clearly on that deviceâs screen. When you edit an image, iCloud downloads a higher quality version. The result is that the pictures that are most important to you are always available at a size optimized for the screen youâre displaying them on.
Security and privacy. iCloud Photo Library encrypts your digital memories to keep them secure when transferring files to and from your Mac and iOS devices, and also while being stored on the servers. This means that snoopers canât see your stuff. Of course, no system is 100% hacker-proof, so to be safe, donât store any incriminating photos in your iCloud Photo Library.
In short, iCloud Photo Library is amazing. It costs a few bucks per month, but thereâs nothing like the confidence and peace of mind you get from knowing that all your files are constantly backed up and that all your images are available on all your Apple devices.
So you did your family a huge favor and bought a Mac. And of course you set up four user accounts on the shiny new Mac, because your two kids are old enough to be responsible Mac users and you want them to learn how to use it. While doing so is completely logical, it causes a seriously unpleasant Photos-related consequence: Each user account you create on your Mac gets its very own Photos library.
Letâs say your partner comes home and uploads some pictures into the currently active Photos library, which may or may not be the one associated with his user account (maybe someone else forgot to sign out when they were done computing). You, being the responsible manager of your familyâs expensive DSLR camera, log into your user account on the Mac and import pictures into your Photos library. And of course your kids randomly upload photos into whatever Photos library is active at the moment.
Before long, nobody has the faintest idea where their pictures live, and youâre left with the unpleasant task of managing four completely separate Photos libraries. In a moment of desperation, you may even create a new Photos library and demand that everyone start using it instead.
Note
Donât panic if youâre already living a shared-Mac, multiple-Photos-libraries nightmare. You can skip ahead to the Merging Libraries and learn how to merge Photos libraries and regain some sanity
Fortunately, thereâs a four-part solution that keeps everyone happy:
If you havenât already, give each person their own user account on the shared Mac. As mentioned earlier, doing so gives them each their own Photos library, email, document storage, and so on. (If you need help creating user accounts, see https://support.apple.com/kb/PH18891.)
Give each person their own Apple ID and iCloud account. Hereâs where the magic startsâby doing this, everyone gets their own email address and the ability to share their pictures and videos with the rest of your family. (Though as you learned on Meet the iCloud Photo Library, you canât share iCloud storage space with other family members.) The section on Family Sharing in Chapter 8 (Family Sharing) walks you through this step, as well as the next two processes in this list.
Set up iCloud Family Sharing. This maneuver tells Apple that each personâup to sixâis a member of your family and thus can share iTunes and App Store purchases among them. That way, everyone gets to use the same credit cardâyou get to approve kidsâ purchases from your device, and you can set spending limitsâand you can share a family calendar using Calendar. (Youâll learn how to set up iCloud Family Sharing on Family Sharing).
Set up a shared family photo album. When you set up Family Sharing, a shared album automatically appears in Shared view in the Photos app on all your family membersâ devices. Now you can all add pictures, videos, and comments to that album, and everyone will be notified when something new is added. Members of your family can also choose to import specific items into their own librariesâsay, to create a book or calendar project (Chapter 9).
This system gives everyone a little privacy, plus itâs a great long-term solution. For example, as family members get additional iOS devices or their own Macs, or they move away (yippee!), their unique Apple ID ensures that all their pictures, videos, emails, and so on migrate to the new devices. Plus they can continue to share digital proof of their adventuresâ¦even from far away.
Get Photos for Mac and iOS: The Missing Manual now with the O’Reilly learning platform.
O’Reilly members experience books, live events, courses curated by job role, and more from O’Reilly and nearly 200 top publishers.

