The Gimp Interface
The following sections describe each group of functions in brief, and provide information such as command key combinations for the various tools where appropriate. The Gimp interface is broken down as follows:
- The Gimp toolbox
This section describes the tools available in the floating toolbox (and from the <Image> → Tools menu).
- The toolbox menu hierarchy
This section describes the menus accessible via the toolbox and the functions associated with them.
- The image menu hierarchy
This section describes the menus associated with an image window. This menu group is accessed by clicking the right mouse button within the image window.
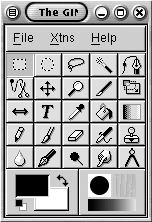
The Toolbox
Figure B-1 shows the Gimp’s toolbox. Each tool has a Tool Options dialog box associated with it that may be accessed by double-clicking on the tool’s icon. These options vary from tool to tool; generally they provide access to parameters, and may put the tool in different modes that affect its behavior.
The selection tools
All of the selection tools operate in a similar manner. To start drawing a selection, hold down the left mouse button and drag the mouse to define the selection area. To cancel a selection while drawing it, hold down the right mouse button while drawing and release the left button. To add to the existing selection, hold down the Shift key before drawing the selection. To subtract from the ...
Get Perl Graphics Programming now with the O’Reilly learning platform.
O’Reilly members experience books, live events, courses curated by job role, and more from O’Reilly and nearly 200 top publishers.

