This chapter describes the basics of web-based Oracle applications whose output or interface is viewed through a web browser, rather than through the graphical user interfaces (GUIs) offered by the applications described in Chapter 3. The advantage of employing a web solution is that you need to deploy it only once, at one web address, and thereby provide a tool that anyone with a web browser can access from anywhere on the network. Using the web as an interface can make life a lot easier for Oracle database administrators who may manage dozens of databases and who need to maintain a satellite’s eye view of their operation and performance. DBAs have long dreamed of being able to monitor their databases from the beach via remote-control applications that require nothing more than browser control from a Palm pilot or some other type of PDA, a cellular phone, or a laptop. That particular scenario is likely to remain a dream, but it’s certainly true that use of the Web adds a convenient dimension to database administration.
Many web-based database applications are implemented as Perl CGI scripts. CGI (Common Gateway Interface) programs are typically small programs (running on the web server) that have historically been used to provide dynamic content to web pages. The output of a CGI program is simply an HTML page that is read by a web browser. How do CGIs work? On the client side, the browser calls a CGI in the same way that it would call a static web page — by making a request for a file from the web server. By calling a CGI, though, the client is actually telling the server to run a small program. In the case of an Oracle CGI script, running that program pulls data from the Oracle database and thus produces the dynamic content for the web page. We won’t attempt to describe the details of CGI in this book. If you are interested in learning more, we recommend the following classic text by Lincoln Stein, the creator of the CGI.pm module:[17]
| Official Guide to Programming With Cgi.Pm, by Lincoln Stein (Wiley & Sons, 1998) |
In this chapter we’ll describe two excellent web-based applications for Oracle DBAs:
- Oracletool
One of the best tools around for Oracle DBAs is Adam vonNieda’s Oracletool, which provides a web-based interface for database performance monitoring and a variety of other database administration tasks. Oracletool is implemented as a Perl CGI script.
- Karma
Another excellent web-based Perl application for Oracle database monitoring is Sean Hull’s Karma. Karma is not strictly a Perl CGI script, but instead relies upon daemons to collect statistics and warnings for Oracle DBAs.
Something else we like about Oracletool and Karma is that you can play around with both of them on their home sites (listed later). If you’re just interested in checking them out, and if the installation procedures described in the following sections seem like a little too much work at this point, feel free to examine the demonstrations provided on their sites. We’re confident you won’t be disappointed.
Before we look at the details of these applications, we’ll take a step back and describe how to install and configure Apache, the leading web server in use today.
Apache is an open source web server — and the most popular web server in use today (including both open source and commercial web servers).[18] Apache is fast, efficient, easy to configure, and very stable on the widest variety of platforms. Apache[19] runs on virtually every operating system, including Win32, Linux, BSD, Solaris, and many other varieties of Unix. The main web site for Apache is:
| http://www.apache.org/ |
Apache and Perl are fast friends. This chapter focuses on Perl-based applications for Oracle that are implemented as CGI scripts or daemons. In Chapter 5, we’ll discuss Apache’s mod_perl module, which makes the Apache/Perl connection a more efficient one.
To obtain the downloads and information concerning Apache for Unix, Win32, and Oracle’s use of Apache, check out the following URLs:
- http://www.apache.org/
Main Apache umbrella web site for all the Apache Software Foundation (ASF) related projects.
- http://httpd.apache.org/
Central site for the actual Apache web server, the ASF’s core offering.
- http://httpd.apache.org/dist/httpd/
Main download page for Apache on Unix.
- http://httpd.apache.org/docs/windows.html
- http://httpd.apache.org/dist/httpd/binaries/win32/
Download page for Win32 Apache.
- http://www.oracle.com/ip/deploy/ias/index.html?web.html
Oracle Corporation’s use of Apache as the Oracle9i Application HTTP Server (iAS).
- http://httpd.apache.org/docs/mod/directives.html
Because Apache is supplied these days as part of your Oracle installation, you may simply choose to use that version because it’s highly compatible with the Oracle development environment. The only problem is that it might be a fairly old version of Apache, depending on the Oracle version you’re using, and it might therefore be difficult to modify in order to meet your own production standards or to blend in with non-Oracle toolsets. In case you need to customize Apache for your environment, we’ll describe in the following sections how to install an independent Apache directly on both Unix and Win32. This way, you get the latest and greatest Apache, with complete freedom to modify it to meet your personal requirements.
Download the latest stable version of Apache from:
| http://httpd.apache.org/dist/httpd/ |
Get the latest stable tarball (we used apache_1.3.24.tar.gz) and unpack it into a temporary working directory:
$ gzip -d apache_1.3.24.tar.gz
$ tar xvf apache_1.3.24.tar
$ cd apache_1.3.24
$ vi README INSTALL
The main installation instructions are within the INSTALL file where you’re offered two options:
Unless you enjoy pain, we recommend that you go for APACI every time!
Note
Although we’re installing Apache as root, it may not always be a good idea to run the resultant httpd servers as root. Most Unix systems immediately switch Apache to the nobody user in nogroup (a harmless person) once they’ve attached to port 80. However some may not and you may therefore risk superuser permissions being accessible over the Web. Alternatively, you may simply wish to run a thoroughly secure system. To achieve this goal, you may want to create a special user to run Apache, typically webuser in webgroup. Check out the Group and User directives on the Apache configuration directives page mentioned previously or via the two following references:
Let’s run through the Unix installation instructions:
We’re going to take the option to build Apache with Perl. To do this, find out where your Perl executable is living, and then configure Apache under APACI using this address, combined with the -- with-perl directive. Also, let the ./configure program know where you want to ultimately install Apache with the -prefix=MyApacheDir switch.[20] We’ll assume for now that you’re happy to install Apache in the usual place, /usr/local/apache, as the root user:
$ type perl perl is hashed (
/usr/bin/perl) $ ./configure --prefix=/usr/local/apache --with-perl=/usr/bin/perlWe should now be ready to go straight into the installation:
$ make
$ make install
You’re looking for the following output:
+--------------------------------------------------------+
| You now have successfully built and installed the      |
| Apache 1.3 HTTP server. To verify that Apache actually |
| works correctly you now should first check the         |
| (initially created or preserved) configuration files   |
...
+--------------------------------------------------------+
Finally, get the Apache httpd server itself up and running:
$ /usr/local/apache/bin/apachectl start /usr/local/apache/bin/apachectl start:
httpdstartedYou can test the successful installation by visiting localhost with your browser, as shown in Figure 4-1.
Now visit the httpd.conf configuration file and find out where the /cgi-bin/ directive will look for CGI scripts:
$ vi /usr/local/apache/conf/httpd.conf
The default should look like this:
ScriptAlias /cgi-bin/ "/usr/local/apache/cgi-bin/"
All CGI scripts should go in the /usr/local/apache/cgi-bin directory.
Now search for the following line, dealing with .cgi scripts:
#AddHandler cgi-script .cgi
Uncomment this, and add a similar line to deal with .pl scripts:
AddHandler cgi-script .cgi
AddHandler cgi-script .pl
If you’re not root, or you’d like a separate development port, you might like to change the Port value from 80, the default for the Internet, to some other value higher than 1024. A typical development port is:
Port 8080
To restart Apache, with the new configuration, run the following command:
$ /usr/local/apache/bin/apachectl restart(You will find that the Apache logs go into the /usr/local/apache/logs directory or in <server_root>/logs, depending upon how you’ve configured httpd.conf.)
You’ll find a Perl CGI example script in Example 4-1.
The process of installing Apache on Win32 platforms has improved by leaps and bounds in the last few years, and it’s now a straightforward install. We downloaded this self-extracting file:
| apache_1.3.24-win32-x86-no_src.msi |
which we obtained from:
| http://httpd.apache.org/dist/httpd/binaries/win32/ |
If you have the MSI installer program on your Windows box (as discussed in Chapter 2), double-clicking on the Apache MSI file should result in a typical pain-free Windows-style installation.The main question you’ll be asked is whether you want to run Apache as a Windows service or as a console application. We opted for the second choice because the Win32 version of mod_perl (which we’ll be installing in Chapter 5) expects Apache to be run in console mode. Follow these steps:
As with the earlier Unix installation, we made some tiny changes to the httpd.conf file to enable the execution of our CGI Perl files before starting up Apache to test them. To gain direct access to httpd.conf from the Windows Start menu, click through the following:
Start->Programs->Apache HTTP Server->Configure Apache Server->
Edit the Apache httpd.conf Configuration File
Once inside httpd.conf, note the location of CGI’s script bin:
ScriptAlias /cgi-bin/ "C:/Program Files/Apache Group/Apache/cgi-bin/"
Now find the handler line dealing with .cgi scripts:
#AddHandler cgi-script
.cgiUncomment it to activate it and add a similar line to deal with .pl scripts:
AddHandler cgi-script
.cgiAddHandler cgi-script.plAt this point, you might want to review the discussion of the Port value in the Unix installation section, but on Win32 we’re generally happy with the default HTTP value, unless we know something else is running on it:
Port 80
Fire up Apache as a console application from the Start menu:
Start->Programs->Apache HTTP Server->
Start Apache in Console
To shut down Apache via its console, simply close down the console window. Any errors will have appeared in:
C:\Program Files\Apache Group\Apache\logs\
error.logThe best web server in the world is now ready to do your bidding.
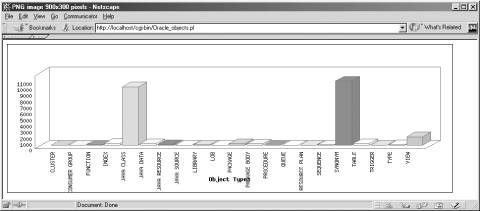
After dealing with all of these installation procedures, you’re probably itching to see some action. In a bid to avoid disappointment, we’ll try out the DBD::Chart Perl script shown in Example 4-1. (We introduced DBD::Chart in Chapter 3.) This example graphically charts Oracle database objects. (Check out the DBI API details in Appendix B, if you need more detailed information.)
Note
If you’re using ActivePerl, all of the Perl CGI scripts you place into Apache’s ../cgi-bin/ directory, under Win32 must have the following first line:
#!/perl/bin/perl
This tells the Apache web server to execute them with ActivePerl, which is generally available as:
C:\Perl\Bin\perl.exe
If the ActivePerl perl.exe executable is in a different or nondefault location, alter the Apache directive appropriately.
Example 4-1. Oracle_objects.pl
#!/perl/bin/perl use strict; use DBI; use Socket qw(:DEFAULT :crlf); # Built-in Perl module, provides $CRLF # Step 1: Tell the calling browser a mime.types PNG is on its way. print "Content-type: image/png$CRLF$CRLF"; # Step 2: Connect to Oracle and prepare the SQL. my $dbh = DBI->connect( 'dbi:Oracle:orcl', 'system', 'manager', { RaiseError => 1 } ); my $sth = $dbh->prepare( 'SELECT object_type, ' . ' COUNT(*)' . ' FROM dba_objects ' . ' GROUP BY object_type' ); $sth->execute; # Step 3: Create the DBD::Chart graph, and prepare to insert bars. my $chart_dbh = DBI->connect('dbi:Chart:'); $chart_dbh->do('CREATE TABLE bars (object_type CHAR(30), object_count FLOAT)'); my $chart_sth = $chart_dbh->prepare('INSERT INTO bars VALUES(?, ?)'); while ( my @res = $sth->fetchrow) { # Step 4: Add an entry to chart. $chart_sth->execute( $res[0], $res[1] ); } # Step 5: Prepare the Chart for output without the need for any # temporary file storage of the default PNG output. $chart_sth = $chart_dbh->prepare( "SELECT BARCHART " . " FROM bars " . " WHERE WIDTH=900 " . " AND HEIGHT=300 " . " AND 3-D=1 " . " AND X-ORIENT= 'HORIZONTAL' " . " AND TITLE = 'Object Types' "); # Step 6: Send the PNG on its way back to the browser, then clean up. $chart_sth->execute; my $row = $chart_sth->fetchrow_arrayref; binmode STDOUT; print $$row[0]; # PNG file sent here! :-) $chart_dbh->do('DROP CHART bars'); $chart_dbh->disconnect; $dbh->disconnect;
Here’s what’s going on in this script:
Before we pump out the PNG’s binary image, we need to tell the calling browser to expect a mime.types PNG output.
Note the $CRLF newline pair included here; it is used to separate the content-type declaration from the actual content. The $CRLF variable from Perl’s built-in Socket.pm ensures that we get the right combination of \015\012 for Internet line endings. The \n character normally represents \012, and \r normally represents \015; however, this may vary from system to system. To be strict about what we output, we use Socket’s $CRLF, which guarantees to be \015\012 (also known as CRLF, for carriage return/line feed). Many systems also recognize \n as a CRLF, so web people often use the \n\n pair.[21]
We create the SQL to extract the required information from Oracle.
Next, we create the destination bar chart and get it ready for data entry.
Row by row, we fill up the bar chart with SELECT results.
We prepare to output the final dynamic chart using the DBI API.
We send the PNG directly to the browser. This is done entirely in memory, without the need for a transitional operating system file. Once we’ve sent the PNG on its way, we clean up and free our resources.
Store this Perl script in your CGI bin directory under either Unix or Win32:
/usr/local/apache/cgi-bin/
C:/Program Files/Apache Group/Apache/cgi-bin/
(Notice how Apache, even on Win32, still prefers the Unix-style forward slash, which is used internally by Win32 systems anyway.)
If you’re using Unix, you will need to change the script’s first line to call your local Perl version — for example:
#!/usr/bin/perl
Now call up the following address on your browser:
| http://localhost/cgi-bin/Oracle_objects.pl |
You should see something like Figure 4-2.
As we discussed in Chapter 3, DBD::Chart is a fine piece of work, one whose limitations are bounded only by feverish imagination. All we need now is a collection of SQL scripts, a CGI program providing a pick-list of these scripts, a wing, a prayer and a few parameter switches. If we had all of these, we could create a really lovely Oracle DBA tool. Or maybe we should just download a single canned application that does all of this for us? Read on. . . .
Oracletool, developed by Adam vonNieda as a tuning, monitoring, and general database administration tool, is one of the best Perl CGI applications you’ll find anywhere. Oracletool provides a simple web-based interface to many of the day-to-day maintenance tasks an Oracle DBA needs to keep a typical database in good working order. (It’s also a very useful development utility.)
Oracletool provides a reasonable degree of security as a default, and also gives you the ability to configure more rigorous security. You can choose your level of security based on your own site’s requirements. The faint of heart will be glad to hear that Oracletool does not modify your database. You can create a user with the SELECT ANY TABLE privilege, and rest assured that running Oracletool won’t break your database. Not that you’ll need to worry in any case — Oracletool is well written, and behaves consistently.
To learn more about Oracletool, visit the following page:
| http://www.oracletool.com/ |
In the following sections we’ll show how to install Oracletool and try out a few of its options. There is much more to learn about Oracletool, however. You can find a more detailed discussion in Oracle & Open Source, and you can browse freely through the tool’s many helpful menus and screens to explore its capabilities.
The instructions for installing Oracletool are virtually identical under Unix and Win32. Get hold of the latest tarball, such as oracletool-2.0.tar.gz, and unpack it into a local directory. Good instructions come with the download. We’ll provide the usual two summaries here.
Copy the oracletool.sam file to your ../cgi-bin/ directory under Apache. Rename it to oracletool.ini. For instance:
$ cp
oracletool.sam/usr/local/apache/cgi-bin/oracletool.iniNow edit this file. Basically, ensure that ORACLE_HOME is set for the use of Perl DBI and that TNS_ADMIN is set so Oracletool can get hold of your target databases.[22] (The TNS_ADMIN value will default to $ORACLE_HOME/network/admin, but there’s no harm done making sure it’s clear to anyone later maintaining the file.)
ORACLE_HOME = /opt/oracle/product/9.0.1
TNS_ADMIN = /opt/oracle/product/9.0.1/network/admin
Now copy oracletool.pl itself to your ../cgi-bin/ directory, without renaming it this time (unless you’d prefer a .cgi suffix):
$ cp oracletool.pl /usr/local/apache/cgi-bin/oracletool.pl
Make sure that the first line of the oracletool.pl script points to the right Perl executable:
#!/usr/bin/perl
We also had some problemettes connecting orcl.world and Oracletool to Oracle9i, on SuSE 7.3 Linux, but there are a range of connection options you can try near the top of oracletool.pl. For instance, we replaced the following line, which was deliberately stripping out .world suffixes:
my %hash =
   map { (split(/\.world/i,(split(':'))[-1]))[0] , undef }
       DBI->data_sources('Oracle')
We used one of the commented-out simpler alternatives. Problem solved:
my %hash =
   map { (split(':'))[-1] , undef } DBI->data_sources('Oracle')
Once you’ve solved any rare teething problems like this, you should secure oracletool.pl by changing its permissions, as with the Unix chmod command:
$ chmod 755 oracletool.pl
Now ensure that your Apache web server and target Oracle database are running. Type the following into your browser location field:
http://localhost/cgi-bin/oracletool.pl You’ll be greeted with the screen sequence displayed in Figure 4-3.
For Win32, follow these steps:
Copy the oracletool.sam file to your ..\cgi-bin\ directory under Apache. Rename it to oracletool.ini:
C:> copy oracletool.sam
   C:\Program Files\Apache Group\Apache\cgi-bin\oracletool.ini
Now edit this file, in the same way as on Unix. Make sure ORACLE_HOME is set for the use of Perl DBI if your Win32 platform needs it, and that TNS_ADMIN is set so Oracletool can get hold of your target databases:
ORACLE_HOME = C:\\ORANT      # You may not need to set this on Win32
TNS_ADMIN = C:\\ORANT\\NET80\\ADMIN
Now copy oracletool.pl itself to your ..\cgi-bin\ directory:
C:> copy oracletool.pl
   C:\Program Files\Apache Group\Apache\cgi-bin\oracletool.pl
Make sure that the first line of the oracletool.pl script points to the right Perl executable. For Win32 using ActivePerl, that’s usually:
#!/perl/bin/perl
If you’re running on NTFS or a similarly secure NT-based filesystem, you should secure oracletool.pl by changing its permissions via your security system to have the equivalent of 755 status on Unix.
Now ensure that your Apache web server and target Oracle database are running. Then type the following into your browser location field to get to the screens displayed in Figure 4-3:
http://localhost/cgi-bin/oracletool.pl
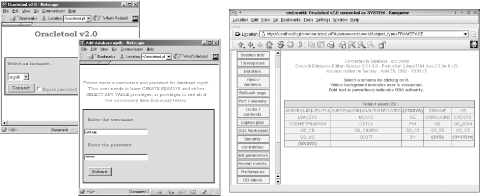
Table 4-1. Main Oracletool initialization parameters
|
Parameter |
Description |
|---|---|
|
Enables Perl DBI to connect to Oracle | |
|
Tells Oracletool where to find your tnsnames.ora file | |
|
EXPIRATION |
Cookie expiration time (defaults to one year) |
|
ORACLENAMES |
Uncomment if using Oracle*Names |
|
DEBUG |
Sends debug information to a nominated log file |
|
LOGGING |
Similar to debug, but for standard logging information |
|
LOG |
Full path of log file required by DEBUG and LOGGING |
|
AUTO_REFRESH |
Determines screen refresh rate in seconds |
|
LIMIT_SEARCH |
Limits various searches (to keep resource use down) |
|
ENCRYPTION_STRING |
Used to encrypt passwords; should be made unguessable |
|
ENCRYPTION_METHOD |
Determines whether IDEA or Blowfish is used in level 2 security |
Once you’ve connected to a database, you can change the Oracletool look and feel by selecting one of the theme options from the Preferences menu. The following Oracle user privileges are also required to run Oracletool’s selection reports:
- Oracle7, Oracle8, Oracle8i
SELECT ANY TABLE
- Oracle9i
SELECT ANY TABLE, SELECT ANY DICTIONARY
To obtain DBA reports, the user must also possess the DBA privilege. Once you’re all sorted out, welcome to Oracletool!
You’ll notice that passwords are being stored inside cookies, which means you don’t have to keep logging on. To protect these cookies, there are three levels of Oracletool security, and the program figures out ahead of time which extra Perl security modules you have installed. It then chooses the security level accordingly:
- Level 0
If you lack the security modules discussed as follows, you’ll be at this security level. Passwords are stored in cookies, in plain text — for example:
mydb.sessionid
system~manager- Level 1
The username, password, and encryption string are MD5-encoded into a single string. The default encryption string is stored within oracletool.ini:
ENCRYPTION_STRING =
changemeObviously, you may wish to alter this string. We changed ours to drinkme, and this turned our cookie password string into:
mydb.sessionid
c3lzdGVt-bWFuYWdlcg%3D%3D-FbMoQ1xyHjwXuKU3aTIL3g%3D%3D
The reason Oracletool did this was because two security modules, created by Gisle Aas, come preinstalled automatically with ActivePerl:
Digest::MD5
MIME::Base64
You’ll have to install these manually with Unix. (See later for details.)
- Level 2
This level uses the IDEA or Blowfish block ciphers (both use extremely secure algorithms). Oracletool defaults to the IDEA algorithm within oracletool.ini:
ENCRYPTION_METHOD =
ideaIf you’d like to use Blowfish instead, change idea to blowfish in oracletool.ini. You’ll need the following modules for level 2 security:
Digest::MD5
Crypt::IDEA or Crypt::Blowfish, both by Dave Paris
Crypt::CBC, by Lincoln Stein
As of this writing, some of the Crypt-* modules mentioned previously, were not available under ActiveState; you should check out the current situation at:
| http://aspn.activestate.com/ASPN/Downloads/ActivePerl/PPM/Packages |
You can get the Unix packages via the three following addresses:
| http://www.cpan.org/authors/id/GAAS/ |
| http://www.cpan.org/authors/id/D/DP/DPARIS/ |
| http://www.cpan.org/authors/id/LDS/ |
You can also find out your current security level from the main Oracletool menu by selecting the About option on the main menu
Tip
Given a choice between Crypt::IDEA and Crypt::Blowfish, we recommend that you opt for the latter. Since around 1999, Version 1.01 of Crypt::IDEA has had some build problems with Perl, particularly with Perl 5.6.1 on some flavors of Linux (though it’s possible that this been resolved with later versions of either Perl or Crypt::IDEA). This problem occurred because Perl used to “pollute” the namespace of C-based modules. The problem was fixed in Perl 5.6; however, some modules had come to rely upon this “feature.”
We won’t provide a detailed description of Oracletool here because ample documentation is available in your Oracletool download. Simply point your browser at the relevant directory where you unpacked Oracletool, and view the following file:
| file:///C|/MyOracletoolUnpackDirectory/oracletool-2.0/doc/index.htm |
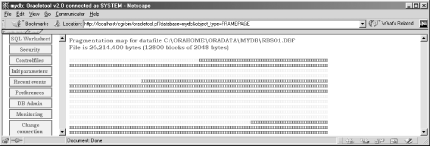
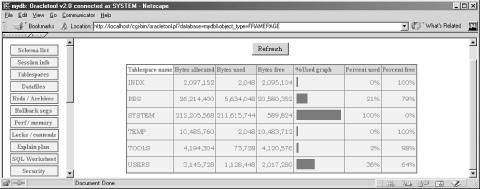
We suggest that you wander through the different Oracletool DBA options and check out the program’s many capabilities (one of them, the fragmentation monitoring option, is shown in Figure 4-4).
Oracletool was designed to be as concise and straightforward as possible. (One way it avoids “code bloat” is to limit itself to monitoring, rather than changing, its target databases.) To this end, Oracletool requires Perl DBI and DBD::Oracle as the only extra Perl modules beyond the standard module set for Perl 5.6.
The requirements code block for the 21,000+ line oracletool.pl file is simply:
require 5.003;

use strict;
use CGI qw(:standard);   # CGI, File::Basename and FileHandle
use File::Basename;      # all standard built-in Perl modules! :-)
use FileHandle;

if (! eval "require DBI") {
   ErrorPage("It appears that the DBI module is not installed!");
}
Everything else is also contained within this single CGI script, except the initialization values held in oracletool.ini.
Not only does Oracletool currently offer a lot of features (for a summary of current features, see Table 4-2), but its author is continually adding even more capabilities. You can participate in its growth by emailing new ideas to Oracletool’s creator via adam@oracletool.com.
Table 4-2. Major features of Oracletool 2.0
|
Feature |
Description |
|---|---|
|
Schema list |
Drill-down screen used to examine each individual schema. |
|
Session info |
Various session-based reports and the ability to view sessions. |
|
Tablespaces |
Large tablespace report and access to tablespace allocations graph (see Figure 4-5). |
|
Datafiles |
Datafiles report, plus access to a datafiles I/O chart. |
|
Redo / Archives |
Online redo log information, including archiving status. |
|
Rollback segs |
Access to various reports on rollback segments and transactions. |
|
Perf / memory |
Memory and SQL allocations, multithreaded server (MTS) use, and shared pool flushing. |
|
Locks / contends |
Checks on object lock contention and session wait information. |
|
Explain plan |
Online form to check SQL explain plans (Oracletool will install PLAN_TABLE for you automatically, if it is unavailable). |
|
SQL Worksheet |
Ability to enter and execute multiple SQL statements, online. SELECT statements produce formatted reports, and DML is executed. |
|
Security |
Reports on roles, profiles, auditing, and other security concerns. |
|
Controlfiles |
Various control file reports, including a breakdown of record types. |
|
Init parameters |
Report on all current INIT.ORA parameters, including descriptions. |
|
Recent events |
Various instance reports including log switches, and startup times |
|
Preferences |
Customization screens displayed for fonts and themes. |
|
DB Admin |
Many different reports and options, including:
|
|
Monitoring |
Oracletool database monitoring system. |
|
Change connection |
Connection screen to other databases. |
|
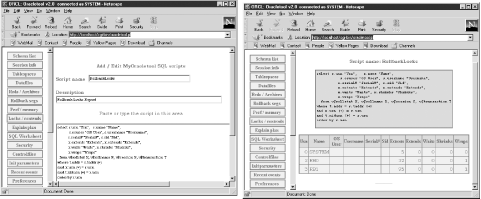
My Oracletool |
Ability to add your own scripts to the Oracletool SQL repository. |
In the following sections, we’ll look at a few Oracletool features we especially like.
The My Oracletool feature was recently added to Oracletool. Using this feature, you can add your own SQL scripts, store them within a target repository, and execute them later whenever you wish. One such script is shown in Figure 4-6.
Version 2.0 of Oracletool also added the ability to monitor databases by utilizing a PL/SQL-based framework. Oracletool checks for common database problems, such as inadequate tablespace usage, resource contention, and so on. When these problems reach certain thresholds, a warning email is delivered to a configured pager’s email address via a nominated email server. See Figure 4-7 for an example.
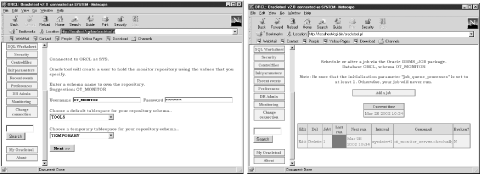
The way Oracletool is designed, the main server has certain PL/SQL procedures installed on it, and the target clients have other procedures installed. This framework is held together by database links. Because of this design, OS daemons are unnecessary. You schedule the monitoring tasks either via Oracle’s built-in DBMS_JOB package or via an OS cron script like this one:
#!/bin/sh

ORACLE_BASE=/u01/oracle
ORACLE_HOME=$ORACLE_BASE/8.1.7
TNS_ADMIN=$ORACLE_HOME/network/admin
PATH=$PATH:$ORACLE_HOME/bin

export ORACLE_BASE ORACLE_HOME TNS_ADMIN PATH

sqlplus -s ot_monitor/ot_monitor_password@server <<EOF
   exec ot_monitor_server.checkall;
EOF
The monitoring server must have a JServer release so that it is able to send emails via the DBMS_SMTP package; the result is that you must be running at least Oracle8i; note, however, that the clients need only be running Oracle8.
Sean Hull’s Karma program takes Oracle database monitoring a step further. Like Oracletool, it is intended to help DBAs with their daily work. The program is especially helpful in automating the tracking of important, though tedious-to-collect information — information that you may need to know, but be too busy to gather personally. Karma’s comprehensive configuration capabilities let you select the particular features and database events to monitor, how often to monitor them, and how strictly to monitor them. (See Figure 4-8 for a sample screen produced by Karma.) You can also break up your many databases into groups, each with its own monitoring criteria and thresholds. Karma’s goal is to help Oracle DBAs collect numerous useful statistics automatically in the background. Karma offers the ability to notify the DBA by email when database problems occur, and it provides a single place to keep track of many different databases.
Because Karma collects a wider range of statistics than Oracletool’s monitoring features do, and because it provides a full suite of online monitoring options, program installation and configuration are slightly more involved. Unlike Oracletool, Karma is not implemented as a CGI script. Instead, it runs a daemon, generating HTML pages in a specified location.
For complete information about Karma, go to:
| http://hypno.iheavy.com/karma/ |
The following sections describe the installation on both Unix and Win32. In both environments, note that you may also need several other modules, depending on your requirements:
- http://www.cpan.org/authors/id/M/MA/MARKOV/
Graham Barr’s and Mark Overmeer’s MailTools.pm Perl module. This is needed by Karma if you’ll be using the email notification facility.
- http://www.cpan.org/authors/id/KJALB/
The CPAN home of Kenneth Albanowski’s TermReadKey.pm package; it’s necessary for collecting operating system statistics under Unix.
- http://www.cpan.org/authors/id/GBARR/
Graham Barr’s home CPAN directory containing some of Perl’s most influential modules, including the libnet library required by MailTools.pm.
We downloaded the following file from the Karma site provided earlier:
| karma-1.0.0.tar.gz |
For Unix, follow these instructions:
Unpack your Karma tarball under a suitable Apache ../htdocs directory:
$ cd /usr/local/apache/htdocs
$ gzip -d karma-1.0.0.tar.gz
$ tar xvf karma-1.0.0.tar
$ cd karma-1.0.0
There are a variety of installation document files; the QUICKSTART document is especially designed for those who want to just get on with it:
$ vi README INSTALL
QUICKSTARTWhen it’s ready, Karma uses the Makefile.PL configuration method:
$ perl Makefile.PL
$ make
Check that the make test step produces output such as the following, before installing:
$ make test
PERL_DL_NONLAZY=1 /usr/bin/perl -Iblib/arch -Iblib/lib -I/usr/local/lib/perl5/5.
6.1/i686-linux -I/usr/local/lib/perl5/5.6.1 test.pl
...
ok 1
Now install:
$ make install
Before you run Karma, you may want to set the KARMA_HOME environment variable to ensure that the correct files are accessed by the daemon agents. You’ll also need to set the Oracle environment:
                        $ export KARMA_HOME=/usr/local/apache/htdocs/karma-1.0.0
$ export ORACLE_HOME=/u01/app/oracle/product/8.1.5
$ export LD_LIBRARY_PATH=$LD_LIBRARY_PATH:$ORACLE_HOME/lib
If you will later want to check the alert log file for each database via Karma, you need to install the TermReadKey.pm module to keep passwords secret. It provides Perl with various input controls for reading console input and allowing specialized input, such as reading in passwords without echoing them back. Follow these steps:
Unpack the tarball from the CPAN web site provided earlier:
$ gzip -d TermReadKey-2.14.tar.gz$ tar xvf TermReadKey-2.14.tar
$ cd TermReadKey-2.14
The command-line input effects are demonstrated by the make test step:
$ perl Makefile.PL
$ make
$ make test
...
This is ReadMode 2. It's just like #1, but echo is turned off. Great
for passwords.
You may enter some invisible text here:
You entered 'The Invisible Man'.
If the tests work OK, go for the install:
$ make install
If you’re thinking of using Karma’s automatic email options, you’ll need to install MailTools.pm. To do this, you also need Graham Barr’s libnet library. We’re after two Perl modules contained within this bundle, Net::SMTP and Net::Domain. The full libnet module collection is summarized in Table 4-3.
You can get hold of the latest bundle, such as libnet-1.0704.tar.gz, from:
| http://www.cpan.org/authors/id/GBARR/ |
Once you’ve unpacked the tarball, the perl Makefile.PL step does more configuration than most Perl module construction kits, and the test step also requires access to a list of Internet hosts. Be prepared to answer plenty of questions, especially during the installation stage. You can, however, skip these tests if you wish:
$ perl Makefile.PL
$ make
$ make test
$ make install
We’re now ready for MailTools.pm proper:
$ gzip -d MailTools-1.40.tar.gz
$ tar xvf MailTools-1.40.tar
$ cd MailTools-1.40
$ perl Makefile.PL
$ make
$ make test
$ make install
To test Karma and create errors (which we’re hoping the program will email us about), we created a ridiculously small TEMP temporary tablespace:
CREATE TABLESPACE TEMP DATAFILE
   '/u04/temp1orcl.ora' SIZE 10240 REUSE AUTOEXTEND OFF
DEFAULT STORAGE
(
  INITIAL           4096
  NEXT              2048
  PCTINCREASE       0
)
TEMPORARY LOGGING ;
Because we’re intending to use OS monitoring, we now need our own special user located directly within the target database, with a SELECT ANY TABLE privilege. We also need a small set of statistical collection tables. We can accomplish this by running two scripts provided by Karma, in the ../sql directory:
| karma_user.sql |
| karma_objs.sql |
Running these two SQL scripts produces the following output, including the expected truncation error:
SQL>@karma_userEnter value for karma_password:seadevilUser created. Grant succeeded. Grant succeeded. SQL>connect karma/seadevilConnected. SQL>@karma_objsCreating karma_os_stats table... Table created. Creating karma_alertlog_errors table... Table created. TRUNCATE TABLE karma_agent * ERROR at line 1: ORA-00942: table or view does not exist Creating karma_agent table... Table created. 1 row created. SQL>
Follow these steps:
As the nominated Oracle user, we can now get the Karma OS monitor agent going. The following script prompted us for the karma user password, seadevil, which then kicked off a daemonized karmagentd. This woke up every 300 configured seconds to check the alert log file specified:
$ karmagentd -u karma -t ORCL -a
$ORACLE_HOME/rdbms/log/alert_orcl.logThe statistics collected by karmagentd are then made accessible to the Web by the karmad program itself. We’ll be kicking this off shortly as the root user. But first, we need to make sure that our configuration is right. We do this by altering the karma.conf file. The following example shows our karma.conf settings. These will check various database states and report back to us if warning or alert thresholds are crossed. Notice the notify_email tag, which tells Karma to whom to send emails. Additional help is available in the installation files.
karma:Marlow:ORCL:karma:seadevil repqueue reperror Marlow:
notify_email:full:oraclenotify_alert:10:fragmentation,a,b,c notify_warning:15:hitratios,a,b,c Marlow:refresh:5:75 Marlow:redolog:1:30:15 Marlow:rollback:1:0:0 Marlow:tablespace:1:85:95 Marlow:slowsql:1:100:200 Marlow:alertlog:1:60:86400 Marlow:hitratios:1:95:70 Marlow:fragmentation:1:0:0 Marlow:extents:1:2:1 Marlow:latch:1:0:0 Marlow:mts:1:50:75 Marlow:os:1:5:10 warn_blink:true alert_blink:true pref_group_sections:true doc_root:/usr/local/apache/htdocs/karma-1.0.0/doc_rootWe can then start up the main karmad program:
$ karmad -c $KARMA_HOME/karma.conf
Two mail messages are now generated automatically by the Karma system and sent to the oracle OS user. These allow us to focus on the requisite errors via the web pages that show these warnings:
Message 1: From root Sun Sep 2 21:00:16 2001 Return-Path: <root> Received: (from root@localhost) by localhost.localdomain (8.8.7/8.8.7) id VAA01389; Sun, 2 Sep 2001 21:00:15 +0100 Date: Sun, 2 Sep 2001 21:00:15 +0100 From: root <root@localhost.localdomain> Message-Id: <200109022000.VAA01389@localhost.localdomain> Subject: ORCL:ALRT:fragmentation,hitratios, To:oracle@localhost.localdomainStatus: RO ORCL database **ALERT** - The following services have problems: fragmentation hitratios & Message 2: From root Sun Sep 2 21:00:16 2001 Return-Path: <root> Received: (from root@localhost) by localhost.localdomain (8.8.7/8.8.7) id VAA01389; Sun, 2 Sep 2001 21:00:15 +0100 Date: Sun, 2 Sep 2001 21:00:15 +0100 From: root <root@localhost.localdomain> Message-Id: <200109022000.VAA01389@localhost.localdomain> Subject: ORCL:WARNING:alertlog, redolog To:oracle@localhost.localdomainStatus: RO ORCL database WARNING - The following services have problems: alertlog redolog &
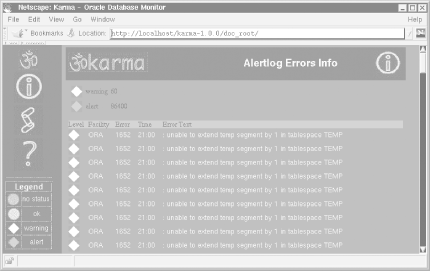
Checking on this later via the web browser, we’ll also be able to find out something about our TEMP tablespace, with the information generated from our alert log file (see Figure 4-9).
At the time this book went to press, the full daemon karmagentd functionality of Karma had yet to be ported to a Win32 service. Even now, though, you can still do a lot with karmad:
Unzip the karma-1.0.0.tar.gz file into an unpack directory under Apache’s ..\htdocs directory, such as:
C:\Program Files\Apache Group\Apache\htdocs\karma-1.0.0 You then need to check out the following set of files:
README README.WIN32 INSTALL QUICKSTART We’ll assume here that you don’t have the compilation facilities on your Win32 box that are required for an automatic installation of Karma. We’ll therefore explain how to perform a manual installation.
We unpack the karmad program from its wrapper:
$ cd bin
$ perl karmad.PL
This should leave us with the Perl program, karmad.
As with Unix, you may wish to create a Karma user within the target database. The ../sql/karma.sql script has been provided for this purpose. We’re now ready to configure Karma for database action.
The karma.conf file itself contains plenty of help on how to configure Karma, though fortunately most of the configuration is fairly intuitive. The main configuration parameters we chose were:
                     karma:Henley-On-Thames:ORCL:karma:dalek
repqueue
reperror
Henley-On-Thames:refresh:5:75
Henley-On-Thames:redolog:1:30:15
Henley-On-Thames:rollback:1:0:0
Henley-On-Thames:tablespace:1:85:95
Henley-On-Thames:slowsql:1:100:200
Henley-On-Thames:alertlog:1:60:86400
Henley-On-Thames:hitratios:1:95:70
Henley-On-Thames:fragmentation:1:0:0
Henley-On-Thames:extents:1:2:1
Henley-On-Thames:latch:1:0:0
Henley-On-Thames:mts:1:50:75
Henley-On-Thames:os:1:5:10
warn_blink:false
alert_blink:false
pref_group_sections:true
#doc_root: Commented out to use default Present Working Directory
The database connection line at the top of the list is perhaps the most important thing to get right. We also decided to default the ..\doc_root to the present working directory.
To get the basic karmad program running, change to the main Karma home directory, make sure your target Oracle database is accessible via its listener, and then run the main Karma monitor program:
C:\> cd C:\Program Files\Apache Group\Apache\htdocs\karma-1.0.0
C:\> perl bin\karmad -c karma.conf
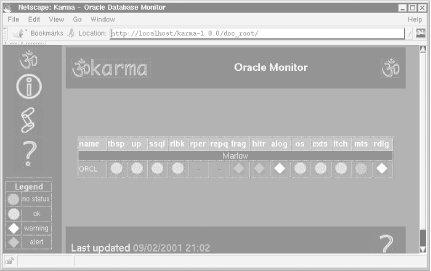
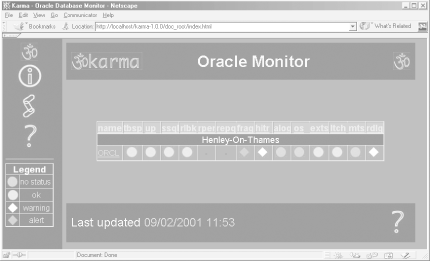
The daemonic karmad monitor periodically produces a series of HTML pages, which you can access via a web server (you can also access them directly with a local browser if you’d prefer). We liked the idea of the first option, so we started up Apache and then visited the following page:
| http://localhost/karma-1.0.0/doc_root/index.html |
You can see the first result in Figure 4-10.
If you do want to push Karma to get mail notification and OS monitoring, you’ll need to get hold of two more ActivePerl packages. Connect to the Internet and run ActivePerl’s PPM program to install the MailTools package. You may also want to install TermReadKey in anticipation of the time that the daemon-based karmagentd will be ported to a service under Win32:
C:\> ppm
PPM> install MailTools
PPM> install TermReadKey
PPM> exit
[17] Lincoln is also the author of Network Programming with Perl (Addison-Wesley, 2000), and the coauthor, with Doug MacEachern, of Writing Apache Modules with Perl and C (O’Reilly & Associates, 1999).
[18] According to Netcraft (http://www.netcraft.com/survey/), Apache’s share of the web’s active sites market was 64% as of March 2002. Following behind was Internet Information Server (IIS), placing second at 27%, and iPlanet, placing third at 2%.
[19] Apache 1.3.24 is the latest version as of this writing, with Apache 2.0 in alpha testing.
[20] In development mode, it’s often a good idea to install Apache to a nondefault area; this helps you avoid overwriting a production version. It may also be necessary if you don’t have root permission.
[21] This may actually be incorrect, though most browsers will be able to cope with it, even on DOS systems, because of the Internet rule of thumb: “Be strict about what you send out; be liberal about what you accept.” See http://www.faqs.org/rfcs/rfc2068.html for a strict interpretation of Internet line endings.
Get Perl for Oracle DBAs now with the O’Reilly learning platform.
O’Reilly members experience books, live events, courses curated by job role, and more from O’Reilly and nearly 200 top publishers.

