Enabling DMA mode transfers with Windows 2000 or Windows XP
To enable DMA under Windows 2000 or Windows XP, take the following steps:
Right-click the My Computer icon on the desktop and choose Properties to display System Properties.
Click the Hardware tab and then the Device Manager button to display the Device Manager.
Locate and expand the IDE ATA/ATAPI controllers item. On a standard system with both ATA controllers enabled, there should be three items listed, sorted alphabetically. One item describes the ATA controller itself (e.g., Intel(r) 82801BA Bus Master IDE Controller or VIA Bus Master PCI IDE Controller) and may be disregarded. The other two items should be Primary IDE Channel and Secondary IDE Channel.
Right-click the channel to which the device you want to enable DMA for is connected, choose Properties, and then click the Advanced Settings tab to display the dialog shown in Figure 14-4.
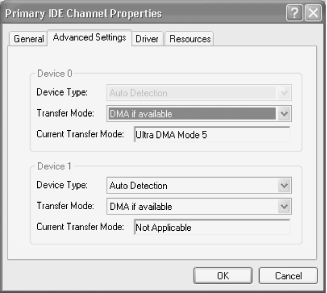
Figure 14-4. Windows XP showing this hard drive is using UDMA-5 (ATA-100) Transfer Mode
This dialog displays the Device Type and Current Transfer Mode for Device 0 (Master) and Device 1 (Slave) on the selected ATA channel. The Current Transfer Mode field shows the transfer mode currently in use, and may be changed as follows:
- DMA Mode x or Ultra DMA Mode x
Windows is using the indicated MDA or UDMA mode, which is the fastest mode supported by the interface, cable, and device. For example, ...
Get PC Hardware in a Nutshell, 3rd Edition now with the O’Reilly learning platform.
O’Reilly members experience books, live events, courses curated by job role, and more from O’Reilly and nearly 200 top publishers.

