If your sound card supports Dolby Digital AC-3 audio, it will provide an S/PDIF output jack (it usually looks like a “composite” or RCA-type connector). S/PDIF audio will need a separate Dolby Digital AC-3 (surround sound) amplifier box to process the digital signals and feed your home entertainment speakers. If you don’t have a suitable amplifier, stick with the PC speakers and do not enable S/PDIF. If you do have the Dolby Digital AC-3 amplifier, just connect the S/PDIF jack between the sound card and amplifier and plug in your surround sound speakers to the amplifier.
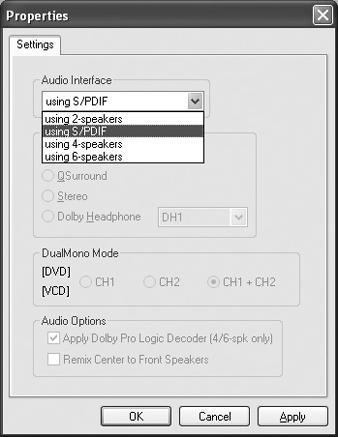
After you set up the hardware, enable S/PDIF in the movie player. The actual setup differs for each movie player application. For Windows Media Player, launch the player, select Tools → Options, click the DVD tab, and click the Advanced button (see Figure 4-7). Choose “using S/PDIF” from the Audio Interface drop-down menu, click the Apply button, and then click the OK button. Now play the movie and enjoy your surround sound.
I don’t hear any audio when I connect the TV output from my video card to a television.
You need to either play the TV audio through your PC speakers, or connect the “Line Out” or “Speaker Out” connections to the audio inputs on your TV (or VCR if you’re recording the output). However, some specialized devices, such as Pinnacle’s PCTV card, let you connect your TV audio to the sound card’s Line In port using a short jumper cable.
Advanced sound cards generally support EAX, which can apply a wide range of audio effects (see the earlier annoyance, “Getting EAX to Work”). However, EAX controls are not “smart” enough to know whether an effect (or its intensity) is appropriate for a given audio file. This means EAX can vastly improve a sound or completely ruin it. If your audio file doesn’t sound right with the selected effects, use the sound card’s control software to reduce or disable the EAX effects. For example, the EAX console for a Creative Labs Sound Blaster Audigy 2 ZS Pro (see Figure 4-8) lets you preset environments, such as cathedrals or bathrooms, and also apply customized effects. You can alter the effect, reduce the amount (percentage) of the effect, or disable EAX effects entirely using the software control panel.

Multiple speaker modes typically use a series of sound card outputs. I mean, you don’t run 4 to 6 speakers off a single stereo jack! First, recheck your speaker connections. Next, try the troublesome speakers in another (working) jack. If the speakers don’t work in other live jacks, replace the defective speakers.
Now check the speaker mode in your operating system (see "Enjoying Surround Sound" earlier in this chapter). Finally, make sure your particular application can indeed support 5.1 or 4-speaker mode. For a DVD player, check the audio properties (see "Can’t Use AC-3 Audio“). For a game, check the game’s audio options menu and select the appropriate speaker mode. If the application does not support your speakers, you won’t hear sound as expected.
My father is hard of hearing. Can I adjust Windows sounds so he will hear them without having to turn the volume way up?
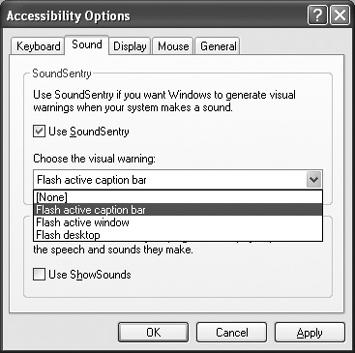
One of the easiest methods is to enable the SoundSentry feature under Windows XP. Simply open the Accessibility Options control panel, click the Sound tab, and check the Use SoundSentry box (see Figure 4-9). Select a visual warning to be displayed when the system makes a sound and click the Apply button. SoundSentry essentially disables sounds in favor of visual queues. For example, when Windows makes a sound, the active caption bar, the active window, or the entire desktop flashes. Now your Dad can work without turning up the volume.
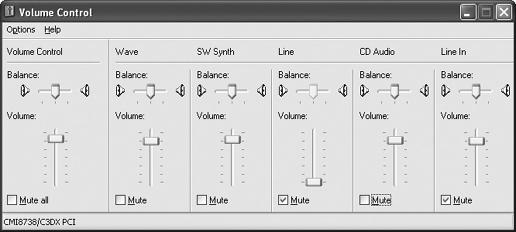
Well, turn the damn thing down! Distortion occurs when the signal overwhelms the amplifier circuit or speakers. The excessive signal causes the distortion. First, check your mixer signals. Select Start → All Programs → Accessories → Entertainment → Volume Control (see Figure 4-10), then set each of the inputs to your main sound mixer at about 75% and the mixed signal output between 75–100%. You should mute any unused inputs. If certain inputs seem prone to distortion (such as voice clips recorded through your microphone), turn the input down until the distortion disappears.
Another common oversight is the speaker volume setting. As a rule, a set of simple powered speakers should not need to go over 25–30% volume. If you cranked the speakers, turn down their volume knob until the sound clears up. If you still feel the need to shake paint from the walls, buy a good quality Harman Karden or Bose speaker set designed to deliver serious audio power.
If you turn down the volume too low and turn up the amplified speaker volume to compensate, you will likely hear static in the output. In this case, turn down the speaker volume knob, then open the Windows Volume Control (see Figure 4-10) and adjust the volume levels to achieve an acceptable signal. If you reduced the QuickTime volume too low (below 20%), turn up the QuickTime volume again and adjust the WAV volume setting in the Windows Volume Control accordingly.
Some hardware platforms (such as laptops or notebooks) may cause static when you adjust player volume through the keyboard. This static continues even when you finish adjusting the player volume. Quit QuickTime (or whatever player you use) and restart the application to clear the static. In the future, pause the QuickTime file before you make any volume adjustments, and then continue the playback.
My microphone is very sensitive to background noise, such as my kids playing in the other room. How can I reduce its sensitivity?
Before you mess around with volume controls, make sure you use the appropriate microphone for the job. You can record with two kinds of microphones: omni-directional and unidirectional. Most run-of-the-mill microphones are omni directional, which means they pick up sounds from all parts of the microphone. A unidirectional microphone only picks up sound from the top of the microphone. If you need to reduce background noise, then you should use a unidirectional microphone or tape your kids’ mouths shut (not recommended). If you absolutely must use an omni-direction microphone, try to get your subject closer to the microphone. Also, use one of those little foam windbreaks (or pop filters) around your microphone to ease the harsh “pah” sounds in words like “picnic” or “Peter.”
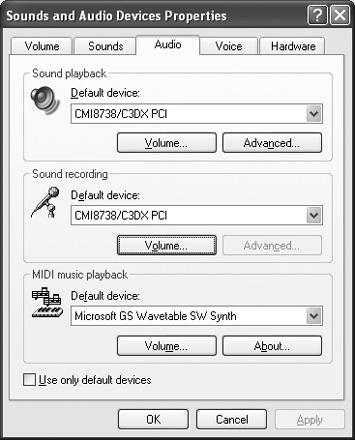
If the problem persists, just turn down your recording volume. Open the “Sounds and Audio Devices” control panel, click the Audio tab, and click the Volume button in the “Sound recording” area (see Figure 4-11) to open a Recording Control mixer where you can lower the Microphone volume. Try lowering the volume in small increments and rerecording until the background noise fades out.
I want to record some personal research notes as voice messages on my PC, but my microphone doesn’t seem to work.
Start with the obvious things, such as your microphone connection. If the microphone has an on/off switch, make sure you flip on the switch. Also, check the microphone type and set your phantom power on or off as required (see the sidebar “The Phantom“). For example, you should turn off phantom power when you use a dynamic microphone, and turn on phantom power when you use a condenser microphone. Now make sure you selected the correct recording source, and set the recording volume to an appropriate level under Windows (see the previous annoyance “Reducing Microphone Sensitivity”).
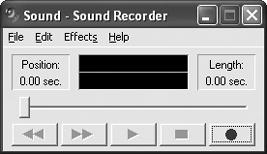
Try a simple recording application, such as Windows Sound Recorder. Select Start → All Programs → Accessories → Entertainment → Sound Recorder (see Figure 4-12). Click the Record button, speak into the microphone, and click Stop. Now click Play to hear your words played back. Adjust the Microphone recording and WAV playback volume controls to achieve the clearest sound. As an alternative, use the Sound Hardware Test Wizard to test your recording and playback setup (see the next annoyance, "Clearing Up Garbled Voice“).
Lots of folks get too close to the microphone and speak too loud. This practice overwhelms the microphone and causes awful distortion during playback. Try recording a bit further back from the microphone, and use a foam windbreak (pop filter) to help smooth out fricative sounds during speech. Also, make sure you set the phantom power to match the microphone (see the sidebar “The Phantom”).
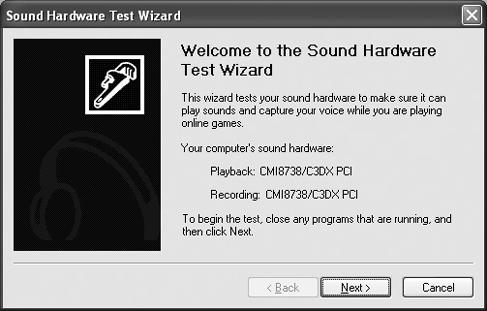
Another possible problem is incorrect audio properties. Open the Sounds and Audio Devices control panel, click the Voice tab, and select the proper recording device from the “Default device” drop-down menu. Now click the “Test hardware” button to launch the Sound Hardware Test Wizard and follow the wizard to test your recording and playback setup (see Figure 4-13).
Get PC Hardware Annoyances now with the O’Reilly learning platform.
O’Reilly members experience books, live events, courses curated by job role, and more from O’Reilly and nearly 200 top publishers.

