280 Patterns: Implementing Self-Service in an SOA Environment
One such case, is the cancel button in the UpdateCustomer.jsp page. In that
case, we simply want to be redirected to the home page (CustomerAdmin.jsp).
We can implement that as follows:
1. Following the directions in the previous section, we can create a navigation
rule that maps the outcome string cancelUpdate to theUpdateCustomer.jsp
page.
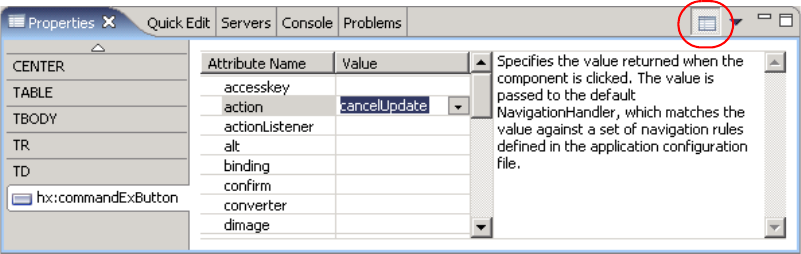
2. Click the Cancel commandButton JSF component, which should populate the
Properties window on the bottom.
3. Click the All Attributes icon, as shown on the top right portion of Figure 9-26,
to display the complete attribute list for the Cancel button.
Figure 9-26 Cancel update command detailed attributes
4. Select or type the outcome string cancelUpdate in the action attribute.
Now the Cancel button will navigate to the UpdateCustomer.jsp directly, without
any action method being created on the backing bean.
9.4.6 Implementing input validation
This section describes how input validation was implemented in the ITSOMart
front-end. The application makes use of both standard validation available in the
JSF components, as well as custom-defined validation for the e-mail format.
Implementing standard validation
Most JSF UI components include at least some level of standard input validation.
These include checks for required values, string length, and date formats. For
example, the following steps describe how to setup standard validation for the
first name component of the CreateCustomer.jsp page.
1. Open CreateCustomer.jsp on the Design tab of the page designer.
Chapter 9. JSF front-end scenario 281
2. Click the JSF inputField component used for the first name, which should
populate the Properties window on the bottom. Select the Properties tab if it
is not yet selected.
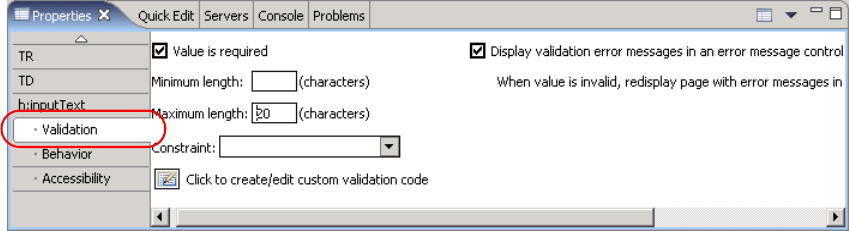
3. Select the Validation panel in the left navigation bar.
4. In the Validation panel, enter the options, as shown in Figure 9-27:
– Check the Value is required option, to indicate first name is a mandatory
field.
– Set Maximum length to 20.
– Check the option Display validation error messages in an error
message control. This will automatically place a Display Error
JSF
component adjacent to the first name input field. The field will display the
appropriate validation errors when needed.
Figure 9-27 Standard validation panel
Implementing custom validation
As we have just seen, standard validation is easy to implement in Rational
Software Architect. However, it only supports simple data types. In the ITSOMart
application, we make use of custom-defined validation to check the syntax of
e-mail addresses.
Unlike the standard validation, custom validation requires a rather manual
process. The following sections show how we implement the special e-mail
format validation in the ITSOMart front-end.
Implement validator interface
The first step is to define a Java class to validate the e-mail address. This class
must implement the javax.faces.validator.Validator,
and specifically the validate
method. For the ITSOMart application, we created the EmailValidator class. It
provides a simple validation of the most common e-mail format (user@domain),
using Java pattern matching. There are more sophisticated e-mail validation

282 Patterns: Implementing Self-Service in an SOA Environment
functions, but for the purpose of this example, this one should suffice.
Example 9-5 shows the code for the EmailValidator class.
Example 9-5 EmailValidator class
public class EmailValidator implements Validator {
public void validate(FacesContext arg0, UIComponent arg1, Object arg2)
throws ValidatorException {
System.out.println("EmailValidator start");
UIInput field = (UIInput) arg1;
String emailValue = (String)arg2;
// use regular expression to identify a reasonable e-mail
Pattern pat = Pattern.compile(".+@.+\\.[a-z]+");
if (!(pat.matcher(emailValue).matches())) {
FacesMessage errmsg = new
FacesMessage(FacesMessage.SEVERITY_ERROR,
"Invalid e-mail format", "Invalid e-mail format");
throw new ValidatorException(errmsg);
}
}
}
Registering the validator in the faces-config.xml file
Once we have created our validator class, we need to register it by adding the
lines in Example 9-6 to the faces-config.xml file.
Example 9-6 Adding the validator class to faces-config.xml
<validator>
<validator-id>emailValidator</validator-id>
<validator-class>
com.ibm.patterns.orderutil.web.EmailValidator
</validator-class>
</validator>
Attach validator to UI component
Now that we have created and registered the validator class, we need to attach it
to the e-mail UI component, using the <f:validator/> JSF tag. The component
Properties window of Rational Software Architect does not support this tag, so
we need to manually enter it in the source code.
Figure 9-28 on page 283 shows the source code for the validator being applied to
the email field of the CreateCustomer.jsp page.
Get Patterns: Implementing Self-Service in an SOA Environment now with the O’Reilly learning platform.
O’Reilly members experience books, live events, courses curated by job role, and more from O’Reilly and nearly 200 top publishers.

