268 Patterns: Implementing Self-Service in an SOA Environment
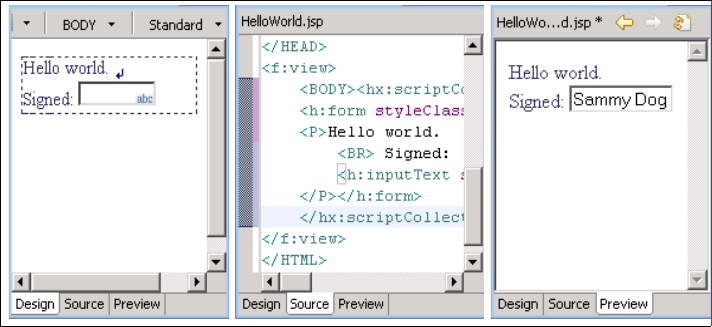
Figure 9-13 shows an example of the three tabs of the Page Designer. We
deviate here from our standard create user use case, simply because those
screens would be to wide to fit side by side in the page.
Figure 9-13 Page designer three tabs
In addition to the standard HTML and JSP tags, JSF pages have a number of
JSF UI components available for screen design. Not only are there standard JSF
tags from the reference J2EE implementation, but the framework also allows for
easy incorporation of additional tags from other vendors. For instance, Rational
Software Architect offers an IBM extension library which supports a number of
additional tags.
All pages in the ITSOMart application are Faces JSP pages that use JSF UI
components. In the subsequent sections, we show how these UI components
interact with the JSF managed beans, perform standard validation, and are used
to trigger actions.
9.4.4 Binding UI components to managed beans
As we discussed in 9.3.2, “JSF managed bean design” on page 257, managed
beans are a critical part of a JSF application. This section will show how we
create the managed beans used in the ITSOMart application, and how they are
bound to the JSF UI components.
Creating backing beans
As previously noted in 9.3.2, “JSF managed bean design” on page 257, when
using Rational Software Architect to create a Faces JSP page, a backing bean is
automatically created, and a definition for it is added to the faces-config.xml file.
The naming convention is such that the bean class will have the same base

Chapter 9. JSF front-end scenario 269
name as the JSP page, only varying in the extension (.java instead of .jsp). The
managed bean is named pc_<class>, where <class> is the name of the backing
bean class. For example, when the CreateCustomer.jsp file is created, the
CreateCustomer.java bean class is automatically created. CreateCustomer.java
will have methods to get and set each JSF UI component in the JSP file. The
pc_CreateCustomer managed bean definition is added to the faces-config.xml
file as in Example 9-3
:
Example 9-3 The pc_CreateCustomer managed bean definition
<managed-bean>
<managed-bean-name>pc_CreateCustomer</managed-bean-name>
<managed-bean-class>pagecode.CreateCustomer</managed-bean-class>
<managed-bean-scope>request</managed-bean-scope>
</managed-bean>
Creating the CustomerDO data bean
The customerDO data bean is used to store the customer data, and transfer it
across the different pages.
The first step is to create the CustomerDO
Java class. This is a standard class,
which we create under the com.ibm.patterns.order.dto package. The class
should have data members for each piece of customer information, such as first
name, last name, e-mail, address, etc. The class will also have the standard
get/set methods to set and retrieve the properties.
After the class is created, in order to declare a new data bean customerDO, we
use the page data window as follows:
1. Open one of the JSP files where the data bean is to be used. In our case, we
can use the CreateCustomer.jsp file we have used in other examples.
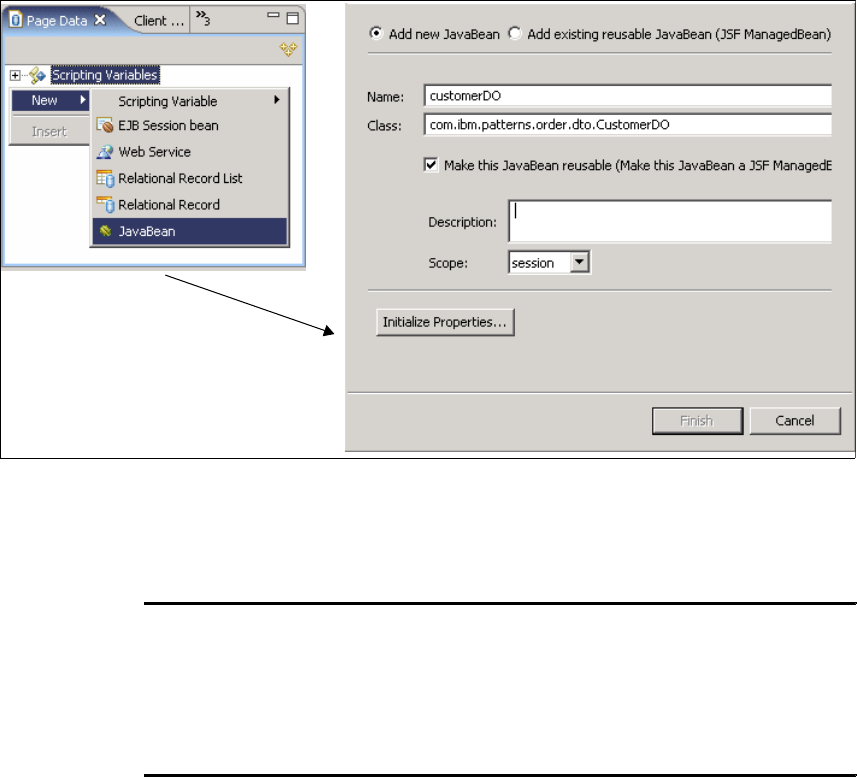
2. On the page data window, right-click and select New → JavaBean.
3. When the Add Java Bean wizard appears, enter the customerDO bean
information as shown in Figure 9-14 on page 270. Note that we need to check
the Make this JavaBean reusable check box, and set the scope to session,
in order to make the data available for other pages.
4. Click Finish and the customerDO
bean is created.
270 Patterns: Implementing Self-Service in an SOA Environment
Figure 9-14 Creating customerDO managed bean
When the bean is created through the wizard, the following lines in Example 9-4
are automatically added to the faces-config.xml:
Example 9-4 Creating the customerDO managed bean in faces-config.xml
<managed-bean>
<managed-bean-name>customerDO</managed-bean-name>
<managed-bean-class>com.ibm.patterns.order.dto.CustomerDO</managed-bean-
class>
<managed-bean-scope>session</managed-bean-scope>
</managed-bean>
After the bean is created, in order to add it to other pages such as the
UpdateCustomer.jsp page, the process is nearly the same. The only difference is
that in the Add JavaBean wizard, we select Add existing reusable Java Bean
instead. The customerDO bean will appear in a table where we can select it.
Once a bean has been added to a JSP page, it appears in its associated page
data window. Figure 9-15 on page 271 shows the resulting page data for the
CreateCustomer.jsp page after the customerDO bean is added to it.
Get Patterns: Implementing Self-Service in an SOA Environment now with the O’Reilly learning platform.
O’Reilly members experience books, live events, courses curated by job role, and more from O’Reilly and nearly 200 top publishers.

