The second plastic button at the bottom of a Palm device, marked with a telephone-handset icon, launches the Address Book program. It presents a neat master list of all your contacts, sorted by last name and displaying each person’s principal phone number. (See Figure 4.16.)
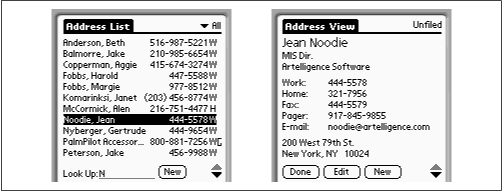
Figure 4-16. The Address Book starts with a home page of all your phone numbers (left). Tap a name to open its detail view for that name (right).
If your world of acquaintances includes 11 people or less, you can stop reading here: 11 names fit on a single “page” of the screen list.
If the person whose number you’re looking up isn’t among the first 11 listed, however, begin writing the person’s last name in the Graffiti writing area. With each letter you write, the phone-book list scrolls to the name that most closely matches what you’ve written so far. In other words, even if you have thousands of names in the list, you can home in on a single acquaintance by writing only about three letters of the name. (In Figure 4.16, writing a single letter, N, sufficed to find Jean Noodie’s entry.)
Alternatively, you can press the plastic up/down scroll buttons at the bottom of the PalmPilot—or tap the up/down black triangle buttons on the screen—to view the previous or next screens full of names.
And if you still can’t find the name you’re looking for—for example, if you can’t remember some guy’s name, but you know that he works at Microsoft—use the Find icon at the lower right of the screen. The Find command, as described earlier in this chapter, can locate text even among the details of an Address Book entry—not just the person’s name.
Note
After looking up a phone number by writing a few letters of the desired name on the Look Up line beneath the Address Book list, you don’t have to delete what you’ve written before looking up a second name.
Instead, just press one of the plastic scroll buttons at the bottom of the palmtop. Doing so instantly empties the Look Up field, making it ready for your next lookup.
A brand-new PalmPilot sorts the names in its Address Book program alphabetically by last name. If you deal mostly with people in the corporate world, however, you may prefer to see your master list sorted by company name, as shown in Figure 4.17.
If that’s the case, the PalmPilot can accommodate you. The procedure is slightly different depending on your model.
Original Pilot models: Tap Menu → Options → List By. A box like the one shown at the right in Figure 4.17 appears.
Later models: Write /R in the Graffiti area. The box shown at the right in Figure 4.17 appears. (If you prefer to use menus, tap Menu → Options → Preferences. The same box appears.)
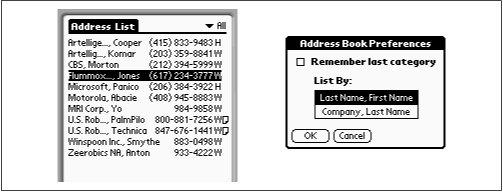
Figure 4-17. To switch between a last-name sorting order and a company-name sort (as shown at left), use the Preferences dialog box (right).
In the dialog box, select the sort order you prefer, and then tap OK.
Fortunately for your sanity, the PalmPilot isn’t so rigid about sorting that it produces silly results. If you’ve opted to sort by last name, for example, but you also have several entries with no personal names—just company names—the company names will fall into alphabetical place among your other contacts’ last names.
To input a new Address Book entry, tap New. You arrive at the screen shown in Figure 4.18, where you can begin filling in the blanks.
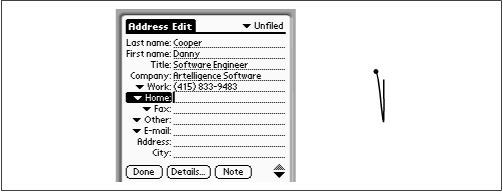
Figure 4-18. Here’s the long way to enter address-book data. The short way: download existing information from your desktop computer, as described in Chapter 6. Shown at right is the Graffiti pen stroke that advances your cursor from one blank to the next.
There are two easy ways to move from blank to blank: either tap the stylus in each blank before writing, or use the “next field” Graffiti pen stroke shown at right in Figure 4.18. As you go, don’t bother drawing the “Shift key” Graffiti stroke; the PalmPilot automatically capitalizes the first letter of every Address Book blank.
These days, you’d be hard pressed to find two people with the same set of phone numbers. One may have a home phone, pager, and fax, while another may have an email address, cell phone, and work extension.
The PalmPilot gets around this problem by letting you change the various Address Book phone-number labels on a person-by-person basis. Figure 4.19 should make this clear.
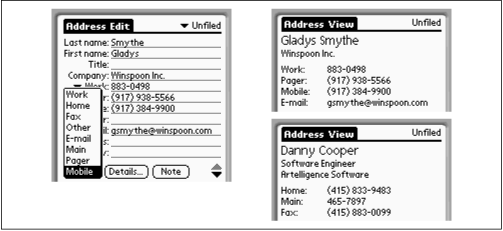
Figure 4-19. By tapping the pop-up menu beside each phone-number blank (left), you can change the labels on an address-by-address basis. The result (right): each person in your phone book might show a different set of phone-number types.
In keeping with this flexible phone-number feature, you can even specify which of each person’s five phone numbers should appear in the master startup phone list shown in Figure 4.16. For example, Danny Cooper works at home, so you’d want his Home number to be the principal listing; but Gladys Smythe spends long hours at the office—you’d want her principal phone listing to be her Work number.
To specify which number shows up in the master list, while editing the person’s information (see Figure 4.19), tap the Details button. The box shown in Figure 4.20 appears; tap the triangle next to “Show in List” to open the pop-up menu of phone numbers. Now tap the one you’d like to designate as the most important number, and then tap OK.

Figure 4-20. Use the “Show in List” pop-up menu to determine which of this person’s phone numbers should appear in the Address Book’s main startup phone list. This setting can be different for every person in your list.
Note
Yes, the Details dialog box lets you specify which telephone number you want to appear on the Address Book program’s main index listing screen. But savvy Piloteers don’t even bother with that—they know the shortcut.
It turns out that, by default, the PalmPilot displays whichever telephone number you wrote in first as its main phone number on the index screen. If you keep that in mind whenever you input a new person’s address, you can avoid ever having to specify a “main listing” phone number.
If you’re recording the names of really well-connected people, the PalmPilot’s five phone number blanks might not be enough. For that reason, the PalmPilot also offers you four blanks that can hold any information you want: birthday, spouse’s name, date of last address update, memory joggers (“bald guy on plane to LA”)—whatever you want.
When you first begin filling in a person’s contact information, you don’t see these custom blanks—they’re off the bottom of the screen. Press the lower plastic scroll button (or tap the down-pointing black triangle on the screen) to see them, as shown at right in Figure 4.21.
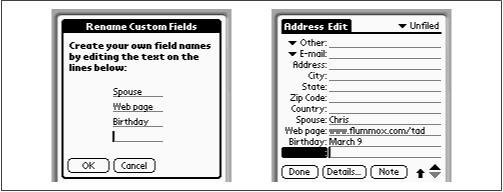
Figure 4-21. At left: you can edit the names of the custom blanks (which the PalmPilot calls “fields”). At right: your new labels appear at the bottom of every address-info screen.
To change these labels from "Custom 1,” “Custom 2,” and so on into something more useful, write /F in the Graffiti writing area. (The slash goes upward, as always.) That’s the shortcut for tapping Menu → Options → Rename Custom Fields. The box shown in Figure 4.21 appears; delete the words “Custom 1,” “Custom 2,” and so on, and write in your own preferred labels for these extra-info blanks. Tap OK when you’re finished.
When you return to the main data-entry screen, you’ll see your new labels in place, as shown at the right in Figure 4.21.
Note that, unlike the phone-number blanks, any new labels you give to the four Custom Fields apply to everyone in your Address Book. You can’t vary these blanks on a person-by-person basis.
Note
If you’re using Palm Desktop 2 for Macintosh, as described in Chapter 9, store your email addresses in the fifth phone-number blank, not in the Custom fields, nor in any of the first four phone-number fields (even if they’re empty). Strange as it sounds, the fifth phone-number blank’s contents get HotSynced to the Palm Desktop’s E-mail field, regardless of this field’s actual label.
Although the PalmPilot displays only a single line for every phone number, address blank, and Custom Field, you can actually write more than one line of information into each blank. To create an additional line, just draw the Graffiti symbol for the Return key (a slash from the top right)—and keep writing! The blank automatically expands to accommodate the new information.
Using this trick, you could actually store, for example, several additional phone numbers in a single phone-number field—or an entire “country home” address in a single Custom Field.
The Details box shown in Figure 4.20 offers a Private checkbox. If you turn this option on for a particular address, it can be made invisible to unauthorized users of your PalmPilot, just as a calendar entry can be. See “Keeping your appointments private” earlier in this chapter for details.
You can attach 650 words’ worth of notes to any name in your Address Book—a handy place to store directions to a client’s office, a phone call history, or other text worth remembering.
To add or edit a note, tap in the narrow right margin of the main Address Book list (to the right of the H and W notations in Figure 4.17). The Note screen appears, ready for text. (This, by the way, is an utterly undocumented shortcut. Everybody else on earth takes the more laborious route to the Note editing screen: first tapping a contact name to open the editing screen, then tapping the Edit button, and finally tapping the Note button.)
After you’ve added Note information, you’ll see a minuscule sheet-of-paper icon next to the person’s name (in the startup master-phone-list view only). Henceforth, you can tap this icon to reopen the Note screen for editing.
Fortunately, you don’t have to burrow to the Note screen just to read the note; the note’s text shows up on your contact’s main data screen—the one that appears when you tap somebody’s name on the main index listing. That feature makes Notes a great place to store, for example, directions to somebody’s house or office.
For more details on Notes, see Section 4.1.7.1 in Section 4.1 earlier in this chapter.
You edit names, addresses, and phone numbers the same way you input them—on the screen shown in Figure 4.16. To get there from the startup master list, tap a person’s name or number, which takes you to the screen shown at right in Figure 4.19. Now tap anywhere on the screen—don’t bother with the Edit button—and edit away.
To cleanse your address list of somebody, tap the name on the master phone list to open that person’s data screen. Now write /D in the Graffiti area (drawing the slash, as always, from the bottom). Or, if you prefer using menus, tap Menu → Record → Delete Record.
Either way, you’re now asked to confirm the deletion. You’re also offered the option of having this person’s information backed up on your desktop computer the next time you HotSync the PalmPilot, exactly as described in “Forgetting the past,” earlier in this chapter.
Palm fans in Canada and other countries occasionally grumble that the Address Book seems hardwired for American users. It has blanks for, for example, State and Zip Code, which may not be appropriate in other countries.
If that’s your situation, don’t despair. Tap Applications → Prefs, and choose Formats from the upper-right pop-up menu. Choose your country from the pop-up menu. When you return to the Address Book, you’ll see that the fields called State and Zip Code have magically changed to Province and Postal Code, or whatever’s appropriate where you live.
(Conversely, the occasional American Palm user has switched to another country’s formats accidentally, winding up frustrated that the currency setting on the Palm device is yen or francs instead of dollars. Now you know the secret: return to the Prefs application and change the setting back to United States.)
As you go through life with your PalmPilot, you may find it convenient to categorize the people in your social circle, so that you can later view a list of people only in a particular group—only your business contacts or only your Christmas-card list, for example. The PalmPilot makes it easy to flag each person with a category tag—and to show you lists of people only in specific categories.
Categories are also available in the To Do list and the Memo Pad—and, on the Palm III and later, even in the Applications launcher and Expense program. In fact, you can create up to 15 different categories for each program, giving you a total of 45 or 75.
To place an Address Book entry into a particular category, get to the editing screen shown in Figure 4.18. (From the master startup phone list, tap a name, and then tap anywhere on the screen.) The pop-up menu for your various categories is in the upper-right corner (see Figure 4.22); tap the black triangle to choose a different category, and then tap Done.
If you’re like most people, you probably find the factory-installed category list—Business and Personal (and, in the Address Book, QuickList)—a bit on the sparse side. Fortunately, you can change these labels and make up your own.
To edit your category list, tap the Category pop-up menu in the upper-right of the Address Book, Memo Pad, or To Do screen. Tap the Edit Categories command at the bottom of the list (as shown at left in Figure 4.22). The Edit Categories box appears, listing all the existing labels.
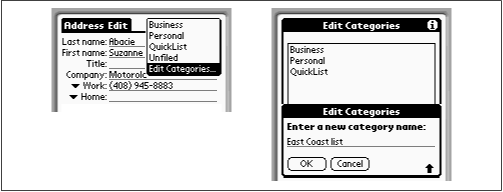
Figure 4-22. To edit the category list, use the pop-up menu in the top right of the Address Book, Memo Pad, or To Do program (left). In the Edit Categories box, tap New to create a new category label (right).
To edit one of the PalmPilot’s existing labels, tap it and then tap Edit. To add a new category, tap New. Either way, you wind up in the box shown at the right in Figure 4.22; write the new category name and tap OK.
Henceforth, your new, improved category list will appear in the upper-right corner of the program whose category list you edited. (Again, don’t be fooled by the fact that Business and Personal categories appear in all Palm programs; the category lists for each program are independent.)
Note
If you plan to add a number of items (addresses, memos, or To Dos) that all belong to the same category, don’t bother changing each one individually.
Instead, switch to the category view you want (see the next section). From now on, every address, memo, or To Do item you create will automatically fall into that category.
After you’ve tagged various Palm items with category labels, you can put them to use. For example, to view only your Personal addresses (or To Dos, or memos), tap the upper-right corner of the screen (where it usually says “Unfiled”), and then tap Personal in the pop-up menu. Suddenly all your names (or To Dos, or memos) that aren’t in the Personal category are hidden. They’re not gone—just invisible for the moment.
Note
Instead of using the upper-right pop-up menu to change category views, simply press the current program’s plastic button at the bottom of the PalmPilot. Each press switches the list to a different category.
For example, if you’re in the Address Book, press the Address Book plastic button repeatedly to view first your Business names, then your Personal names, and so on.
To view all of your addresses (or To Dos, or memos) again, choose All from that upper-right pop-up menu. (Alternatively, keep pressing the program’s plastic hardware button until the “All” category name appears in the upper-right corner of the screen.)
In the Memo Pad and To Do programs, whatever category list you’re viewing is what you’ll see the next time you use the program.
The Address Book is different: in Palm OS 2 or later, you can make the Address Book either (a) behave like the other two programs, or (b) restore the category selection to All each time you return to the program.
In the Preferences dialog box (accessible from the Options menu), you’ll see a checkbox called “Remember last category.” (See Figure 4.17.) When that option is on, the category you last used in the Address Book will still be selected when you use it next time. Otherwise, the Address Book always shows you the names in all categories when you switch to it.
You can edit the list of categories without ever risking your data. For example, if you change the name of the Business category to Office, all addresses previously in the Business category are automatically flagged with the new Office label.
Similarly, if you delete a category, any addresses already flagged with its name rejoin the pool of Unfiled addresses, but you don’t lose any of those names. (The PalmPilot explains this to you before proceeding.)
Finally, if you rename a category so that its name exactly matches another category, you effectively merge the two groups of addresses into one. (Again, the PalmPilot will explain this before acting.)
It’s perfectly safe, by the way, to ignore the PalmPilot’s category feature entirely if you don’t see how it could help your particular work style. Every address, To Do item, and memo will be flagged with the “Unfiled” category name; that’s perfectly OK.
To deselect your Address Book entry as the business card to be beamed, you have no choice but to select a different Address Book entry as the Business Card—or to delete your own entry.
Get PalmPilot: The Ultimate Guide, Second Edition now with the O’Reilly learning platform.
O’Reilly members experience books, live events, courses curated by job role, and more from O’Reilly and nearly 200 top publishers.

