Without a doubt, much of the fun of PalmPiloting is using the kinds of add-on programs included with this book. But for thousands of Palm owners, the four primary built-in programs are enough.
During the machine’s development, Palm Computing programmers became obsessed over tap counts . They’d sit around and tally the number of stylus taps—on buttons and other controls—that were necessary to accomplish frequently used tasks, such as recording an appointment.
That attention to detail and streamlining paid off. Palm’s Big Four—the programs launched by the four rounded hardware buttons at the bottom of the device—are surprisingly complete, elegant, and efficient.
Although there are thousands of add-on programs for the PalmPilot, few programmers have attempted to write a replacement for the Date Book program. That fact is a testimony to this program’s completeness; if you’ve ever whipped out your PalmPilot, pressed a single button to view your next appointment, and then watched the faces of nearby laptop users who would have required three minutes to start up their machines and retrieve the same information, you know exactly what I mean.
To check your upcoming appointments, press the plastic Date Book button at the lower-left corner of your palmtop. That button turns the machine on, launches the Date Book program, and flips to today’s date. The display looks something like Figure 4.1.
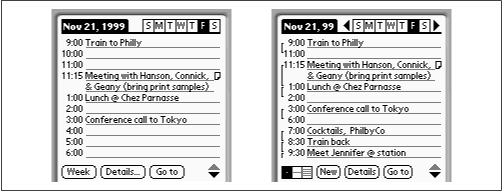
Figure 4-1. The Date Book shows the day’s events in day-at-a-glance format. At right, the time-compression feature at work. (Original Pilot models lack the ability to hide empty lines.)
The Date Book program in Palm OS 2 and later is particularly likable; as shown in Figure 4.1, time slots during the day where nothing is happening can be hidden. Your eye goes directly to the time slots where something is actually happening; as a bonus, omitting empty time slots means your PalmPilot can generally fit an entire day’s worth of activities onto its small screen. (On the other hand, you can turn this option off if you prefer seeing all hours listed, as shown at left in Figure 4.1. To do so, tap Menu → Options → Display Options, and turn off Compress Day View.)
Palm OS 2 and later also sport tiny vertical bars at the left side of the display; they help you visualize the lengths of your appointments and, because they can overlap, help clarify simultaneous events. You can hide these bars if they get in your way; tap Menu → Options → Display Options to see the Display Time Bars checkbox.
Note
If you have Palm OS 2 or later, a special shortcut awaits you. Pressing the plastic Date Book button at the lower-left of the device launches the Date Book program. But if you press that same plastic button again, you get the week-at-a-glance screen, described in an upcoming section. Press a third time to see the month view, and a fourth to return to today’s “day view” schedule. In other words, the plastic hardware button rotates among the various views of your calendar.
To view your schedule for a different day this week, tap one of the initials at the top of the screen (S M T W T F S). You can also move forward or back a day at a time by pressing the plastic up/down buttons at the bottom of the PalmPilot. (Weirdly enough, the up button shows you the next earlier date, and the down button moves forward in time.) Tap the black triangle buttons on either side of the S M T W T F S header to look at this same weekday next week (or last week).
If the day you want to see isn’t conveniently accessible using those buttons, tap the Go To button; you’ll be able to jump to any day, past or future, in the resulting dialog box (see Figure 4.3).
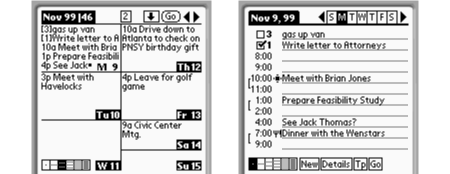
Several of the day-view screen elements are worth learning about because they appear in all of the Date Book’s views. First, at the lower-left corner, you’ll see three tiny squares filled with dots (see Figure 4.1). (Original Pilot models have a Week button instead.) Tap the middle button (or the Week button) to open the week view, shown in Figure 4.2. (If your display actually looks like Figure 4.2, you need an assistant.)
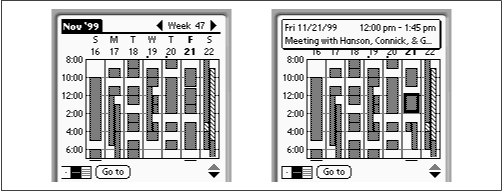
Figure 4-2. In week view (left), the dark blocks represent times that you’re busy. Tap one of the gray blocks to see what you’re supposed To Do (top right).
In the upper-left corner of every Date Book view, the currently viewed month and year appear in a black “tab.” Tap that tab with your pen—the black tab changes to reveal the current time.
Note
You’ve just read a handy two-tap trick for getting your PalmPilot to tell you what time it is, no matter what program you’re using: press the Date Book button and then tap the month/year tab in the upper left.
There is, however, a quicker way to check the time, no matter what you’re doing on the PalmPilot: tap the Applications button at the lower-left corner of the screen. You’ll see the time displayed just next to the battery graph.
While the day-at-a-glance screen shows a lot of detail, the PalmPilot can also give you a visual overview of your week ahead.
The main attraction of the week view is the gray vertical blocks that indicate chunks of busy time. As Figure 4.2 shows, the PalmPilot can even show you simultaneous (overlapping) appointments—it draws two narrow side-by-side bars. And if you’re so busy that you’re juggling more than two meetings at once, you’re treated to the rare but striking diagonal-line block shown on the last day of the week in Figure 4.2.
In addition to the gray blocks, week view offers several other useful cues and controls:
- Event details
A dark gray box doesn’t, by itself, convey a world of information. If you’re trying to set up a dinner date, for example, you can’t very well tell your companion, “Sorry, can’t make the twentieth—I’ve got a dark gray rectangle.”
But if you tap the stylus tip on a dark gray block, a banner appears at the top of the screen, as shown at right in Figure 4.2, identifying that appointment. The banner remains in place for only about five seconds, so read quickly. (While the banner is displayed, a black border appears on the appointment block you tapped.)
Alas, this feature doesn’t exist on the original Pilot models. If you tap one of the gray squares on these models, you’re taken out of week view and into the day-at-a-glance view, where you can now identify the event you tapped.
- Blank space
Tap any empty area on the time chart to open the corresponding day’s day-at-a-glance display. For example, to open Friday’s page, tap between gray blocks (if any). The day view opens, with the cursor already waiting at the time slot you tapped.
Note
To move from week view into day view, you’re ordinarily supposed to tap a blank area of the display. But suppose you’re really busy, and there isn’t any blank space between gray blocks. How are you supposed to open up a day-at-a-glance screen?
Tap the header above a particular column—one of the day-of-the-week initials (S M T W T F S) or date numbers (16 17 18 and so on). Tapping the header opens the corresponding day-view screen.
- Timeless events
Some events don’t occur at a certain time, but instead on a certain day (such as Aggie’s Birthday or Thanksgiving). Later in this chapter, you’ll learn how to add these to your Date Book. For now, note how these events appear in the week-at-a-glance view: as tiny dots just beneath the date numbers. For example, if you study the top of Figure 4.2, you’ll see the dots beneath the numbers 19 and 20. November 19 and 20 each have a non-time-specific event.
- The scroll triangles
The PalmPilot doesn’t “collapse” empty time slots in week view, as it does in day view. You’re always shown a 10-hour slice of time. To see more, tap the up- or down-triangle buttons at the right side of the screen, just below the week grid. Tapping these triangles scrolls the previous (or next) hours of the day into view.
These scroll triangles don’t appear at all unless there are events that begin or end outside of the hours you’re currently viewing. You never have to wonder if there are events “below the screen”—the triangles tell you so.
- Off-the-screen events
The appearance of the scroll triangles isn’t your only cue that events may begin or end off the current screen. Inspect your calendar grid. Is there a horizontal line at the bottom of one of the columns? (In Figure 4.2, you can see such underlines beneath the Sunday and Friday columns.) This underline signals you that you’re not seeing the entire day’s worth of events—that there’s more, later in the day. (If the line appears above the column, of course, that means there’s more to see earlier than the current display.) Tap the scroll triangles to see them.
- The week-change buttons
The top-right corner of the screen indicates which week of the year you’re viewing—Christmas generally appears in Week 52, for example—and the right- and left-pointing triangles let you view the previous and next weeks, respectively.
Instead of tapping these tiny triangles with the stylus, you can also press the plastic up/down scroll buttons at the bottom of the PalmPilot; in week view, they, too, move to the previous or next week display. (As in day view, the downward-pointing button takes you to the next week.)
- The “Go to” button
At the bottom of the week grid is a button called “Go to.” Tap it to make the date-selection display appear, as shown in Figure 4.3. In this special window, you can jump to any date to set up, consult, or edit your agenda. Be sure to select a month and year first, however; tapping a day closes this special window and opens the corresponding date’s day view.
Seizing Control over Time and Space
If you’re a night owl (or an early bird), you may be slightly annoyed that the PalmPilot, in all its views, insists that mornings begin at 8:00 am. You may wish that the PalmPilot would automatically display the hours when you’re active, beginning at, for example, 10:00 a.m. (or 5:00 a.m.).
To specify what you consider the beginning and ending hours of the day, tap Menu → Options → Preferences. The Preferences screen appears, shown in the figure below. Tap the black triangle buttons to adjust the Starting Time (the time slot the PalmPilot’s displays will put at the top of the screen) and Ending Time.
While we’re at it, note that some savvy Piloteers deliberately set their Ending Time to 11:00 p.m. Why? Suppose your day’s ending time is set to 7:00 p.m. If you wish to add an appointment for 8:00, you’re forced to: (1) write the appointment at some other time; (2) tap the time label of the slot you wrote on; and (3) change the time in a dialog box to 8:00. If you set your day’s Ending Time to 11:00 pm, scroll arrows always appear in day view (unless you’re using the “Compress Day View” option). To record an after-working-hours appointment, just tap the scroll triangles to bring the evening hours into view—no dialog box visit required.
On the other hand, a certain other population of PalmPilot users deliberately sets both the Starting Time and Ending Time to the same time. The result: in day view, you won’t see any empty time slots displayed at all, as shown in the figure below at right—one small blow in the modern war against complexity. When you consult your calendar for the day, you see only a neat, clean, short list of events; if you have no events scheduled, you see only a single blank line.
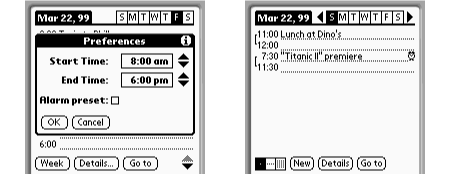
At first, you might wonder: with no empty lines available, how can you record a new appointment? If you’ve adopted this ultra-collapsed display mode, you must create a new appointment by writing the first number of its time in the Graffiti writing area. The dialog box shown in Figure 4.6 appears, so that you can finish specifying the time—and then, when you tap OK, you’ll return to the day view, where a new blank line has been created. Write the name of the appointment on it, and you’re done.
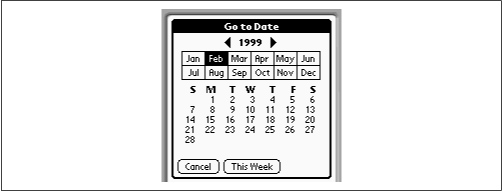
Figure 4-3. Only on the Go to Date screen is time travel a reality. If you decide not to change the date displayed, tap Cancel ; if you’ve been viewing some date in the past or future, tap This Week to return to the week display for today’s date.
Note
In Palm OS 2 or later, the Date Book offers a handy rescheduling option. Point to a gray square in week view. If you keep your stylus tip pressed against the screen, you can actually drag that appointment to a different time slot—or even a different day.
Unfortunately, your dragging is confined to the current screen; you can’t drag an appointment out of the current week. If that’s your goal, you’ll have to reschedule it manually, using the techniques described in Section 4.1.4.3, later in this chapter.
You get to the month view by tapping the rightmost of the three “view” buttons, as shown at lower left in Figure 4.4, or by pressing the plastic Date Book button repeatedly.

Figure 4-4. The month view, available in Palm OS 2 or later, lets you see how your month is shaping up.
The PalmPilot would be somewhat larger than 3 × 5 inches if it had to show you the actual names of your appointments in this month-at-a-glance view. The squares representing appointments here are so small that only three fit on each day’s square—and you can’t tap one to identify it, as you can in week view.
Instead, the PalmPilot tries to show you which chunks of the day have events scheduled: if you’ve got something before noon, you see a tiny black block at the top right of the calendar square. If something’s scheduled to begin between noon and 1:00 p.m., a black block appears at the middle right side; and if you have an appointment scheduled for 1:00 p.m. or later, a black block appears at the lower right side. Figure 4.5 should make all of this clear.
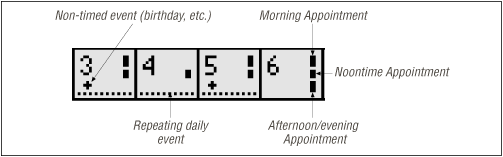
Figure 4.5 also shows an example of the nearly microscopic + symbol that may appear on the left side of a calendar square. This symbol indicates a non-timed event, such as a birthday or holiday. Finally, you may see a horizontal dotted line running across several days of the month view—your cue that some event has been scheduled to appear on several consecutive days, such as “In Dallas through Friday.”
Note
Don’t be alarmed if your month view doesn’t show the tiny + symbol (for timeless events) or horizontal dotted line (for daily repeating events). As it comes from the factory, the PalmPilot is set up not to show these extra elements in month view. You’re expected to turn them on if you want them.
To do so, tap Menu → Options → Display Options. In the resulting box, you’ll see the checkboxes that control Untimed Events and Daily Repeating Events; tap to turn these features on.
Month view’s interface controls—scroll triangles, Go to button, month/year tab, and so on—are mostly the same as in the week view. (In this view, your plastic up/down scroll buttons take you to the previous and next month; again, though, you might find the logic backward. The top button opens the previous month.)
There are only two differences between the month and week views. First, tapping the S M T W T F S header at the top of the calendar display doesn’t show you the corresponding day or week view, as you might expect; second, tapping a calendar square does open up the day view for the date you tapped.
If you use a full-fledged calendar program on your desktop PC, you may never need to add events on the PalmPilot itself. You’ll just transfer the information from your computer to the PalmPilot before each road trip, as described in Chapter 6. But if you think you may want to modify your schedule on the actual PalmPilot, read on.
You can create and edit appointments only in the day-at-a-glance view, not week or month views. Simply tap the appropriate time slot (such as 3:00) and begin writing in the Graffiti area (see Chapter 3 ).
If your appointment-to-be doesn’t fall squarely on the hour (for example, if it’s slated for 3:35 p.m.), use one of these three methods to set it up:
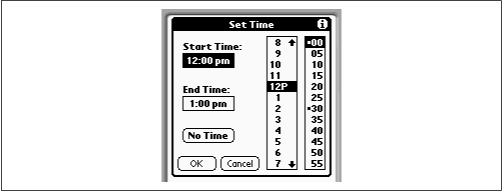
Tap the line corresponding to the correct hour, such as 3:00. Write the name of the event. Then tap the time label (“3:00”) at the left side of the screen to open the box shown in Figure 4.6. Tap the 35 in the right-most column; tap End Time (plus an hour and minute) to specify an end time, if any; and then tap OK.
Begin by writing the hour number on the right side of the Graffiti writing area (write 3 to begin an appointment for 3:35, for example).
Figure 4-6. In this box, tap inside the Start Time or End Time box, and then select a time by tapping first in the hours column and then in the minutes column. (Tap the small up- and down-arrow buttons to scroll the list of hours.) No, you can’t make an appointment for 3:33 —only five-minute time slots are available.
Doing so automatically opens the dialog box shown in Figure 4.6, where two quick taps (on 35 and OK ) will complete the time setup and return you to the day view. Now write the event’s name.
This method—writing the hour number on the Graffiti area—is also a handy shortcut if the time slot you want isn’t currently shown on the screen (9, for example); by writing in the Graffiti area, you avoid scrolling.
In day view, tap the New button. You arrive at the Set Time screen shown in Figure 4.6. Now simply begin writing the starting time for your appointment, using the standard Graffiti number symbols. The PalmPilot does its best to guess what hour you really mean; for example, when you write the number 1, 1 p.m. is automatically selected in the scrolling list of hours (instead of the less likely 1 a.m.). But if, on the other hand, you then write a 0, 10 p.m. is now highlighted. Add a 5, and 10:50 is now selected.
As you continue to write, the PalmPilot continues to interpret. If you’ve set your PalmPilot to use the 24-hour, military-style clock display, for example, and you write 25, the PalmPilot automatically enters 2:50 (since there’s no such time as 25:00).
If you’d like to jot down an untimed event—something associated with a particular day (like a birthday) but not a specific time—you have three options:
Tap the New button. In the dialog box that appears, tap OK. You return to the day view, where your cursor awaits at the top of the screen. Now write the name of the event (such as “Set clocks ahead tonight”).
Tap any empty time slot and write the name of the event. When you’re finished, tap the time slot’s label (such as “8:00”) to open the dialog box shown in Figure 4.6. Tap No Time, and then OK.
Use the easiest, fastest method of all: just start writing. (This time-saving trick isn’t available on orginal Pilot models.)
In all three cases, the name of your event appears at the top of the screen. The black diamond to its left designates this event as having no special time associated with it. (If you later decide this event is supposed to appear at a specific time, tap the black diamond. You get the Set Time box, where you can tap inside the Start Time box to set a time. Conversely, you can change an event already in a time slot into a nontimed event by tapping its time label, tapping No Time, and tapping OK.)
To change the time for an appointment, tap the time label (such as “12:00”) to its left. The dialog box shown in Figure 4.6 appears; tap an hour and minute from the two columns on the right, and then click OK to confirm the new time.
Note
Technically, you can reach the Set Time dialog box in two other ways—either via the Event Details box (see Figure 4.7) or by writing a number (in the right side of the writing area) when no Date Book event is selected (that is, the cursor isn’t blinking anywhere).
But tapping a time label at the left side of the screen is much quicker.
Alternatively, you can switch to week view and drag the appointment’s block to a different time slot, although you can’t get much precision this way.
To change the date of an appointment, tap anywhere on its line. Then tap Details. The box shown in Figure 4.7 appears; tap inside the Date dotted rectangle. A calendar appears, much like the one shown in Figure 4.3; tap to change the month and year first (if necessary) and, finally, the date. You return to the Details box. One final OK tap takes you back to the event you’ve adjusted, which is now shown on its new day.

Figure 4-7. The Details box lets you change an event’s date, set an audible alarm, schedule it to appear at regular intervals (such as once a month), add a note, or keep it safe from prying eyes.
To reschedule an appointment for a different time during the same week, here’s a shortcut: switch to week view, and then drag the appointment’s block horizontally to a different day (Palm OS 2 or later).
You might not expect such a tiny gadget to offer a recurring-events feature. But if you need to schedule a once-a-month payment, or a weekly sales meeting, or your annual anniversary, you’re in luck.
To create such an event, write it in on the first day of its kind. Then tap the Details button. In the Details box, tap inside the dotted “Repeat:” rectangle (where it now says None). You finally arrive at the box shown in Figure 4.8.
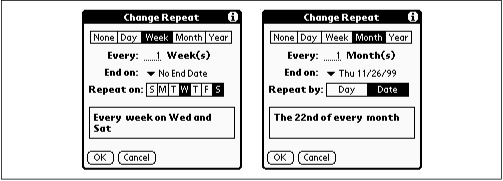
Figure 4-8. It may take you a moment to figure out what’s going on in this Change Repeat box, but you’ll eventually discover a great deal of flexibility.
Now specify how often this event should repeat. For example:
- Every day
Tap the Day box at the top of the screen. Write (in the Graffiti area) a number into the “Every:” box to indicate the frequency—if you write 2, for example, this event will automatically appear every other day on your calendar.
If this recurring event is supposed to keep going from now until doomsday, you’re finished; tap OK. Otherwise, tap the “End on:” pop-up menu to specify the stop date for this repeating appointment.
The “Every day” recurring event type is the closest thing the Date Book program has to a banner, as found in many desktop-computer calendar programs. For example, use an “Every day” setting for a business trip, to indicate which days you’ll be away.
- Every week
Tap the Week box at the top of the screen. Now you see the options shown at left in Figure 4.8. By changing the “Every:” number, you can specify that this event is something that happens every week (write 1), or every other week (write 2), and so on. You can also tap more than one day of the week in the “Repeat on:” control—Monday, Wednesday, and Friday for your gym workouts, for example. Again, be sure to specify when this event stops, if ever, using the “End on:” pop-up menu.
- Every month
This option, shown at right in Figure 4.8, is ideal for PTA meetings, mortgage-payment reminders, and other once-a-month happenings. The only new control here is the “Repeat by:” option. It lets you indicate whether this event takes place on a specific date each month (like a mortgage payment due the first of each month) or on a particular weekday (such as a computer-club meeting on the second Tuesday of each month).
How does the PalmPilot know that you mean the second Tuesday? Because that’s the day on which you wrote the first occurrence before you even began setting up the repeat feature.
- Every year
Use this option for holidays, birthdays, and anniversaries; it places a copy of this appointment on the same date of every year (December 25, for example).
Thanksgiving and Other Recurrent Problems
You might expect the “Every year” repeat option to be ideal for such annual events as Thanksgiving. Unfortunately, it won’t work for such “Fourth Thursday in November"-type holidays; after all, Thanksgiving doesn’t fall on the same numerical date of the month each year.
To schedule such an event, use the Month repeat option described earlier. Set the “Repeat by:” option to Day, and set the “Every: __ Month” option to 12. Sure enough, you’ll see the plain-English translation: “The 4th Thursday of every 12th month,” as shown below at left.
But what if it’s not that simple? What if the 4th Thursday happens to be the last Thursday of the month? How is the PalmPilot supposed to know whether turkey-day is supposed to be the fourth Thursday or the last Thursday in November?
Easy: it asks you. After you’ve created the repeat, tapped OK, and tapped OK in the Event Details box, you get the message shown below. Those programmers think of everything.

When you’ve finished setting up the repeat feature, tap OK to return to the day view. As shown in Figure 4.9, a tiny icon (resembling, you might say, a piece of paper being duplicated) appears beside the name of the event. If you ever want to change some aspect of this event’s repetition schedule, you can tap this tiny icon to open up the Details dialog box; now tap inside the Repeat box to change the repeat’s setup.
Recurring events are often a complicated and inflexible feature of calendar programs. It’s particularly pleasant, therefore, that the PalmPilot almost always handles such repeating appointments gracefully. If you reschedule the first event, for example, the PalmPilot offers to shift all of the repeating occurrences by a corresponding number of hours or days. If you change an event’s recurrence schedule after the initial appointment has already passed, the PalmPilot thoughtfully applies the change only to current and future occurrences—the past record of your life’s events is left intact.
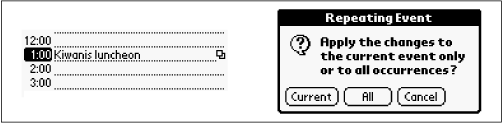
Figure 4-9. In day view, a tiny icon appears to the right of any repeating event (left). If you try to delete or change an occurrence of this repeating event, the PalmPilot is thoughtful enough to ask whether you’re trying to change all occurrences or just the one you tapped (right).
Best of all, if you try to change any aspect of the appointment itself (add or delete an alarm or note, change the time of the appointment, and so on), you’ll be asked the important question shown in Figure 4.9. The PalmPilot wants to know if you’re adding to or changing just this one appointment—or whether this change is supposed to apply to this and all future repetitions. (The button in the Figure 4.9 message may say “All,” but it means “This Event and Future Repetitions.” Changing a repeating event never disturbs the occurrences prior to the one you’re editing.)
The PalmPilot offers three different ways to delete appointments. Each offers a tradeoff of convenience and permanence. For example:
- Use the Delete Event menu command
If you’re a Graffiti speed freak, write /D in the writing area (draw the slash upward). If you prefer using the menus, tap the Menu icon to make the Record menu appear; then tap Delete Event.
Either way, a message now appears: “Delete selected event?” The message box offers a checkbox labeled “Save archive copy on PC.” If you select this option, the event you’re deleting will disappear from your PalmPilot—but will be transferred to your desktop computer the next time you HotSync (see Chapter 6). In other words, this option lets you preserve a deleted event for recordkeeping’s sake, while still freeing up memory on the PalmPilot.
- Use the Details box
Tap an event’s text, and then tap Details. In the dialog box that appears, tap Delete; at last you arrive at the confirmation box described earlier. This is the longest and least efficient method of deleting something.
- Drag through the description of an event to highlight it, and then draw the “backspace” Graffiti stroke
The text of your calendar event disappears. When you tap anywhere else on the screen, you may even see its time slot “collapse” as subsequent events for the day slide upward to fill the gap. This is the fastest way to delete an event.
Warning
If you delete the text of a recurring event, you’re instantly deleting all occurrences of that event—you won’t even be warned.
Furthermore, if you delete an appointment by deleting its text, you’re not offered a chance to have the deleted event archived on your desktop computer the next time you HotSync. (See Chapter 8, for more on archiving and HotSyncing.)
The PalmPilot’s built-in speaker doesn’t have the strength to wake up an entire dorm room, but it’s loud enough to get your attention if you’re (a) at your desk at work, hoping not to disturb your coworkers, or (b) sleeping with the PalmPilot on the bedside table. Therefore, the alarm feature is ideal for reminders and wake-up calls for the average-depth sleeper.
To set an alarm, create an appointment, as described in the previous sections. Then, with the cursor still blinking on the proper day-view line, tap Details.
As you can see in Figure 4.10, the box that now appears offers an Alarm option. Once you’ve tapped that checkbox to select it, a new set of controls appears; they let you specify how much advance notice you’d like. If you’re reminding yourself to watch a certain show on TV, you might set the alarm to 5 Minutes, so you’ve got five minutes to get downstairs and find the correct channel. If you’re off to Tampa for a relative’s wedding, on the other hand, you might want the alarm to go off 2 Days before the “Tampa wedding” Date Book event. That way, you’ve got some time to shop for a wedding gift. (You can enter any number in the blank from zero to 99, replacing the 5, which is the proposed amount.)

Figure 4-10. Tap the Minutes pop-up menu to see your choice of time units —Minutes, Hours, or Days —that represent the advance notice you want for your alarmed appointment.
Tap OK when you’re finished. Except on original Pilots, a tiny alarm clock icon appears next to your appointment’s name, as shown in Figure 4.11.
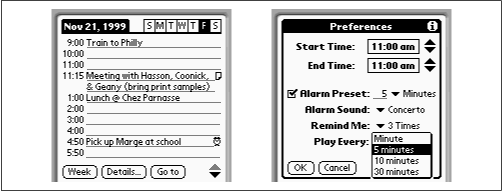
Figure 4-11. Once an alarm is set, an alarm clock icon appears next to the event’s name (except on original Pilot models), as shown at 4:50 at left. On the Palm III and later models, you can control what sound the alarm makes and how insistent it is —tap Menu → Options → Preferences to access the dialog box shown at right.
When the designated moment arrives, the PalmPilot turns itself on automatically (if it wasn’t on already). It sounds the alarm to get your attention—on the Pilot and PalmPilot, three “ding-dong!” chirps; on the Palm III and later models, whatever alarm sound you choose in the Date Book program’s Preferences dialog box (see Figure 4.11, right). Meanwhile, the screen shows a no-frills, full-screen alert message whose distinguishing characteristic is an alarm-clock icon. Tap OK to make the message go away.
If a couple of missed breakfasts have convinced you that the alarm sound isn’t loud enough to wake you, remember that the PalmPilot’s internal speaker faces the back of the unit. Therefore, leaving your PalmPilot snugly wrapped in a leather case isn’t the best way to maximize volume. Take it out of its case and leave it face down on your nightstand for maximum sound.
Note
The PalmPilot’s alarm isn’t what you’d call a musical virtuoso, especially on pre-Palm III models: you get three two-note chirps, and that’s it. If you sleep through those chirps, you’ll miss your morning meeting.
AlarmHack, an add-on program included with this book, can help. It offers 10 replacement chirp sounds, one of which might be more successful in waking you. AlarmHack also lets you make the sound play more than three times, just as the Palm III and later models can do.
But if you’re determined to sleep in, AlarmHack also offers an option that turns the entire screen into an Alarm Off button, so that you can shut the thing up without even having to open your eyes.
By tapping an untimed event’s name and then tapping the Details button, you can set up an alarm for birthdays, anniversaries, and other such events. Of course, these events aren’t scheduled for a particular time (only for a certain day); therefore, the PalmPilot isn’t quite as frantic in getting your attention as it is with timed alarms. For example, it doesn’t turn on by itself, and it doesn’t play any sound when the alert for an untimed event comes up.
Instead, the PalmPilot simply displays the full-screen alert message a few minutes, hours, or days before the beginning of the day on which your untimed event occurs. If your PalmPilot is turned on at the time, you’ll see the message; otherwise, you’ll see the message as soon as you turn the PalmPilot on during the day of the untimed event.
For example, if you leave the proposed alarm setting—five minutes—on your untimed “Christmas” event, your PalmPilot will show a message at 11:55 p.m. on Christmas Eve, if you’re using it at the time. Otherwise, the message will appear the first time you use the palmtop on Christmas day.
If you find yourself setting up alarms for most of the events in your Date Book, consider telling the PalmPilot to set up alarms for all events. (You can always turn off the alarm for the appointments for which you don’t need reminders.)
To do so, tap Menu → Options → Preferences. In the dialog box that appears, tap the Alarm Preset checkbox, and then tap Done. From now on, every new appointment you notate will give you a five-minute warning alarm (unless you change the warning time, as described earlier).
If you’re attending a live performance or movie, do the world a favor: temporarily shut up all your PalmPilot alarms. To do so, tap Applications → Prefs; from the upper-right pop-up menu, choose General; and tap the Alarm Sound checkbox so that no checkmark appears.
Your PalmPilot will still display visual messages as your alarms go off—but it won’t make a sound.
Each event in your Date Book consumes only the tiniest amount of your memory. Still, as time goes by, those appointments and notes add up. After you’ve used your PalmPilot for six months or more, consider erasing past events so that they’re not cluttering up your machine’s limited memory. You lose very little by doing so—you’ll still have a backup on your desktop computer in case you ever want to consult those past months’ calendars (or even restore them to the PalmPilot).
To purge past events, follow these steps:
Tap Menu → Record → Purge. (As an alternative to this entire step, you could use the Graffiti menu shortcut: /E. Draw the slash from the bottom.)
In the dialog box (see Figure 4.12), use the pop-up menu to specify how far back you want your appointments preserved. For example, if you choose “1 week” from the pop-up menu, everything older than one week will be deleted from the PalmPilot. As long as you leave the checkbox called “Save archive copy on PC” selected, though, those calendar entries won’t be gone forever. The next time you HotSync (see Chapter 6), those old events do disappear from the Palm Desktop program on your PC or Mac—but they’re still retrievable in the form of a Date Book archive, as described in Chapter 8 and Chapter 9.)
Tap OK.

Figure 4-12. The Purge command lets you free up PalmPilot memory by deleting (but backing up) events that have already passed.
If you’d like the added satisfaction of seeing proof that you’ve freed up memory, tap Applications → Menu → App → Info (or on pre-Palm III models, Applications → Memory instead), and relish how much lower the Date Book memory amount is now. (This is only satisfying, of course, if you checked its memory consumption before doing the purge.)
If the Date Book memory amount doesn’t look impressively low, it may be because you used the “Save archive copy on PC” option in Step 2. In that case, your PalmPilot is still hanging on to the older data, awaiting its next date with your PC. Only after your next HotSync will the PalmPilot truly be rid of those older appointments, and only then will you free up the memory you’ve worked so hard to reclaim.
Note
When you purge old Date Book events, everything older than the date you specified is erased from the PalmPilot’s memory. But what if there’s some important event in your life that you want to preserve—even though it took place a while ago? Wouldn’t it be nice if you could designate certain significant appointments as non-purgeable?
You can. Before you purge, tap the event and then tap the Details button. Change the event into a repeating event—that only repeats, for example, every 50 years. The PalmPilot can’t purge the first occurrence of any repeating event whose repetitions haven’t finished yet. As a result, the event you designated will be safe from purging—at least for the next 50 years! (And by then, you’ll be wearing the Palm MCMVIII implanted in your earlobe.)
DateBk3: The Date Book on Steroids
This powerful program offers a week view that actually shows your appointments (as shown below, left), a year view, a list view, and other views. It integrates your To Do-list items with your calendar (as shown below, right), lets you associate alarms and repeats with your To Do’s, adds a Snooze feature to the alarms, lets you create appointments that go on past midnight, offers a daily journal, and boasts 40 other improvements over the built-in Date Book program.
Its sole downside—its memory requirement of 245K—seems a small sacrifice for such an impressive piece of life-management software. (A trial version is on this book’s CD-ROM.)
A few of the PalmPilot’s features work in any of its built-in programs: attaching notes, finding lost bits of information, grabbing numbers from the Address Book program, and hiding sensitive data from unauthorized snoopers. Here’s how you might use them in the Date Book program.
The name of a particular Date Book appointment can be several lines long—255 letters and spaces, or about 40 words. But suppose you need more room; for example, suppose you want to record instructions for getting to a particular meeting. In that case, use the Notes feature. (Notes are also available in the To Do and Address Book programs.)
Here’s how: After entering the name of your appointment (or Address Book name, or To Do entry), tap Menu → Record → Attach Note. (Or, if you’re a shortcut-lover, simply write /A in the Graffiti area—the menu shortcut for Attach Note. Draw the slash from bottom to top.)
A new screen appears, like that shown in Figure 4.13, where you can write up to 4,025 characters’ worth of notes. Now that’s more like it: about 670 words, roughly a single-spaced page of typing.
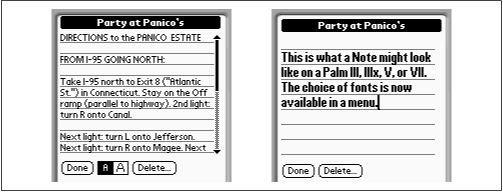
Figure 4-13. The Notes page, which holds text associated with a particular appointment. Get used to the Notes feature ; a similar one is available in several other Palm programs.
As you can see in Figure 4.13, the bottom of the Notes window shows two boxed letter As on the Pilot or PalmPilot. These buttons control the size of the text in the Notes window. On later models, you can choose from among several different fonts—tap Menu → Options → Font to view your choices.
Don’t expect a Macintosh or Windows 95 here—you have only one font in each program—but when your eyes are bleary, it’s nice to be able to magnify the text by tapping a larger font button.
For details on using the scrollbars that appear in long notes, see Section 4.4 later in this chapter.
Suppose you need to know when you last had your meeting with Joseph Schorr, but you can’t remember. Don’t waste your time scrolling through week after week of Date Book screens. Instead, use the Find command, which searches your entire PalmPilot for information—To Do list, Memo Pad, Address Book, and the Date Book—simultaneously.
Tap the Find icon at the lower right of the screen. A Find blank appears, as shown in Figure 4.14; type a word or phrase you’re sure was part of the description of that appointment (or even part of its Notes), and then tap OK.
After a moment, the result is a list of items from all four major programs that contain the name you looked for (also shown in Figure 4.14). For example, you’ll see any appointments you’ve had with Schorr (listed under the Date Book category), but you may also see Schorr’s phone number (from the Address Book program).
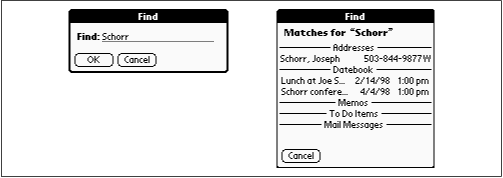
Figure 4-14. When you tap the Find icon, you get the Find blank (left). Type what you’re looking for and tap OK. Now the PalmPilot shows you a list of matches for what you sought, from all of its various programs (right).
Tap a line in this items-found window to view its full entry in the appropriate program. For example, in Figure 4.14, you could tap the second of the two Date Book entries, because it’s the most recent entry in the Date Book.
To get the most out of the Find command, you should know that:
You don’t have to complete the word you’re looking for. You can write base to locate the word baseball.
On the other hand, the PalmPilot searches only for matches at the beginnings of words. If you search for ball, the PalmPilot won’t find the word baseball. (If this quirk bothers you, install FindHack, included with this book, which finds text even in the middle of words. FindHack is described in Appendix A.)
Instead of writing what you’re seeking into the Find blank, you can highlight some text you’ve already written (in any program) by dragging the stylus across it. (See Chapter 3 for more on editing techniques.) If you now tap the Find icon, the highlighted text automatically appears in the Find blank.
As your PalmPilot becomes increasingly crammed with information, searching can take longer and longer. If, during a search, the item you’re looking for appears in the list, tap the Stop button to cut short the search. (You can resume the search by tapping Find More.)
The PalmPilot always searches the program you’re in first. In other words, if you’re looking up a phrase that you know appears in your Memo Pad, you’ll save time by switching to the Memo Pad before tapping the Find button.
If you tried the tutorial in Chapter 2, you’ve already encountered the Phone Lookup command (a feature unique to Palm OS 2 and later). It automatically pastes the full name and phone number of a person listed in your Address Book into whatever other program you’re using (Date Book, To Do, or Memo Pad, for example).
To use the Phone Lookup command, first take one of these three actions:
Tap a blank line in your Date Book, or create a new blank Memo or To Do item.
Write an identifiable portion of a person’s name.
Highlight a person’s name (by dragging the stylus across it) anywhere you’ve already written it.
Next, invoke the Phone Lookup menu command. If you’re in a hurry, use the menu shortcut—write /L in the Graffiti area (draw the slash upward, as usual). The longer way is to tap Menu → Options → Phone Lookup.
What happens next depends on how you set up the command:
If you began with a new, blank entry, you’re now shown a complete list of your PalmPilot’s phone numbers, essentially as shown in the middle in Figure 4.15. Tap the name you want, and then tap Add; you return to the Date Book (or To Do or Memo program), where the full name and phone number now appears.
If you had typed or highlighted a name, whatever you just typed or highlighted is now replaced by the full name and number of the closest-matching last name in your Address Book. (If there’s more than one match, or no match, you’re taken to the full phone number list shown in the middle in Figure 4.15. Again, tap the name you want and then Add; the name in your Date Book, To Do, or Memo program is replaced by the full name/number information.)
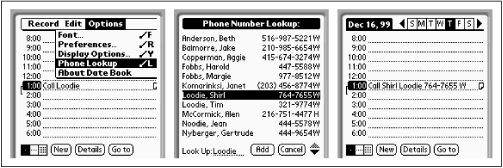
Figure 4-15. In the Date Book, To Do program, or Memo Pad, write or highlight a name (or part of a name), and then invoke the Phone Lookup command (left). If there’s no obvious match with an Address Book entry, you’ll be shown the full list of numbers (center), where you can make a selection and tap Add. The result is a complete name and number in the program in which you started (right).
Incidentally, the Address Book can store five or more phone numbers for each person. The phone number that appears when you use the Phone Lookup command is the principal one for each contact—the one you’ve designated as the “Show in list” number. For instructions, see Section 4.2.2.1 in Section 4.2 of this chapter.
The PalmPilot’s privacy feature lets you keep specified appointments (and memos, addresses, and To Do items) hidden from prying eyes. This security option is useful if, for example, you don’t want a coworker snooping through the PalmPilot you leave in your desk drawer. If you pretty much keep your PalmPilot either with you or filled with declassified information, you can safely ignore this entire aspect of the machine.
To flag a particular item as private, tap it, and then tap the Details button. The Details dialog box appears, as shown in Figure 4.10. Tap the Private checkbox to put a checkmark there, and then tap OK. Now a warning message appears. It lets you know that the appointment (or To Do item, address, or memo) you’ve just changed won’t disappear until you turn on the privacy master switch. Tap OK to dismiss the message.
To turn the privacy master switch on or off, tap the Applications icon. In the Applications screen, tap Security. You’ll see the Show/Hide buttons; tap Hide.
Now all items, in all programs, that you’ve marked as Private are invisible. Neither you nor anyone else can see them until you tap the Show button (in that Security screen), which makes all of them reappear.
You can, if you wish, also specify a password that’s required to hide or show all the Private items. For details (and more information about the Security program), see Chapter 5.
Note
The Private checkbox on certain records (appointments, addresses, and so on) is useful, as far as it goes. But it has one drawback: you can’t ever see which appointments you’ve marked as private. If you go to the Security application to turn on the privacy master switch, all Private records disappear. Turn off the privacy master switch, and they all reappear—but mixed in among normal, nonprivate records.
The handy solution: Set up a category for private records in each of your PalmPilot programs. Whenever you tag a record as Private, also assign it to the Private category. From now on, all your private stuff is in one place, easy to spot, and easy to recategorize, when the time comes, as unclassified.
Get PalmPilot: The Ultimate Guide, Second Edition now with the O’Reilly learning platform.
O’Reilly members experience books, live events, courses curated by job role, and more from O’Reilly and nearly 200 top publishers.

