Most of the time, you’ll use the Dock as either a launcher (you click an icon once to open the corresponding program, file, folder, or disk) or as a status indicator (the tiny, shiny reflective spots identified in Figure 4-1 indicate which programs are running).
But the Dock has more tricks than that up its sleeve. You can use it, for example, to pull off any of the following stunts.
The Dock isn’t just a launcher; it’s also a switcher. Here are some of the tricks it lets you do:
Jump among your open programs by clicking their icons.
Drag a document (such as a text file) onto a Dock application (such as the Microsoft Word icon) to open the former with the latter. (If the program balks at opening the document, yet you’re sure the program should be able to open the document, then add the ⌘ and Option keys as you drag.)
Hide all windows of the program you’re in by Option-clicking another Dock icon.
Hide all other programs’ windows by Option-⌘-clicking the Dock icon of the program you do want (even if it’s already in front).
Switch windows in one program by pointing to that program’s Dock icon without clicking, and then doing a three-finger downward swipe on your trackpad. (This feature, called App Exposé, doesn’t work until you turn it on in System Preferences→Trackpad→More Gestures.)
Tip
This trick—the three-finger downswipe—works even on the Dock icons of programs that aren’t running. In those situations, you get the effect shown in Figure 5-21. For some Apple programs, at least, it’s a quick way to get to the icons of recently opened documents.
This is just a quick summary of the Dock’s application-management functions; you’ll find the full details in Chapter 5.
If you turn on keyboard navigation, you can operate the Dock entirely from the keyboard; see Keyboard Control.
If you right-click (or two-finger click), or click-and-hold on a Dock icon, you see its very useful shortcut menu (Figure 4-6).
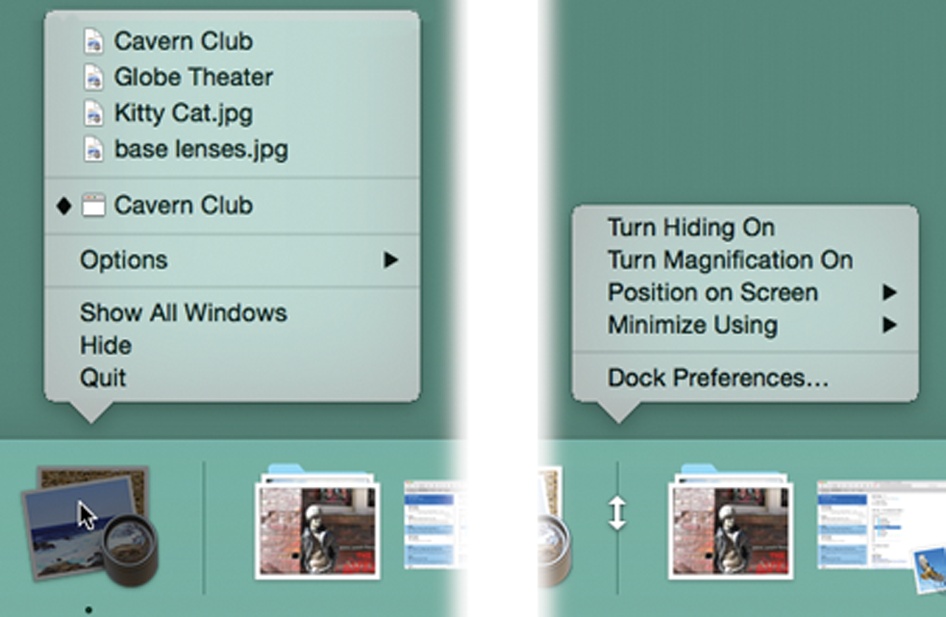
Figure 4-6. Left: Right-click or two-finger click a Dock icon to open the secret menu. In certain recent programs, the top half of the menu lists recently opened documents, followed by currently open ones. Right: Right-click or two-finger click the divider bar to open a different hidden menu. This one lists a bunch of useful Dock commands, including the ones listed in the ![]() →Dock submenu.
→Dock submenu.
If you’ve clicked a minimized window icon, this shortcut menu says only Open (unless it’s a minimized Finder window, in which case it also says Close).
But if you’ve clicked any other kind of icon, you get some very useful hidden commands. For example:
[Window names]. The secret Dock menu of a running program usually lists one or more tiny, neatly labeled window icons, like those shown in Figure 4-6. This useful feature means you can jump directly not only to a certain program, but also to a certain open window in that program.
For example, suppose you’ve been using Word to edit three different chapters. You can use Word’s Dock icon as a Window menu to pull forward one particular chapter, or (if it’s been minimized) to pull it up—even if a different program is in front of Word. (The checkmark indicates the frontmost window, even if the entire program is in the background. A diamond symbol means that the window is minimized and therefore not visible on the screen at the moment.)
In certain Apple showcase programs like TextEdit and the iWork programs, there are actually two lists of documents, separated by a horizontal line. (You can see the effect in Figure 4-6.) The top group lists files you’ve recently opened in that program; the next batch lists currently open documents.
Show All Windows/Show Recents. When a program on the Dock is open, this command says Show All Windows; when it’s not running, it says Show Recents. Either way, it takes you to the screen shown in Figure 4-6, where the icons of recently opened documents appear for easy clicking and reopening. (OK, they may appear. Apple programs like TextEdit and Pages show these recent icons, but non-Apple programs have to be updated before they’ll show you the recent-document icons.)
To exit the Recents screen, press Esc or ⌘-period.
Options. This submenu contains a bunch of miscellaneous commands:
Options→Keep In Dock. Whenever you open a program, OS X puts its icon in the Dock—marked with a shiny, white spot—even if you don’t normally keep its icon there. As soon as you quit the program, its icon disappears again from the Dock.
Tip
You can get rid of that white “running program” indicator underline, if you like. Open System Preferences→Dock and turn off “Show indicator lights for open applications.”
If you understand that much, then the Keep In Dock command makes a lot of sense. It means, “Hello, I’m this program’s icon. I know you don’t normally keep me in your Dock, but I could stay here even after you quit my program. Just say the word.” If you find you’ve been using, for example, Terminal a lot more often than you thought you would, this command may be the ticket.
GEM IN THE ROUGH: Using the Dock or Sidebar for Drag-and-Drop
The Mac is smart about the relationship between documents and applications. If you double-click a TextEdit document icon, for example, TextEdit opens automatically and shows you the document.
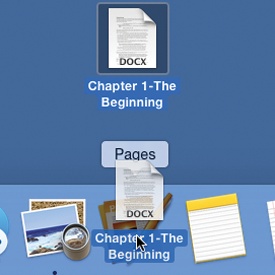
But it’s occasionally useful to open a document using a program other than the one that created it. Perhaps, as is often the case with downloaded Internet graphics, you don’t have the program that created it, or you don’t know which one was used. This technique is also useful if you want to open a ReadMe file into your word processor, such as Word, instead of the usual TextEdit program.
In such cases, the Dock is handy: Just drag the mystery document onto one of the Dock’s tiles, as shown here. Doing so forces the program to open the document—if it can. (Dragging onto a program’s icon in the Sidebar or even the Finder toolbar works just as well.)
Incidentally, in general only the Dock icons of programs that can, in fact, open the file you’re dragging become highlighted. The others just shrug indifferently or even scoot aside, thinking you’re trying to drag the file into the Dock.
Pressing Option-⌘ as you drag forces Dock icons to be more tolerant. Now all of them “light up” as your document touches them, indicating that they’ll try to open your file. Even so, a “could not be opened” error message may result. As they say in Cupertino, sometimes what a can really needs is a can opener.
Tip
Actually, there’s a faster way to tell a running application to remain in the Dock from now on. Just drag its icon off the Dock and then right back onto it—yes, while the program is running. You have to try it to believe it.
If you don’t want a program’s icon to appear on the Dock when it’s not running, choose this command again so that the checkmark disappears.
Note
If the program is already running, turning off Keep In Dock doesn’t immediately remove its icon from the Dock. That’s because a program always appears in the Dock when it’s open. What you’re doing here is saying, “Disappear from the Dock when you’re not running”—and you’ll see the proof as soon as you quit that program.
Options→Open at Login. This command lets you specify that you want this icon to open itself automatically each time you log into your account. It’s a great way to make sure your email inbox, your calendar, or the Microsoft Word thesis you’ve been working on is fired up and waiting on the screen when you sit down to work.
To make this item stop auto-opening, choose this command again so that the checkmark no longer appears.
Options→Show In Finder. This command highlights the actual icon (in whatever folder window it happens to sit) of the application, alias, folder, or document you’ve clicked. You might want to do this when, for example, you’re using a program that you can’t quite figure out, and you want to jump to its desktop folder in hopes of finding a Read Me file there.
Hide/Show. You can hide all traces of the program you’re using by choosing Hide from its Dock icon. (You could accomplish the same thing in many other ways, of course; see Hiding Programs the Old-Fashioned Way.)
What’s cool here is that (a) you can even hide the Finder and all its windows, and (b) if you press Option, the command changes to say Hide Others. This, in its way, is a much more powerful command. It tells all the programs you’re not using—the ones in the background—to get out of your face. They hide themselves instantly.
Quit. You can quit any program directly from its Dock shortcut menu. (Finder, Launchpad, and Mission Control are exceptions.) The beauty of this feature is that you don’t have to switch into a program to get to its Quit command.
(If you get nothing but a beep when you use this Quit command, it’s because you’ve hidden the windows of that program, and one of them has unsaved changes. Click the program’s icon, save your document, and then try to quit again.)
Miscellaneous. You might find other commands in Dock shortcut menus; software companies are free to add specialty options to their own programs.
For example, the Finder icon’s shortcut menu offers direct access to commands like Find, Connect to Server, and New Finder Window. Microsoft Office programs (Word, Excel, and so on) come with an Open Recent command, with a list of documents you’ve opened recently. The Mail icon offers Get New Mail and Compose New Message commands. The Safari icon has a New Window command. The System Preferences icon sprouts a complete list of the preference panes (Sound, Keyboard, Trackpad, and so on). You get the idea.
Tip
If you Control-⌘-click a program’s Dock icon, you get an abbreviated shortcut menu. It lists only the Options, Hide, and Quit commands and maybe some recent documents—not the full list of commands. If all you want to do is quit a program or something, this abbreviated menu is faster and easier to comprehend.
When you click an application icon in the Dock, its icon jumps up and down a few times as the program launches, as though with excitement at having been selected. The longer a program takes to start up, the more bounces you see. This has given birth to a hilarious phenomenon: counting these bounces as a casual speed benchmark for application-launching times. “InDesign took 12 bouncemarks to open in Mac OS X 10.9,” you might read online, “but only three bouncemarks in 10.10.”
Tip
If you find the icon-bouncing a bit over the top, try this: Choose ![]() →Dock→Dock Preferences. In the Dock preference pane (shown in Figure 4-4), turn off “Animate opening applications.” From now on, your icons won’t actually bounce—instead, the little shiny spot underneath it will simply pulse as the application opens.
→Dock→Dock Preferences. In the Dock preference pane (shown in Figure 4-4), turn off “Animate opening applications.” From now on, your icons won’t actually bounce—instead, the little shiny spot underneath it will simply pulse as the application opens.
Dock icons are spring-loaded. That is, if you drag any icon onto a Dock folder or disk icon and pause—or, if you’re in a hurry, tap the space bar—the Dock icon opens to receive the dragged file.
Note
It opens, that is, if the spring-loaded folder feature is turned on in Finder→Preferences→General.
This technique is most useful in these situations:
Drag a document icon onto a Dock folder icon. The folder’s Finder window pops open so you can continue the drag into a subfolder.
Drag a document into an application. The classic example is dragging a photo onto the iPhoto icon. When you tap the space bar, iPhoto opens automatically. Since your mouse button is still down, and you’re technically still in mid-drag, you can now drop the photo directly into the appropriate iPhoto album or Event.
You can drag an MP3 file into iTunes or an attachment into Mail or Outlook in the same way.
Once you’ve tried stashing a few important folders on the right side of your Dock, there’s no going back. You can mostly forget all the other navigation tricks you’ve learned in OS X. The folders you care about are always there, ready for opening with a single click.
Better yet, they’re easily accessible for putting away files; you can drag files directly into the Dock’s folder icons as though they were regular folders.
In fact, you can even drag a file into a subfolder in a Dock folder. That’s because, again, Dock folders are spring-loaded. When you drag an icon onto a Dock folder and pause, the folder’s window appears around your cursor, so you can continue the drag into an inner folder (and even an inner inner folder, and so on). Spring-Loaded Folders: Dragging Icons into Closed Folders has the details on spring-loaded folders.
Tip
When you try to drag something into a folder on the Dock, the Dock icons scoot out of the way; the Dock assumes you’re trying to put that something onto the Dock. But if you press the ⌘ key as you drag an icon to the Dock, the existing icons freeze in place. Without the ⌘ key, you wind up playing a frustrating game of chase-the-folder.
Now that you know what the Dock is about, it’s time to set up shop, installing the programs, folders, and disks you’ll be using most often.
They can be whatever you want, of course, but don’t miss these opportunities:
Your Home folder. Many people immediately drag their hard drive icons—or, perhaps more practically, their Home folders—onto the right side of the Dock. Now they have quick access to every file in every folder they ever use.
The Applications folder. Here’s a no-brainer: Stash the Applications folder here so you’ll have quick pop-up menu access to any program on your machine.
Your Applications folder. As an even more efficient corollary, create a new folder of your own. Fill it with the aliases of just the programs you use most often and park it in the Dock. Now you’ve got an even more useful Applications folder that opens as a stack.
The Shared folder. If you’re using the Mac’s accounts feature (Chapter 13), this is your wormhole to all the accounts—the one place you can put files where everybody can access them (Sharing Across Accounts).
A tag. You know those color-coded Finder tags (Finder Tags)? You can drag one directly out of a Finder window’s Sidebar and onto the left side of the Dock. When you click its Dock icon, you get a window that displays the icons of everything on your Mac you’ve tagged that way.
Get OS X Yosemite: The Missing Manual now with the O’Reilly learning platform.
O’Reilly members experience books, live events, courses curated by job role, and more from O’Reilly and nearly 200 top publishers.

