OS X is a robust operating system; while problems are rare, they do show up from time to time. Since these issues always seem to present themselves at the worst possible moment, it helps if you know the best ways to troubleshoot them. That’s what this chapter is all about, and it’s a great reason to keep this book in your pocket!
There are a lot of things that can go wrong with your Mac: Hardware problems, software glitches, and configuration issues can happen at any moment. Most of the problems you’ll encounter can be easily addressed or diagnosed by following the steps in this chapter.
However, some issues are unusual or won’t respond to the fixes listed in this chapter. A great resource for those situations is Apple’s website: www.apple.com/support. As you’d expect, you can browse manuals and tutorials on that site. More useful when trying to fix that quirky problem, though, are the communities you can access via that site, where you’ll likely find someone who’s having the same problem you are—and the fix.
If the information there doesn’t resolve things, you could have a unique issue, in which case a trip to your local Apple Store or a call to Apple is in order. You can find a complete list of technical support numbers for Apple at www.apple.com/support/contact/phone_contacts.html. In the United States, the number is 1-800-275-2273.
One of the most common problems on a Mac is an application that isn’t behaving as expected. This issue comes in many forms: an application that unexpectedly quits repeatedly, stops responding, or just doesn’t perform the way it normally does. This section suggests ways to resolve all these issues and more.
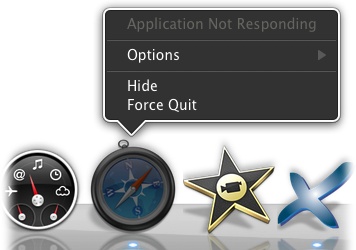
Occasionally, an application will simply stop reacting to anything. Your mouse or trackpad will still work, and other programs will be fine, but if you want to use the troublesome program, all you’ll get is a spinning beach-ball cursor (instead of the mouse pointer) and you’ll have no way to input anything.
Don’t panic—there’s an easy fix. Simply right-click or Control-click the stalled application’s icon in the Dock to bring up its Dock menu (Figure 4-1). If you see Application Not Responding in faint text at the top of the menu, you’ll also see a Force Quit option. Select Force Quit and OS X will kill the program.
You may also need another way to kill applications, because
occasionally a program can become unresponsive without OS X realizing that the program is in
peril. For these times, launch the Force Quit Applications dialog box
either by selecting ![]() →Force Quit or
using the key combo Option-⌘-Esc. You can also try holding down Shift
as you click the
→Force Quit or
using the key combo Option-⌘-Esc. You can also try holding down Shift
as you click the ![]() menu, then select “Force Quit [application
name]” to kill the frontmost application.
menu, then select “Force Quit [application
name]” to kill the frontmost application.
There’s some good news when it comes to force quitting applications in Mountain Lion. In the old days of OS X (before Lion), any changes you made between the last time you saved a document and the moment the application started misbehaving were gone forever. But thanks to Auto Save, if you’re forced to quit an application, Mountain Lion preserves the work you’ve done since the last time you manually saved.
Warning
“Save early, save often” is still good advice, since Auto Save works only with applications specifically built with Auto Save in mind. That means that work you do in apps designed for Lion or Mountain Lion will be saved, but applications that haven’t been updated since Lion came out won’t automatically save your work.
The Finder is just another program, so it can get hung
up, too. If that happens, either head to ![]() →Force Quit or
use the key combination ⌘-Option-Esc. If nothing happens, try clicking
the Dock or some other application first, and
then use the
→Force Quit or
use the key combination ⌘-Option-Esc. If nothing happens, try clicking
the Dock or some other application first, and
then use the ![]() menu or ⌘-Option-Esc to invoke the Force Quit
dialog box.
menu or ⌘-Option-Esc to invoke the Force Quit
dialog box.
If you suspect something is eating up too much processor time or hogging too many system resources (because your Mac is running really slowly, say, or the fans are running at full speed for no obvious reason), Force Quit won’t help you figure out which application is the culprit. Instead, open Activity Monitor (Applications→Utilities→Activity Monitor), click its CPU tab in the lower half of the window, and then look for any processes that are using a lot of CPU resources for more than a few seconds. (Safari and its helper applications occasionally do this, particularly with runaway Flash or JavaScript code.) When you identify a suspect, single-click the renegade process’s name and then click the big red Quit Process button (you can’t miss it—it’s shaped like a stop sign).
Warning
Be careful which applications you quit in this way. There are some programs that your Mac runs in the background, and many of these are important in helping your computer operate normally. Here’s a rule of thumb: if you don’t recognize the name of the program as an application that you launched, don’t kill it. Instead, do a Google search on its name (for good measure, include the terms “OS X” and “cpu,” too). Chances are good you’ll find a solution for whatever is causing that process to use up so much CPU time.
It seems like computers never have enough USB ports, so most of us end up using USB hubs (or keyboards that have extra USB ports). Then we plug some fantastic new USB device into the hub—and it doesn’t work. In fact, if you dig through System Information (it’s in the /Applications/Utilities folder) and look at the USB Device Tree (click USB in the list on the left), the hub shows up, but not the device.
Often the problem is that the device requires a powered USB port and you’re using an unpowered hub (or you’ve maxed out the power capabilities of the hub or port). Switching to a powered hub might fix the problem, but that isn’t guaranteed. What works most often is plugging the device directly into your Mac, which means you’ll need to shuffle your various USB devices around. If any of them can run off of their own external power supply rather than taking power from the USB port, that may help as well (sometimes these power supplies are sold separately; check with the device’s manufacturer).
The second method of attacking USB device problems is a little more involved. First, shut down your Mac and unplug all the USB devices (even the ones that use external power supplies). Reboot your Mac, and then plug them back in one at a time while watching the USB Device Tree (it’s updated quickly so you’ll see each device appear as it’s plugged in) to figure out which device isn’t playing nicely with others. Sometimes going through this process results in all the devices suddenly working. But if you discover that only a certain device isn’t working, the fix may be to install a new driver for it. Check the manufacturer’s website for updates.
MacBook users are faced with a problem that desktop users don’t have to worry about: the battery. The goal of most Apple batteries is to still provide 80% of the original charge capacity after a certain number of cycles (charges and discharges). The number of cycles varies depending on your machine. For Mountain Lion–capable MacBooks, the cycle count is either 750 or 1,000 cycles (depending on the model). If you notice your battery isn’t holding a charge for as long as it used to, the first thing to do is launch System Information (Applications→Utilities→System Information) and then click Power in the list on the left; see Figure 4-2.
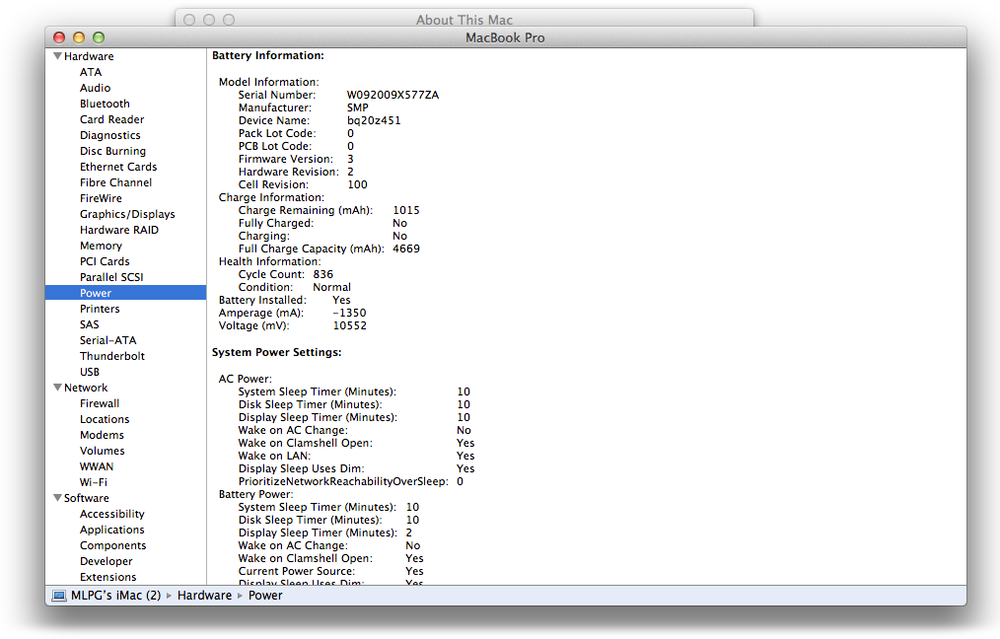
The Battery Information list includes your battery’s full charge capacity, how many cycles it’s been through, and its condition. If the condition is listed as Replace Soon or something equally ominous, it’s time to think about getting a new battery. If the cycle count is low but the battery is still running out of juice prematurely, here are a couple of things you can try:
- Calibrate the battery
Inside every MacBook battery is a microcontroller that tells your computer how long the battery is going to last until it runs out of juice. Over time, this estimation can get further and further from real-world performance. To get the computer and the microcontroller on the same page, you need to recalibrate the battery from time to time. To do so, fully charge the battery and then keep your computer plugged into the power adapter for two more hours. Next, unplug the power adapter and fully drain the battery. When a warning pops up alerting you that the battery is running dangerously low, save your work and keep on trucking until your computer automatically goes to sleep. Then let the computer sleep for more than five hours to make sure every drop of power is gone. Finally, plug in the power adapter and let your computer fully charge. The battery indicator should now be successfully recalibrated.
Note
If your MacBook has an internal battery, Apple recommends not calibrating the battery because these internal batteries should be serviced only by an authorized repair center.
- Reset the SMC
SMC is short for the System Management Controller, a chip that’s responsible for hard drive spin-down, sleeping your Mac, waking your Mac, and keyboard backlighting. A malfunctioning SMC can prevent the battery from charging, so you need to reset the SMC. How you do that depends on whether your MacBook has an internal battery (like all the newer MacBooks) or a battery that you can easily remove. If it has a removable battery, shut it down, unplug the power adapter from the wall and the computer, and then remove the battery. Next, press the power button for five seconds. After that, replace the battery, plug in the power adapter, and then restart the computer. If your MacBook has an internal battery, shut down the computer and plug it into an adapter that’s getting power. On the left side of the keyboard, hold down Left Shift-Control-Option, and then press the power button. Keep all these buttons depressed (including the power button) for five seconds and then release them all simultaneously. Pat yourself on the back for pulling off an impressive feat of manual dexterity, and then press the power button to restart the computer.
If those remedies don’t restore your battery, it’s likely time for a trip to the local Apple Store or authorized repair center. If your computer is under warranty and your cycle count is low, Apple will probably replace the battery for free. If your cycle count is over the recommended number and the performance degradation is within expectations, you’ll probably need to pay for a new battery or live with the reduced (and ever-shrinking) battery capacity.
Most Macs come with a built-in display that doesn’t require special configuration, so display problems are uncommon. When they do happen, they’re often caused by user error. The fix, while usually easy, isn’t readily apparent. Here are some things to try:
- Fuzzy/tiny display
If your display is fuzzy or everything is suddenly bigger than you remember, it’s possible that someone changed the display’s resolution (on some systems, this may also manifest itself as a small screen with black bars around its edges). Head to
 →System
Preferences→Displays and look
for the monitor’s native resolution (on Macs with built-in
displays, this is usually the highest resolution available—the
one at the top of the list). Once you select the optimal
resolution, things should look normal again.
→System
Preferences→Displays and look
for the monitor’s native resolution (on Macs with built-in
displays, this is usually the highest resolution available—the
one at the top of the list). Once you select the optimal
resolution, things should look normal again.- Your display moves with your mouse
The weird thing is that this always happens when children under five are on your lap while you’re using your computer. Is there some kind of kid detector in your Mac that causes this? Nope—your kid just pressed some keys while you were working. (If you don’t have kids or lap cats, then it was probably you.)
There are a couple of key combinations that will cause your Mac to zoom the screen. The most common is holding down Control while you zoom in or out with your mouse or trackpad. Once you’re zoomed in, your mouse will suddenly start dragging the screen around, which is disconcerting if you aren’t expecting it. To turn it off, hold down Control and zoom out with your trackpad or mouse wheel.
There are a couple of other key sequences that can be invoked accidentally: Option-⌘-8 toggles keyboard zooming on and off, and holding down = or − while pressing Option-⌘ zooms in or out, respectively.
A misbehaving application is bad enough, but a Mac that won’t start properly is truly disconcerting. The good news is that most such problems are repairable. The general method of attack in this case is to get your Mac to a state where you can run Disk Utility and repair the drive. However, there are some situations where you can’t even get to that point.
If your Mac just beeps at you when you try to start it up, it’s trying to tell you something: one beep means there’s no memory (RAM) installed, and three beeps means your RAM doesn’t pass the integrity check. The problem could be a bad RAM module, so you’ll need to open up your Mac and replace the module.
Try installing some memory that you’re certain is fully functional to see if that resolves the problem. If you don’t have any spare memory lying around, try removing all the RAM modules and then replacing them one by one until you’ve isolated the bad module.
Note
If you don’t know how to replace memory in your Mac, check the user guide that came with it. Or if your Mac is still under warranty, just take it into an Apple Store for service.
If you suspect you’ve got a physical hard drive problem, you need to check things out quickly before they get much, much worse. If you hear a strange noise coming from your machine, that’s an obvious sign of a hard drive problem, but these issues can also be indicated by the computer stalling for several seconds at a time (or making a clicking sound when stalling).
Just as with a car, when a bad sound is emanating from your hard drive, it’s usually a bad thing. If you’ve ever listened to National Public Radio’s Car Talk, you know that one of the highlights is when callers try to imitate the sounds their cars are making. If you’re inclined to try identifying your hard drive’s sound by ear, head over to http://datacent.com/hard_drive_sounds.php and take a listen to the sounds of dying drives, sorted by manufacturer.
Warning
If your hard drive is failing, you’re likely to lose more data every moment it’s running. If you don’t have current backups, your best bet is to replace the drive immediately and either seek a data-recovery professional or, if you don’t have the money for that, install the damaged drive in an external drive enclosure and use the GNU ddrescue utility (www.gnu.org/software/ddrescue) to recover the data on the damaged drive.
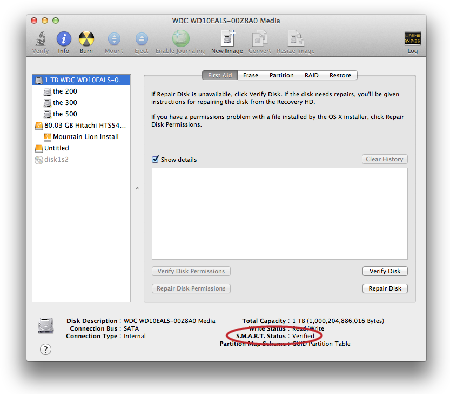
If you aren’t hearing any unusual sounds but still suspect your hard drive is causing your problems, head to Disk Utility (Applications→Utilities→Disk Utility) and check the S.M.A.R.T. status of the drive. (Using a computer means loving acronyms, and this time the acronym is clever, if a little forced: S.M.A.R.T. stands for Self-Monitoring Analysis and Reporting Technology.)
Note
S.M.A.R.T. isn’t available on every drive, so if you don’t see this option, don’t worry!
The idea behind S.M.A.R.T. is that many hard disk failures are predictable and computer users, if given a heads-up that their hard drive is on the verge of failing, will be able to recover data before the failure actually happens. You can find your drive’s S.M.A.R.T. status by opening Disk Utility and selecting the disk you’re worried about in the list on the left. In the lower-right part of the Disk Utility window, you’ll see the S.M.A.R.T. Status (Figure 4-3): either Verified (everything is fine) or “About to Fail.” If you get the “About to Fail” notice, don’t waste any time: if your Mac is under warranty, take it into an Apple Store; otherwise, back up your data as soon as possible and start pricing out a new drive.
Warning
S.M.A.R.T. isn’t perfect (that’s no surprise—nothing is). You can have a problematic drive that S.M.A.R.T. won’t recognize. So if you’re having consistent problems and S.M.A.R.T. keeps telling you everything is fine, don’t discount the drive as the source of the problems after you’ve exhausted other fixes.
Thankfully, the hardware failures just described are relatively rare. Much more common are software failures: corrupt files, wonky login items, and even font problems can cause a startup failure. These issues are generally repairable, hopefully without data loss. Unfortunately, when you have one of these problems, the cause isn’t immediately obvious. When faced with a Mac that won’t boot, there are a few things you can try to get your computer back to a usable state:
- Restart your Mac
A lot happens when OS X starts up: it checks your Mac’s hardware, prepares the system software, and more. During the startup process, there are ample opportunities for something to go wrong, especially right after you install an update to OS X or even an application. If your Mac won’t complete the startup sequence, don’t panic; simply restart the machine by holding down the power button until you hear a chime; chances are everything will be fine.
- Safe Boot
If a simple restart doesn’t do the trick, it means you have problems that persist across restarts, so the next step is a Safe Boot. In Safe Mode, all your Mac’s startup items are disabled, font caches are cleared, and some other potentially problematic items are avoided. More important, Safe Boot gives you a chance to run Disk Utility, uninstall any software that may be misbehaving, or back up your data before whatever is causing the problem gets worse. To boot your Mac in Safe Mode, restart it while holding the Shift key. Once you see a progress bar appear on the lower half of the screen, you can release the Shift key and your Mac will boot in Safe Mode. Once it has booted, run Disk Utility (Applications→Utilities→Disk Utility).
- Restart in Recovery Mode
Before Lion, one remedy to try when your Mac went bad was to boot from the DVD you either got with your Mac or purchased when you upgraded to Snow Leopard. But since you don’t use any physical media—DVD or otherwise—when you install Mountain Lion, this trick doesn’t work anymore. Fortunately, Apple realizes that, when problems occur, you might need to boot your Mac from a different source than usual, so Mountain Lion includes Recovery Mode.
Note
You need to be connected to the Internet to use Recovery Mode to reinstall Mountain Lion. The Reinstall Mountain Lion option will download every byte of the Mountain Lion installer, so you might want to try other fixes before going through that process.
Recovery Mode lets you boot from a virtual partition called Recovery 10.8. When you boot into Recovery Mode, you’ll find yourself running a special system that lets you restore your Mac from a Time Machine backup, reinstall Mountain Lion, use Safari to look for solutions to your problem online, or run Disk Utility. (Don’t be afraid to launch Safari even if you’re not connected to the Internet; there’s a static web page with basic instructions that automatically opens when you launch the program.)
Note
You can only run one application at a time in Recovery Mode, so if you’re running Disk Utility, say, you can’t also launch Safari. Being aware of this limitation can save you some frustration and endless restarts.
In addition to Recovery Mode’s obvious choices, you can also run Firmware Password Utility, Network Utility, and Terminal by visiting the Utilities drop-down menu at the top of the screen. With all of these options, you’ll likely find one that can fix your Mac woes.
To boot in Recovery Mode, hold down the Option key while starting your Mac (this process should be familiar if you’ve booted Macs from alternative disks before). You’ll be presented with a screen that shows all the viable startup partitions available. Double-click Recovery-10.8, and you’ll be well on your way to diagnosing (and hopefully fixing) whatever problem is currently plaguing your Mac.
Note
If you have a brand-new Mac (one that came with Mountain Lion installed), you have one more trick you can use: Internet Recovery. If something terrible happens to your machine (a massive hard drive failure, say) or you want to install Mountain Lion onto a completely blank hard drive, hold down the Option key while starting your Mac, and then choose Internet Recovery. Once you tell your computer which network to use, it will boot from Apple’s servers. Once booted, your Mac will download the Recovery 10.8 image from Apple. After that, the process is the same as for a standard Mountain Lion reinstall.
This section emphasized tools that come with Mountain Lion because, well, if you’ve installed Mountain Lion, you have access to them. But these tools aren’t the only ones available when things go wrong. There are several disk repair programs (many of which are more powerful than Disk Utility) from third parties, such as DiskWarrior (www.alsoft.com/DiskWarrior) and TechTool Pro (www.micromat.com).
This maneuver gets its own section only because it’s one of the oldest troubleshooting techniques in Mac history.
PRAM (parameter random access memory) is where your Mac stores many of its hardware settings. Resetting the PRAM almost never resolves a startup issue, but it’s something Apple support usually asks you to do when troubleshooting a problem (and it does, in some rare cases, help). To reset the PRAM, turn on your Mac, immediately press and hold Option-⌘-P-R, and continue to hold those keys until your Mac restarts and you hear the startup chime a total of three times. After you do this, you may have to reconfigure some of the system settings (like date, time, and possibly keyboard/mouse settings if you’ve customized them).
Get OS X Mountain Lion Pocket Guide now with the O’Reilly learning platform.
O’Reilly members experience books, live events, courses curated by job role, and more from O’Reilly and nearly 200 top publishers.

