Setting Up File Sharing
Before you get into the nitty-gritty of sharing files, you must complete a few housekeeping tasks, such as enabling the appropriate type of file sharing. Follow these steps to do so:
1. Choose ⇒System Preferences, and then click the Sharing icon.
The Sharing System Preferences pane appears. The first word of the long username of the first Admin account created on this computer appears in the Computer Name field by default, followed by the type of Mac (for example, Bob L’s MacBook Pro).
2. If you want to change the name of your computer from whatever Mountain Lion decided to call it to something more personal, do that now in the Computer Name text field at the top of the Sharing pane.
In Figure 16-2, you can see that I named mine Bob L’s MacBook Pro. You can name yours anything you like.
3. Select the File Sharing check box, as shown in Figure 16-2.
Now other users on your network can access files and folders on your computer, as you see later in this chapter.
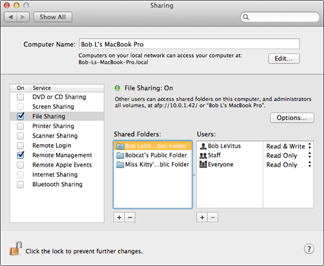
Figure 16-2: Turning file sharing on and off.
By default, only one folder in your Home folder is shared, and that folder is your Public Folder. If you want to access files or folders on this computer while you’re using another computer on the network, you can so long as you first provide your username and password. Everyone else on the network can see only your Public folder.
These are the safest ...
Get OS X Mountain Lion For Dummies now with the O’Reilly learning platform.
O’Reilly members experience books, live events, courses curated by job role, and more from O’Reilly and nearly 200 top publishers.

