In the previous chapter, we saw that itâs possible to customize the look and feel of an Orchard site by creating alternate templates for pieces of content. While this feature does provide some flexibility over how content is rendered on pages, it doesnât easily allow for wholesale changes to the way a site looks.
In order to achieve this broader goal, weâll look at creating our own themes. Weâve already taken a brief tour of the default themeââTheThemeMachineââthat is part of a standard Orchard installation. In this chapter, weâre going to take a look inside of that theme to understand how to create our own.
At this point, our Orchard development has been limited to editing a couple of view files. We wrote some C# code in those Razor templates and learned a little about how the content is modeled and displayed in a view. However, we havenât really been exposed to the Orchard development experience. To gain this exposure, we first need to learn about a couple of tools that make Orchard development easier.
It probably seems strange to consider using a command-line interface
(CLI) with a web-based CMS. However, the Orchard
CLI offers quick access to many common admin functions without
the need to open up a browser and navigate to different property pages.
Assuming youâve been working in the Orchard solution, the CLI has been
ready for use since you first compiled your app and set up your
recipe.
To get started with Orchardâs CLI, open up a command window (or PowerShell) and navigate to the bin directory of your Orchard site. There youâll find file Orchard.exe. Execute that file. After a few moments, youâll see an Orchard prompt.
PS C:\dev\Orchard> cd .\src\Orchard.Web\binPS C:\dev\Orchard\src\Orchard.Web\bin> .\Orchard.exeIntializing Orchard Session. (This might take a few seconds...)Type â?â for help, âexitâ to exit, cls to clear screenorchard>
There are a number of commands you could execute. To get CLI help, there are two commands you should know. The first simply tells you how to perform tasks like quitting, clearing the screen, and getting more help:
orchard> helpOne of the items listed when you execute the help command explains how to get help for the
commands that allow you to work with your Orchard site:
orchard> help commandsExecuting help commands gives
you a list of CLI commands ranging from user creation to page creation.
Youâll also see how to go one level deeper for command help:
orchard> help page createTo test your session, enter the command that simply lists the site cultures, which are used for the internationalization of your site:
orchard> cultures listListing Cultures:en-US
If you ran the help commands, you probably saw that the Orchard CLI has commands for many of the common
tasks youâd normally perform in the admin pages, including enabling and
disabling features. Weâre going to use this command to enable a feature
that will give us additional command line tools:
orchard> feature enable Orchard.CodeGenerationEnabling features Orchard.CodeGenerationCode Generation was enabled
Once the code generation tools are enabled, they will provide useful
shortcuts for creating and managing themes and modules. Orchard.CodeGeneration is an example of the
Orchardâs extensibility. In fact, you can build your own command-line
tools for Orchard. Itâs as simple as creating a class that extends
the base class DefaultOrchardCommandHandler.
Note
The code generation module is not installed by default with Orchard, but it was found in the source when you downloaded the zip or cloned the repository. If you are not working with the solution, you might need to install this module from the Orchard Gallery.
In the previous chapter, we saw that a theme is a collection of
files contained in a directory in the Themes project in the Orchard solution.
Thereâs nothing special about a theme other than it follows a set of
conventions and is stored in the Themes directory under the Orchard.Web project.
To start building a new theme, you could simply copy the directory structure for the âTheThemeMachineâ theme and paste it into a new sibling directory. Weâll instead use the command line code generation options to create our theme. Later weâll learn how these tools can help us avoid starting from scratch.
Note
The Orchard solution is organized using solution folders, so it
appears that the Themes project
lives outside of the web projectâs directory structure. However, the
Themes project and theme files are
actually nested in the filesystem under the Orchard.Web directory.
Return to the CLI and your Orchard prompt. Weâre going to create a new theme named âDaisysTheme.â There are three options weâll want to consider before we create our new theme:
- CreateProject
Whether to create new project for this theme. The default is false.
- IncludeInSolution
Include this theme in the solution. The default is true.
- BasedOn
Inherit default templates from an existing theme.
For our new theme, weâre neither going to inherit from an existing theme nor create a new project. Weâll simply run the theme code generation without any arguments:
orchard> codegen theme DaisysThemeCreating Theme DaisysThemeTheme DaisysTheme created successfully
Return to Visual Studio where youâll be prompted to reload the
solution. The codegen utility modified the
Themes project and forced a reload of the solution.
After reloading, we can start to inspect the anatomy of our new
theme.
The structure might look somewhat familiar to an experienced ASP.NET MVC developer. As is the case with the standard Visual Studio ASP.NET MVC project template, there are directories for Scripts, Styles, and Views. The purpose of each of these and the other directories is as follows:
- Scripts
Directory for JavaScript files
- Styles
Directory for CSS files
- Views
Directory for Razor template (*.cshtml) files
- Content
Directory for images and other static content
- Zones
Directory for templates that wrap zones
Additionally, the generated theme template includes a Placement.info file. Recall that this is the XML file that instructs Orchard as to how or whether to layout fields, parts, and items. There are also numerous Web.config files that are used by ASP.NET to set up some configuration plumbing for ASP.NET and ASP.NET MVC. There are two other files worth noting, namely Theme.txt and Theme.png. Both of these files are used by Orchard to describe your theme to the admin pages.
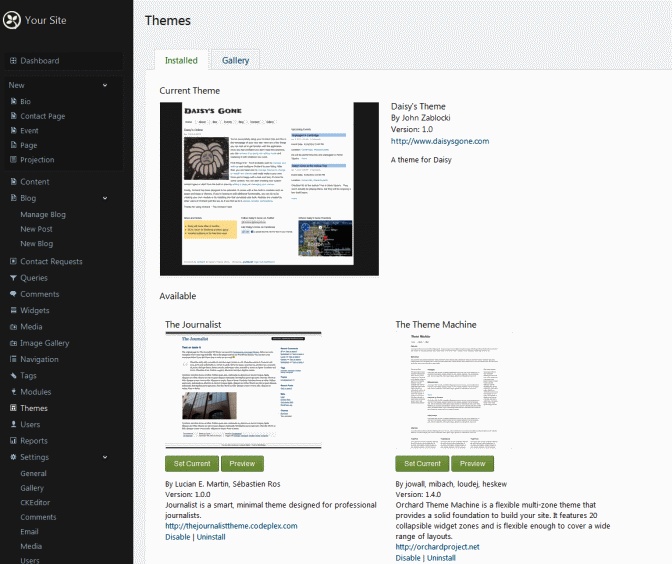
Back in the admin dashboard, select ThemesâInstalled. Youâll see three themes listed (Figure 4-1). The current theme will be the default âTheThemeMachine.â Thereâs a second theme called âThe Journalistâ and our new theme named âDaisysTheme.â However, some things donât look quite right with our new theme.
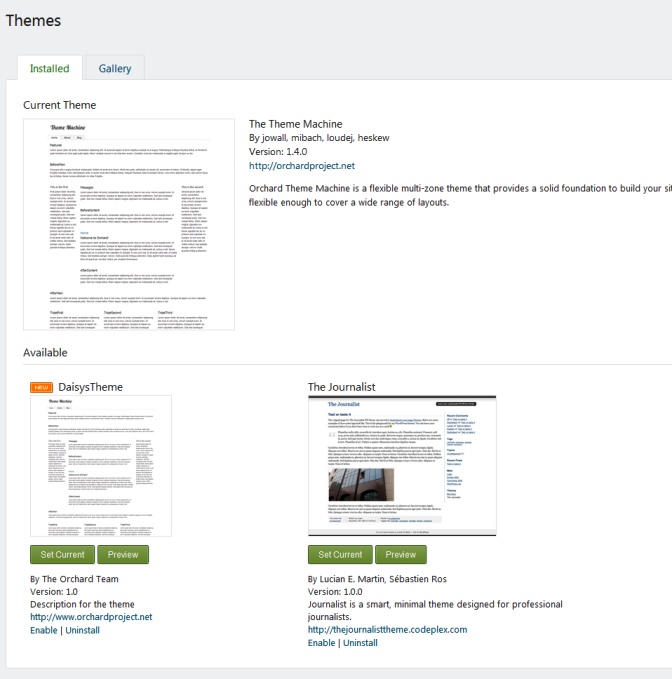
Notice that the name is âDaisysThemeâ without a space. Authorship is attributed to âThe Orchard Team.â The version is already set to 1.0 and the description and URL are also wrong. As weâll see shortly, the preview image also fails to accurately represent our new theme at this stage. You might have guessed that Orchard is using Theme.txt and Theme.png to determine what values to plug into this admin page.
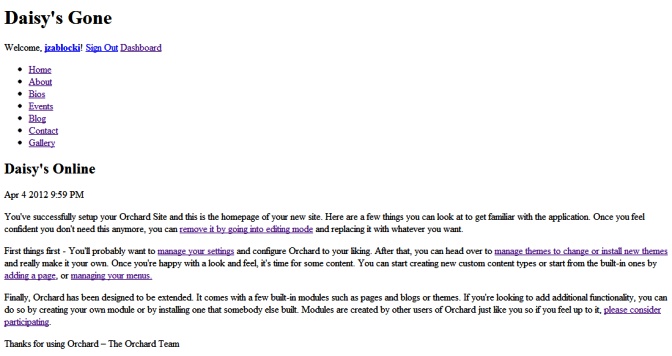
Before returning to Visual Studio to look at these files, letâs first make our new template the current template by clicking âSet Current.â Once the switch is complete, refresh your site. What youâll see is that your site is suddenly without any discernible structure or styling (Figure 4-2). Also notice that our alternates are gone. Weâll add some of those pieces before we modify the metadata thatâs used by the Dashboard.
Note
The purpose of this chapter is to introduce theme development. As I am not a designer, I am intentionally keeping the theme we will build simple, including all graphical treatments, styles, and HTML.
If you view the source for the home page, youâll notice that there
is a full HTML document wrapping the content. This might seem strange,
since we havenât actually defined any master page or layout files. These
default template files do exist, though. Orchard includes them in the
Orchard.Core project.
If you expand that project in Visual Studioâs Solution Explorer, youâll see a Views directory nested under a Shapes directory. The view files inside this
directory are used by Orchard as safe defaults for displaying content
when no suitable template alternates are found in a theme for a given
piece of content.
Open the files Document.cshtml and Layout.cshtml to see the HTML that is
wrapping the content in our home page. Document.cshtml defines the basic structure
of an HTML document, including the html, head,
title, and body tags. Layout.cshtml defines a very basic
arrangement of div elements on the
page. Notice that the template for the title of the page is actually
found in the Parts.Title.cshtml
file in the Views directory under
Title in the Orchard.Core project.
As is hopefully now clear, Orchard uses a hierarchy of templates when determining how to render content. In the previous chapter, when we defined alternate templates, we simply added files to the current theme and those files took precedence over those found in the default templates directories. When creating a theme or module (in the next chapter), you could choose to inherit a template or override it at any level (item, type, part, or field).
In Chapter 3, we created alternate templates in the form of Razor template files. However, we didnât explore these templates in any detail. Before we build a theme and continue our Razor efforts, itâs worth a quick look at some of the functionality that Orchard adds to the standard base class used by Razor views. For more on Razor, see Programming Razor by Jess Chadwick (OâReilly).
Orchard extends the System.Web.Mvc.WebViewPage base class used by
Razor views with its own WebViewPage.
Weâve already seen a method from this subclass. When we created our zones,
we used its Display method. There are
other useful helper methods in this base class.
The Style property of WebViewPage has an Include method that will render a link tag that points to the filename provided as
its argument. It assumes that your file is in the Styles directory of your theme. Similarly,
there is a Script property with
methods related to including JavaScript blocks and files.
Both the Script and Style properties are of type ResourceRegister, which provides an additional
method named Require. Given a resource
defined in a manifest class (weâll learn more about this class in Creating
Widgets), Require will find a script or
style and ensure that itâs included only once.
WebViewPage also includes some
convenience methods, such as the null and whitespace checking HasText method. Orchard also provides a StringExtensions class in the Orchard.Utilities.Extensions namespace. This
class has methods such as CamelFriendly, Ellipsize, and HtmlClassify, all of which may be useful in
views.
For our theme, weâll consider this document wrapper sufficient and wonât override it with a new Document.cshtml. Weâll instead start our theme with a new layout file. Add a new Razor file named Layout.cshtml to the Views folder in the âDaisysThemeâ theme. If you save this file with no content (an empty HTML file) and refresh any page on your site, youâll see that the content has disappeared.
By including a Layout.cshtml file in our template, weâve instructed Orchard not to use its default layout template. Instead weâve instructed Orchard to use this new, empty file. Notice though that the page title still appears. As mentioned, the title was included in Document.cshtml, which we chose not to override.
Note
If youâve viewed the source of any of your siteâs pages as weâve
been making changes to the theme, you may have noticed a great deal of
JavaScript content. The script is from the Shape Tracing module that we enabled in the
previous chapter. It would not appear on production sites unless you
left that module enabled.
Weâll add some code to Layout.cshtml to get some content back on our site. Start by adding the following snippet:
<div id="main">
@if (Model.Content != null) {
    @Display(Model.Content)
}
</div>
This simple chunk of Razor code demonstrates a couple of key
patterns for building layouts in Orchard. Weâre going to explore this
pattern in more detail later in this chapter. For now, recognize that we
null-check a property on our viewâs Model and call Display on that property when itâs not
null.
Recall that the data bound to our views are dynamic types known as
shapes. The Model property of our view
is a representation of these shapes. When you call the Display method, itâs going to check the runtime
type of the argument you provided. In this case, the type will contain
metadata indicating that itâs a âzone,â which will allow the Display method to properly render content in
that given zone.
Note
The Display method is actually
a read-only dynamic property that is
defined in Orchardâs WebViewPage,
which is the base page type for Razor views in Orchard. This property
returns an instance of a callable dynamic object, which is why the method-call
syntax works.
Saving the layout and refreshing the home page, we now see that the main content has been added. However, weâve lost our navigation and other zones. Letâs add the navigation by placing the block of code that follows above the content snippet we previously entered:
@if (Model.Navigation != null) {
<div id="layout-navigation" class="group">
    @Display(Model.Navigation)
</div>
}
Once navigation has been added, we can now refresh the home page and click through each of the pages to see that content is in fact displaying on each page. While most pages look like their âTheThemeMachineâ equivalents without any CSS, the home page is noticeably missing the widgets weâd previously added.
If we want the Bing Maps widget
to show up in our new theme, we need to include a zone named TripelThird and a block of Razor/HTML as
follows:
@if (Model.TripelThird != null) {
    <div id="tripel-third">
        @Display(Model.TripelThird)
    </div>
}At this point we can see that zones are simply sections defined in
our layout templates. We use the Display method of the view to create them.
Adding widgets to zones in the admin tool creates the relationship that
allows the null-checks that surround the Display calls to evaluate properly. Had we not
added a widget to the zone TripelThird, then Model.TripelThird would evaluate to
null.
Letâs take a quick detour from Daisyâs Theme to explore zones a little deeper. Start by opening up Theme.txt in our themeâs root directory. The âZonesâ entry in this file is used by Orchard to display the list of zones that appear when you click âWidgetsâ on the admin menu. That list is currently populated by zones defined in other installed themes and Orchard will tell you as much when you visit that page.
Add a âZonesâ section to your Theme.txt named âMoreContentâ:
Zones: MoreContent
Next return to Layout.cshtml and add a new zone:
@if (Model.MoreContent != null) {
<div id="more-content">
@Display(Model.MoreContent)
</div>
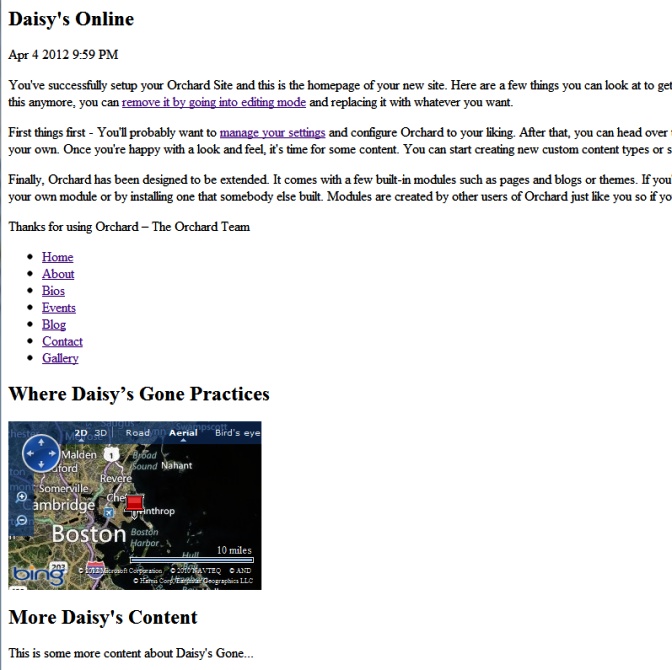
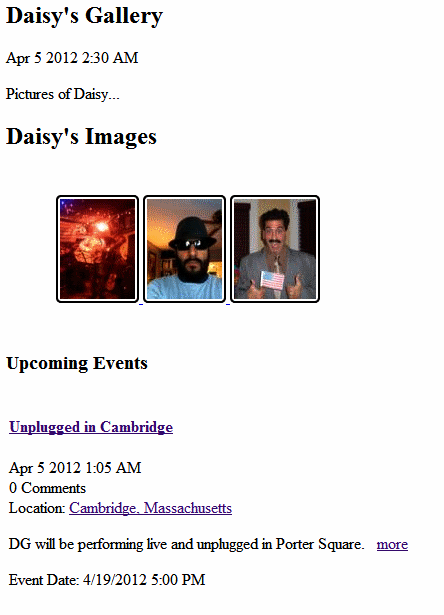
}If you refresh the âWidgetsâ admin page, youâll now see a zone named âMoreContentâ above the zones defined in âTheThemeMachine.â Click AddâHtml Widget, add some content, and save. Next, refresh the home page (or any other page). Youâll now see that the zone is displaying on each page (Figure 4-5).
Letâs limit this new widget so that it appears only on the home
page. Click on the âMore Daisyâs Contentâ link (the name of the HTML widget) listed with the âMoreContentâ
zone. On the property page for that widget, choose the layer named
âTheHomepageâ and click Save. Click through to each of the pages to see
that the layer rule has enabled this zone only for the home page.
As you navigate around the site, youâll notice that weâve lost the customization built in Chapter 3 for rendering bios and events. If we want to get these templates back, all we need to do is add those Razor files into our new template.
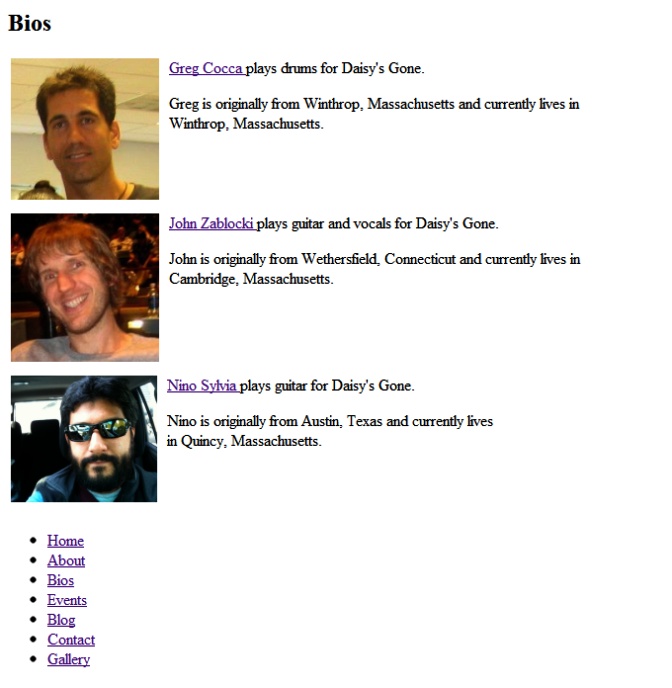
If you move or copy Content-Bio.Summary.cshtml to the Views directory of our âDaisysThemeâ theme and refresh the bio page, youâll see the listed bios are displaying content as they were previously. Of course, without any CSS in our theme youâll notice that the rendering lacks any style (Figure 4-4).
At this point, our theme isnât particularly stylish or interesting. Our layout is pretty limiting as well. What we really want is some HTML thatâs easily styled by a skilled designer. Fortunately, the work for that has already been done.
The theme âTheThemeMachineâ defines a very flexible layout file. We could simply copy that into our theme, but instead weâre going to inherit it into our theme. In âDaisysThemeâ open Theme.txt and add the line that follows. Then delete Layout.cshtml (the one we created):
BaseTheme: TheThemeMachine
After you refresh the home page, youâll see that our site has returned to its âTheThemeMachineâ roots. However, we obviously want to customize our look and feel a bit. To deviate from the inherited theme, we need to override the default styles found in âTheThemeMachine.â
Create a new file Site.css in the Styles directory of the âDaisysThemeâ theme. After you create the empty stylesheet, youâll see after refreshing your site that weâve again lost our styling, but maintained our layout and alternate templates (Figure 4-5).
Unfortunately, thereâs no way for our theme to inherit both the layout and stylesheet from the âTheThemeMachineâ theme. Layout.cshtml explicitly includes only a single stylesheet named Site.css. If we want to inherit the entire layout file and customize the style, we have to copy the contents of Site.css from the Styles directory of âTheThemeMachineâ into our new file. Otherwise, we have to modify the layout file to look for an additional stylesheet.
Copy the stylesheet content over into our new theme (Site.css) and save the stylesheet file. Refresh the site to see that weâre now back to the âTheThemeMachine.â Again, weâll leave the design lessons for the designers, but weâll modify some of the basic UI to make our theme a little more unique.
Since weâre designing a site for a rock band, weâll change the background color to a blackish color. Locate the body selector in the stylesheet and weâll go from a light theme to dark simply by changing the background color:
body {
  line-height: 1;
  font-size: 81.3%;
  color: #434343;
  background: #303030;
  font-family: Tahoma, "Helvetica Neue", Arial, Helvetica, sans-serif;
}
Of course, itâs a bit hard to read the gray text on the dark-gray
background. So letâs lighten up our content areas. We could go into the
individual page sections and set each to have a white background, but
thereâs an easier way. We can take advantage of the fact that the layout
from which weâre inheriting wraps various groups of zones in div elements with a class name of
âgroupâ:
.group {
    background: #fff;
}Letâs also update the font thatâs used for the header of the site.
By default it uses a font named âLobster.â Youâre probably thinking that
you donât have âLobsterâ installed, yet youâve somehow been seeing the
correct cursive font on the header. Orchard assumes modern web standards
by default, so our theme is able to make use of the @font-face directive in CSS3. More
specifically, it uses the Google Web Fonts API:
Style.Include("http://fonts.googleapis.com/css?family=Lobster");If we want to change this font, we have a few options. Weâre again faced with the dilemma of whether to modify or copy Layout.cshtml in âTheThemeMachineâ to include our desired change. Since weâre just changing styles, weâre going to keep the layout in place and take a different approach.
Weâll simply import a new web font in our stylesheet and then set
the branding elementâs font-family to our new font. Start by adding a
new @import directive to the top of
our stylesheet:
@import url(http://fonts.googleapis.com/css?family=Frijole);
In our template, the header text is rendered in an h1 element named âbranding.â Weâll simply set
style for that element to use our newly imported font:
#branding a
{
    text-decoration:none;
    color: #434343;
    font-family: 'Frijole';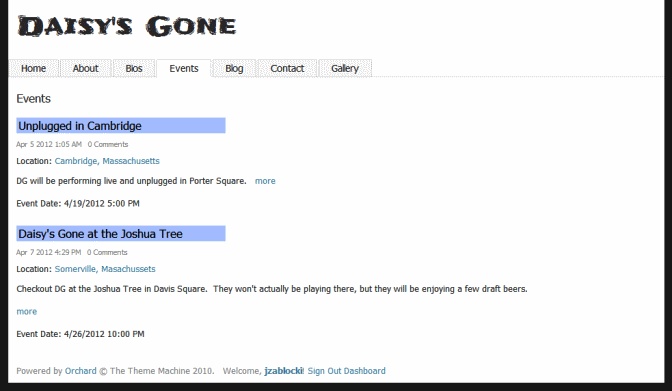
}Next weâre going to modify the event listing so that the event
titles have a background color and text thatâs in all caps. We could
write our CSS selector expression to affect all a tags that follow h1 tags as thatâs the way events are rendered,
but such a selector would not be limited to events matching that
pattern. Instead weâre going to inject a class name into each event
row.
In the admin dashboard, navigate to âQueriesâ and select the row for âAll Events.â Click to edit the â1 columns gridâ that we created previously. In the section with the heading âHtml properties,â enter a value âevent-rowâ under the âRow classâ and save. We could also have chosen from predefined dynamic expressions (in the drop-down menu for that field), but a static class is sufficient for our purposes.
After you save the new row class, add a new CSS rule to affect
a elements that follow h1 elements that follow a tr element with a class name of âevent-row.â
Weâll style the anchors to be displayed as âblockâ so that we have equal
length backgrounds:
tr.event-row h1 a {
    background-color:#BACEFF;
    padding:3px;
    color:#000;
    width:300px;
    display:block;
}
Figure 4-6 shows the template with our new styling.
Weâre going to add another template to our theme, but first we have to bring back the rest of our content customization. Copy or move Content-Bio.cshtml, Parts.Common.Body-11.cshtml, and Placement.info from âTheThemeMachineâ to âDaisysTheme.â
After moving those files, add a new template named NewsAndNotes.Wrapper.cshtml. Unlike our other
templates, this one will surround its target with HTML and wonât
actually modify the shape template itself. To call attention to band
activity, the code for this wrapper will simply add a div element with a yellowish background to our
âNews and Notesâ HTML widget:
<div style="background:#FFE8A5;padding:2px;">
    @Model.Html
</div>
An additional step is required for this wrapper to be used on our
site. We need to update Placement.info to instruct Orchard to use
this template. The match constraint will cause this rule to apply to the
HTML widget on our home page:
<Match ContentType="Widget" Path="~/">
    <Place Parts_Common_Body="Content:5;Wrapper=NewsAndNotes_Wrapper" />
</Match>
This scenario is admittedly slightly contrived, as we could have used an alternate template for our zone to accomplish the same thing. However, it does illustrate an additional layer of customization available to theme designers.
Weâll consider our theme sufficiently styled at this point (at least by developer standards). Now weâre ready to update the metadata used by the admin tool. Return to Visual Studio and open Theme.txt in the root of the theme. Most of the values are pretty obvious; Name, Author, Website, Description, and Version are included by default and shouldnât merit any further description. If you personalize these values and return to ThemesâInstalled in the Dashboard, youâll see these updated values.
There are two final files you need to know about when developing themes: Theme.png and ThemeZonePreview.png. These files both live at the root of a theme. The former is typically a screen-grab of your themeâs homepage that will be used in the Dashboard and the gallery to provide a preview of your theme. The latter is an image used on the Widget admin page to provide a preview of where zones are conceptually placed in layout files.
The last update weâll want to make is to modify the chunk of HTML
on the bottom of the page that gives credit to âTheThemeMachineâ as this
siteâs theme. While that statement is partially true, weâll instead
claim credit for our âDaisyâsThemeâ theme. Weâll need to override a file thatâs in
âTheThemeMachineâ named
BadgeOfHonor.cshtml. Copy it from the
Views directory of
âTheThemeMachineâ into our themeâs Views directory. Modify the content so that
the span with the âcopyrightâ class
has the content as follows:
<span class="copyright">@T("© Daisy's Theme 2012.")</span>In our exploration of developing themes, weâve seen that we donât have to start from scratch when developing our siteâs look and feel. In fact, this is a common way to develop themes. The âTheThemeMachineâ theme provides a flexible, barebones layout that could easily be styled by a skilled designer.
There is little reason to create new layout files and complex zone schemes when most of what you need may be found in this theme. Simply inherit from it and create a new stylesheet with new graphical treatments. Of course, your needs may require that you copy the entire âTheThemeMachineâ theme to get started. Moreover, the same approach we took to modifying âTheThemeMachineâ applies to any theme you install into Orchard (theme license permitting).
Get Orchard CMS: Up and Running now with the O’Reilly learning platform.
O’Reilly members experience books, live events, courses curated by job role, and more from O’Reilly and nearly 200 top publishers.

