chapter 4: styles, page layout, and tables 165
Tables
How do you use Word to create a résumé, agenda, program booklet, list, multiple-
choice test, Web page, or other document where numbers, words, and phrases must
be aligned across the page? In the bad old days, people did it by pressing the Tab key
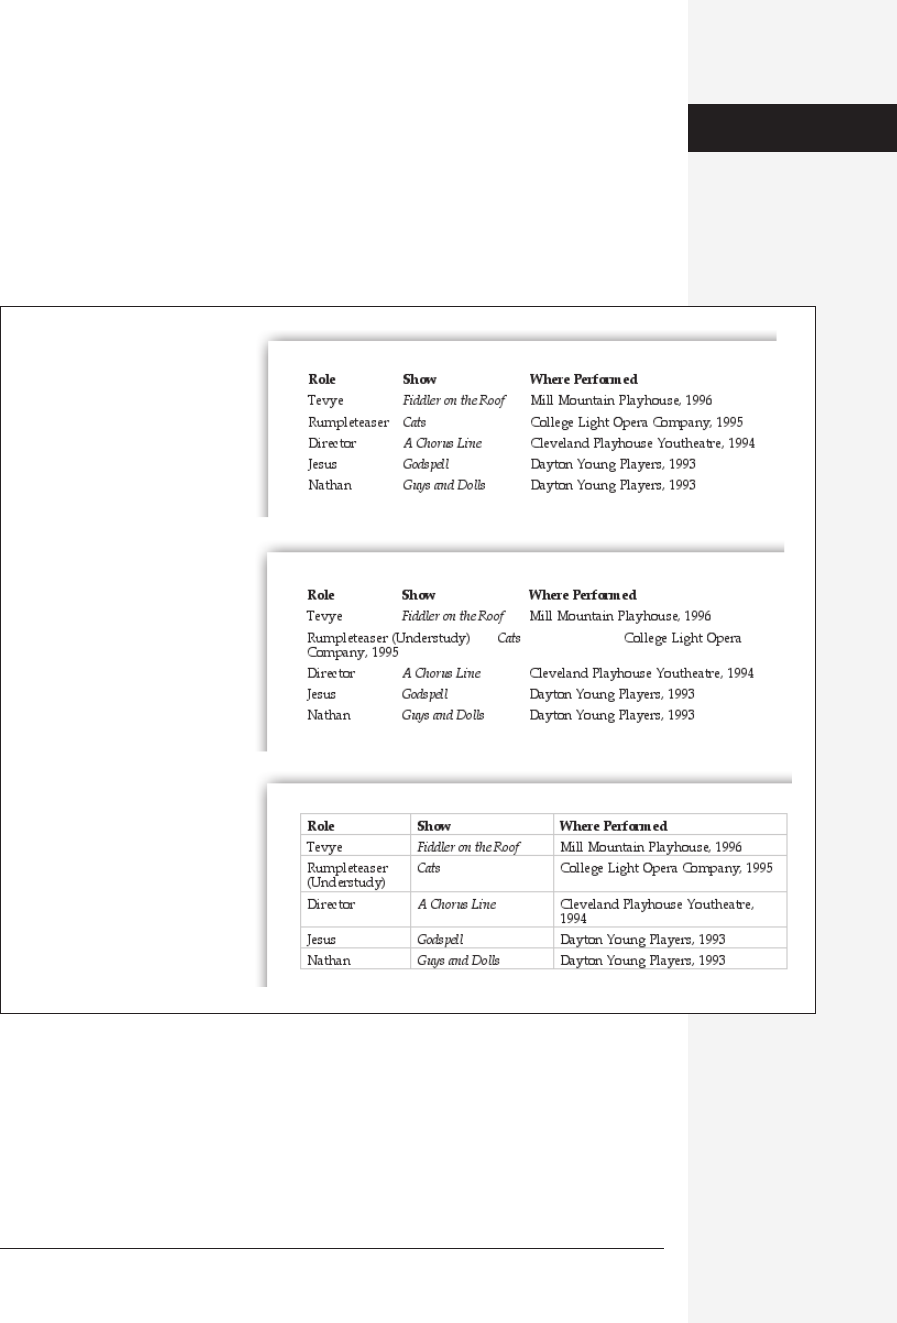
to line up columns. As Figure 4-14 illustrates, this method is a recipe for disaster.
(Unfortunately, thousands of people still use this method—or, worse, they still try
to line up columns by continuously pressing the Space bar.)
Using Word’s table feature is light-years easier and more flexible. As illustrated in
Figure 4-14, each row of a table expands infinitely to contain whatever you put into
it, while everything else on its row remains aligned. Tables also offer a few simple
spreadsheet features.
Figure 4-14:
Top: If you use tabs to set up a
table, things may look good at
first—as long as every line fits
within its space and you never
plan to insert any additional
text.
Middle: Here’s what’s wrong
with the tab approach. When
you insert the word Understudy
into one of the columns, it
pushes too far to the right,
causing an ugly ripple effect
that will take you a long time to
straighten out.
Bottom: If you use a table, you
never have this kind of problem.
Just type as much text as you
like into a “cell,” and that row of
the table will simply expand to
contain it. (The light gray
gridlines don’t print unless you
want them to.)
Tables
166 office x for macintosh: the missing manual
Creating Tables
There are two ways to insert a table: You can let Word build the table to your
specifications, or you can draw it more or less freehand.
Inserting a table
The quickest way to insert a table is to use the Insert Table pop-up button on the
Standard toolbar (see Figure 4-15).
If the toolbar isn’t visible, choose Table→Insert→Table. The Insert Table dialog box
opens, also shown in Figure 4-15.
After choosing the number of rows and columns you wish to start with (you can
always add more later), click an AutoFit radio button to instruct Word how to size
the columns across your table. If you know how wide in inches you’d like each col-
umn to be, click “Initial column width” and set a measurement in the size box.
“AutoFit to contents” creates skinny columns that expand as you type into them,
and “AutoFit to window” (the easiest way to go if you’re not sure) spaces the selected
number of columns evenly across the page. The table appears in your document at
the insertion point when you click OK. Figure 4-16 depicts a small 6 x 4 table.
Figure 4-15:
Left: A quick way to make a small
table is to drag from the Insert
Table button on the Standard
toolbar. As you drag through the
resulting grid, you’re specifying
the grid size you want. (You can
drag beyond the boundaries
shown here, by the way, to specify
a 9 x 9 table, for example; the
pop-up grid grows as necessary.)
Right: If you frequently use the
same kind of table, check the “Set
as default for new tables” box to
make your favorite settings the
new defaults. They will appear in
this dialog box each time you
choose Table
→
Insert
→
Table.
Figure 4-16:
The light gray markings shown here appear when you click the
Show/Hide ¶ button on the Standard toolbar or Formatting
Palette. To select an entire column, click near the top of it; the
cursor turns into a tiny arrow. To resize a row or column, drag
the horizontal or vertical lines when the cursor turns into a
double arrow. The resize box at lower right keeps all rows and
columns in proportion as it expands or shrinks the entire table.
Tables
Get Office X for Macintosh: The Missing Manual now with the O’Reilly learning platform.
O’Reilly members experience books, live events, courses curated by job role, and more from O’Reilly and nearly 200 top publishers.

