
148 office x for macintosh: the missing manual
Note: Word won’t let you delete certain built-in styles (such as Normal, Heading 1, 2, and 3, and so on).
If you click one of these styles, the Delete button is grayed out.
To delete many styles at once, choose Format→Style and click Organizer (or press
c-O). The Organizer opens, as shown on page 207. In the list box for the current
document, c-click the styles you want to delete, then click Delete. (If the list of
styles you wish to delete are consecutive, click the first one, then Shift-click the last
style name; click Delete.)
Transferring styles
Once you’ve cultivated a crop of magnificent styles, you may want to spread their
sunshine to other documents. You can do so in the Organizer dialog box, described
in the previous paragraph and on page 207, but that’s a lot of trouble.
The sneaky, much faster way is to copy paragraphs formatted in the styles you want
to transfer and then paste them into another document. Word automatically adds
the pasted styles to the second document’s list of styles. (If the document already
contains a style of the same name, it ignores the new one you’ve pasted.)
Tip: If you’re ever confused about which styles you’ve applied where, try this: Choose
Word→Preferences→View panel. Set the “Style area width” to about one inch, then click OK. Now Word
opens a new strip at the left side of your document window that identifies the style of every paragraph!
Page Layout
Word automatically flows text from line to line and page to page. However, an im-
portant part of document design is placing text right where you want it, breaking it
up, and generally controlling the flow.
Inserting Breaks
A break is an invisible barrier that stops your text in its tracks, and then starts it
again on a new line, column, or page.
Paragraph break
In Word, pressing Return (or Enter) creates a paragraph break; although you may
not have been aware of the term, this is what you’ve been creating every time you
end a paragraph. Unless you’ve chosen a different “following paragraph” style (see
page 146), the new paragraph takes on the same formatting as the one above.
Line break
Pressing Shift-Return inserts a line break. It’s similar to a paragraph break except
that the text on the new line remains part of the original paragraph, and retains its
style and paragraph formatting. No matter how you edit the surrounding text, the
line break will remain where you inserted it—until you remove it, of course.
Styles
chapter 4: styles, page layout, and tables 149
Page break
Choose Insert→Break→Page Break (or press Shift-Enter) to force a hard page break.
No matter how much text you add above the break, the text after the break will
always appear at the top of a new page.
Use a page break when, for example, your report has a separate title page. Inserting
a hard page break at the end of the title page text forces the body of your paper to
begin on page 2. You may also want to start a new page for each topic in a document,
if you’re writing a manual on chores for the kids, for example. In this case, you could
start a new page for the cleaning instructions for each room in the house.
Tip: In Page Layout view, page breaks are generally invisible. The text just ends in the middle of a page
and won’t go any further, which can be disconcerting if you’ve forgotten about the page break you added.
To view the dotted lines that represent a page break, choose View→Normal, or click the Show/Hide 
button on the Standard toolbar or Formatting Palette.
Column break
To make text at a certain spot jump to the top of a new column (in multicolumn
layouts like those described in the next section), choose Insert→Break→Column
Break. Word ends the current column and, when you start typing again, begins at
the top of the next column at the top of the page.
If you choose this option when you’re not using multiple columns (see page 150), it
behaves like a hard page break. (On the other hand, if you later switch to a two- or
three-column format, the column break behaves like a normal column break. If you
plan to make two different versions of your document—one with columns and one
without—you may therefore want to use column breaks instead of page breaks.)
Keyboard shortcut: Shift-c-Return.
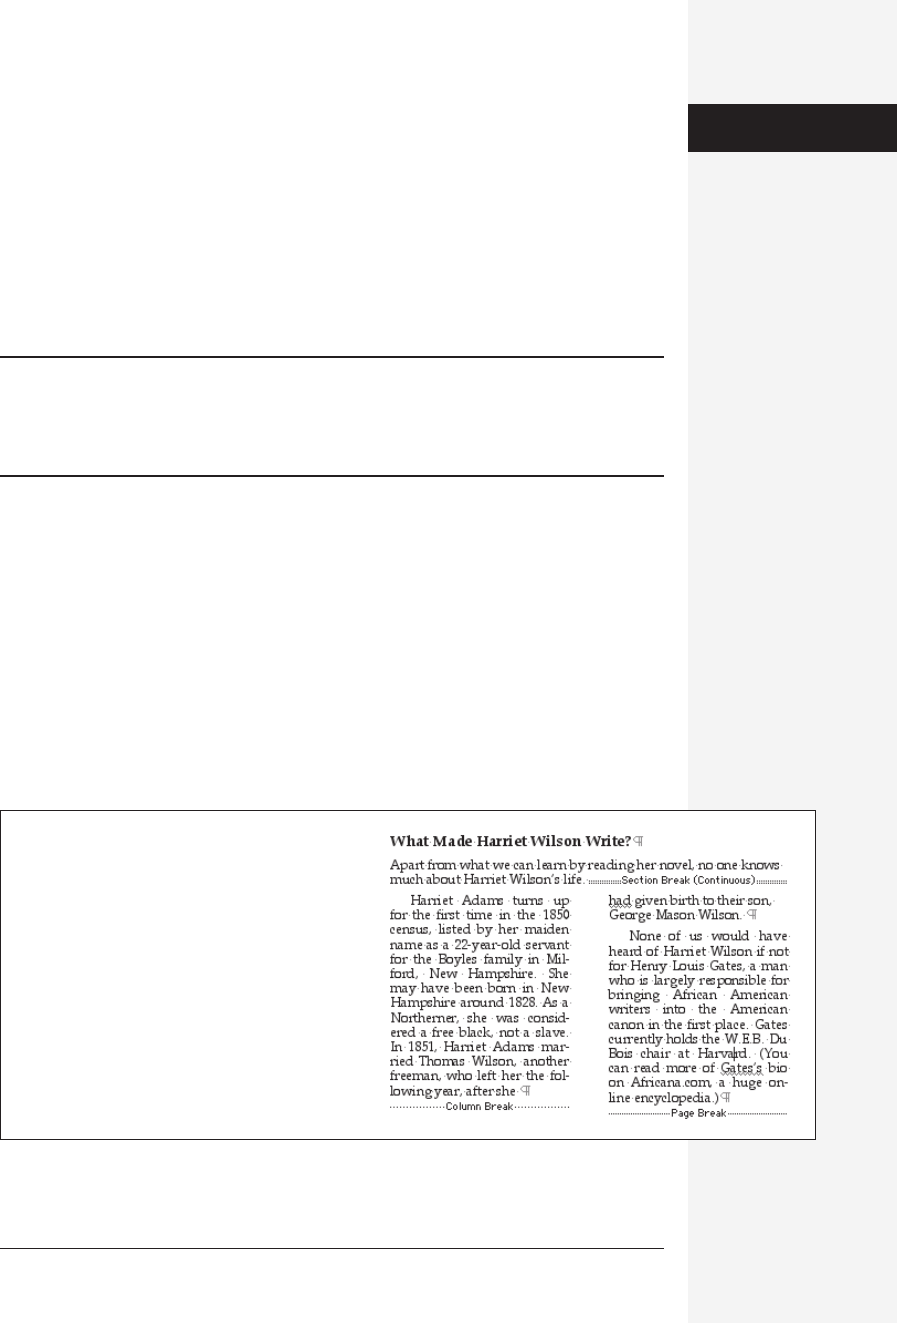
Figure 4-5:
Click the ¶ (Show/Hide) on the Standard toolbar to
see which breaks are where in your document. This
is the sure-fire way to get rid of breaks you want
removed. Now that you can see them, you can delete
or backspace over them.
Page Layout
Get Office X for Macintosh: The Missing Manual now with the O’Reilly learning platform.
O’Reilly members experience books, live events, courses curated by job role, and more from O’Reilly and nearly 200 top publishers.

