
chapter 3: formatting in word 117
When you want Word to display the text you’ve designated as hidden, use either of
these techniques:
• Choose Word→Preferences→View tab. Turn on “Hidden text” and click OK.
• Click the Show/Hide button (¶) on the Standard toolbar (or the Document sec-
tion of the Formatting Palette).
Either way, hidden text appears with a dotted underline to distinguish it from the
rest of the text.
Tip: Whether or not hidden text prints is up to you. To print hidden text along with the rest of the
document, choose Word→Preferences, click the Print button, turn on the Include with Document→Hidden
text box, and click OK.
Lists
If you’re in the business world, or even the business of organizing your thoughts,
you can’t get far without using numbered or bulleted lists.
Bulleted lists are an attractive way of presenting little nuggets of information. Here,
for example, is a bulleted list that illustrates how useful they can be:
• Each paragraph is indented from the left margin (like this one) and is preceded
by a bullet (the round dot shown at left).
• You can always create a numbered list by typing a number at the beginning of
each line, but it won’t be nicely indented.
• You may know how to create a bullet (•) at the beginning of every line by using
the keyboard shortcut Option-8. But again, that won’t produce the clean left
margin on your bulleted paragraphs.
• Furthermore, creating lists manually can get messy. For example, inserting an
item between two existing ones in a numbered list requires some serious renum-
bering. And if you want your list indented, you’ll have to fiddle with the indent
controls quite a bit.
Word has partially automated the process. A quick way to start a numbered or bul-
leted list is to click one of the list icons on the Formatting Palette (next to where it
says Lists). Word promptly indents the paragraph containing the insertion point
and adds a bullet (or the number 1). Even the indenting is perfect: The second and
following lines of a list item start under the first letter, not all the way back to the left
margin. To start a new list item, just hit Return. When you’re finished building the
list, press Return once more and then click the same icon in the Formatting Palette
a second time.
If you create a numbered list this way, Word does the numbering automatically as
you go. Better yet, if you insert a new list item between two others, Word knows
enough to renumber the entire list.
Character
Formatting
118 office x for macintosh: the missing manual
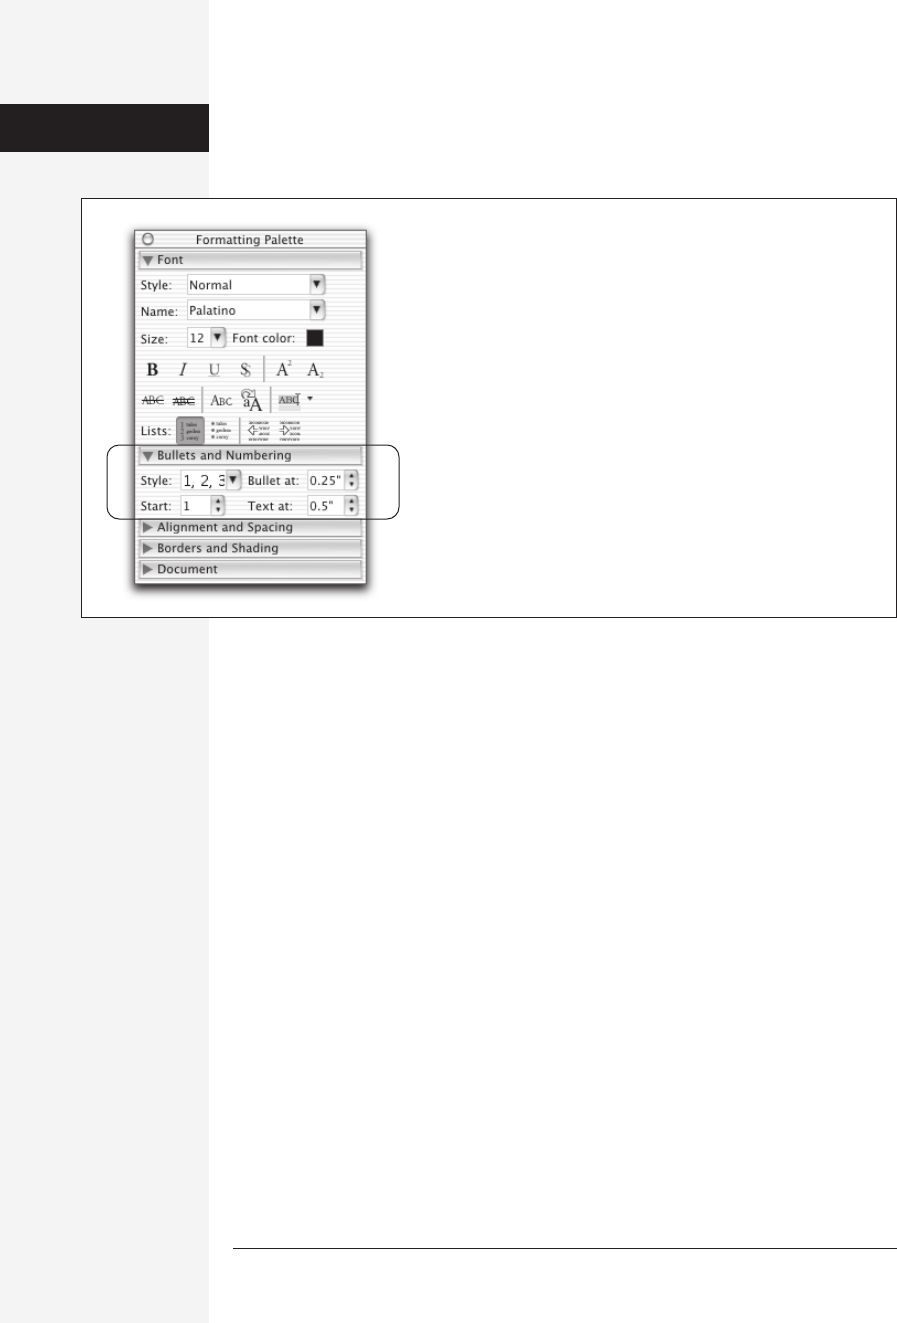
When you click one of the list icons in the Formatting Palette, a new palette segment
labeled Bullets and Numbering appears directly below, complete with its own flippy
triangle (see Figure 3-4).
Each of the four pop-up menus in the Bullets and Numbering panel controls a dif-
ferent aspect of how your list will look (the entire list, no matter which individual
list line contains your insertion point).
• Style specifies the kind of numbering (Arabic numerals, roman numerals, and so
on), or the size and shape of the bullet.
• Start at tells Word what number to start the list with.
• Bullet at tells Word, in inches, how far from the left margin to set the bullet.
• Text at tells Word, in inches, how far to indent the words from the left margin. It
must always be a larger number than “Bullet at.”
You can also adjust the indents by clicking the indent left and indent right icons on
the Formatting Palette, which are right next to the list icons.
Extra Features in the Bullets and Numbering Dialog Box
The Formatting Palette is great for quickly designing a list, but the Bullets and Num-
bering dialog box offers even more options. Open it by choosing Format→Bullets
and Numbering (see Figure 3-5).
Customizing a bulleted list
Bulleted lists as delivered by the Formatting Palette are fine, but there may come a
day when simple black, round bullets just don’t cut it for the radical new-age busi-
ness plan you’re writing up. In such cases, click the Bulleted tab in the Bullets and
Figure 3-4:
After clicking the icon for a numbered list, a new Bullets and
Numbering panel appears (click the flippy triangle to expand it).
Lists
Get Office X for Macintosh: The Missing Manual now with the O’Reilly learning platform.
O’Reilly members experience books, live events, courses curated by job role, and more from O’Reilly and nearly 200 top publishers.

