One of the big advantages of using a productivity suite like Microsoft Office is that you can quickly get a handle on how the programs work. How’s this for a nightmare scenario: You learn a word processing program for creating memos and newsletters and toil over your novel in the wee hours but your spreadsheet program has a whole different approach to doing things, and your slideshow program might as well be from a whole different planet. With a suite—a group of related programs—there’s no need to start from scratch learning each program you need to get your work done.
Although Office 2013’s programs each perform different tasks, they all work similarly. When you’ve learned how to use the ribbon and save a file in Word, for example, you’re already 90 percent of the way to learning those same tasks in Excel, Outlook, PowerPoint, and other Office programs. Although what you’re doing changes from one program to another, the way you do it carries over from one program to the next.
This chapter focuses on the common features of Office programs, from the basics of opening and saving a file to customizing each program. No matter which of the Office 2013 programs you use, you’ll appreciate their common features.
The first step to working with any Office program is opening it. Where you find these programs varies depending on which version of Windows you have:
Windows 7. Click the lower-left Start button to open the Start menu. If the menu shows the program you want, bingo—click that program to open it. If you don’t see the program in the Start menu, select All Programs→Microsoft Office 2013, and then click the name of the program, such as Excel 2013 or Word 2013.
Windows 8 or Windows RT. When you start up your computer or tablet, you should see tiles for the Office apps already pinned to the Start screen. (If you don’t see a tile for the program you want, scroll or swipe from left to right to see more.) Click or tap a tile to open its program. You can also open Office programs in the following ways:
Right-click or swipe vertically from the top or bottom edge of the screen. Select “All apps,” and then choose the program you want.
Move your mouse pointer to the upper-right or lower-right corner of the screen; on a touchscreen, touch the right side of the screen and swipe inward. Select Search to open a search pane. Type the name of the program you want into the search box, and then select it from the results list.
Tip
You can add Office programs to the taskbar permanently, so you’ll always know where to find them. On the Windows 8 or RT Start screen, right-click the tile for the program you want. If you’re using a touchscreen, swipe downward on the tile. Select “Pin to Taskbar” to make the program stay put. If you’re using Windows 7, you can right-click the program’s icon and select “Pin to Taskbar” from the shortcut menu or—even easier—drag the icon to the taskbar and drop it there.
If you’ve used previous versions of Office, one big change you’ll notice right away in Office 2013 is the Start screen. It used to be that when you opened an Office program, you’d see a new, empty file in the program’s standard template. When you fired up Word, you’d see a plain document; when you opened Excel, you’d see a blank worksheet; and so on.
Not so in Office 2013, which recognizes that you might want to start with a file you’ve worked on recently or with a particular kind of template. Enter the Start screen. From here, you can open recent files or select a template, and then jump right into working with them. Figure 1-1 shows the Word Start screen.
Note
Outlook 2013 is a little different from the other Office programs. Instead of showing you a Start screen when you open it, it displays your email Inbox.
What can you do from the Start screen? Any of these productivity-boosters:
Open a recent file. The left side of the Start screen lists the files—up to seven of them—that you’ve worked on most recently. Click any file to open it.
Open an older file. If the file you want isn’t in the Recent list, look below that list for a folder containing Other Files. (The actual name reflects the program you’re using—Open Other Documents for Word, Open Other Presentations for PowerPoint, and so on.) Click that folder icon to switch to the Open page (and flip to Finding and Opening a Saved File for more details on opening a file you’ve saved).
Create a new blank file. Want to start a new file from scratch? If you love the possibilities of a fresh, clean page, you can open a blank file of whatever type you want—document, worksheet, presentation, database, publication, or notebook—from the Start screen.
Create a new file from a template. All Office programs come preloaded with useful templates—preformatted files for a wide variety of specific purposes—so you don’t have to spend time designing them from the ground up. There are resumes in Word, photo albums in PowerPoint, budgets in Excel, project management databases in Access—and that doesn’t even begin to scratch the surface. You can even search for the kind of template you want. For more on working with templates, see Chapter 8.
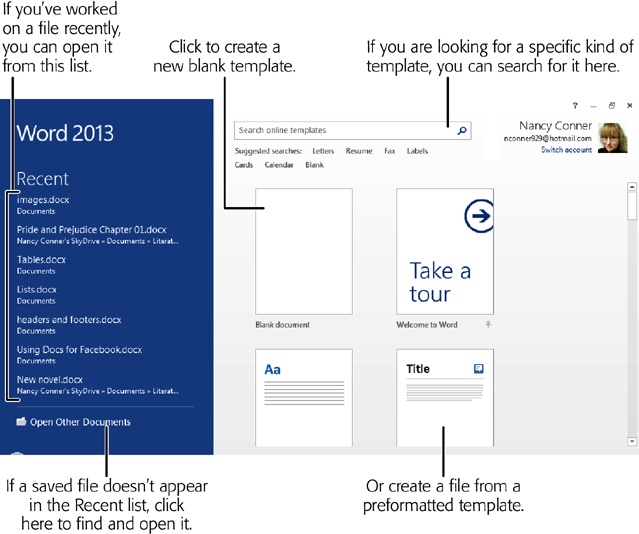
Figure 1-1. The Start screen, shown here in Word, lets you get right to work, whether you’re opening a recent file or creating a new one.
Tip
Not a fan of the Start screen? You can set Office programs to open to a blank file, just as they did in earlier versions. Open the program whose Start screen you want to nix, and then select File→Options. In the General tab’s “Start up options” section, turn off the “Show the Start screen when this application starts” checkbox, and then click OK. You have to do this separately for each program. If you change your mind later, simply turn the checkbox back on.
Before the ribbon made its debut in Office 2007, the commands you needed to work with your files were hidden away in menus. That meant you had to either memorize which commands were on which menus or waste time clicking around trying to find the command you wanted.
The ribbon, shown in Figure 1-2, stretches across the top of each program’s workspace and lays out those commands in plain sight. The top of the ribbon consists of a series of tabs that serve as categories to organize common tasks. Click a tab, and the ribbon changes to a bunch of buttons, each one showing a command related to the tab. The open layout makes it easy to find the button you want.
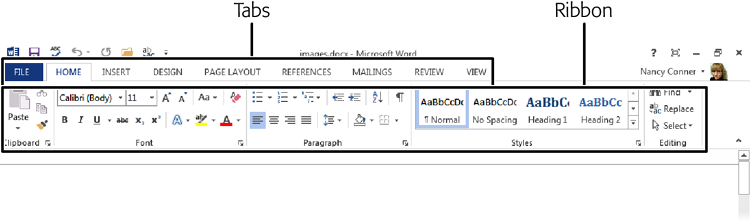
Figure 1-2. The ribbon in Word. Click any tab, and the ribbon displays commands related to that tab. The Home tab (shown here) gathers together some of the most common actions, keeping them easy to find.
Here are some basics to keep in mind as you explore the ribbon:
Many of the ribbon’s buttons show their function through pictures, not labels. If you’re not sure what a button does, point to it with your mouse. Up pops a tooltip that gives you the button’s name and a brief description of what it does.
The ribbon is divided into sections, and each section groups related commands together. So if you’re looking for a command you know is related to, say, paragraph formatting, just look for it in the Paragraph section.
Some sections have even more commands than can fit on the ribbon. To see everything you can do within a particular section, look for a pop-out button (with the little arrow on it) in the section’s lower-right corner. Click it to open a dialog box. For example, the Home tab’s Clipboard, Font, Paragraph, and Styles sections all have these pop-out buttons: Each one opens a dialog box or a pane that gives you even more choices related to that section.
The ribbon’s tabs and commands vary depending on which program you’re using. For example, PowerPoint has ribbon tabs about working with animations and transitions in a slideshow presentation, while Excel has tabs for working with formulas and data. You won’t find any of those tabs, though, in Word.
The Home tab brings together the most common commands. It’s your home base for working with files, and it’s where you’ll find the Clipboard (for copying and pasting), font and alignment options for text, search and replace commands, and so on.
The File tab is an oddball. It doesn’t change the ribbon; it takes you to the program’s backstage area, where you work with the file itself (as opposed to its content). Going Backstage tells you more about going backstage in Office—what it means, and what you can do there.
If you’ve used earlier versions of Office, you know how much faster you can work by keeping your hands on the keyboard—that is, rather than having to reach for the mouse, move it around, click a few times, and find your way back to the keyboard (and then repeat the whole ordeal each time you use the mouse). So you may have learned certain keyboard shortcuts, like Ctrl+C for copy and Ctrl+V for paste. You’ll be pleased to know that these shortcuts are alive and kicking in Word 2013.
Starting with Office 2007—and continuing through subsequent versions of Office—Microsoft revamped the keyboard shortcut system so it’s based on the Alt key. No longer do you have to remember dozens of keystroke combinations. Just press Alt, and Office shows you which key to press to perform the task you want (Figure 1-3). For example, if you want to choose a task from the File menu, press Alt, then F to open that menu (you don’t have to hold the keys down at the same time). Similarly, to do something on the Home tab, press Alt, then H. Each option on the menu or ribbon is labeled with its own shortcut key, so you know what to press next.
To turn off the labels, simply press Alt again or click anywhere on the screen.
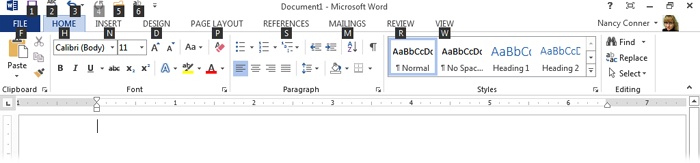
Figure 1-3. When you press the Alt key, little letter and number icons sprout onscreen, indicating keyboard shortcuts. In this example, which shows Word, press N to open the Insert tab, D to open the Design tab, P to open Page Layout, and so on. When you choose a tab, its buttons are similarly labeled, so you can select a command by pressing a key or combination of keys.
The ribbon holds the commands you need to work on the contents of your file—formatting text, laying out objects, creating charts, editing images, and more. But when you want to work with the file itself, you go backstage. That’s what Microsoft calls the behind-the-scenes area, usually hidden from view while you work on a file, that lets you open a new file, save the current one, print, share, and so on.
Note
Microsoft introduced the backstage concept in its Office 2010 programs, so if you’ve worked with that version you’re already a backstage pro. If your most recent version of Office is 2007 or earlier, this section will get you up to speed.
Your portal to Office’s backstage area is the File tab. That’s the color-coded ribbon tab at far left that matches the program’s color scheme (blue for Word, green for Excel, and so on); you can see an example in Figure 1-1. When you click this tab or press Alt, F, the file you’re working on temporarily disappears, and the screen changes to look something like Figure 1-4.
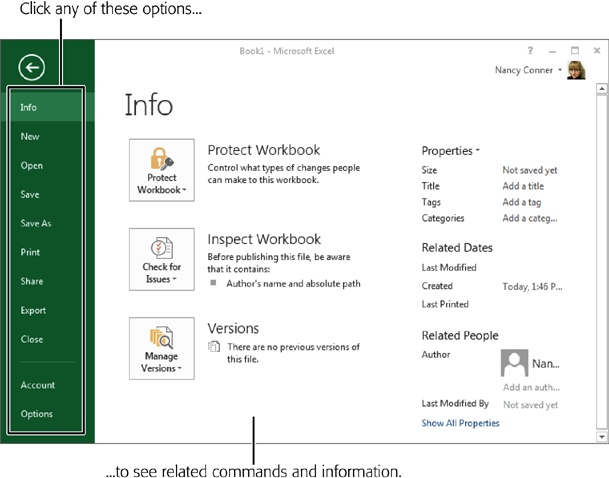
Figure 1-4. Backstage is the control center for your Office file. (This example shows an Excel workbook.) When you choose an option from the left-hand menu, the main part of the page changes to show you commands related to your choice.
The left side of the page contains a list of commands for working with the file. Choose the one you want, and the main part of the page shows you related commands. Here’s a list of some of the things you can do backstage:
Info (Alt, F, I). Protect your file from unwanted changes, inspect it for hidden info, and view its properties, such as its size, who (if anyone) has permission to share it, how much time you’ve spent working on it, and so on.
New (Alt, F, N). Choose a template for creating a new file.
Open (Alt, F, O). Find and open a file you’ve saved. You can scan a list of recent files or open the file from wherever you’ve stored it—on your computer, in the cloud, or on a company network.
Save (Alt, F, S). When you select this option for a document you’ve already saved, it saves the current version of your file in the location where you’ve stored it.
Save As (Alt, F, A). This option lets you save a file in a location you choose. It’s where you go backstage when you save a file for the first time. It’s also the option to choose when you want to save a copy of a file in a new location.
Print (Alt, F, P). Here’s where you go to choose a printer, set up a print job (specify how many pages to print, select page orientation, and so on), and print your file.
Share (Alt, F, H). Electronic sharing options include sending off a file as an email attachment, presenting it online, and sharing it on SkyDrive (for Word, Excel, PowerPoint, and OneNote files).
Export (Alt, F, E). Save the current file as another type of file or format it for optimal viewing in a web browser.
Close (Alt, F, C). Closes the current file while keeping the program, such as Word or Excel, open.
Backstage also offers a couple of broader options that control more than the file you’re working on:
Account (Alt, F, Y1). Office 2013 gives you the most flexibility when you tie it to a Microsoft account. With an account, you can save files to SkyDrive and sign in to any PC that runs Windows 8. On this page, you can sign in to your account, add a new account, and even connect your account to social networks like Facebook and Twitter.
Options (Alt, F, T). Here, you can customize how you use your Office program. For example, if real-time spell checking is distracting, you can turn it off here. You can turn the Mini Toolbar, the Start screen, and Live Preview off or on. The Options page is chock full of choices specifically geared to each program.
Note
This list gives an overview of the backstage commands for Word, Excel, PowerPoint, and Publisher. There are some variations among programs (for example, Outlook offers an option to let you save email attachments), but the list gives you a general idea of the kinds of things you can do backstage.
When you’ve worked on a file in any Office program, you’ll probably want to save it, whether to work on it again later or just to keep a copy for your records. In Office, saving happens backstage. When you’re working on a new file that you haven’t saved before, you can start the process using any of these options:
The first time you save a file, any of these routes takes you to the backstage Save As page, shown in Figure 1-5. From here, choose the location where you want to save the file: your SkyDrive (Setting Up Office Web Apps), a location on your computer, or another location, such as a company server. After you’ve chosen your main destination for saving the file, you have two options:
Click the folder where you want to store the file.
If you don’t see the folder you want, click the Browse button.
Either option opens the Save As dialog box. If you clicked a folder, it appears already selected as the folder where you’ll save the file. If you clicked Browse, use the left pane to find the folder you want, and then the right pane to choose a subfolder (if any). Give your file a name, and then click the Save button. You’ve saved your file, safe and secure, in the folder you selected.
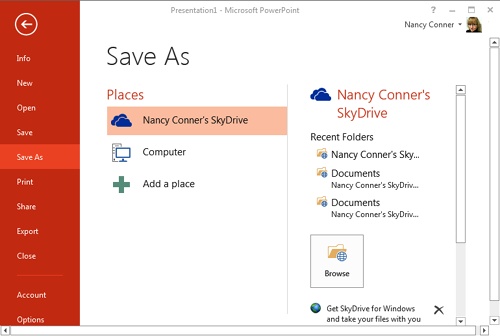
Figure 1-5. When you choose a place to save a file on the left side of the page, your Office program displays possible folders on the right. Don’t see the folder you want? Click Browse, which opens a dialog box that lets you find and select the right folder. Your program selects a file type based on the program you’re using (here, PowerPoint).
After you’ve saved a file, stashing it in a folder somewhere on SkyDrive or your computer’s hard drive, how do you find it again to open it? The quick answer, if the file is one of the last seven or so files you’ve worked with, is on your Start screen. When you open an Office program (except Outlook), the left side of the screen lists recent files. If you see the file you want there, you’re all set. Click it to open it.
If your file isn’t in the Recent list, you need to go to the backstage Open page. Here are a few ways you can get there:
The Open page, shown in Figure 1-6, also lists recent files. (Unlike the Start screen, this screen displays filenames on the right; it also lists a couple more files.) Click a file’s name to open it.
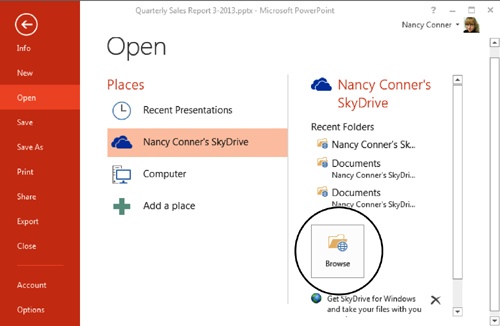
Figure 1-6. Make a selection from the Places list to see recent files or folders on the right. If you can’t find the file or folder you want, click the Browse button (circled) to navigate through all of the folders and files in the place you selected. This example shows PowerPoint’s Open page, but the same setup appears throughout Office 2013.
If you’re not opening a recent file, you need to find where you stored the file you want and open it from there. On the Open page’s left-hand Places list, click the place where you saved the file: SkyDrive, your computer, or a place you added, such as a server on a company network.
When you select a place, the right side of the page changes to list recent folders. If you see the folder where you saved the file, click it. If not, click the Browse button.
Either way, you end up in the Open box. If you clicked a recent folder, it’s preselected in the left-hand pane. If you stored the file in a subfolder, such as the Documents→My Novel subfolder, find the subfolder in the right-hand pane and double-click it. Still in the right-hand pane, find and select the file you want to open. Click Open, and—you guessed it!—the program opens your file.
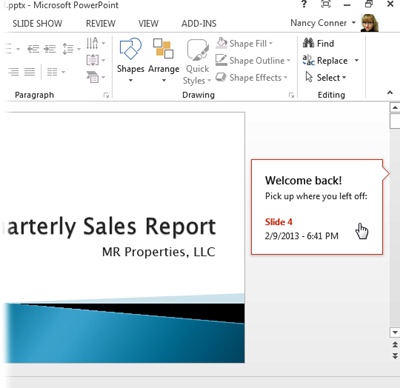
Some Office 2013 programs, named Word and PowerPoint, are so thrilled to be working with you that they welcome you back—literally—when you open a file. When you open a program a program you’ve worked on before, you’ll see a bookmark icon on the screen’s right side. Point at it to read your welcome message, shown in Figure 1-7, which tells you when you last worked on the file and where you were when you quit. Click the message to jump over to where you left off, so you can get right back to work.
When you’re finished (for now) working in an Office application, you can quickly move on to the next thing. Here’s how to say, “See ya later!” to a file or program:
Click the upper-right Close button. This button, which looks like an X, closes the file. If the current file is the only window you’ve got open in a particular program, it closes the program, too.
Click the upper-left Program button, and then select Close. The name of this button reflects the program you’re using—Word, Excel, PowerPoint, and so on. When you’re working with just a single window in a program, it closes both the file and the program.
Press Alt+F4. Behaves the exact same way as the previous two options.
Select File→Close (Alt, F, C). Take this route when you want to close a file but leave the program open, so you can get started on another file.
If you’ve just saved the file you’re closing, the file closes immediately. If you haven’t saved the file, the program gives you the chance to save the file in its current state before closing it. Click Save or Don’t Save, as you prefer.
Note
Everyone’s done it—you closed a file without saving changes. Don’t panic. With several Office 2013 programs, all is not lost. Word, PowerPoint, and Excel all create and hang on to a temporary copy of an unsaved file when you close it. To recover the temporary file, go backstage to the Open page (File→Open or Alt, F, O) and scroll to the bottom of the Recent list. There, you’ll see a button labeled Recover Unsaved (the button’s name reflects the kind of file that you’re recovering: Documents, Workbooks, or Presentations). Click it, and the program shows you a list of unsaved files. The list is temporary, though—these files hang around for only about four days before they’re really gone.
Office applications aren’t set in stone. You’ve got a lot of flexibility in making them work in the ways that work best for you. This section is all about the ways you can customize your Office apps—from how they look to ways you can work faster and better when using the Quick Access toolbar, the ribbon, and the status bar.
Lots of people like Office 2013’s new, modern, streamlined look. If you prefer a bit more ornamentation in your productivity apps, you can tweak the look of your Office programs. Doing so is easy:
In any Office program, select File→Account (Alt, F, Y1).
This command takes you to a backstage page that gives information about your Office installation and the account you use with it.
Click the Office Background drop-down list.
This list shows different themes—like Calligraphy, Clouds, and Tree Rings—for adorning your apps. You can also choose the ever-popular None for a minimalist look.
Select the background theme you want.
Office immediately applies the theme to all the programs in your Office suite.
The effect is subtle; to see it, look in the upper-right part of the screen. (For some backgrounds, you might even have to squint a little.) Still, you can apply a few artistic dabs if that suits your fancy.
The Office Quick Access toolbar sits in the upper-left part of your screen, giving you easy access to the buttons you use most, no matter what’s currently on the ribbon. Out of the box, the Quick Access toolbar displays the buttons that Microsoft considers most useful, like Save, Undo, and Redo. But you’re not stuck with just these buttons; consider them suggestions from Microsoft.
To add your favorite buttons, click the button circled in Figure 1-8, which opens a menu displaying some of the program’s most popular commands. Items already on the toolbar have a checkmark next to their name. Click any command that’s not already checked to add its button to the toolbar. The new button appears to the right of those already there. To remove any button, repeat the steps just described, but this time uncheck the command’s name.
Tip
If you want to see the Quick Access toolbar below the ribbon, rather than way up there at the top of the screen, select Customize Quick Access Toolbar→“Show Below the Ribbon” to move it.
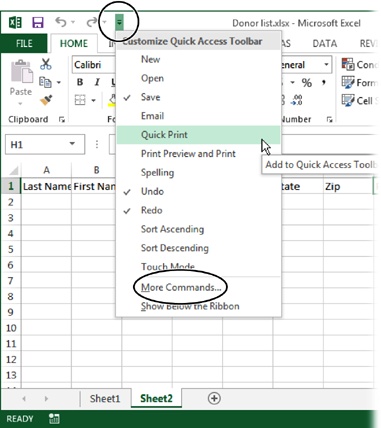
Figure 1-8. Click the circled button to see a menu of popular commands (here, the commands are for Excel) that you can add to the Quick Access toolbar. Click More Commands (also circled) to open a dialog box that lets you add items that aren’t on this menu.
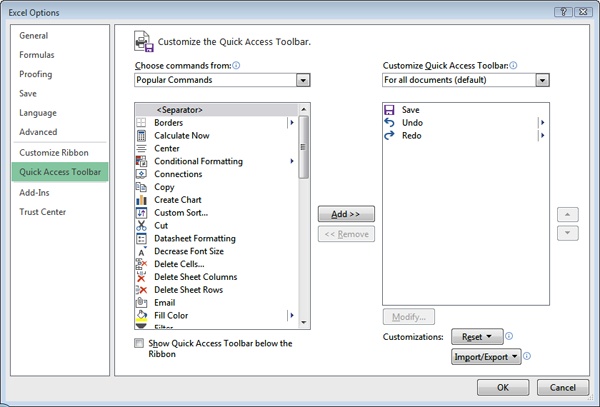
What if the command you want isn’t on the menu? Go down to the bottom of the menu and click More Commands to open the Options dialog box for your program; Excel’s version is shown in Figure 1-9.
From the “Choose commands from” drop-down list, select a category to choose your button from. Popular Commands, for example, gathers together the most commonly used commands, but you can pick from any tab (including contextual tabs like Chart Tools | Design or Drawing Tools | Format).
Tip
With Office 2013’s emphasis on touchscreens, there’s no need to worry about fat fingers when you’re using the Quick Access toolbar. From the Customize Quick Access Toolbar menu (Figure 1-8), select Touch Mode. This spaces the toolbar’s buttons farther apart.
In the list on the left (below the “Choose commands from” drop-down list), select the item you want to add to the toolbar. Click Add, and the command jumps to the list on the right, which shows current Quick Access toolbar commands. To remove a button from the Quick Access toolbar, reverse the process: From the right-hand list, select the button you want gone, and then click Remove.
Tip
You can customize the Quick Access toolbar for all files you work with in an Office program or just for a single file. If you want a custom toolbar for just this file, open the file whose toolbar you want to customize and choose its name from the upper-right Customize Quick Access Toolbar drop-down list.
The top-to-bottom listing of Quick Access toolbar commands corresponds with where each button appears on the toolbar, going from left to right. To rearrange the buttons on the Quick Access toolbar, select the button you want to move. This activates the up and down arrows to the right of the list. Click the arrows to move the button.
When you’re done customizing, click OK to close the Options dialog box and save your changes.
Tip
Here’s a quick way to add a button to the Quick Access toolbar as you work. Right-click any button on the ribbon. From the shortcut menu, choose “Add to Quick Access Toolbar.”
Start by heading to the Customize Ribbon section of the Options dialog box, such as the Outlook Options box shown in Figure 1-10. To open this dialog box, right-click the ribbon and select “Customize the Ribbon.” Or select File→Options (Alt, F, T) and choose Customize Ribbon.
Here are your ribbon-tweaking options:
Add a button to a tab. On the left, choose the command you want to add (use the “Choose commands from” drop-down list to see your choices). On the right, choose the tab to which you want to add the command. Select a command from the left-hand list and click Add to put its button on the ribbon of the tab you chose.
Remove a button from a tab. On the right, choose the tab whose ribbon currently shows the command you want to remove. Select that command and then click Remove.
Rename a tab. Select a tab in the right-hand list and click the lower-right Rename tab to open the Rename dialog box. Type the tab’s new name and then click OK.
Create a new group on a tab. In the right-hand tabs list, select the tab that will display the new group and then click the New Group button (it’s below the list). A new group appears in the list, with the name New Group (Custom). To give your group a better name, right-click it and select Rename from the shortcut menu. In the dialog box that opens, enter a name in the “Display name” text box and click OK.
Remove a group from a tab. In the right-hand list that displays ribbon tabs, find the group you want to remove and right-click it; choose Remove.
Create a new tab. Under the tabs list, click New Tab. Your new tab appears in the tabs list with the name New Tab (Custom). To rename the tab, right-click it in the tabs list, select Rename, and enter the new name in the “Display name” text box. Finally, click OK.
Hide a tab. To prevent a tab from showing while still keeping that tab (with all its groups and buttons), go to the tabs list, find the tab you want to hide, and turn off its checkbox.
Remove a tab or group. To remove a tab altogether, find the tab or group in the tabs list, right-click it, and then select Remove.
Move a tab or group. You can rearrange the ribbon’s tabs or the groups that make up a tab. In the tabs list, find the tab or group you want to move, select it, and then use the up and down arrows to the right of the list to move your selection to its new position. Alternatively, you can right-click any tab or group and select Move Up or Move Down.
Reset a tab to its default settings. If you want to undo customization for a specific tab, click the tab you want to restore in the tabs list, then (below the list) click Reset. From the shortcut menu, choose “Reset only selected Ribbon tab.”
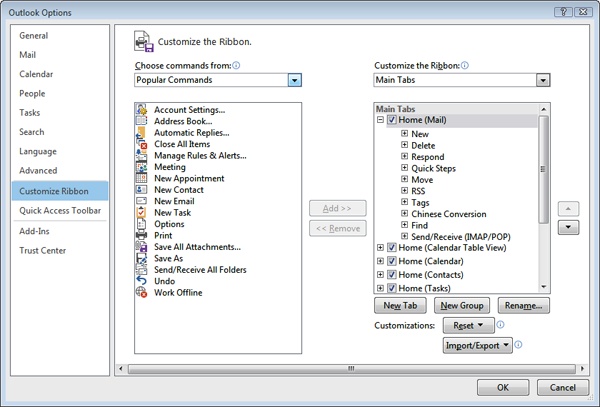
Figure 1-10. A program’s ribbon tabs (here, they’re for Outlook) appear in the right-hand list. To show or hide a tab, turn its checkbox on or off. To add a button to a tab, select the button you want from the left-hand list of commands and then select the tab where you want it to appear. Click Add, and then use the up and down arrows to the right of the tabs list to position the new button on the tab.
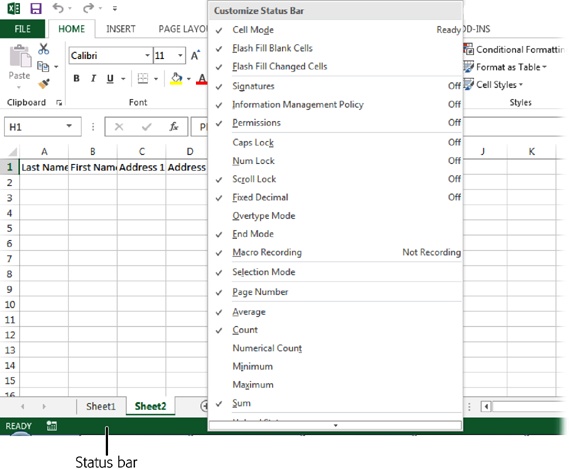
The Office status bar appears at the bottom of your screen and gives you information about your file, such as which page you’re on and how many words you’ve written in a Word document, or the results of a formula like Average, Count, or Sum in an Excel worksheet. Here again, you can choose the kind of information that appears.
To customize the status bar, right-click it. The shortcut menu you see in Figure 1-11 appears. Elements currently displayed on the status bar have a checkmark next to them. Click any checked element to remove it from the status bar; click any unchecked element to add it.
Get Office 2013: The Missing Manual now with the O’Reilly learning platform.
O’Reilly members experience books, live events, courses curated by job role, and more from O’Reilly and nearly 200 top publishers.

