When you’re using columns, the hyphenation feature (which automatically breaks longer words at the right margin) creates a straighter, almost even right margin. It also provides more regular spacing within each line in justified text (text that’s stretched to be flush with both margins).
Word normally doesn’t insert hyphens until you type them—or until you turn on the automatic hyphenation feature. To do so, choose Tools → Hyphenation, then turn on “Automatically hyphenate document” (see Figure 4-8). When you click OK, Word scrutinizes the document and hyphenates words where necessary, using its built-in dictionary as a guide to “legal” syllable breaks. Word will continue hyphenating automatically as you edit and add on to your document.
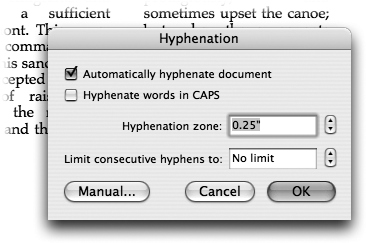
Figure 4-8. By default, hyphenation is turned off; if a word is too long, Word moves it down to a new line. The result can be ugly gaps between words. Turning on “Automatically hyphenate document” can produce much better-looking spacing.
Before clicking OK, be sure to review the following hyphenation settings:
Turning off “Hyphenate words in CAPS,” leaves your acronyms whole; that’s probably what you want it to do.
The “Hyphenation zone” is the amount of space allowed at the end of a line before Word inserts a hyphen. The larger you set this number, the fewer hyphens you’ll end up with in your document. The smaller the number, the more even the right margin will be—and the more hyphens you’ll have.
Set “Limit consecutive hyphens” to 2 or 3. If you set it to more than that, all the hyphens at the end of consecutive lines will look like a little ladder climbing up the page (a big no-no in professional publishing).
Undoing hyphenation is easy: Just choose Tools → Hyphenation and turn off the “Automatically hyphenate document” box. Word returns your document to its pristine, pre-hyphenated condition.
The automatic hyphenation feature is an all-or-nothing deal, in that it applies to the entire document, or not at all. If you’d like more say in Word’s hyphenation propagation (say that three times fast with a mouthful of pickled peppers), use manual hyphenation. Doing so lets you say Yea or Nay to each word that Word wants to break up.
Here’s how: Choose Tools → Hyphenation and click Manual. Word goes through your document, stopping at each word it wants to hyphenate, just as in a spell check. In the Manual Hyphenation dialog box that appears, you can click No (don’t hyphenate), Yes (hyphenate at the blinking hyphen), or use the arrow keys to move to the point where you want Word to put the hyphen; now click Yes. Clicking Cancel dismisses the dialog box and ends manual hyphenation.
If you expect to be doing more editing to your document, then don’t hyphenate manually. Unlike automatic hyphenation, manual hyphenation doesn’t add or remove hyphens automatically as your text reflows during editing. (You can also rehyphenate only parts of the document by selecting the text before performing a manual hyphenation.)
For the true control freak, Word gives you two ways to place hyphens right where you want them. These keyboard shortcuts are effective whether or not you use the manual or automatic hyphenation features. For example, if you feel your document has too many hyphens in a row, even after your manual hyphenation pass, you can still change a hyphenated word to have a nonbreaking hyphen.
Optional hyphen. By clicking inside a word and then pressing ⌘-hyphen, you tell Word where to place a hyphen if the word needs to be hyphenated. As you edit the document, if the word moves away from the end of a line, the optional hyphen disappears, returning only if the word needs to be divided again.
Nonbreaking hyphen. Click inside a word and then press Shift-⌘-hyphen. You’ve just told Word that you do not want to break this word up—ever.
To delete optional hyphens and the oxymoronic nonbreaking hyphens, click the Show/Hide (¶) button on the Standard toolbar. The invisible hyphens become visible (they look like an L-shaped bar and an approximately-equal sign, respectively) and are ready for you to delete.
Get Office 2008 for Macintosh: The Missing Manual now with the O’Reilly learning platform.
O’Reilly members experience books, live events, courses curated by job role, and more from O’Reilly and nearly 200 top publishers.

