Creating Word documents usually requires a small assortment of formatting styles, which you’ll use repeatedly. In a short piece, reformatting your chapter titles (for example) is no big deal; just highlight each and then use the Formatting Palette to make it look the way you like.
But what about long documents? What if your document has 49 chapter headings, plus 294 (or even 394?) sidebar boxes, captions, long quotations, and other heavily formatted elements? In such documents—this book, for example—manually reformatting each heading, subhead, sidebar, and caption would drive you crazy. Word’s styles feature can alleviate the pain.
A style is a prepackaged collection of formatting attributes that you can apply and reapply with a click of the mouse. You can create as many styles as you need: chapter headings, sidebar styles, whatever. The result is a collection of custom-tailored styles for each of the repeating elements of your document. Figure 4-1 makes all of this clear.
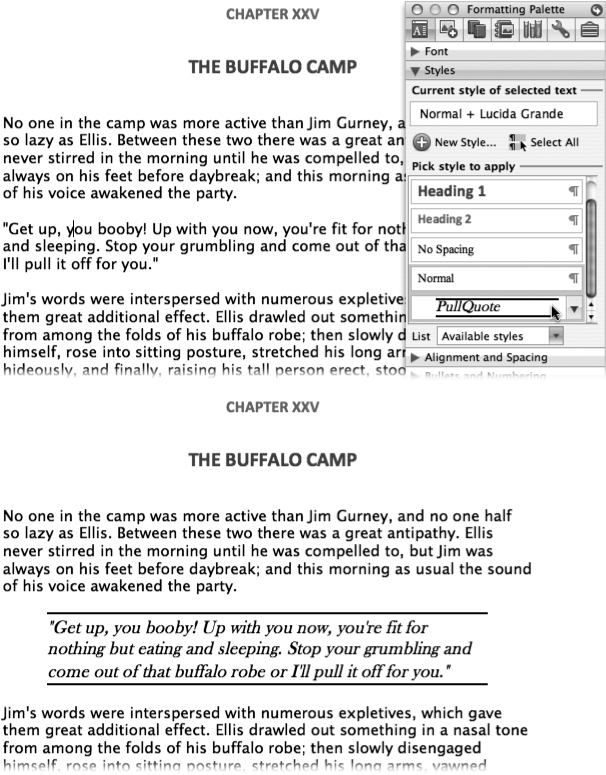
Figure 4-1. Suppose you want to call special attention to a paragraph. This before-and-after shot shows the beauty of a style: With a single click in the Style pop-up menu on the Formatting Palette (top), you can apply a special font, style, and paragraph border all at once (bottom). Better yet, you don’t have to remember how you formatted a similar paragraph earlier.
After creating your styles, just apply them as needed; they stay consistent throughout the document. During the editing process, if you notice an accidentally styled, say, headline using the Subhead style, you can fix the problem by simply applying the correct style.
You’ll appreciate styles even more when it comes time to change the formatting of a particular style. If you change a style’s description, Word changes every occurrence of that style in your document.
Styles aren’t one of Microsoft’s ease-of-understanding masterpieces, but they’re getting better. Grasping how they work, where they’re stored, and when they change explains many of Word’s idiosyncrasies, and pays off handsomely in the long run.
Every document has a collection of ready-to-use, built-in styles, whether you’re aware of it or not. (To be more precise, every document is based on a template that stores a canned set of styles, as described on Styles.) Word opens each new blank document with the Normal paragraph style selected (unless you’ve made changes to your Normal template, as detailed on Normal and Global Templates).
The controls available to change the styles in your document reside in several places: in the Style panel of the Formatting Palette, the Formatting toolbar, and the Format → Style dialog box (see Figure 4-2).
Tip
There are many more styles in the Style dialog box than in the Formatting Palette or the toolbar menus, which have only a selection of the most useful styles. To see a more comprehensive list of styles without opening the Style dialog box, just Shift-click the Formatting toolbar’s Style menu arrow, or choose All Styles from the Formatting Palette’s Styles pane’s List pop-up menu.

Figure 4-2. Choose Format → Style to see the styles available in your document. Each document comes with a few styles, such as the Normal style and Heading 1, because every template has these starter styles built right in. (See Templates for more on templates.) Starting from a different template might produce a different set of starter styles.
To apply a pre-existing style to text you’ve already typed, highlight the text. For example, drag through some text, or click once inside a paragraph to select it. (You can also choose a style for a new paragraph before you begin typing it.)
Note
If you click twice to select a word, the style will only apply to that word. Clicking once within a paragraph, however, will apply the subsequently chosen style to the entire paragraph. No fuss, little muss.
Now choose a style from one of Word’s style boxes, using one of the following methods (listed in descending efficiency order):
Press Shift-⌘-S to highlight the Style menu in the Formatting toolbar (if it’s showing—if it’s not showing, this command displays the Formatting Toolbar) and then use the up and down arrow keys to step through the styles in the list until the one you’re seeking is highlighted. Press Return to apply the style. You can also use the mouse to scroll through this list.
Tip
You can save time by typing the name of the style and then pressing Return. For this very reason, some people use very short style names when they format a style. For instance, if you name a style GX, you only have to press Shift-⌘-S, type gx, and Return to apply the style—never having touched the mouse. Better yet, give the style two names, separated by a comma—one in English for your own reference in using the Style menus, the other its “keystroke name.” For example, your Sidebar style might be called Sidebar, sb.
Use the scroll bar next to the Style list in the Formatting Palette, then click the style name to apply it.
Choose Format → Style; double-click one of the style names in the Styles list box (see Figure 4-2)—or click the style name once, then click Apply.
There are two ways to create styles: You can use the Styles dialog box to build one, or you can “create by example”—that is, you can format the text in the document the way you want it, and then tell Word to memorize that formatting. The second method is usually easier.
For example, suppose you want to create a style for illustration captions. Start by typing out the caption, making sure you end with Return in order to create a paragraph.
Select the paragraph (by clicking inside it, for example).
Now use the formatting controls to make it look exactly like you want it.
Using the Formatting Palette or Format menu, choose the Century Gothic font, at 10-point size, italic, centered, indented on both sides.
Chapter 3 has details on using these controls.
Click the New Style icon on the Formatting Palette to bring up the New Style dialog box, type the new style name (Picture Caption, for example), and click OK. (If the Formatting toolbar is open, you can simply type the new name in the Style box and then press Return.)
To apply this style more quickly in the future, consider assigning it two names separated by a comma—the second one can be an abbreviation (see the Tip above).
That’s it…your style is now ready for use in your document.
For more style control, use the Style dialog box. To use it, choose Format → Style and then click New (or press ⌘-N) or click the New Style icon in the Style pane of the Formatting Palette. The New Style dialog box opens, as shown in Figure 4-3.
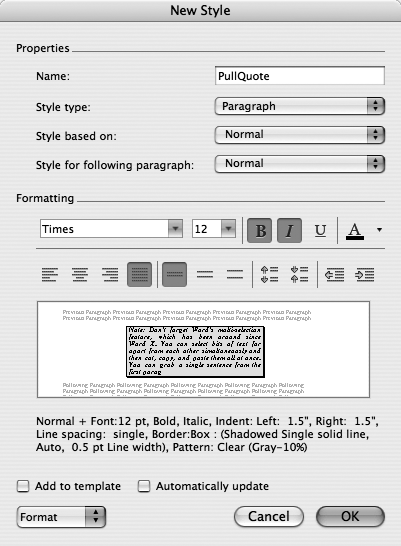
Figure 4-3. As you develop your new style, the preview window in the middle of the New Style dialog gives you live feedback, so you can see exactly what you’re creating. Below, the written definition of the style changes to indicate, in somewhat technical terms, the specifics of your formatting choices.
Use the various controls here to define this new style:
Name. Give your style a name that reflects its usage: Headline, Sidebar, and so on.
Style based on. Choose Normal or whatever existing style is closest to what you envision for the new style. Basing your new style on an existing one has two payoffs. First, it saves you time, since some of the formatting is already in place; second, when you modify the underlying style (such as Normal), all styles based upon it change as well, keeping your document design coordinated. For example, if you base Heading 1 on (no style), and base other headings on Heading 1, then you can change the body text style without changing the headings. Or you could change the font of Heading 1, which automatically changes all the other heading styles—since they’re based on Heading 1.
Style for following paragraph is a big timesaver. Let’s say the new style you’re creating is a heading, and after each heading, you always return to typing in Normal style. Instead of manually changing the font back to Normal after each use of the Heading style, just choose Normal here. Now, whenever you press Return after using the heading style, the font automatically returns to Normal.
If you chose Paragraph in the Style type menu, the style will include the current settings for indents, tabs, and other aspects of paragraph formatting (as described in Chapter 3). If you chose Character formatting, then Word memorizes only the font and other type characteristics of your new style. You can apply a character-formatting style in a paragraph independently of the paragraph style.
Turning on Add to template stores your new style in the template on which your document is based (Templates). Now, all new documents based on this template will include this style. (To find out which template you’re using, choose File → Properties → Summary tab. The name of the template is shown near the bottom of the dialog box.)
Turn on Automatically update with caution. When this box is turned on, any formatting change you make to any one occurrence of text in this style will change the style’s definition—and with it, every occurrence of the style in your document. Great for global changes; bad for singular changes.
The Formatting panel lets you set the font type, size, and color; paragraph justification; line spacing; and indent. These options, all of which are fully described in Chapter 3, have always been available in the Format pop-up menu (see below), but this new panel gives you quicker access to the settings you’re likely to use most often.
Clicking the Format pop-up menu (or pressing ⌘-O) gains you access to the dialog boxes, where you actually format the style you’re building:
Font opens the Font dialog box, described on Styles of Type.
Paragraph opens the Paragraph dialog box, described on Alignment and Spacing.
Tabs opens the Tabs dialog box, described on Setting tabs.
Border opens the Borders tab of the “Borders and Shading” dialog box (Applying tabs to paragraphs and styles).
Language provides foreign language choices for your style, for the benefit of the spell checker and other proofing tools.
Placing a Frame around a paragraph gives it some of the qualities of text boxes. (Frames are an early Word feature that most people have abandoned in favor of text boxes; see Text Boxes.)
Numbering opens the “Bullets and Numbering” dialog box described on Extra Features in the Bullets and Numbering Dialog Box. The menu option’s name, “Numbering,” is only half accurate, since it’s used for bulleted lists as well as numbered ones.
Shortcut Key opens the Customize Keyboard dialog box (see Resetting everything back to normal), where you can assign a keyboard shortcut to this style. For example, you can assign Control-⌘-Z to your favorite heading style and apply it with a quick tap of the left hand. This feature is a godsend if you frequently change styles as you type along or have trouble using a mouse.
When you click OK after making changes in any of these formatting dialog boxes, you return to the New Style dialog box, where the description information tells you which characteristics you’ve assigned to this style.
When you click OK again to return to your document, the newly created style’s name appears along with all the others in the Formatting Palette—ready to apply.
There are several ways to change an existing style, but here are two of the quickest:
Select text in your document and then, in the Formatting Palette, click the little triangle next to the style’s name; choose Modify Style in the pop-up menu that appears. When the Modify Style dialog box opens (Figure 4-4), make your changes, and then click OK to update the style.
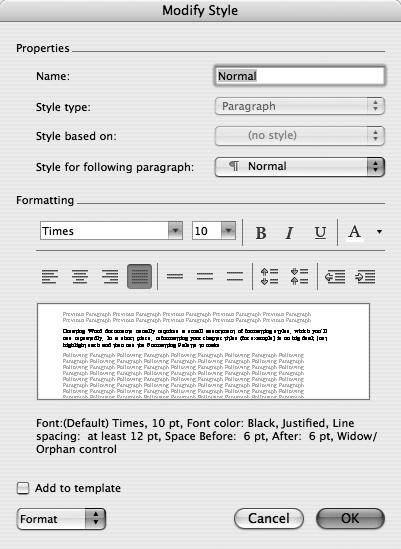
Figure 4-4. To modify selected text, click the triangle to the right of the style’s name in the Formatting Palette and select Modify Style from the subsequent pop-up menu. You get this nifty dialog box where you can do almost everything you can in the Format → Style dialog box, only more quickly. If you’re already in the Style dialog box, click the Modify button to summon this window.
Choose Format → Style; click the style’s name in the Styles box; click Modify (or press ⌘-M); and use the Format menu to make changes to the font, paragraph, and so on, just as if creating a new style (as described above).
To delete unwanted styles, choose Format → Style, then click the style in the Styles list box and click Delete.
Once you’ve cultivated a crop of magnificent styles, you may want to spread their sunshine to other documents. You can do so in the Organizer dialog box, described in the previous paragraph and on The Organizer, but that’s a lot of trouble.
The sneaky, much faster way is to copy paragraphs formatted in the styles you want to transfer and then paste them into another document. Word automatically adds the pasted styles to the second document’s list of styles. (If the document already has a style with the same name, it ignores the newly pasted one.)
Tip
If you’re confused about which styles you’ve applied where, try this: in either Draft or Outline view, Choose Word → Preferences → View button. Set the “Style area width” to about one inch, then click OK. Now Word opens a new strip at the left side of your document window identifying the style of every paragraph!
Get Office 2008 for Macintosh: The Missing Manual now with the O’Reilly learning platform.
O’Reilly members experience books, live events, courses curated by job role, and more from O’Reilly and nearly 200 top publishers.

