Even with so many people relying on email and the Web for communicating information, you can’t use Word for very long without printing something on paper. As with so much else in Word, printing can be as simple or as complicated as you care to make it.
Printing doesn’t get any simpler. Click the printer icon on the Standard toolbar to print one copy of your document to the currently selected printer. No dialog box, no page ranges, no flexibility.
This method is still simple, but lets you be more specific. Choose File → Print (or press ⌘-P) to open the Print dialog box, where you can tell Word how many copies of which pages of your document to print (and which printer you want to use, if you have several).
The Print dialog box is comprised of a series of panels that you expose by choosing from the pop-up menu in the middle of the box. This remodeling was much more than cosmetic, however, as you can now do things from the Print window (such as add a border or create an Adobe Acrobat [PDF] document), which used to require opening a separate dialog box—or a separate program!
The features in the Print box vary depending upon which printer you choose, but here are a few of the classics.
This panel is the preselected pop-up menu choice when the Print dialog box opens. Often, these are the only settings you need.
Copies. Enter the number of copies you need. Hit Return to print, or Tab to move on to more settings.
Collated. Turning on this checkbox prints out each copy of your document in page order. For instance, if you print multiple copies of a three-page letter with collating turned off, you’ll get all your copies of page one, followed by all page twos, and so on. With collating turned on, you’ll get page one, page two, page three, followed by another complete set of pages one, two, and three, and so on.
Pages. The All button is initially selected, but you can also hit Tab and enter page numbers for a page range. For more control over which pages to print, read on.
Tip
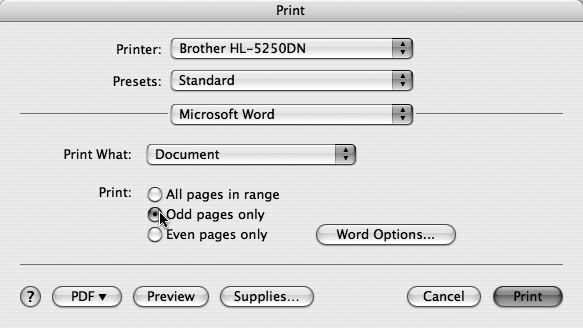
If you don’t see “Print odd/even pages only” or other common printing options, choose Microsoft Word from the pop-up menu, as described in Figure 1-11.
Figure 1-11. The ability to choose odd or even pages is hidden behind the easily overlooked Microsoft Word pop-up menu choice. You can print double-sided pages—even if your printer doesn’t have duplex capabilities—if you print the odd pages first, then turn them over, reinsert them into the printer, and then print the even sides. (Experiment with just a couple of pages first until you figure out how to get them right side up on both sides.)
Range. Clicking this button activates a text box where you can be more specific about which pages you want Word to print. Actually, you can be very specific. To print an individual page, type its number in this box (12, for example). Separate additional single pages by commas. (Typing 12, 20, for example, prints Status Bar and Notebook Layout View.) You can add ranges to your print batch as well, by using hyphens, like this: 12, 20, 25-30, 100-102. These combinations prints Status Bar, Notebook Layout View, pages Layout through Print Preview, and Hidden Text through Formatting.
This menu choice offers a shortcut to a feature formerly available only in the Page Setup dialog box: the ability to print more than one Word page on each sheet of paper—a great paper-saving tool for printing rough drafts.
The Layout panel also features a surprise: the Border menu. You can choose one of four simple page border options (single hairline, double hairline, and so on). The beauty and power of this menu is that you can apply the border to only one print job, or only one page, without actually changing your document in the “Borders and Shading” dialog box. (When you choose a border type from the menu, the preview box at the left presents an idea of what the border will look like.)
The options in this panel (and even the name of the panel itself) depend on the kind of printer you’ve selected. Here’s where you can choose from a list of paper types (plain, glossy, and so on), and whether you want to use black and white or color. Choosing the print option that matches the type of paper you’re using effectively changes settings in the printer (amount of ink released, printing speed, and so on) to achieve the best results on that paper. If you’re using photo paper to print documents containing digital photographs, for example, it’s especially important to specify that here.
It’s also where you can adjust print quality—high for good looks, low to save ink when printing out rough drafts or file copies.
This panel, too, appears only for certain printers. It may provide finer control over quality, such as letting you specify the exact dpi (number of dots per inch) that the printer uses. For a professional-looking invitation or newsletter, for example, use at least 300 dpi.
This panel lets you restrict your printout to odd or even pages, as described in Figure 1-11. It also offers the Print what pop-up menu, which is usually set to Document. However, this menu lets you print out some fascinating behind-the-scenes Word information sheets. They include:
Document Properties provides a page of statistics for the pathologically curious. In addition to the usual number of pages, the title, and the author, you can see how many minutes you’ve spent on the document.
If you have tracked changes or comments visible in Word’s reviewing feature (see Change Tracking), choose List of Markup to print out lists of the comments, additions and deletions that appear in the document. (They print on separate pages, not the way you see them on screen.)
If you do a lot of work with Styles (if you’re charged with keeping them consistent in all your company documents, for example, or if you’re just a total control freak), this choice lets you print a list of all styles the current document uses, complete with a full description of each. (Much more on Styles in Chapter 3.)
Similarly, if you’ve created a lot of Auto Text entries in your copy of Word 2008 and you’re getting confused, this option prints out a list of them. You can get the same information by choosing Tools → AutoCorrect → AutoText tab and scrolling through the list.
If you’re one of those power users who uses more than one global template (see Using a document template), this command is the way to create a separate AutoText cheat sheet for each template. It’s also a quick way to print a list of all your address-book contacts, since they’re considered AutoText entries; that way, you can review the list and decide which ones you want to add or delete.
Key Assignments produces a handy cheat sheet to remind you of the keyboard-shortcut keystrokes you’ve created, as described at the end of Chapter 20.
This panel also shows the Word Options button, which opens the Print tab of the Preferences dialog box.
This command calls up a box showing all current print settings: number of copies, page range, layout options, and so on. It’s a quick way to review all your choices with one stroke of the pop-up menu. You can’t print this information, and probably won’t need to. Use the Custom option (described below) to save your favorite settings.
You’ve gone through every choice on the pop-up menu and gotten everything just the way you want it. For instance, you know you’ll always print two copies, always want them collated, and almost always want to print with black ink (saving the more expensive color ink for photographs). To save this combination of settings for repeated use, choose “Save As” from the Presets pop-up menu after you’ve set all the other panels to your liking. Fill in a name for your presets, and you’re good to go.
From then on, all you have to do is press ⌘-P and choose the name from the Presets menu in the Print dialog box. Then press Return to print, or you can go on to adjust any of the settings if you need to deviate from your usual custom set (print three copies instead of your usual two, for example).
This button is the key to one of Mac OS X’s best features: its ability to turn any printable document—including Word documents, of course—into a PDF (Acrobat) file.
Because all Macs and PCs can view Adobe Acrobat documents, you can attach a PDF file to an email and know that your recipient, no matter what kind of computer she has, will be able to open and read it, with all your fonts and layout intact. That makes PDF an ideal format for resumes, flyers or brochures, booklets, and other documents that need to look good for their intended audiences.
To “print” your Word document as an Acrobat file, simply click the PDF button at the bottom of the Window and choose Save as PDF from the pop-up menu. But, as one peek into this pop-up menu shows, Mac OS X is willing to do a lot more with your PDF than just save it. Here’s what else you might consider doing:
Save PDF as PostScript. This file format is intended for use by graphic designers or print shops. It has the most accurate printing instructions for their PostScript laser printers.
Fax PDF. Instead of printing your file, this option sends it to Mac OS X’s built-in fax system. If your computer has a modem and a telephone line connection, you can enter a phone number and send your document to any fax machine.
Compress PDF creates a smaller PDF file—at the expense of quality. This is a good choice for e-mailing or viewing on screen, but not for printing.
Encrypt PDF creates a password-protected PDF document. It can only be opened by someone who knows the password you assign to it.
Mail PDF opens Apple Mail and attaches the PDF to a new outgoing message. This only works with Apple Mail—even if you’ve designated Entourage, for example, as your regular email program.
Save as PDF-X. This option saves a streamlined style of PDF favored in the printing industry.
Save as PDF to iPhoto creates your PDF and automatically deposits it in your iPhoto library—which is a great place to keep all kinds of graphic files, not just photographs.
Save PDF to Web Receipts Folder is intended as a way to save copies of receipts for the things you buy online, without actually printing them out. This way, the records from your online buying sprees end up in your Home → Documents → Web Receipts folder.
Edit menu lets you tidy up this PDF menu, removing those commands you never use.
The Preview button is your gateway to the magnificent built-in Mac OS X print preview function. Click the button to get a picture of what your page will look like when printed. Mac OS X actually creates a PDF file of your document on the fly, and pops it open in your Mac’s Preview program. Accordingly, you get to use all of Preview’s bells and whistles—things Word’s built-in Print Preview never dreamed of. You can flip forward and backward through your recently viewed pages, type in a page number to jump to it, page through your document a page at a time, zoom in and out, and even choose a page to view from a drawer containing each page in the document. And, oh yeah, after giving it the once over, you can also print the document if you so desire (click the Print button).
The Preview toolbar includes the following buttons:
Drawer. Clicking this button slides out the drawer that displays the pages of the current document. Simply click a page to go to it—a convenient way to preview long documents.
Previous/Next. Pages up and down through the pages displayed in the drawer.
Page Window. Type a number to go directly to that page.
Back/Forward. Click the arrows to flip through the document pages you’ve viewed.
Zoom In/Out. Clicking the + magnifying glass zooms in the document. That’s good for studying images within the document, or when you left your glasses in the bedroom. Clicking the – magnifying glass zooms out.
Tool Mode. The Tool Mode offers three modes. The left button (a cross) activates the hand tool, which lets you move and scroll through the document. Clicking the A button to activate the text tool to select text within the document. The dotted square button lets you select a section of a page (to zoom in on, for example). The last button is the Annotate Tool—click and hold this button to choose between Text Annotation and Oval Annotation. Text annotation lets you draw a box on your document into which you can type a comment. Oval annotation, on the other hand, lets you circle portions of the document requiring your readers’ attention.
Tip
Yes, you can also turn your Word files into PDF documents using the Print dialog box as described on PDF—but this way, you get to review it before committing.
Clicking this button takes you on a side trip from printing to the online Apple Store, which offers to sell you ink and toner for your selected printer. When you’re done ordering (or not), you’ll find the print dialog boxes patiently waiting for you when you return.
Some of the settings that appear when you choose Page Setup are a function of your printer’s software, not of Word. As in the Print dialog box, choose your printer from the pop-up menu at the top to see exactly what’s available. Generally you’ll find options like these:
Paper Size. Make sure the page size here matches what you’ve got in your printer. You can choose envelopes as well as paper, but if you use Word’s envelope feature (see Yet another way to format labels), this setting is taken care of automatically.
Orientation. You can change thedirection that Word prints the page on the paper (vertical portrait versus horizontal landscape mode).
Scaling. Most of the time, you print at 100%, but in some cases this might not be your best option. For instance, if your document is just two lines too long to fit on one page, try printing at 90%. (You’ll know if you’ve adjusted the document correctly by checking the File → Print Preview before committing the document to paper.)
You can set custom page sizes by clicking Custom Paper Size, as shown in Figure 1-12. Turn on “Use custom page size,” and then enter the dimensions of your paper. Remember that width is the measurement of the edge that you feed into the printer. After setting up your page, click OK (or press Return) to save your page settings. Click Reset to return all settings to their original configuration.
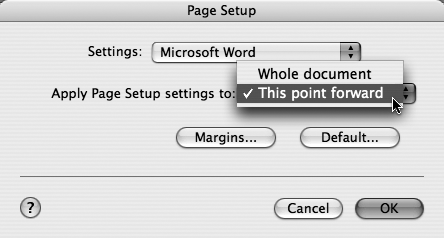
Figure 1-12. Choose Microsoft Word from the Settings menu if you need to change the printer settings for just part of the document. Then choose “This point forward” from the “Apply Page Setup settings to” pop-up menu. This feature comes in handy if you have letters and envelopes together in the same document, for example.
For more advanced settings, choose Microsoft Word from the Settings menu. If you need to adjust the document’s margins before printing, clicking the Margins button is a quick way to open the Format → Document → Margins tab, as described on Page tab). Finally, if you find yourself frequently changing from the default settings to your own configuration (2 Up, 99% reduction, and so on), click the Default button to make that your new default page setup. Word asks if you want to change the default settings for all new documents based on the Normal template (in other words, all new, blank Word documents that you open).
Word’s Print Preview feature was created in the old days, before Apple added a system-wide Preview function to Mac OS X itself. Like the Mac OS X version, the built-in Word view lets you see an onscreen representation of how your document will look on paper—a terrific way to avoid wasting paper on printouts that get chopped at the margin or have straggling one-line orphans on the last page. To see for yourself, choose File → Print Preview. (Keyboard shortcut: ⌘-F2.) A special preview window opens, displaying a full view of one page of your document.
Because most windows are smaller than 8.5” x 11”, the image is probably reduced. You can see the percentage of reduction in the Print Preview toolbar, as shown in Figure 1-13. (Unlike most toolbars, you can’t choose this one from the View menu; you have to open the Print Preview window to see it.)
The Print Preview window opens in magnification mode. For a closer look at a certain word or a particular portion of your document, click the page with the magnifying-glass icon (Figure 1-13). You can also change the view size by typing a percentage in the Zoom box (also shown in Figure 1-13). Remember, 100% isn’t necessarily life-size; it’s the size that lets you see one full printed sheet at a time.
If your close inspection turns up an error, turn off the magnifying glass by clicking its toolbar icon, putting you in Edit mode, where you can make changes directly to your document.
If your document is going to be bound with facing pages, you can see how the two-page spread will look by clicking (and holding the cursor down on) the Multiple Pages pop-up button. Drag to highlight two or more panes, and then click; Word simultaneously displays that number of pages.
The most powerful button on the Print Preview toolbar is the “Shrink to Fit” button. When the last page of a document has just a few lines, you may want to avoid wasting that whole extra piece of paper. Or suppose you’ve been given a five-page limit, and you’re just a couple of paragraphs too long. If you have neither the time nor the inclination to edit down your document, you can click the “Shrink to Fit” button. Word adjusts the type sizes, across the entire document, just enough to eliminate that last fraction of a page.
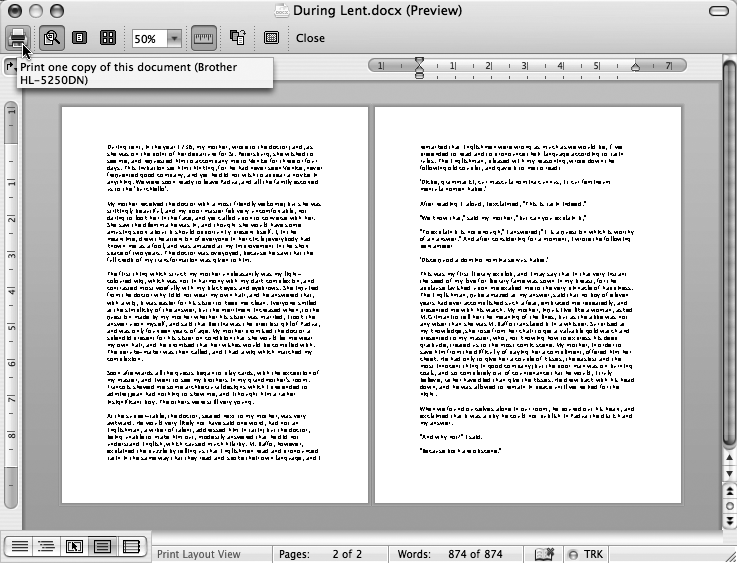
Figure 1-13. Word’s Print Preview window displays an overview of how your document will look on the page. When you’re ready to print, click the printer icon on this toolbar to immediately print one copy without visiting the Print dialog box. You can dismiss the Print Preview window by clicking the close box, pressing Esc, or clicking back in any other document window.
Tip
If you don’t like the effect of “Shrink to Fit”, you can choose Edit → “Undo Shrink to Fit”, press F1, or press ⌘-Z. But once you save and close the file, you can’t restore the original font sizes with the Undo command. You have to do so manually.
Pointing to the other buttons on the Print Preview toolbar, without clicking, prompts their identifying screen tip labels. These other buttons include:
View Ruler. Click to make both horizontal and vertical rulers appear. As shown in Figure 1-14, you can use these rulers to adjust the margins of your document quickly and easily.
Full screen. Because of the reduced view, Microsoft gives you this one-click way to maximize the available screen space. Clicking here collapses your tool palettes, enlarges the window to the edges of your monitor, and hides Word’s usual assortment of status bars around the window edges.
Close button. Click to return to whatever view you were using before opening the print preview.
Believe it or not, Word 2008 offers yet another swath of printing settings—none of which even appear in the usual Print and Page Setup dialog boxes.
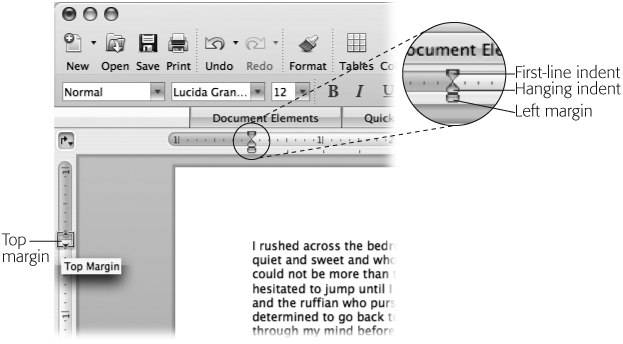
Figure 1-14. Left: It’s easy to adjust the top margin. Just drag the intersection of the white and gray regions on the rulers (you can see the special cursor shape at left). Right: Finding the spot to drag is extremely important when adjusting the left margin markers. The top part controls the first-line indent, the middle part controls the hanging indents, and the bottom part moves the other two in concert, adjusting the left margin. Remember, only the very tip of your arrow cursor is active, and when you pause your cursor for a moment over the margin markers, a screen tip appears.
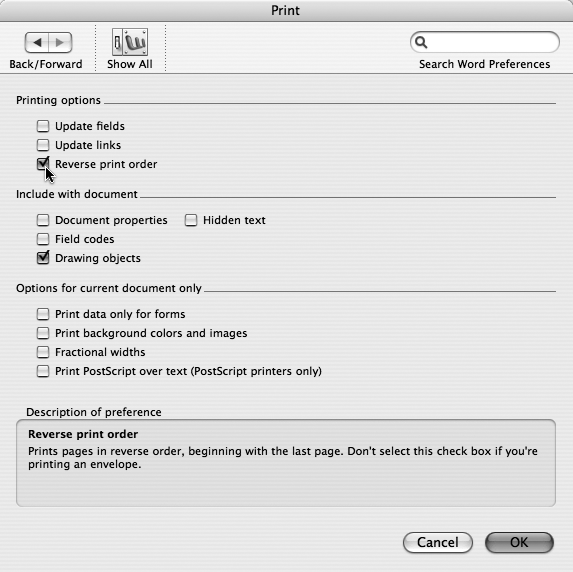
Specifically, the controls that govern the printing of fields, hyperlinks, drawings, and other advanced features are tucked away in the Word → Preferences → Print dialog box, as shown in Figure 1-15.
When Update fields is turned on, Word checks all the fields in your document (Fields) and verifies they contain the most recent information. The date is updated, for example, and captions are renumbered.
Turning on Update links tells Word to check all hyperlinks (Paste as Hyperlink) in the document and fix any whose destination document on your hard drive has moved. (Word can’t update Web links this way, alas. Instead, you have to update Web links manually, as explained on Hyperlinks.)
Reverse print order tells Word to print starting with the last page first. If your printer puts out sheets right side up, with each new sheet on top of the previous one, this option saves you from shuffling the pages into their proper order.
Turning on Document properties prints the information from the General, Summary, and Statistics tabs of the File → Properties dialog box onto a separate sheet at the end of the document.
When Field codes is turned on, Word prints the field codes (see Fields) instead of the results of those codes. For instance, a Date field would print as { DATE \@ “M/d/yy” \* MERGEFORMAT } instead of 10/31/08.
Figure 1-15. The three checkboxes under “Options for current document only” need to be turned on each time you use them. For example, if you really do want to use up your expensive ink and make your document harder to read, you’ll have to turn on “Print background colors and images.” You can also access this dialog box by clicking the Word Options button in the Microsoft Word panel of the Print dialog box.
Turning on Drawing objects prints all images, including drawings, paintings, Clip Art, and WordArt. Turning it off suppresses images and prints text only.
When Hidden text is turned on, any hidden text (Hidden Text) in your document prints, along with all the other text.
Print data only for forms suppresses the main text of the form document and prints only information that has been entered into form fields, as described on Preparing Data Sources.
The precision that the Mac can use to place characters onscreen is limited to the screen’s resolution of 1/72 of an inch. But with Fractional widths turned on, the printer possesses much greater precision and flexibility to place each character in its typographically correct position on the page. For the best-looking printouts, turn on Fractional widths just before printing.
Note, however, that when Fractional widths is turned on, Word’s approximation of the printed appearance can result in overlapping, awkward-looking spacing on the screen. (Interestingly, when you switch to Page Layout view, Word automatically turns on Fractional widths, because Page Layout view is intended to show you how the page will look when printed.)
Note
If you’re not connected to a PostScript printer and haven’t used any <print> fields (Fields) in your document, the “Print PostScript over text” box is grayed out. If you have—you desktop publishing professional, you—turning on this box prints watermarks and other PostScript-generated figures on top of the text.
There’s a big temptation to just hand-letter your envelope, but Word makes it so easy that there’s no need to settle for anything less than a professional-looking, printed envelope. Moreover, the Labels command is equipped for printing business cards, Rolodex cards, and other odd-shaped items. These are tools worth learning.
Note
You can also print a whole mass of labels or envelopes at once, based on addresses in your Office Address Book; see Printing labels.
Before starting, inspect your printer and the envelope you’re going to use. Practice fitting the envelope into the feed slot. Check the printer’s manual to see if you need to flip any levers or mash any buttons to accommodate envelopes.
Now it’s time for the Word part of envelope printing, as follows:
Choose Tools → Envelopes.
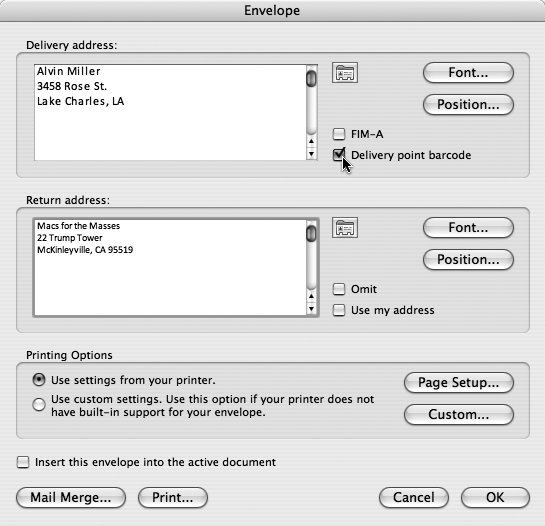
The Envelope dialog box opens, as shown in Figure 1-16.
Fill in the Delivery address and Return address boxes.
To change the return address, turn off the “Use my address” box. (Word automatically fills in your name and address as you entered them in the Word → Preferences → User Information panel.)
Alternatively, click the address-card icon located next to the address box to select a name and address from the Office Address Book.
Click the Font button to choose any of Word’s fonts, type styles, and font sizes, as described on Character Formatting.
Click one of the Position buttons; use the arrow buttons in the Address Position dialog box to adjust the addresses on the envelope, if you wish.
The Preview pane displays the results of your repositioning actions. Click OK when done.
Click Page Setup or Custom in the Printing Options pane.
If your printer has an envelope slot, and you’re using a standard envelope size (as opposed to an oddly shaped greeting card envelope, for example), you’re in luck. Click Page Setup and choose the envelope size in the Print dialog box (#10 is a standard business envelope). Click OK to return to the Envelope dialog box.
Figure 1-16. When you check the “Delivery point barcode” box, Word will print the barcode used by the U.S. Postal Service’s machinery. You may actually speed your letter’s delivery as a result. Check the FIM-A box as well if you’re printing a reply envelope.
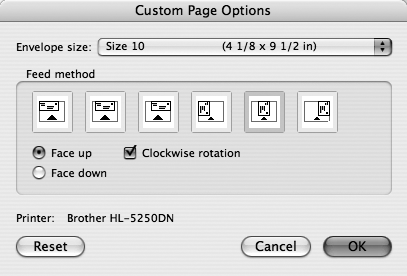
Click Custom if your printer doesn’t have an envelope feed or doesn’t accommodate your size envelope. In the Custom Page Options dialog box (Figure 1-17), choose the “Envelope size” menu, and then click the preview window that most closely resembles how you plan to insert that envelope into your printer’s feed. Click OK when done.
You’re almost ready to print. When you do, Word will create a new document to hold the envelope text. To store the envelope in the same document that you’ve been working in, check “Insert this envelope into the active document.”
If you’d like to use the envelope you’ve just set up in a mail merge (see Preparing Data Sources), click Mail Merge to open the Mail Merge Manager and use the envelope with a list of addresses.
Otherwise, click Print or OK to print the envelope with the current address.
As mentioned above, Word’s label function can print more than plain white address labels. You can make name tags, Rolodex or index cards, postcards, and so on. When you buy blank labels or cards for printing, they usually come on a convenient 8.5” x 11” sheet that fits nicely into your printer’s feed. You can then detach the individual labels after printing.
To print labels in Word, proceed as follows:
Choose Tools→ Labels.
The Labels dialog box opens, as shown in Figure 1-18.
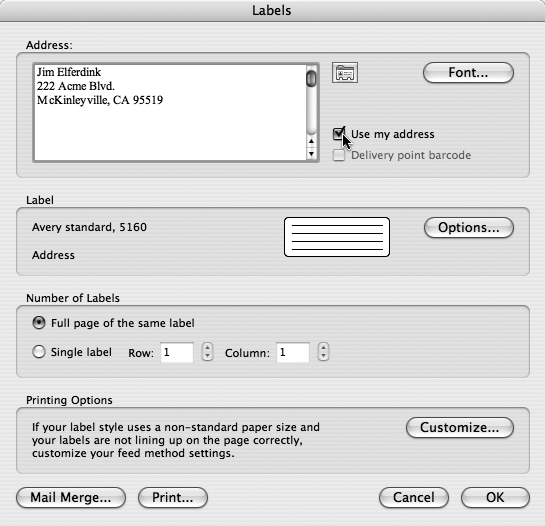
Type an address—or other label information—into the Address window.
See Figure 1-18 for full details.
Figure 1-18. When typing in the Address window, click Font to use any of Word’s fonts or text formatting. Check the “Use my address” box to have Word insert your name and address from the Word → Preferences → User information tab (which is also reflected in the Entourage Address Book entry you created for yourself). Click the contact icon to choose a name and address from the Entourage address book.
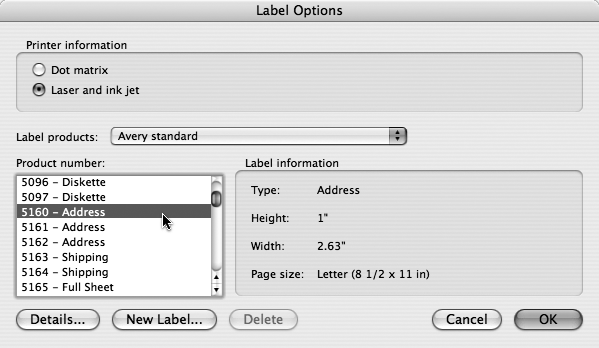
Click Options in the Label pane to tell Word what kind of label or card you’re using, as shown inFigure 1-19.
The choices may seem overwhelming, but Word can help. Once you’ve chosen a manufacturer and item number, click Details to see a preview (with measurements) of the label itself.
If you have an odd-sized or unidentified label, click New Label. Word opens a dialog box where you can enter your custom dimensions. (You’ll need a ruler to measure the label itself in this case; however, Word has enough built-in labels that you’ll rarely need to get this creative.) Click OK.
If your odd-sized labels come on odd-sized sheets (something other than 8.5” x 11”), click Customize in the Printing Options pane. Here you set the page size and feeding method, as described earlier and shown in Figure 1-20.
If you’re printing only one label, click the “Single label” radio button and choose a row and column to tell Word where to print the label.
This way, if you have a sheet with some blank labels left over, you can have Word print on one of those remaining labels. No waste!
If you’re printing more than one label, on the other hand, click Mail Merge and use the Mail Merge Manager (see Creating a New Data Source) to give Word a list of addresses to use.
Click Print or OK when done.
To avoid wasting labels, print on a blank piece of paper first. Hold the printed sheet over a label sheet (preferably against a window or light) to see if the labels are going to line up. If they don’t align correctly, choose Tools → Labels, click Options, and click Details to adjust the print area and spacing of each label.
These days, it’s rare that a document is sent into the world on paper or disk. Instead, it’s usually transmitted electronically. Word’s File → Send To command gives you two ways of transmitting your work electronically: via email and as a PowerPoint presentation.
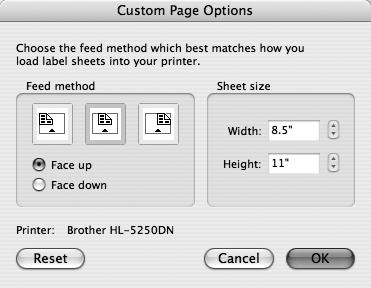
Figure 1-20. Practice on a blank sheet of paper to determine whether your printer feeds face up or face down, and which corner the labels start to print from. Then, if necessary, use the buttons in this dialog box to match Word with what your printer is doing. If you’re using one of the standard label types, you probably won’t have to bother with these settings.
File → Send To→ Mail Recipient (as HTML). This alternative offers a prettier, though riskier, way of emailing a Word document. It converts the Word text into HTML and plunks it directly into the body of an email message. Why riskier? Because your recipient won’t be able to see it if her email program’s HTML options are turned off or nonexistent.
File → Send To→ Mail Recipient (as Attachment). This long-winded command launches Entourage and opens a new email message. The document you were just working on in Word is automatically attached to the message, and your address book is open—ready and waiting for you to choose a recipient from your list of contacts. (See Chapter 10 for more on Entourage’s Address Book.) Congratulations—you’ve just saved several tedious steps.
File → Send To→ PowerPoint. You can import a Word outline into PowerPoint for conversion into a slideshow, but why go to all the trouble? When your Word document is ready to become part of your big show, choose this command. PowerPoint opens with your Word document now displayed as a PowerPoint presentation. See Chapter 16 for full details on working with your document in PowerPoint.
Get Office 2008 for Macintosh: The Missing Manual now with the O’Reilly learning platform.
O’Reilly members experience books, live events, courses curated by job role, and more from O’Reilly and nearly 200 top publishers.

