Compressing Images
Having an image that is too large (that is, too high a dpi) is not a problem quality-wise. You can resize it in PowerPoint to make it as small as you like; just drag its selection handles. There will be no loss of quality as it gets smaller. However, as mentioned earlier in the chapter, having a picture that is much larger than necessary can increase the overall size of the PowerPoint file, which can become problematic if you plan to distribute the presentation on floppy disk or over the Internet.
To avoid problems with overly large graphic files, you can compress the images to reduce their resolution and remove any cropped portions. You can do this from within PowerPoint or with a third-party utility.
Reducing resolution and compressing images in PowerPoint
PowerPoint offers an image compression utility that compresses all of the pictures in the presentation in a single step and reduces their resolution to the amount needed for the type of output you specify (e-mail, Screen, or Print). To reduce resolution and compress images, do the following:
1. | Click a picture, so that the Format tab appears.
|
2. | Click the Compress Pictures button. The Compress Pictures dialog box appears, as shown in Figure 24-45).
Figure 24-45. Click OK to compress with the default settings or click Options to fine-tune.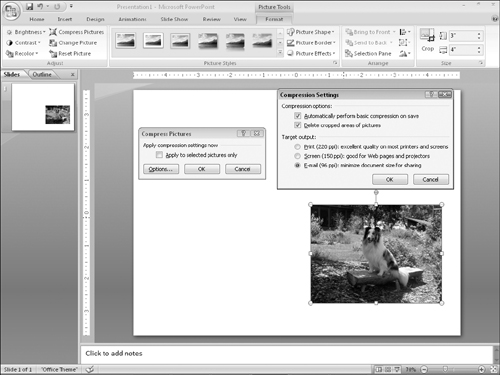
|
3. | (Optional) If you do not want to compress ... |
Get Office 2007 Bible now with the O’Reilly learning platform.
O’Reilly members experience books, live events, courses curated by job role, and more from O’Reilly and nearly 200 top publishers.

