Although the Node core is extremely useful, many of its abstractions are very low-level. So a lot of development in Node is done using higher abstraction libraries built by the community, similar to how Ruby-based websites use Rails or Sinatra rather than custom-written Ruby code. Although these modules arenât technically Node itself, they are extremely important for getting things done, and many of them are mature projects in themselves. This chapter explores some of the most popular and useful community modules for Node.
Express, an MVC framework for Node, is probably the most widely used Node module. It was inspired by the Sinatra framework for Ruby and enables a lot of features that make it very easy to throw together a website with Node.
Express works by defining page handlers for
routes. The routes can be as simple as a path, or
much more complex. The handlers could be as simple as emitting âHello,
worldâ or as complex as a whole page-rendering system that interacts
with a database. Youâll need to install Express using npm install express before you can start using it. Example 7-1
shows how to create a simple application with Express.
Example 7-1. Creating a simple Express app
var express = require('express');

var app = express.createServer();

app.get('/', function(req, res) {
  res.send('hello world');
});

app.listen(9001);
This code is obviously pretty similar to http in terms of creating a server. However, a few things are a
lot more straightforward. First, app.get() is creating a response to a specific
routeâin this case, '/'. Unlike a
regular http server, which provides a
listener for generic requests, Express offers a listener for specific
HTTP verbs. So get() will answer only
GET requests, put()
will answer only PUT requests, etc. Combine that with the route we
specified, and you immediately have some powerful functionality. A
typical Express program specifies a series of expressions, and Express
matches the route in each incoming request against each expression in
turn, executing the code associated with the first expression that
matches.
Note
It is possible to have Express skip over expressions under
certain conditions, using the next() function discussed later in this
section.
The next thing to notice in the example is how we responded. We
still use the response object as in
http, but Express has provided a
send() method. We didnât need to provide any HTTP headers or call
end(). The send() method figures out things such as the
HTTP headers that should be sent and includes end() automatically.
The point here is that Express takes the basic structure laid out
by http and enriches it significantly
with a lot of functionality to create real applications quickly. You
shouldnât have to create routing code every time you want to deal with
HTTP requests, so Express takes care of that stuff.
Routes are one of the core concepts in Express, and one of the things that make
it really useful. As mentioned in the previous section, routes are
applied to an HTTP verb via a method with the same name, such as
get() or post(). The routes consist of a simple string
or a regex and can contain variable declarations, wildcards, and
optional key flags. Letâs take a look at some examples, starting with
Example 7-2.
Example 7-2. Route with variable and optional flag
var express = require('express');
var app = express.createServer();

app.get('/:id?', function(req, res) {
  if(req.params.id) {
    res.send(req.params.id);
  } else {
    res.send('oh hai');
  }
});

app.listen(9001);
This example shows a route that includes an optional variable
called id. The variable name does not
have any special meaning to Express, but it will be available to use
inside the callback function. In Express routes, you use a preceding
colon (:) to mark a variable you want
preserved. The string passed in the URL will be captured into the
variable. All routes in Express are actually turned into regular
expressions (more on this later) and tokenized[16] for use by application code.[17] The regex used will match up to the next known token in
your route. Notice that this variable is also optional. If you run this
program and go to http://localhost:9001, youâll
just get âoh haiâ back because you did not put a slash after the port,
and the variable part of the route was optional. If you append anything
else (so long as you donât include another /), youâll get it back as your response body;
matching the id token, it will be
stored in req.params.id.
Express routes will always treat / as a token, but they will also treat it as
optional if it terminates the request. So our route /:id? will match localhost, localhost/ localhost/tom, and localhost/tom/, but not
localhost/tom/tom.
Routes can also use wildcards, as shown in Example 7-3. (*) will
match anything except the token following it (nongreedy regex
matching).
Example 7-3. Using wildcards in routes
app.get('/a*', function(req,res) {
  res.send('a');
  //matches /afoo /a.bar /a/qux etc.
});

app.get('/b*/c*d', function(req,res) {
  res.send('b');
  //matches /b/cd /b/cfood /b//c/d/ etc.
  //does not match /b/c/d/foo
});

app.get('*', function(req, res) {
  res.send('*');
  //matches /a /c /b/cd /b/c/d /b/c/d/foo
  //does not match /afoo /bfoo/cbard
});
When you use a wildcard to make routes, any tokens between the
wildcards must match, unless they are optional. Wildcards are often used
for things such as filenames containing periods (.). Itâs also important to notice that unlike
in many regular expression languages, * does not mean zero or more characters; it
means one or more characters. A forward slash (/) can be considered a character when matching
with wildcards.
Another important thing to note is that routes are ordered. Multiple routes can match a given URL, but only the first one that matches will trigger the associated activity. This means that the order in which routes are defined is very significant. In the previous example, the general wildcard will catch everything that wasnât already caught by a previous route, even though it matches all of them.
You can also use regexes to define routes (Example 7-4).
If you do this, router wonât process
the regex any further. Because you still might want to get variables out
of the URL, you can use captures to define them.
Example 7-4. Using a regex to define a route
var express = require('express');
var app = express.createServer();

app.get(/\/(\d+)/, function(req, res) {
  res.send(req.params[0]);
});

app.listen(9001);
In this example, the regex will match only URLs that start with a
number (\d matches any digit, and the
+ allows one or more to match). This
means that / will not match, but
/12 will. However, the regex checking
uses RegExp.match(), which
finds a regex inside a larger string. This means that /12abc will also match. If you want to make
sure that a regex represents the complete route, use the $ token at the end of the regex, such as
/\/(\d+)$/. $ checks for the end of the line, so the regex
will match only if it terminates. You probably want to keep the default
Express behavior of loosely matching a / at the end of URLs, though. Do this with
\/?$ instead of just $, to allow an optional / at the end of the string.
Notice how we accessed the capture in our regex in Example 7-4. If you use a regex for your route, you can use
req.params as an array to access the
captures as variables. This also works when router converts your route to a regex, but you
probably want to use the variable names in that case, as we showed
earlier. You can also use regex to make better-named variables in routes
by constraining what will match that variable, as in Example 7-5.
Example 7-5. Use regex to be more specific about variable types
var express = require('express');
var app = express.createServer();

app.get('/:id(\\d+)', function(req, res) {
  res.send(req.params[0]);
});

app.listen(9001);
This example constrains the id
parameter to numbers by asking route
to match only numbers with the regex \d+. The capture will still be exposed as
req.params.id, but it will match only
if the regex matched. Because the regex is highly flexible, you can use
this technique to capture or restrict URL matching to pretty much
anything while still getting named variables to use. Remember to escape
any backslash (\) you use in
JavaScript strings. (This was not necessary in Example 7-4, because it used a regular expression directly
rather than inside a string.)
Sometimes there are multiple routes that match a URL that you want to use in various circumstances. Weâve already seen that the order in which routes are defined is significant in determining which will be selected. However, it is possible to pass control back to the next route if some criteria isnât met (Example 7-6). This is a great option for a number of scenarios.
Example 7-6. Passing control to another route
app.get('/users/:id', function(req, res, next){
  var id = req.params.id;

  if (checkPermission(id)) {
    // show private page
  } else {
    next();
  }
});

app.get('/users/:id', function(req, res){
  // show public user page
});Weâve added another argument to the function that handles the
routes. The next argument tells the
router middleware (weâll discuss
middleware shortly in more depth) to call the next route. The argument is always passed to
the callback, but this example is the first where we choose to name and
use it. In this case, we can check the id to see whether the user has permission to
view the private version of this page, and if not, send her to the next
route, which has the public version.
This combines really well with app.all(), the method that describes all HTTP
verbs. As Example 7-7 demonstrates, we can capture
across a range of HTTP verbs and routes, apply some logic, and then pass
control onto more specific routes.
Example 7-7. Using app.all( ) to select multiple HTTP verbs and routes and then pass control back
var express = require('express');

var app = express.createServer();

var users = [{ name: 'tj' }, { name: tom }];

app.all('/user/:id/:op?', function(req, res, next){
  req.user = users[req.params.id];

  if (req.user) {
    next();
  } else {
    next(new Error('Cannot find user with ID: ' + req.params.id));
  }
});

app.get('/user/:id', function(req, res){
  res.send('Viewing ' + req.user.name);
});

app.get('/user/:id/edit', function(req, res){
  res.send('Editing ' + req.user.name);
});

app.put('/user/:id', function(req, res){
  res.send('Updating ' + req.user.name);
});

app.get('*', function(req, res){
  res.send('Danger, Will Robinson!', 404);
});

app.listen(3000);
This example is similar to Example 7-6, in that we are validating whether a user exists before passing on control. However, we are not doing this only for all the subsequent routes; we are also doing it across all HTTP verbs. Normally when only one route matches, this doesnât make any difference, but itâs important to note how you can pass state between routes.
When the req.user attribute is
added in the app.all() method, it is
available in all the subsequent methods because the middleware owns the
request object. When each callback is fired, the variable .req is really a pointer to the request object
owned by the middleware, and any changes to the request object are
visible to every other function and route using the middleware.
Example 7-8 shows how a file extension can be
made either optional or mandatory within a specific range. In the first
get(), the :format parameter is optional (as denoted by
the question mark), so Express will respond to requests for a user by
ID, regardless of which format has been requested. It is up to the
programmer to capture the formats (JSON, XML, text, etc.) via a switch
statement in order to do special processing.
In the second example, the :format parameter
looks for json or xml as predefined file types. If those are not
found, the book request will not be processed, regardless of whether the
:id parameter is valid. This gives us
greater control over which requests are responded to and ensures that
only formats for which a view can be generated are available to
respond.
Example 7-8. Optional and required route extensions
var express = require('express');
var app = express.createServer();

app.get('/users/:id.:format?', function(req, res) {
  res.send(req.params.id + "<br/>" + req.params.format);
  // Responds to:
  // /users/15
  // /users/15.xml
  // /users/15.json
});

app.get('/books/:id.:format((json|xml))', function(req, res) {
  res.send(req.params.id + "<br/>" + req.params.format);
  // Responds to:
  // /books/7.json
  // /books/7.xml
  // But NOT to:
  // /books/7
  // /books/7.txt
});

app.listen(8080);Most examples have demonstrated the GET verb, but Express is built to support RESTful architecture in the style of Ruby on Rails. Using hidden fields inside web forms, you can indicate whether a formâs intention is to PUT (replace data), POST (create data), DELETE (remove data) or GET (retrieve data). See Example 7-9.
Example 7-9. Handling forms using Express
var express = require('express');
var app = express.createServer();

app.use(express.limit('1mb'));
app.use(express.bodyParser());
app.use(express.methodOverride());

app.get('/', function(req, res) {
  res.send('<form method="post" action="/">' +
           '<input type="hidden" name="_method" value="put" />' +
           'Your Name: <input type="text" name="username" />' +
           '<input type="submit" />' +
           '</form>');
});

app.put('/', function(req, res) {
  res.send('Welcome, ' + req.body.username);
});

app.listen(8080);
This simple application demonstrates the use of a form. First, an
Express application is created and configured to use the bodyParser() and methodOverride() functions. The bodyParser() function parses the request body sent by the web browser and
translates form variables into objects usable by Express. The methodOverride() function allows the hidden
_method variable in form posts to
override the GET method in favor of the RESTful method types.
The express.limit() function instructs Express to limit the length of request
bodies to 1 MB. This is an important security consideration because
otherwise it would be possible to send a large post to the application
to be processed by bodyParser(),
making it very easy to launch a denial-of-service (DoS) attack.
Note
Be sure to call methodOverride() after bodyParser(). Otherwise, the form variables
will not be processed when Express checks to see whether it should be
responding to a GET or some other command.
Clearly, it isnât practical to continue writing HTML directly in application code. For starters, it is unreadable and unmaintainable; but more importantly, it is bad form to mix application logic with presentation markup. Template engines allow developers space to focus on how to present information to the userâoften in different formats, such as screen or mobileâand inject specific data separately from processing.
Express is minimalist and does not come with built-in template engines, opting instead for community-supported modules. Some of the more popular engines are Haml, Jade, Embedded Javascript (EJ), CoffeeKup (a CoffeeScript-based engine), and jQuery templates.
In Example 7-10, an application is set up to render a simple Jade template.
Example 7-10. Using a basic Jade template in Express
var express = require('express');
var app = express.createServer();

app.get('/', function(req, res) {
  res.render('index.jade', { pageTitle: 'Jade Example', layout: false });
});

app.listen(8080);
To run this example, you will need to install the Jade template engine:
npm install jade
The first thing to notice is the lack of any reference to the Jade
library. Express parses the view templateâs filename and uses the
extension (in this case, the jade
from index.jade) to determine which
view engine should be used. Therefore, it is possible to
mix and match different view engines into the same project. You are not
limited to using only Jade or only CoffeeKup, for example; you can use
both.
This example passes two arguments into the render function. The
first is the name of the view to display, and the second contains
options and variables needed for the rendering. Weâll come back to the
filename in a minute. There are two variables passed into the view in
this example: pageTitle and layout. The layout variable
is interesting in this case because it is set to false, which instructs the Jade view engine to
render the contents of index.jade
without first going through a master layout file (more on this
later).
pageTitle is a local variable
that will be consumed by the contents of the view. It represents the
point of templating: whereas the HTML is specified mostly in index.jade file, that file has a placeholder
named pageTitle where Jade will plug
in the value we provide.
The file (index.jade) from the first parameter needs to be placed in the views folder (/views/index.jade) and looks like Example 7-11.
Example 7-11. A basic Jade file for Express
!!! 5
html(lang="en")
  head
    title =pageTitle
  body
    h1 Hello, World
    p This is an example of Jade.
After Jade plugs in the value for pageTitle that we supplied, the page renders
as:
<!DOCTYPE html>
<html lang="en">
  <head>
    <title>Jade Example</title>
  </head>

  <body>
    <h1>Hello, World</h1>
    <p>This is an example of Jade.</p>
  </body>
</html>
The Jade template aims to make the page more succinct by paring down the markup to the bare minimum. Instead of the closing tags you may be accustomed to in HTML, Jade uses indentation to communicate position within the pageâs hierarchy, resulting in a clean and generally easy-to-read file.
The very first line, "!!! 5",
identifies the content type as HTML5, manifesting as an HTML5 doctype in
the resulting output. The default document types supported by Jade are
5, xml, default (which is XHTML 1.0 Transitional),
transitional (the default), strict, frameset, 1.1, basic,
and mobile. You can supply your own,
though, such as doctype html PUBLIC
"-//W3C//DATA XHTML Custom 1.10a//DE".
Look in the title tag on the
fourth line of the Jade input. The string =pageTitle is interpreted by Jade as âinsert
the contents of the variable named pageTitle here.â In the resulting output, this
becomes Jade Example, the value
provided by the previous application code.
As we mentioned, there are many other templating options, each of which does essentially what Jade does, but with different syntax and conventions.
Layouts allow views to share common structural elements in your site, providing an even greater separation of content and data. By standardizing parts of the layout, such as navigation, header, and footer, you can focus your development efforts on the actual content for each view.
Example 7-12 takes the view engine concept already discussed and turns it into a ârealâ website.
Example 7-12. Defining global template engines in Express
var express = require('express');
var app = express.createServer();

app.set('view engine', 'jade');

app.get('/', function(req, res) {
  res.render('battlestar')
});
New to this example is the set command on the âview engineâ parameter.
The Jade view engine will now be considered the default by Express,
although it is still possible to override it in the render
method.
The render function is markedly different. Because the Jade
engine has been set as the default view engine, this example does not
need to specify the full filename, so battlestar actually refers to /views/battlestar.jade. The layout: false parameter from Example 7-10 is no longer needed, because this time
Express will be making use of this layout file located at views/layout.jade, shown in Example 7-13.
The layout file is very similar to the view file created
earlier, but in this case there is a special body variable. Weâre talking here about the
!= body line; please donât
confuse that with the body keyword
near the top of the file. The second body is not the name of a variable passed in
through the application code, so where does it come from?
When the layout option is set
to true (the default) in Express,
the render method works by parsing
the contents of the first parameter and passing the rendered output to
the layout as a variable called body. The battlestar.jade file looks like Example 7-14.
This is called a partial view because it does not contain the full content needed to generate a page, and it needs to be combined with a layout to become useful output. The final web browser output for all this work looks like this:
<html>
  <body>
    <h1>Battlestar Galactica Fan Page</h1>
    <p>Welcome to the fan page.</p>
  </body>
</html>
Partial views are powerful because they allow developers to focus on the specific content being displayed, rather than the web page as a whole. This means the contents donât have to be tied to a web page and can be output to mobile web pages, AJAX requests (for in-place page refreshes), and more.
Warning
Be careful not to confuse the variable named body, which contains the actual content of
your view, with the keyword body,
which is an HTML tag used by the web browser.
Some of the examples up to this point have included a rather
innocuous-looking function: app.use(). This function
invokes the Connect library and exposes many powerful tools that make it simple to add
functionality. Now it's time to take a step back and examine what all
this glueâknown as middlewareâis, and why it is so important to developing with
Express.
Although it might sound like one of those obscure buzzwords that programmers like to use when they want to appear âin the know,â middlewareâas weâve mentioned in previous chaptersârefers to a piece of software that acts as a link between two other programs, typically between a higher-level application and a wider network. In the real world, middleware is analogous to the telephone lines you might find in your home or office building. All telephones (applications) connect to the same telephone lines (middleware), which in turn broker communication from the application to the underlying network.
Your phone may or may not support call waiting or voicemail, but the line behaves the same, regardless of which features are available to you. You may have voicemail built into your phone, or it may be provided by your telco (network); in either case, the line itself is happy to support your usage.
Connect provides the middleware functionality used by Express (see
Table 7-1). As shown in Figure 7-1, Connect extends Nodeâs base http module, giving it all of the
base capabilities provided by http, upon which it
adds its own functionality. Express in turn inherits from Connect,
gaining its abilities and, by extension, httpâs as
well. Any module plugged into
Connect is automatically made available to Express. Connect is the
middle layer between Express and the network, and as such exposes and
uses a myriad of features that may not be used directly by Express, but
are available all the same. Finally, because Express derives itself from
Connect, most of Connectâs functionality is available directly from
Express, allowing you to issue commands such as
app.bodyParser() rather than
connect.bodyParser().
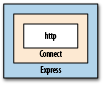
Table 7-1. Middleware bundled with Connect
| Name | Description |
|---|---|
basicAuth | Accepts a callback function that accepts username and password parameters, then returns true if the credentials are permitted access to the site. |
bodyParser | Parses the contents of the request body. |
compiler | Compiles .sass and .less files to CSS and CoffeeScript files to JavaScript. |
.cookieParser | Parses the contents of cookies sent by the web browser in the request headers. |
csrf | Provides cross-site request forgery (CSRF) protection by mutating the request through an
additional form variable. Requires session
and bodyParser middleware. |
directory | Prints directory listings inside a root path, with options to display hidden files and icons. |
errorHandler | Traps errors encountered by the application and provides options to log errors to stderr or request output in multiple formats (JSON, plain text, or HTML). |
favicon | Serves favicon files from memory, with cache control. |
limit | Limits the size of requests accepted by the server to protect against DoS attacks. |
logger | Logs requests to output or a file, in multiple formats, either on response (default) or on request. Optional buffer size controls how many requests are collected before writing to disk. |
methodOverride | Combine with bodyParser to provide
DELETE and PUT methods along with POST. Allows for more explicit
route definitions; for example, use app.put()
rather than detecting the userâs intention from
app.post(). This technique enables RESTful
application design. |
profiler | Typically placed before all other middleware,
profiler records the response time and memory
statistics for requests. |
query | Parses query strings and populates the
req.query parameter. |
responseTime | Populates the X-Response-Time header with the time (in milliseconds) to generate a response. |
router | Provides advanced routing (discussed in Setting Up Routes in Express) |
session | The session manager for persisting user data across requests. |
static | Enables streaming of static files from a root directory. Allows for partial downloads and custom expiry aging. |
staticCache | Adds a caching layer to the static middleware, keeping the most popular downloaded files in memory for greatly improved response times. |
vhost | Enables multiple sites for different vhosts on a single machine. |
By now you may have noticed that middleware consists of little more than functions that are executed sequentially by Express. JavaScript closures give us a lot of power to implement the factory pattern[18] inside Node, which can be exploited to provide contextual functionality to your web routes.
Expressâs routing functions use internal middleware during their processing cycle, which you can override to add extra functionalityâfor example, to add custom headers to your HTML output. Letâs look at Example 7-15 and see how we can use a middleware factory to intercept a page request and enforce role-based authentication.
Example 7-15. Middleware factories in Express
var express = require('express');
var app = express.createServer(
  express.cookieParser(),
  express.session({ secret: 'secret key' })
);

var roleFactory = function(role) {
  return function(req, res, next) {
    if ( req.session.role && req.session.role.indexOf(role) != -1 ) {
      next();    } else {
      res.send('You are not authenticated.');
    }
  }
};

app.get('/', roleFactory('admin'), function(req, res) {
  res.send('Welcome to Express!');
});

app.get('/auth', function(req, res) {
  req.session.role = 'admin';
  res.send('You have been authenticated.');
});

app.listen(8080);
Right off the bat, if you visit
http://localhost:8080/ you will receive the
message âYou are not authenticated.â However, if you look at the
contents of the route for '/', you will notice that
the actual page contents are 'Welcome to Express!'.
The second parameter, roleFactory('admin'), launched before the
page was displayed and detected that there was no role property in your session, so it output
its own message and stopped the page execution.
If you visit http://localhost:8080/auth
followed by http://localhost:8080/ you will
receive the âWelcome to Express!â message. In this circumstance, the
/auth URL attached the 'admin'
variable to your sessionâs role property, so when
roleFactory was executed it passed the execution
control to next(), which is the
app.get('/') function.
Therefore, it could be said that by using internal middleware, we changed the order of execution to:
roleFactory('admin')app.get('/')
What if we wanted to authenticate based on more than one role? In that case, we could change the route to:
var powerUsers = [roleFactory('admin'),roleFactory('client')];
app.get('/', powerUsers, function(req, res) {
  res.send('Welcome to Express!');
});
Because we passed an array as the middleware, we have limited the page execution to users belonging to the âadminâ and âclientâ roles, and changed the order of execution to:
roleFactory('admin')roleFactory('client')app.get('/')
Because each roleFactory demands that the
role be present in the session, the user must be both a âclientâ and
an âadminâ in order to access the page.
[16] Tokenized refers to the process of breaking apart a string of text into chunks (or words) called tokens.
[17] This functionality is actually part of a submodule of Express
called router. You can look at
the source code of router to see
the details of routing regexes.
[18] A factory is an object that creates other objects with specific parameters, whereas creating those objects manually would involve a lot of repetitive or complex program code.
Get Node: Up and Running now with the O’Reilly learning platform.
O’Reilly members experience books, live events, courses curated by job role, and more from O’Reilly and nearly 200 top publishers.

