Removing Red-Eye
If you spot red-eye in a flash portrait, give the Red-Eye Correction tool a try:
 Display your photo in single-image view and press the Picture Control button or OK button.
The Retouch menu appears over your photo. Note that the Red-Eye Correction option appears dimmed in the menu for photos taken without flash.
- Highlight Red-Eye Correction and press OK.
If the camera detects red-eye, it applies the removal filter and displays the results in the monitor. If the camera can't find any red-eye, it displays a message telling you so.
- Zoom in to inspect the repair.
 Press the Qual button to magnify the display so that you can check the camera's work, as shown in Figure 11-3. To scroll the display, press the Multi Selector up, down, right, or left. The yellow box in the tiny navigation window in the lower-right corner of the screen indicates the area of the picture that you're currently viewing.
 - If you approve of the correction, press OK twice.
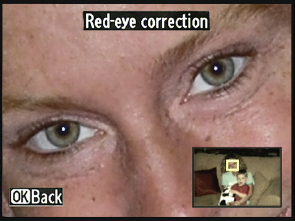
Figure 11-3: Zoom in to magnify the image and check the red-eye repair.
The first OK returns the display to normal magnification; the second creates the retouched copy.
- If you're not happy with the results, press OK to return to normal ...
Get Nikon D600 For Dummies now with the O’Reilly learning platform.
O’Reilly members experience books, live events, courses curated by job role, and more from O’Reilly and nearly 200 top publishers.

