Chapter 3. Modularizing and Managing JavaScript
One of the great aspects of writing Node.js applications is the built-in modularity the environment provides. As demonstrated in [link unavailable], itâs simple to download and install any number of Node modules, and using them is equally simple: just include a single require() statement naming the module, and youâre off and running.
The ease with which the modules can be incorporated is one of the benefits of JavaScript modularization. Modularizing ensures that external functionality is created in such a way that it isnât dependent on other external functionality, a concept known as loose coupling. This means I can use a Foo module, without having to include a Bar module, because Foo is tightly dependent on having Bar included.
JavaScript modularization is both a discipline and a contract. The discipline comes in by having to follow certain mandated criteria in order for external code to participate in the module system. The contract is between you, me, and other JavaScript developers: weâre following an agreed on path when we produce (or consume) external functionality in a module system, and we all have expectations based on the module system.
Note
ECMAScript 6 provides native support for modules, but the specification is still undergoing change and there is no implementation support yet. There is some support for it in Traceur, as well as a polyfill, which can at least provide an idea of how theyâll be implemented in the future.
Chances are you have used modularized JavaScript. If you have used jQuery with RequireJS or Dojo, youâve used modularized JavaScript. If youâve used Node, youâve used a modular system. They donât look the same, but they work the same: ensuring that functionality developed by disparate parties works together seamlessly. The modular system that RequireJS and Dojo support is the Asynchronous Module Definition (AMD), while Nodeâs system is based on CommonJS. One major difference between the two is that AMD is asynchronous, while CommonJS is synchronous.
Even if you donât use a formal modular system, you can still improve the performance of script loading with script loaders and using new HTML5 async functionality. You can also improve the management of your entire application process using tools such as Grunt, or ensuring your own code is packaged for ease of use and innovation.
Note
One major dependency on virtually all aspects of application and library management and publication is the use of Git, a source control system, and GitHub, an extremely popular Git endpoint. How Git works and using Git with GitHub are beyond the scope of this book. I recommend The Git Pocket Guide (OâReilly) to get more familiar with Git, and GitHubâs own documentation for more on using this service.
Loading Scripts with a Script Loader
Solution
One solution is to use a script loader to load your JavaScript files asynchronously and concurrently. Examples of use are documented in the discussion.
Discussion
There are several techniques you can use to load JavaScript files. One is the traditional method of using a script element for each file, and just loading each in turn. The issue that people have had with this approach is the inefficiency of having to access each file individually, the problems that can occur if scripts are loaded out of order (with one script being dependent on another already loaded), and the fact that the entire page is blocked while the scripts load.
Some solutions are to compile all the individual JavaScript files into a single file, which is what the content management system (CMS) Drupal does. This eliminates the multiple file access and even the issues with ordering, but it still leaves us with the fact that the page is blocked from loading until the scripts are loaded.
Script loaders were created to provide a way of loading JavaScript files asynchronously, which means the rest of the page can continue loading while the script is loading. They use script injection: creating a script element in a script block that loads the JavaScript file, and then appending that block to the page. The inline JavaScript is executed asynchronously and does not block the page from loading like the use of the traditional script element does.
The code to do so can be similar to the script block shown in the following minimal HTML5 page:
<!DOCTYPE html><htmllang="en"><head><metacharset="utf-8"><title>title</title></head><body><script>varscrpt=document.querySelector("script");vart=document.createElement("script");t.src="test1.js";scrpt.parentNode.insertBefore(t,scrpt);</script></body></html>
To prevent the variables from cluttering up the global namespace, they can be included in an Immediately-Invoked Function Expression (IIFE):
<script>(function(){varscrpt=document.querySelector("script");vart=document.createElement("script");t.src="test1.js";scrpt.parentNode.insertBefore(t,scrpt);}());</script>
If you need to use a pathname for the script, you can use a protocol-relative URL (sometimes referred to as a protocol-less URL) so that the code adapts whether the page is accessed with http or https:
t.src="//somecompany.com/scriptfolder/test1.js";
With this, the client application uses the same protocol (http or https) used to access the parent page.
Multiple scripts can be loaded into the page using this approach. It can also be used to load CSS files, as well as larger images or other media files. However, we donât have to do the work ourselves: we can use a script loading library, such as HeadJS.
According to the HeadJS documentation, the best approach to including support for the library is to include a link to the library in the head element:
<html><head><scriptsrc="head.min.js"></script><script>head.load("file1.js","file2.js");</script></head><body><!-- my content--><script>head.ready(function(){// some callback stuff});</script></body></html>
Note the head.load() function call. All of the script files to be loaded are listed in the function call. In addition, any ready state functionality can be provided in the head.ready() function call.
If you do have JavaScript, you want to load right away; rather than using another script element, you can use a data- attribute on the script element loading HeadJS:
<scriptsrc="head.min.js"data-headjs-load="init.js"></script>
Any immediately invoked functionality is then listed in init.js.
Note
HeadJS has other functionality, including assistance for responsive design and browser version support. Read more about setting it up in the set up documentation.
Another script loader with an interesting twist is Basket.js. It also loads JavaScript files asynchronously, but it goes a step further: it caches the script using localStorage, which means if the JavaScript has already been accessed once, a second access loads the JavaScript from cache rather than loading the file again.
Once you include the Basket.js JavaScript file, you can then define the JavaScript files to be loaded:
<!DOCTYPE html><htmllang="en"><head><metacharset="utf-8"><title>title</title></head><body><scriptsrc="basket.full.min.js"></script><script>basket.require({url:'test1.js'},{url:'test2.js'});</script></body></html>
If you monitor the page using your browserâs debugger/development tools, and reload the page, youâll note that the files arenât accessed again after the first load.
To handle source dependencies, Basket.js returns a promise from require(), and the then() callback is executed. You can then list the second JavaScript file in the callback:
<script>basket.require({url:'test2.js'}).then(function(){basket.require({url:'test1.js'});});</script>
Note
Access Basket.js and read how to use it in the libraryâs home page.
Loading Scripts Asynchronously the HTML5 Way
Problem
Youâre interested in processing scripts asynchronouslyânot blocking the page from loading while the scripts loadâbut you have discovered that the script injection technique has one problem: the CSS Object Model (CSSOM) blocks inline scripts because these scripts typically operate on the CSSOM. Since the CSSOM doesnât know what the script is going to do, it blocks the script until all of the CSS is loaded. This, then, delays the network access of the script until all CSS files have been loaded.
Discussion
There are two script element attributes: defer, which defers script loading until the rest of the page is loaded, and the newest async. The latter tells the browser to load the script asynchronously, as the page is being parsed. It only works with external scripts; the page still blocks with inline scripts.
The async attribute prevents many of the problems weâve had with blocked scripts and having to use tricks such as script injection. The only reason script injection is still being used is there are older versions of browsers, such as IE9 and older, that donât support it.
Converting Your JavaScript to AMD and RequireJS
Solution
RequireJS is integrated into the following three small JavaScript libraries:
one.js
define(function(){return{hi:function(){console.log('hello from one');}}});
two.js
define(function(){return{hi:function(val){console.log('hello '+val+' from two');}}});
mylib.js
require(["./one","./two"],function(one,two){one.hi();two.hi('world');console.log("And that's all");});
And the web page, index.html:
<!DOCTYPE html><html><head><title>Hello Modularization</title><scriptdata-main="scripts/mylib"src="scripts/require.js"></script></head><body><h1>Stuff</h1></body></html>
Discussion
Consider the following three very basic JavaScript libraries:
one.js
functiononeHi(){console.log('hello from one');}
two.js
functiontwoHi(val){console.log('hello '+val+' from two');}
mylib.js
functionallThat(){oneHi();twoHi('world');console.log("And that's all");}
They could be included in a simple web page as demonstrated in the following code, assuming all the JavaScript libraries are in a subdirectory named scripts/:
<!DOCTYPE html><html><head><title>Hello Modularization</title><scriptsrc="scripts/one.js"type="text/javascript"></script><scriptsrc="scripts/two.js"type="text/javascript"></script><scriptsrc="scripts/mylib.js"type="text/javascript"></script><scripttype="text/javascript">allThat();</script></head><body><h1>Stuff</h1></body></html>
And you might expect the application to work, with the messages printed out in the right order. However, if you make a modest change, such as use the async attribute with all of the scripts:
<scriptsrc="scripts/one.js"asynctype="text/javascript"></script><scriptsrc="scripts/two.js"asynctype="text/javascript"></script><scriptsrc="scripts/mylib.js"asynctype="text/javascript"></script>
Youâll be hosed, because the browser no longer blocks program execution, waiting for each script to load, in turn, before going to the next. Other challenges that can occur are that youâre using other peopleâs libraries and you donât know the correct order to list the source scripts, or you forget one or more of them. The problem with this common approach from the past is that nothing enforces both order and dependencies. Thatâs where RequireJS comes in.
In the solution, youâll notice two key words: define and require. The define keyword is used to define a module, while require is used to list dependencies with a callback function thatâs called when all dependencies are loaded.
In the solution, two of the libraries are defined as modules, each return a function. The third library, mylib.js, declares the two modules as dependencies and in the callback function, invokes the returned module functions. All of this is pulled into the HTML page with the following line:
<scriptdata-main="scripts/mylib"src="scripts/require.js"></script>
The actual source is the RequireJS library. The custom attribute data-main specifies the JavaScript source to load after RequireJS is loaded.
The modules can return more than one function, or can return data objects, functions, or a combination of both:
define(function(){return{value1:'one',value2:'two',doSomething:function(){// do something}}})
Modules can also have dependencies. The following code version of two.js creates a dependency on one.js in two.js and removes it as a dependency in mylib.js:
two.js
define(['one'],function(one){return{hi:function(val){one.hi();console.log('hello '+val+' from two');}}});
mylib.js
require(["./two"],function(two){two.hi('world');console.log("And that's all");});
Note
Typically after you create your JavaScript files, youâll want to optimize them. RequireJS provides the tools and documentation for optimizing your source at http://requirejs.org/docs/optimization.html.
See Also
Your library can still exist as a standard JavaScript library and an AMD-compliant module, as discussed in [link unavailable].
Using RequireJS with jQuery or Another Library
Solution
If the library can work with AMD (as jQuery can), and you save the jQuery file as jquery.js and load it in the same directory as your application JavaScript, you can use the jQuery functionality easily, as shown in the following small code snippet:
require(["./jquery"],function($){$('h1').css('color','red');});
However, if the jQuery file is named something else, or youâre accessing the library from a CDN, then youâll need to use a RequireJS shim:
requirejs.config({baseUrl:'scripts/lib',paths:{jquery:'//ajax.googleapis.com/ajax/libs/jquery/2.1.1/jquery.min'},});
Discussion
As the solution demonstrates, if your application code already incorporates jQueryâs dollar sign ($) and the jQuery file is local to the script, you can incorporate its use in your application in the same manner used for any other module. The jQuery library can recognize that itâs within a RequireJS environment, and respond accordingly. Where things get a little more complicated is if the library is not accessed locally, is accessed from a CDN, or the library doesnât support AMD.
To demonstrate, I modified the source files discussed in âConverting Your JavaScript to AMD and RequireJSâ. The source files are now organized in the following directory structure:
wwwappmain.jsindex.htmlscriptsapp.jslibone.jsrequire.jstwo.js
In addition, I removed the define() in the source library two.js, making it into an anonymous closureâan IIFE object that is added to the Window object as two:
(function(){window.two=this;this.hi=function(val){console.log('hello '+val+' from two');}}());
The one.js file still contains the AMD define() statement, meaning it requires no special handling to use:
define(function(){return{hi:function(){console.log('hello from one');}}});
The app.js file contains a RequireJS config block that, among other things, sets a baseUrl for all loaded modules, defines a CDN path for both jQuery and the app subdirectory, and creates a shim for the non-AMD compliant two. It also loads the app/main module:
requirejs.config({baseUrl:'scripts/lib',paths:{app:'../../app',jquery:'//ajax.googleapis.com/ajax/libs/jquery/2.1.1/jquery.min'},shim:{two:{exports:'two'}}});requirejs(["app/main"]);
The shim for two defines an exported object (an object defined on Window in the browser), since the library doesnât use define() to identify the object.
Lastly, the main.js module lays out the dependency on jQuery, one, and two, and runs the application:
define(["jquery","one","two"],function($,one,two){one.hi();two.hi('world');console.log("And that's all");$('h1').css('color','red');});
If two had been dependent on one of the modules or other libraries, such as one, the dependency would have been noted in the shim:
requirejs.config({baseUrl:'scripts/lib',paths:{app:'../../app',jquery:'//ajax.googleapis.com/ajax/libs/jquery/2.1.1/jquery.min'},shim:{two:{deps:['one'],exports:'two'}}});
If youâd like to make your JavaScript library into an AMD-compliant module, but still allow it to be used in other contexts, you can add a small amount of code to ensure both:
(function(){window.two=this;this.hi=function(val){console.log('hello '+val+' from two');}}());
The tiny library is now redesigned into an IIFE. Any private data and methods would be fully enclosed in the closure, and the only public method is exposed by adding it as a property to the object. The object itself is given global access via assignment to the Window property.
A variation on this would be the following, where the exposed methods and data are returned as an object to the assigned variable:
vartwo=(function(){return{hi:function(val){console.log('hello '+val+' from two');}}}());
The code now meets the module pattern, ensuring both public and private data and functions are encapsulated using the closure, and globally accessible methods and data are returned in the object. Another variation of the module pattern is the following:
vartwo=(function(){varmy={};my.hi=function(val){console.log('hello '+val+' from two');};returnmy;}());
I modified the original form of the object to make it AMD compliant:
(function(){window.two=this;this.hi=function(val){console.log('hello '+val+' from two');}if(typeofdefine==="function"&&define.amd){define("two",[],function(){returntwo;});}}());
The code tests to see if the define() function exists. If so, then itâs invoked, passing in the name of the exported library object and in the callback, returning the exported library object. This is how a library such as jQuery can work in AMD, but still work in other traditional JavaScript environments.
A variation, using the more established module pattern, is the following:
vartwo=(function(){vartwo={};two.hi=function(val){console.log('hello '+val+' from two');}if(typeofdefine==="function"&&define.amd){define("two",[],function(){returntwo;});}returntwo;}());
Loading and Using Dojo Modules
Solution
Dojo has implemented the AMD architecture for its functionality. When you add the main Dojo script to your page, what youâre loading is the module loader, rather than all of its various functions:
<scriptsrc="http://ajax.googleapis.com/ajax/libs/dojo/1.10.0/dojo/dojo.js"data-dojo-config="async: true"></script>
The library can be accessed at a CDN, as the code snippet demonstrates. The custom data attribute data-dojo-config specifies that the Dojo asynchronous AMD loader should be used.
To use the Dojo functionality, specify the dependencies in the require() method:
<script>require(['dojo/dom','dojo/dom-construct'],function(dom,domConstruct){varph=dom.byId("placeholder");ph.innerHTML="Using Dojo";domConstruct.create("h1",{innerHTML:"<i>Howdy!</i>"},ph,"before");});</script>
Discussion
Dojo is a sophisticated library system providing functionality similar to that provided in the jQuery environment. It does require a little time to become familiar with its implementation of AMD, though, before jumping in.
In the solution, the Dojo asynchronous loader is sourced from a CDN. The solution then imports two Dojo modules: dojo/dom and dojo/dom-construct. Both provide much of the basic DOM functionality, such as the ability to access an existing element by an identifier (dom.byId()), and create and place a new element (domConstruct.create()). To give you a better idea how it all holds together, a complete page example is given in Example 3-1.
Example 3-1. A complete Dojo example accessing one page element and adding another
<!DOCTYPE html><html><head><metacharset="utf-8"><title>Dojo</title><scriptsrc="http://ajax.googleapis.com/ajax/libs/dojo/1.10.0/dojo/dojo.js"data-dojo-config="async: true"></script></head><body><divid="placeholder"></div><script>require(['dojo/dom','dojo/dom-construct'],function(dom,domConstruct){varph=dom.byId("placeholder");ph.innerHTML="Using Dojo";domConstruct.create("h1",{innerHTML:"<i>Howdy!</i>"},ph,"before");});</script></body></html>
Caution
Though Dojo is generally AMD-compatible, thereâs still some funkiness with the implementation that makes it incompatible with a module loader like RequireJS. The concepts of a module loader, the require() and define() functions, and creating a configuration object are the same, but implementation compatibility fails.
Dojo does provide a decent set of tutorials to help you understand more fully how the framework operates.
Installing and Maintaining Node Modules with npm
Solution
The glue that holds the Node universe together is npm, the Node package manager. To install a specific module, use the following on the command line:
npminstallpackagename
If you want to install the package globally, so itâs accessible from all locations in the computer, use the following:
npminstall-gpackagename
When to install locally or globally is dependent on whether youâre going to require() the module, or if you need to run it from the command line. Typically you install require() modules locally, and executables are installed globally, though you donât have to follow this typical usage. If you do install a module globally, you might need administrative privileges:
sudonpminstall-gpackagename
Discussion
The solution demonstrated the most common use of npm: installing a registered npm module locally or globally on your system. However, you can install modules that are located in GitHub, downloaded as a tar file, or located in a folder. If you type:
npminstall--help
youâll get a list of allowable approaches for installing a module:
npminstallnpminstall<pkg>npminstall<pkg>@<tag>npminstall<pkg>@<version>npminstall<pkg>@<versionrange>npminstall<folder>npminstall<tarballfile>npminstall<tarballurl>npminstall<git:// url>npminstall<githubusername>/<github project>
If your current directory contains a npm-shrinkwrap.json or package.json file, the dependencies in the files are installed by typing npm install.
To remove an installed Node module, use:
npmrmpackagename
The package and any dependencies are removed. To update existing packages, use:
npmupdate[g][packagename[packagename...]]
You can update locally or globally installed modules. When updating, you can list all modules to be updated, or just type the command to update all locally-installed modules relative to your current location.
Searching for a Specific Node Module via npm
Solution
In most cases, youâll discover modules via recommendations from your friends and co-developers, but sometimes you need something new.
You can search for new modules directly at the npm website. The front page also lists the most popular modules, which are worth an exploratory look.
You can also use npm directly to search for a module. For instance, if youâre interested in modules that do something with PDFs, run the following search at the command line:
npmsearch
Discussion
The npm website provides more than just good documentation for using npm; it also provides a listing of newly updated modules, as well as those modules most depended on. Regardless of what youâre looking for, you definitely should spend time exploring these essential modules. In addition, if you access each moduleâs page at npm, you can see how popular the module is, what other modules are dependent on it, the license, and other relevant information.
However, you can also search for modules, directly, using npm.
The first time you perform a search with npm, youâll get the following feedback:
npmWARNBuildingthelocalindexforthefirsttime,pleasebepatient
The process can take a fair amount of time, too. Luckily, the index build only needs to be performed the first time you do a search. And when it finishes, youâre likely to get a huge number of modules in return, especially with a broader topic such as modules that work with PDFs.
You can refine the results by listing multiple terms:
npmsearchgeneration
This query returns a much smaller list of modules, specific to PDF generation. You can also use a regular expression to search:
npmsearch\/Firefox\\sOS
Now Iâm getting all modules that reference Firefox OS. However, as the example demonstrates, you have to incorporate escape characters specific to your environment, as I did with the beginning of the regular expression, and the use of \s for white space.
Once you do find a module that sounds interesting, you can get detailed information about it with:
npmviewnode-firefoxos-cli
Youâll get the package.json file for the module, which can tell you what itâs dependent on, who wrote it, and when it was created. I still recommend checking out the moduleâs GitHub page directly. There youâll be able to determine if the module is being actively maintained or not. If you access the npm website page for the module, youâll also get an idea of how popular the module is.
Converting Your Library into a Node Module
Solution
Convert the library into a Node module. For example, if the library is designed as the following IIFE:
(function(){varval='world';console.log('Hello '+val+' from two');}());
You can convert it to work with Node by the simple addition of an exports keyword:
module.exports=(function(){return{hi:function(val){console.log('Hello '+val+' from two');}};}());
You can then use the module in your application:
vartwo=require('./two.js');two.hi('world');
Discussion
Nodeâs module system is based on CommonJS, the second modular system covered in this chapter. CommonJS uses three constructs: exports to define whatâs exported from the library, require() to include the module in the application, and module, which includes information about the module but also can be used to export a function, directly.
Though the solution maintains the IIFE, itâs not really required in the CommonJS environment, because every module operates in its own module space. The following is also acceptable:
module.exports.hi=function(val){console.log('hello '+val+' from two');}
If your library returns an object with several functions and data objects, you can assign each to the comparably named property on module.exports, or you could return an object from a function:
module.exports=function(){return{somedata:'some data',hi:function(val){console.log('Hello '+val+' from two');}};};
And then invoke the object in the application:
vartwoObj=require('./two.js');vartwo=twoObj();two.hi(two.somedata);
Or you can access the object property directly:
varhi=require('./twob.js').hi;hi('world');
Because the module isnât installed using npm, and just resides in the directory where the application resides, itâs accessed by the location and name, not just the name.
See Also
In the next section, I cover how to make sure your library code works in all of the environments: CommonJS, Node, AMD, and as a traditional JavaScript library.
Taking Your Code Across All Module Environments
Solution
The following library with two functions:
functionconcatArray(str,array){returnarray.map(function(element){returnstr+' '+element;});}functionsplitArray(str,array){returnarray.map(function(element){varlen=str.length+1;returnelement.substring(len);});}
Will work with RequireJS, Node, as a plain script, and CommonJS in the browser when converted to:
(function(global){'use strict';varbbArray={};bbArray.concatArray=function(str,array){returnarray.map(function(element){returnstr+' '+element;});};bbArray.splitArray=function(str,array){returnarray.map(function(element){varlen=str.length+1;returnelement.substring(len);});};if(typeofmodule!='undefined'&&module.exports){module.exports=bbArray;}elseif(typeofdefine==="function"&&define.amd){define("bbArray",[],function(){returnbbArray;});}else{global.bbArray=bbArray;}}(this));
Discussion
To ensure your library works in a traditional scripting environment, you should encapsulate your functionality in an IIFE, to minimize leak between private and public functionality and data. Youâll also want to limit pollution of the global space:
(function(global){'use strict';varbbArray={};bbArray.concatArray=function(str,array){returnarray.map(function(element){returnstr+' '+element;});};bbArray.splitArray=function(str,array){returnarray.map(function(element){varlen=str.length+1;returnelement.substring(len);});};global.bbArray=bbArray;}(this));
The object is being used in an environment that may not have access to a window object, so the global object (global in Node, window in the browser) is passed as an argument to the object as this, and then defined as global in the library.
At this point, the library can work as a traditional library in a browser application:
<!DOCTYPE html><html><head><metacharset="utf-8"><title>Array test</title><scriptsrc="bbarray.js"type="text/javascript"></script><scripttype="text/javascript">vara=['one','two','three'];varb=bbArray.concatArray('number is ',a);console.log(b);varc=bbArray.splitArray('number is ',b);console.log(c);</script></head><body></body></html>
The result is two print outs to the console:
['number is one','number is two','number is three']['one','two','three']
Next, weâll add the Node support. We add this using the following lines of code:
if(typeofmodule!='undefined'&&module.exports){module.exports=bbArray;}
This code checks whether the module object is defined and if it is, whether the module.exports object exists. If the tests succeed, then the object is assigned to module.exports, no different than defining exported functionality (covered earlier in âConverting Your Library into a Node Moduleâ). It can now be accessed in a Node application like the following:
varbbArray=require('./bbarray.js');vara=['one','two','three'];varb=bbArray.concatArray('number is ',a);console.log(b);varc=bbArray.splitArray('number is ',b);console.log(c);
Now we add support for CommonJS, specifically RequireJS. From âUsing RequireJS with jQuery or Another Libraryâ, we know to check if define exists, and if so, to add support for RequireJS. After adding this modification, the library module now looks like this:
(function(global){'use strict';varbbArray={};bbArray.concatArray=function(str,array){returnarray.map(function(element){returnstr+' '+element;});};bbArray.splitArray=function(str,array){returnarray.map(function(element){varlen=str.length+1;returnelement.substring(len);});};if(typeofmodule!='undefined'&&module.exports){module.exports=bbArray;}elseif(typeofdefine==="function"&&define.amd){define("bbArray",[],function(){returnbbArray;});}else{global.bbArray=bbAarray;}}(this));
The module can now be used in a web application that incorporates RequireJS for module support. Following RequireJSâs suggestion that all inline scripts be pulled into a separate file, the JavaScript application to test the library is created in a file named main.js:
require(["./bbarray"],function(bbArray){vara=['one','two','three'];varb=bbArray.concatArray('number is ',a);console.log(b);varc=bbArray.splitArray('number is ',b);console.log(c);});
And the web page incorporates the RequireJS script, loaded via CDN:
<!DOCTYPE html><html><head><metacharset="utf-8"><title>Array test</title><scriptsrc="//cdnjs.cloudflare.com/ajax/libs/require.js/2.1.14/require.min.js"data-main="main"></script></head><body></body></html>
Modify the URL for Require.js to match whatâs available at the CDN when you run the test.
See Also
The example covered in this recipe works in all of our environments but it has one limitation: itâs not using any other libraries. So what happens when you need to include libraries?
This is where things can get ugly. We know that CommonJS/Node import dependencies with require:
varlibrary=require('somelib');
While AMD incorporates dependencies in require or define:
define(['./somelib'],function(library){// rest of the code});
Not compatible. At all. The workaround for this problem has been either to use Browserify (covered in âCompiling Node.js Modules for Use in the Browser with Browserifyâ) or to incorporate a Universal Module Definition (UMD). You can see examples of a UMD online, and itâs covered in detail in Addy Osmaniâs âWriting Modular JavaScript with AMD, CommonJS, and ES Harmonyâ.
Creating an Installable Node Module
Solution
Once youâve created your Node module and any supporting functionality (including module tests), you can package the entire directory. The key to packaging and publishing the Node module is creating a package.json file that describes the module, any dependencies, the directory structure, what to ignore, and so on.
The following is a relatively basic package.json file:
{"name":"bbArray","version":"0.1.0","description":"A description of what my module is about","main":"./lib/bbArray","author":{"name":"Shelley Powers"},"keywords":["array","utility"],"repository":{"type":"git","url":"https://github.com/accountname/bbarray.git"},"engines":{"node":">=0.10.3 <0.12"},"bugs":{"url":"https://github.com/accountname/bbarray/issues"},"licenses":[{"type":"MIT","url":"https://github.com/accountname/bbarray/raw/master/LICENSE"}],"dependencies":{"some-module":"~0.1.0"},"directories":{"doc":"./doc","man":"./man","lib":"./lib","bin":"./bin"},"scripts":{"test":"nodeunit test/test-bbarray.js"}}
Once youâve created package.json, package all the source directories and the package.json file as a gzipped tarball. Then install the package locally, or install it in npm for public access.
Discussion
The package.json file is key to packaging a Node module up for local installation or uploading to npm for management. At a minimum, it requires a name and a version. The other fields given in the solution are:
-
description: A description of what the module is and does -
main: Entry module for application -
author: Author(s) of the module -
keywords: List of keywords appropriate for module -
repository: Place where code lives, typically GitHub -
engines: Node version you know your module works with -
bugs: Where to file bugs -
licenses: License for your module -
dependencies: Any module dependencies -
directories: A hash describing directory structure for your module -
scripts: A hash of object commands that are run during module lifecycle
There are a host of other options, which are described at the npm website. You can also use a tool to help you fill in many of these fields. Typing the following at the command line runs the tool that asks questions and then generates a basic package.json file:
npminit
Once you have your source set up and your package.json file, you can test whether everything works by running the following command in the top-level directory of your module:
npminstall.-g
If you have no errors, then you can package the file as a gzipped tarball. At this point, if you want to publish the module, youâll first need to add yourself as a user in the npm registry:
npmadd-user
To publish the Node module to the npm registry, use the following in the root directory of the module, specifying a URL to the tarball, a filename for the tarball, or a path:
npmpublish./
If you have development dependencies for your module, such as using a testing framework like Mocha, one excellent shortcut to ensure these are added to your package.json file is to use the following, in the same directory as the package.json file, when youâre installing the dependent module:
npminstall-gmocha--save-dev
Not only does this install Mocha (discussed later, in âUnit Testing Your Node Modulesâ), this command also updates your package.json file with the following:
"devDependencies":{"grunt":"^0.4.5","grunt-contrib-jshint":"^0.10.0","mocha":"^1.21.4"}
You can also use this same type of option to add a module to dependencies in package.json. The following:
npminstalld3--save
adds the following to the package.json file:
"dependencies":{"d3":"^3.4.11"}
If the module is no longer needed and shouldnât be listed in package.json, remove it from the devDependencies with:
npmremovemocha--save-dev
And remove a module from dependencies with:
npmremoved3--save
If the module is the last in either dependencies or devDependencies, the property isnât removed. Itâs just set to an empty value:
"dependencies":{}
Note
npm provides a decent developer guide for creating and installing a Node module. You should consider the use of an .npmignore file for keeping stuff out of your module. And though this is beyond the scope of the book, you should also become familiar with Git and GitHub, and make use of it for your applications/modules.
Extra: The README File and Markdown Syntax
When you package your module or library for reuse and upload it to a source repository such as GitHub, youâll need to provide how-to information about installing the module/library and basic information about how to use it. For this, you need a README file.
Youâve seen files named README.md or readme.md with applications and Node modules. Theyâre text-based with some odd, unobtrusive markup that youâre not sure is useful, until you see it in a site like GitHub, where the README file provides all of the project page installation and usage information. The markup translates into HTML, making for readable Web-based help.
The content for the README is marked up with annotation known as Markdown. The popular website Daring Fireball calls Markdown easy to read and write, but âReadability, however, is emphasized above all else.â Unlike with HTML, the Markdown markup doesnât get in the way of reading the text.
Note
Daring Fireball also provides an overview of generic Markdown, but if youâre working with GitHub files, you might also want to check out GitHubâs Flavored Markdown.
In [link unavailable], I created a simple Firefox OS mobile app named âWhere Am I?â Part of its installation is a README.md file that provides information about using the app. The following is a brief excerpt from the file:
#WhereAmI?ThisisasimpledemonstrationFirefoxOSappthatusestheGeolocationAPItogettheuser'scurrentlocation,andthenloadsastaticmapintothepage.##ObtainingTheWhereAmI?appishostedontheweb,ina[Burningbirdworkdirectory](http://burningbird.net/work/whereami)##UsageImportitintotheMozillaWebIDEusingthehostedappoption,andthenruntheappinoneormoresimulators.
When I use a CLI tool like Pandoc, I can covert the README.md file into readable HTML:
pandocREADME.md-oreadme.html
Figure 3-1 displays the generated content. Itâs not fancy, but it is imminently readable.

Figure 3-1. Generated HTML from README.md text and Markdown annotation
When you install your source in a site such as GitHub (discussed in [link unavailable]), GitHub uses the README.md file to generate the cover page for the repository.
Packaging and Managing Your Client-Side Dependencies with Bower
Solution
Bower can help you manage client dependencies. To use it you must have Node, npm, and support for Git installed on your client or server.
Once your environment is set up, install Bower using npm:
npminstall-gbower
Now, to add packages to the bower-components subdirectory, install them with bower:
bowerinstalljquery
Then you can create a bower.json file by typing the following in the root directory of your library or application:
bowerinit
The application asks a set of questions and generates a bower.json file, which can be used to install the dependencies with another simple command:
bowerinstall
Discussion
Bower is a way of keeping your script and other dependencies collected and up to date. Unlike npm, it can work with a variety of file extensions, including CSS, images, as well as script. You can use it to install dependencies in bower-components, and then access the dependencies directly in your web applications:
<scriptsrc="path/to/bower_components/d3/d3.min.js"></script>
You can package all of your applicationâs dependencies in a bower.json file, and reinstall them in a fresh directory with a simple command (in the same directory as the bower.json file):
bowerinstall
To ensure youâre using the latest and greatest version of the module and library, update your dependencies:
bowerupdate
If your application is publicly available on GitHub, you can register its dependencies in Bower by, first, ensuring the bower.json file for the application is accurate, youâre using semantic versioning with your Git tags, your application is publicly available as a Git end point (such as GitHub), and the package name adheres to the bower.json specification. Once these dependencies are met, register the application:
bowerregister<package-name><git-endpoint>
If youâre wondering why you canât use something like require directly with Bower, remember that itâs a dependency management tool, just like npm. Itâs the libraries and infrastructure in place, such as RequireJS, that allows you to use modular AMD or CommonJS techniques.
Note
You can read more about using Bower at the applicationâs website.
Bower can be used with other tools, such as Grunt, demonstrated later in âRunning Tasks with Gruntâ.
Compiling Node.js Modules for Use in the Browser with Browserify
Solution
You can use Browserify to compile the Node module into browser accessible code. If itâs one of the Node core modules, many are already compiled into shims that can be used in your browser application.
For instance, if youâre interested in using the Node querystring module functionality, you create a client JavaScript bundle using the following Browserify command:
browserify-rquerystring>bundle.js
Then use the module in your browser app:
<scriptsrc="bundle.js"type="text/javascript"></script><scripttype="text/javascript">var qs = require('querystring'); var str = qs.stringify({ first: 'apple', second: 'pear', third: 'pineapple'}) ; console.log(str); //first=apple&second=pear&third=pineapple</script
Discussion
Browserify is a tool that basically moves Node functionality to the browser, as long as doing so makes sense. Of course, some functionality wonât work (think input/output) but a surprising amount of functionality, including that in Node core, can work in the browser.
Browserify is installed via npm:
npminstall-gbrowserify
It runs at the command line, as shown in the solution. In the solution, the -r flag triggers Browserify into creating a require() function to wrap the moduleâs functionality, so we can use it in a similar manner in the browser app. The querystring module is one of the many Node core modules already compiled as a shim. The others are:
-
assert -
buffer -
console -
constants -
crypto -
domain -
events -
http -
https -
os -
path -
punycode -
querystring -
stream -
string_decoder -
timers -
tty -
url -
util -
vm -
zlib
You can also compile other Node modules into browser code, including your own. As an example, letâs say I have the following three Node files:
one.js
module.exports=function(){console.log('hi from one');};
two.js
varone=require('./one');module.exports=function(val){one();console.log('hi '+val+' from two');};
index.js
vartwo=require('./two');module.exports=function(){two('world');console.log("And that's all");}
I compiled it into an appl.js file using the following:
browserify./index.js-o./appl.js
Including the library in a web page results in the same three console log() function calls as you would see if you ran the original index.js file with Node, as soon as the generated script file is loaded.
Unit Testing Your Node Modules
Solution
Add unit tests as part of your production process.
Given the following module, named bbarray, and created in a file named index.js in the module directory:
varutil=require('util');(function(global){'use strict';varbbarray={};bbarray.concatArray=function(str,array){if(!util.isArray(array)||array.length===0){return-1;}elseif(typeofstr!='string'){return-1;}else{returnarray.map(function(element){returnstr+' '+element;});}};bbarray.splitArray=function(str,array){if(!util.isArray(array)||array.length===0){return-1;}elseif(typeofstr!='string'){return-1;}else{returnarray.map(function(element){varlen=str.length+1;returnelement.substring(len);});}};if(typeofmodule!='undefined'&&module.exports){module.exports=bbarray;}elseif(typeofdefine==="function"&&define.amd){define("bbarray",[],function(){returnbbarray;});}else{global.bbarray=bbaarray;}}(this));
Using Mocha, a JavaScript testing framework, and Nodeâs built-in assert module, the following unit test (created as index.js and located in the projectâs test subdirectory) should result in the successful pass of six tests:
varassert=require('assert');varbbarray=require('../index.js');describe('bbarray',function(){describe('#concatArray()',function(){it('should return -1 when not using array',function(){assert.equal(-1,bbarray.concatArray(9,'str'));});it('should return -1 when not using string',function(){assert.equal(-1,bbarray.concatArray(9,['test','two']));});it('should return an array with proper args',function(){assert.deepEqual(['is test','is three'],bbarray.concatArray('is',['test','three']));});});describe('#splitArray()',function(){it('should return -1 when not using array',function(){assert.equal(-1,bbarray.splitArray(9,'str'));});it('should return -1 when not using string',function(){assert.equal(-1,bbarray.splitArray(9,['test','two']));});it('should return an array with proper args',function(){assert.deepEqual(['test','three'],bbarray.splitArray('is',['is test','is three']));});});});
The result of the test is shown in Figure 3-2, run using npm test.
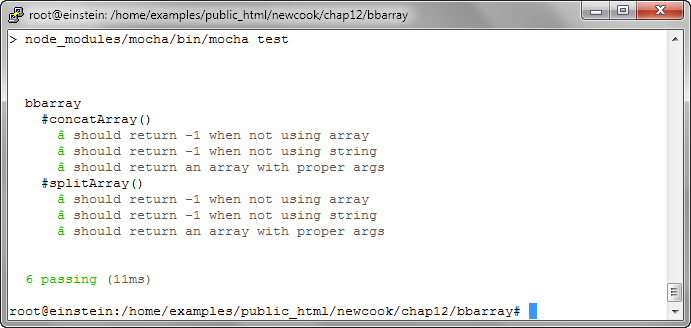
Figure 3-2. Running unit tests based on Node Assert and Mocha
Discussion
Unit testing is one of those development tasks that may seem like a pain when you first start, but can soon become second nature. I donât necessarily agree with the folks that believe we should write the unit tests (test-driven development) first, before writing the code. But developing both test and code in parallel to each other should be a goal.
A unit test is a way that developers test their code to ensure it meets the specifications. It involves testing functional behavior, and seeing what happens when you send bad argumentsâor no arguments at all. Itâs called unit testing because itâs used with individual units of code, such as testing one module in a Node application, as compared to testing the entire Node application. It becomes one part of integration testing, where all the pieces are plugged together, before going to user acceptance testing: testing to ensure that the application does what users expect it to do (and that they generally donât hate it when they use it).
In the solution, I use two different functionalities for testing: Nodeâs built-in assert module, and Mocha, a sophisticated testing framework. My module is simple, so Iâm not using some of the more complex Mocha testing mechanisms. However, I think youâll get a feel for whatâs happening.
To install Mocha, use the following:
npminstallmocha--save-dep
Iâm using the --save-dep flag, because Iâm installing Mocha into the moduleâs Node dependencies. In addition, I modify the moduleâs package.json file to add the following section:
"scripts":{"test":"node_modules/mocha/bin/mocha test"},
The test script is saved as index.js in the test subdirectory under the project. The following command runs the test:
npmtest
The Mocha unit test makes use of assertion tests from Nodeâs assert module.
Running Tasks with Grunt
Solution
Use a task runner like Grunt to manage all the bits for you.
For the following bbarray module:
varutil=require('util');(function(global){'use strict';varbbarray={};bbarray.concatArray=function(str,array){if(!util.isArray(array)||array.length===0){return-1;}elseif(typeofstr!='string'){return-1;}else{returnarray.map(function(element){returnstr+' '+element;});}};bbarray.splitArray=function(str,array){if(!util.isArray(array)||array.length===0){return-1;}elseif(typeofstr!='string'){return-1;}else{returnarray.map(function(element){varlen=str.length+1;returnelement.substring(len);});}};if(typeofmodule!='undefined'&&module.exports){module.exports=bbarray;}elseif(typeofdefine==='function'&&define.amd){define('bbarray',[],function(){returnbbarray;});}else{global.bbarray=bbaarray;}}(this));
Saved as bbarray.js in the root directory, with a Mocha test file:
varassert=require('assert');varbbarray=require('../bbarray.js');describe('bbarray',function(){describe('#concatArray()',function(){it('should return -1 when not using array',function(){assert.equal(-1,bbarray.concatArray(9,'str'));});it('should return -1 when not using string',function(){assert.equal(-1,bbarray.concatArray(9,['test','two']));});it('should return an array with proper args',function(){assert.deepEqual(['is test','is three'],bbarray.concatArray('is',['test','three']));});});describe('#splitArray()',function(){it('should return -1 when not using array',function(){assert.equal(-1,bbarray.splitArray(9,'str'));});it('should return -1 when not using string',function(){assert.equal(-1,bbarray.splitArray(9,['test','two']));});it('should return an array with proper args',function(){assert.deepEqual(['test','three'],bbarray.splitArray('is',['is test','is three']));});});});
Saved as index.js in a test subdirectory, the Grunt file is:
module.exports=function(grunt){varbanner='/*\n<%= pkg.name %> <%= pkg.version %>';banner+='- <%= pkg.description %>\n<%= pkg.repository.url %>\n';banner+='Built on <%= grunt.template.today("yyyy-mm-dd") %>\n*/\n';grunt.initConfig({pkg:grunt.file.readJSON('package.json'),jshint:{files:['gruntfile.js','src/*.js'],options:{maxlen:80,quotmark:'single'}},uglify:{options:{banner:banner,},build:{files:{'build/<%= pkg.name %>.min.js':['build/<%= pkg.name %>.js'],}}},simplemocha:{options:{globals:['assert'],timeout:3000,ignoreLeaks:false,ui:'bdd',reporter:'tap'},all:{src:['test/*.js']}}});grunt.loadNpmTasks('grunt-contrib-jshint');grunt.loadNpmTasks('grunt-contrib-uglify');grunt.loadNpmTasks('grunt-simple-mocha');grunt.registerTask('default',['jshint','simplemocha','uglify']);};
When the file is saved as gruntfile.js, Grunt runs all the tasks defined in the file:
gruntDiscussion
Grunt is a task runner. Its only purpose is to consistently run a series of tasks. Itâs similar to the old Makefile, but without the decades of musty history.
To use Grunt, install it first:
npminstall-ggrunt-cli
Grunt needs to run in the same directory as your application/moduleâs package.json file, as it works with the file. You can create either a JavaScript or Coffee-based Grunt file, but Iâm focusing on the JS version.
Create the file by using the grunt-init CLI, with a given template, or you can use the example file given in the Getting Started Guide.
A module needs to run within a certain framework to work with Grunt. Luckily, plugins have been created for many of the commonly used modules, such as the plugins used in the example for JSHint, Uglify, and Mocha. To ensure theyâre listed in the package.json file, they need to be installed using --save-dev:
npminstallgrunt-contrib-jshint--save-devnpminstallgrunt-simple-mocha--save-devnpminstallgrunt-contrib-uglify--save-dev
Each plugin also provides instructions about how to modify the Gruntfile to use the plugin and process your files.
Once you have both the package.json and gruntfile.js files running, the following will install any of the dependencies in the file, and run the Grunt tasks:
npminstallgrunt
The result of running Grunt with the file in the solution is:
Running"jshint:files"(jshint)task>>1filelintfree.Running"simplemocha:all"(simplemocha)task1..6ok1bbarrayconcatArray()shouldreturn-1whennotusingarrayok2bbarrayconcatArray()shouldreturn-1whennotusingstringok3bbarrayconcatArray()shouldreturnanarraywithproperargsok4bbarraysplitArray()shouldreturn-1whennotusingarrayok5bbarraysplitArray()shouldreturn-1whennotusingstringok6bbarraysplitArray()shouldreturnanarraywithproperargs#tests6#pass6#fail0Running"uglify:build"(uglify)task>>Destinationbuild/bbarray.min.jsnotwrittenbecausesrcfileswereempty.Done,withouterrors.
There are no files in the src directory, but I left the instructions in the Grunt file, for future expansion of the module.
See Also
Read all about Grunt, and check out the available plugins, at the applicationâs website.
Another popular build system is Gulp.
Get Modern JavaScript now with the O’Reilly learning platform.
O’Reilly members experience books, live events, courses curated by job role, and more from O’Reilly and nearly 200 top publishers.

