Once you understand how the Finder sets application icons, there’s nothing to stop you from building a fake “application” of your own. In these steps, you’ll create a new “application” and assign an icon to it. This creates a completely useless but visually stunning file that sits on your Desktop, and helps you review exactly how application icon assignments work.
Design the art that you’ll use to represent the icon for the fake application and convert it into a .icns file (Figure 4-12). For this example, name the new icon FakeApp.icns.
Create two new folders on your Desktop named Contents and Resources. Place the FakeApp.icns file in the Resources folder, and then drag the Resources folder onto the Contents folder.
Launch the Terminal, and change directories to the Contents folder on your Desktop:
$
cd Desktop/ContentsUse the echo command to create the PkgInfo file, adding the following eight characters to the file (pay attention to upper-and lowercase letters):
$
echo "APPSFooB" > PkgInfoThis command creates the PkgInfo file in the Contents folder, and assigns the characters
APPSFooBas the text in the file. These letters in the PkgInfo file tell the Finder two things. The first four characters (APPS) identify the bundle as an application. The last four characters (FooB) are the application’s unique bundle identifier (also known as the creator code).Copy the Calculator application’s Info.plist file into the Contents folder:
$
cp /Applications/Calculator.app/Contents/Info.plist ~/Desktop/ContentsOpen the Info.plist file in TextEdit:
$
open–e Info.plistThis command opens the Info.plist file in TextEdit (the
-eoption tells theopencommand to open the file in TextEdit without actually having to specify the application).Locate the two dictionary tags: <
dict> and </dict>. Remove all the lines between these tags, leaving the two tags untouched. This leaves you with the following plist skeleton:<?xml version="1.0" encoding="UTF-8"?> <!DOCTYPE plist PUBLIC "-//Apple Computer//DTD PLIST 1.0//EN" "http://www.apple.com/DTDs/PropertyList-1.0.dtd"> <plist version="1.0"> <dict> </dict> </plist>
Place the following two lines between the <
dict></dict> tags. Type carefully. Pay attention to case and spelling; you’ll probably want to indent for clarity:<key>CFBundleIconFile</key> <string>FakeApp.icns</string>
These lines specify where Finder can find the icon file for your new “application” Save the file with these changes and then quit TextEdit (TextEdit → Quit TextEdit, or ⌘-Q).
Create a new folder on the Desktop, named FakeApp:
$
cd ..$mkdir FakeAppThe first command moves you out of the Contents folder and back onto the Desktop; the second command creates the FakeApp folder.
Move the Contents folder (and the Resources folder within) into the FakeApp folder:
$
mv Contents FakeAppChange the name of the FakeApp folder to FakeApp.app:
$
mv FakeApp FakeApp.appThe Finder converts the FakeApp folder into an application bundle. When you click on the Desktop, the default folder icon changes to the new application icon, as shown in Figure 4-13.


Here are four simple things you can do with your new “application”:
- Launch it.
Since there’s no application in there, the Finder reports that your “application” is “damaged”
- Reveal it.
Control-click (right-click) on the application icon and choose Show Package Contents from the pop-up; the Finder opens the bundle to expose the material you placed within it.
- Revert it.
Use the command line to rename your bundle from FakeApp.app back to FakeApp; the bundle reverts to a normal folder:
$
mv FakeApp.app FakeApp- Change it.
Edit or replace the FakeApp.icns file to change the look of your pseudo-application. You may need to log out and back in before the icon updates.
The previous section showed how you could create a bundle and then associate an application icon with it. Now you’ll discover how to modify an Info.plist file to add custom document associations. As you’ll discover, faking out the Finder is a bit of a fiddle. Sometimes you’ll need to log out and log back in; other times you won’t.
Open the Terminal and change directories to your Desktop. Rename FakeApp.app to FakeApp; this instantly converts the bundle back to a folder:
$
cd ~/Desktop$mv FakeApp.app FakeAppIf the icon does not change back immediately to a folder, click on the Desktop.
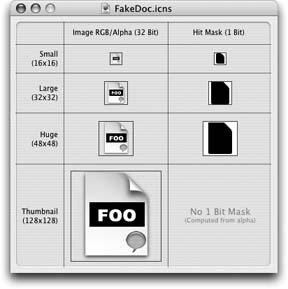
Change directories to /System/Library/CoreServices/SystemIcons.bundle/Contents/Resources. Copy GenericDocumentIcon.icns to your Desktop and extract the picture with Icon Composer. Combine the application and document art in your favorite image editor, then create a new .icns file from the result, as in Figure 4-14 on the next page. For this example, use the name FakeDoc.icns.
Place FakeDoc.icns in the application’s Resources folder. Assuming that the FakeApp folder is still on the Desktop, the full path will be ~/Desktop/FakeApp/Contents/Resources/FakeDoc.icns.
Open the Info.plist file in TextEdit:
$
open–e ~/Desktop/FakeApp/Contents/Info. plistAt this point, the Info.plist file contains only a single key,
CFBundleIconFile, and its string. This is simply not enough to trick the Finder into thinking the pseudo-application is a proper program with associated documents. To make that happen, you have to identify your package a little more carefully.Add the following three keys and strings, staying inside the <
dict> </dict> tags. The package type and signature mirror the case-sensitive four-character sequences you added to the PkgInfo file (APPLandFooB). The executable is simply a dummy; use any string, such asFoo.<key>CFBundlePackageType</key> <string>APPL</string> <key>CFBundleSignature</key> <string>FooB</string> <key>CFBundleExecutable</key> <string>Foo</string>
Info.plist files specify the extensions for files that can be opened by the application. In most real applications, this material appears toward the top of the file, just after the opening <
dict> tag and before the first bundle tag. However, where these items are placed in the XML file is not all that critical. This can be placed anywhere you’d like.This snippet defines the
CFBundleDocumentTypeskey. The bold emphasis added here shows the three values you’re defining: the extension (foo), its icon file (FooDoc.icns), and whether your pseudo-app is the default application for this type (Yes). Carefully add this snippet to the Info.plist file. Watch for typos and unbalanced tags.<key>CFBundleDocumentTypes</key> <array> <dict> <key>CFBundleTypeExtensions</key> <array> <string>foo</string> </array> <key>CFBundleTypeIconFile</key> <string>FooDoc.icns</string> <key>LSIsAppleDefaultForType</key> <string>Yes</string> </dict> </array>After making this change, save the Info.plist to disk (⌘-Q).
Rename the FakeApp folder back to FakeApp.app:
$
mv FakeApp FakeApp.appThe folder converts back to an “application”
Change directories to your Desktop and use
touchto create a file:$
cd ~/Desktop$touch MyFile.fooWhen you click on your Desktop, the new file appears.
If the new document uses the fake document icon, super. (It probably won’t.) If not, log out and log back in; this allows the Finder to rediscover your fake application and reread its Info.plist file.
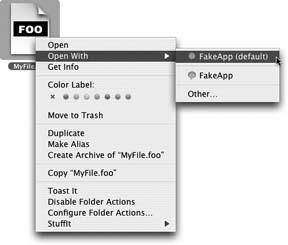
Assuming you’ve carefully followed these directions, the MyFile.foo file now displays the FakeDoc.icns icon. Control-click (right-click) the file. As Figure 4-15 shows, even the Open With pop-up should correctly identify FakeApp as your file’s default application.
Get Modding Mac OS X now with the O’Reilly learning platform.
O’Reilly members experience books, live events, courses curated by job role, and more from O’Reilly and nearly 200 top publishers.

