At some point in your life, you’ll say to yourself, “Self, I want a new screensaver” Over time, even the ever-changing default Flurry screensaver can grow dull. That’s when you’ll turn to MacUpdate (http://www.macupdate.com) on your quest for a new screensaver.
At MacUpdate, search for “saver” and you’ll find page after page of screensaver options. Find one that looks good, open its page, read about it, and (after appropriate investigation and thought) download it to your Macintosh.
Follow these steps to find, download, install, and set up a new screensaver:
Search through the “saver” results at MacUpdate. Make sure to read through the comments section for whatever screensaver you pick. Some items are free; others are shareware. I like the variety of Skyrocket Software’s offerings (http://www.skyrocketsoftware.com), many of which are listed at MacUpdate. For this example, I used their Butterflyz screensaver.
When you’ve found the ultimate screensaver, download it to your Mac.
Most screensavers will download as a disk image (a file with a .dmg extension). After the disk image downloads to your Mac, the Finder will mount the disk image and open up a new Finder window, showing you its contents. The actual screensaver file will have a .saver extension on the end.
Launch System Preferences by clicking on its icon in the Dock or by selecting
→ System Preferences.
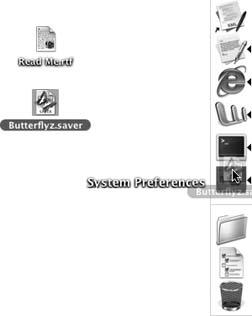
From the Finder window that appeared after the screensaver’s disk image mounted, drag the new screensaver onto the System Preferences icon in the Dock, as shown in Figure 1-10.
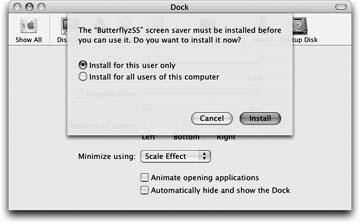
The System Preferences window moves to the front and the sheet shown in Figure 1-11 appears. This sheet slides out in front of the current preferences pane, regardless of which preferences are selected.
Use the dialog’s radio buttons to select whether to install the new screensaver for the current user (just yourself) or for all users of the computer, and then click on the Install button.
If you select “Install for this user only,” the screensaver file will be saved in ~/Library/Screen Savers. If you select “Install for all users of this computer”, the screensaver file will be saved in /Library/Screen Savers. Note the difference, and keep this info handy in case you later decide that you want to uninstall the screensaver. To uninstall a screensaver, all you need to do is open a Finder window, go to the appropriate location, select the .saver file you want to get rid of, and drag it to the Trash.
Another way to install a screensaver file (.saver) is to open another Finder window (
 -N), navigate to /Library/Screen Savers, and then drag the .saver file from the mounted disk image’s Finder window into the other window that’s set to the Screen Savers folder.
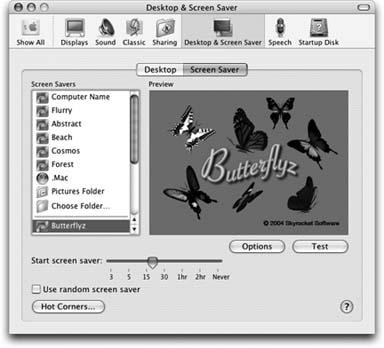
Now quit System Preferences (⌘-Q). Launch it again and go to the Desktop & Screen Saver panel, then to the Screen Saver pane. The new screensaver appears at the bottom of the list of Screen Savers on the left side of the window, just above the iPhoto folders (see Figure 1-12).
Click Options to set any options associated with your new screensaver. Click Test to test it out.
Mac OS X makes it easy to create a slideshow screensaver using images in your iPhoto library. Slideshows work just like any other screensaver, except they use your photos to create a personalized touch. Follow these steps to build your own.
In the Screen Saver preferences pane (System Preferences → Desktop & Screen Saver → Screen Saver), scroll to the bottom of the list on the left side of the window. There, you’ll find iPhoto’s Photo Library and any of the Photo Albums you’ve created to categorize your photos.
Select the Photo Album you want to use, and the slideshow begins to preview on the right side of the window.
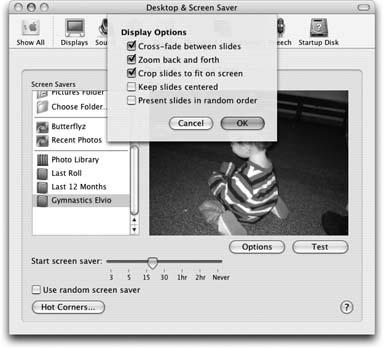
Beneath the preview, click on the Options button to open the slideshow Display Options (Figure 1-13). The options control how the screensaver displays the pictures from your Photo Album.
Items in the Display Options sheet include:
- Cross-fade between slides
When selected, this option tells the screen saver to use a dissolve to fade from one slide to another.
- Zoom back and forth
Zooming gently pans and zooms into your images, producing a “Ken Burns"-type of effect.
- Crop slides to fit on screen
As the option name suggests, this option limits overly large images.
- Keep slides centered
This option prevents panning during image zooms. The picture stays centered on the screen.
- Present slides in random order
When selected, this option does exactly what the title suggests.
Click OK to dismiss the Display Options sheet and apply them to your slideshow.
To finish, click Test to test your changes and see how the screensaver will look.
Get Modding Mac OS X now with the O’Reilly learning platform.
O’Reilly members experience books, live events, courses curated by job role, and more from O’Reilly and nearly 200 top publishers.

