This chapter will introduce some basic concepts about HTML5, and will explain the impact of the new features of the standard in mobile applications. We are going to see how different aspects of HTML5 are brought together, how they impact our markup code, and how they can be used in a mobile environment.
HTML5 was born as a reaction to the direction that the W3C was giving to the HTML 5 standards (note the difference in the names, one with a space, the other without). The HTML5 standard, proposed by the WHATWG group, primarily proposed by Opera, Mozilla, and Apple, was designed with the core principle of simplification of the whole HTML specification.
Another important element of the HTML5 specification is the strong focus in applications . Apple and others providers have foreseen, five years ago, the implications and opportunities provided by a standardized, distributed, simplified application development framework, available in every mobile device on the planet, and they have pushed forward to offer advanced app development possibilities to developers using these technologies.
Finally, another important thing to know is that HTML5 is built upon HTML 4.01, which guarantees backwards compatibility, but adds lots of additional information to the specification, such as:
Error handling
Required JavaScript APIs
Implementation details
Rendering of HTML5 engines
At the time of this writing, the HTML5 specification has the “Working Draft” status at the W3C.
For those developers used to the quirks and verbosity of HTML, HTML5 is a welcome simplification. Let’s see one by one the most important differences for markup developers.
In its most minimally useful form, an empty HTML5 document looks like this:
<!DOCTYPE html><htmllang="en"><head><metacharset="utf-8"><title>title</title><linkrel="stylesheet"href="style.css"><scriptsrc="script.js"></script></head><body><!-- page content --></body></html>
Let’s see in detail the major changes brought by HTML5.
This is the most visible change. HTML5 documents must start with
this, über-simple DOCTYPE
declaration:
<!DOCTYPE html>
It could not be any simpler.
Another welcome simplification is the new charset meta tag; this is what it used to look like:
<metahttp-equiv="Content-Type"content="text/html; charset=utf-8">
And this is the new version:
<metacharset="utf-8">
This should be proof enough that simplicity was a major requirement in the development of HTML5!
Finally, <link>
and <script> tags are stripped
of their “type” parameter, which is not required anymore: ,
<linkrel="stylesheet"href="style.css"><scriptsrc="app.js">
The new HTML5 spec clearly expects style sheets to be CSS files,
and scripts to be JavaScript; no more ambiguity here. Oh, and by the
way, you do not need to add a closing / to your standalone tags anymore; if you
want, you can, but pay attention to the fact that HTML5 is not
based in XHTML, but in HTML 4.01.
Many underused (or downright harmful) tags have been
rendered obsolete by HTML5: <frame>, <frameset>, <noframes>, <acronym>, <font>, <big>, <center>, <strike>. This also includes attributes
such as bgcolor, cellspacing, and valign. Just use CSS for them!
The specification also brings new elements to the HTML
family: have you heard about <canvas>, <audio>, <video>, <mark>, <time>, <meter>, <progress>, <section>, <header>, or <article>? Well, be prepared, as HTML5
will brings definition to the word web
semantics.
According to the biography by Walter Isaacson, when the first iPhone was released to the public in 2007, Steve Jobs was not fond of the idea of allowing third-party developers write apps for it. He was aiming for a closed platform, where only Apple would deploy its own services, and where external applications would be created using web technologies. As a matter of fact, in the 2007 edition of the WWDC[8] Apple did not introduce a native, official SDK for the iPhone, but rather proposed the idea of building applications using web technologies[9].
As explained at the beginning of this chapter, Apple was one of the “founding fathers” of the original HTML5 specification, together with Opera and the Mozilla Foundation. Many parts of this standard specifically target the use of web technologies as a means to build fully fledged applications, capable of many feats reserved so far to desktop applications:
Offline storage
Network connectivity
Multimedia
Sockets and threads
Drawing and animation
Advanced form controls
In addition, iPhone pioneered the concept of “adding a web app to the home screen” of the device, allowing users to create bookmarks to their preferred web applications, just like any other app installed in the device.
We are going to see, one by one, the many new features proposed by HTML5 in terms of application development, including sample HTML and JavaScript code for each one of them.
Both iOS and Android allow users to install special bookmarks to web apps on their home screens; this allows users to keep bookmarks to specific web applications, and to access them with a single touch.
In the case of iOS, as shown in Figure 1-1, users can install web applications directly from Safari, by tapping on the action button (in the middle of the toolbar at the bottom of the screen) and then selecting the button labeled “Add to Home Screen,” as shown in Figure 1-1.
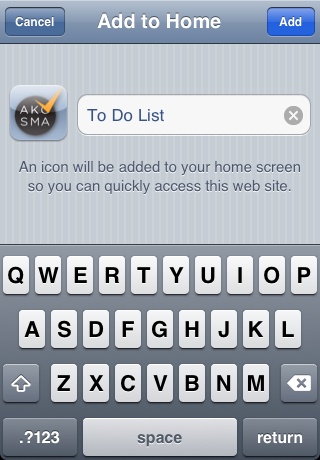
Of course, it can be challenging to show this to the user, so thankfully you can use the excellent Add to Home Screen script by Matteo Spinelli, which shows a very simple pop-up window, directly on the screen of Safari (on the iPhone, the iPod touch, or the iPad) with the required instructions to perform the operation. This pop up can be configured to appear one or many times, it can be customized to include icons or text, and is also available in many languages! An excellent tool to consider. You can see a screenshot of it in Figure 1-2.

In Android devices, adding a web application to the home screen is a bit more difficult, but not impossible:
In the browser, add a bookmark for the current page:
Tap the menu button.
Select “Bookmarks.”
Select the location marked with a star and the “Add” text.
Tap OK.
Tap the “Home” button.
On the home screen:
Tap the menu button.
Select “Add.”
Select “Shortcut.”
Select “Bookmark.”
Select the bookmark to your app.
You will have now an icon on your home screen that will take you directly to the web application.
You can use the following HTML <meta> and <link> tags in your main HTML file, to
specify several features of your application, used by iOS and some of
them also by Android, when your application is added to the home screen
of your device.
Note
You can check the complete reference of HTML5 application-related meta tags in the Supported Meta Tags page of the Apple Safari Developer Library site.
The first is the apple-mobile-web-app-capable tag; this will
allow the application, once it is installed on the home screen of your
device, to run on full screen mode, usually called the standalone mode. From your own JavaScript
code, you can then check whether the application is running in standalone mode by checking the window.navigator.standalone property:
<metaname="apple-mobile-web-app-capable"content="yes"/>
Trailing slash or not?
As you can see in the examples in this chapter, HTML5 does not impose trailing slashes at the end of tags, as XHTML would require. Remember that HTML5 is backwards-compatible with HTML 4, and that trailing slashes (or closing tags) are optional (but of course recommended).
The following tag, viewport, allows developers to disable the
typical pinching and zooming available to users of Mobile Safari:
<metaname="viewport"content="initial-scale=1.0, user-scalable=no">
The apple-touch-icon
element specifies the icon to be displayed on the home screen of the
device when the HTML5 application is used in standalone mode:
<linkrel="apple-touch-icon"href="icon.png"/>
You can also specify several different sizes and resolutions, to be used on different devices:
<linkrel="apple-touch-icon"sizes="72x72"href="touch-icon-ipad.png"/><linkrel="apple-touch-icon"sizes="114x114"href="touch-icon-iphone4.png"/>
Note
The files referenced in the apple-touch-icon tag must have the sizes
explained in the Technical
Q&A QA1686 by Apple, which specifies all the possible icon
sizes for iOS application, including those required in devices with
Retina displays, such as the iPhone 4, the iPhone 4S, or the new iPad
released in 2012. If no size is specified, then the file must be 57
pixels in width and height.
For the complete reference of file names for web app icons, check the Configuring web applications section in the iOS Developer Library from Apple.
By default, the icon specified for the standalone application will feature a glare effect, applied automatically by iOS; if you do not want to have that effect, because your designer has already applied some visual pizazz to your icon, you can do two different things:
You can name your file apple-touch-icon-precomposed.png.
You can use the
rel="apple-touch-icon-precomposed"attribute in yourlinktag, as shown in the following code snippet:
<linkrel="apple-touch-icon-precomposed"href="icon.png"/>
Another useful tag allows developers to change the look and feel
of the status bar, shown on top of every iPhone application; this status
bar can be changed only when your HTML file already contains the
apple-mobile-web-app-capable tag, and
when it is running on standalone
mode:
<metaname="apple-mobile-web-app-status-bar-style"content="black">
The final element, apple-touch-startup-image specifies a file
that is shown by iOS when the web application is starting. This is a
visual trick that creates the illusion of the application starting up
faster than it really does.
Note
The file referenced by the apple-touch-startup-image tag must have
exactly 320 x 460 pixels. If the file has a different size, it will
not be shown by the system.
<linkrel="apple-touch-startup-image"href="Default.png"/>
In their most simple nature, mobile web applications require a network connection to offer their services. The world, however, is far from an ideal place, and we all know that network connections are shaky at best. Tunnels, big buildings, airplanes, elevators, trains, and the countryside are all typical environments where our smartphones are cut off from the network. We need, however, to be able to use our applications in those situations as well, and this is why working offline is one of the most important requirements for mobile apps.
The ability of a web application to work offline is a big feature of HTML5. HTML5 uses the newly introduced cache manifest feature[10] to list the resources to fetch while connected to server and maintain while to be used while offline.
HTML5 cache manifests are simple text files, specifying the list of files that have to be kept in the browser after they have been requested. They can also contain references to files or URLs that cannot be kept offline (for technical or legal reasons), and the mobile browser uses this information to speed up the rendering of the application.
Let’s take a look at a simple cache manifest, taken from an application written by the author of this book:
CACHE MANIFEST
# version 7
CACHE:
index.html
icon.png
app.js
style.css
/_libs/sencha/sencha-touch.js
/_libs/sencha/resources/css/sencha-touch.css
NETWORK:
http://maps.gstatic.com/
http://maps.google.com/
http://maps.googleapis.com/
http://mt0.googleapis.com/
http://mt1.googleapis.com/
http://mt2.googleapis.com/
http://mt3.googleapis.com/
http://khm0.googleapis.com/
http://khm1.googleapis.com/
http://cbk0.googleapis.com/
http://cbk1.googleapis.com/
http://www.google-analytics.com/
http://gg.google.com/
http://google-maps-utility-library-v3.googlecode.com/
FALLBACK:
offline.html
The application cache is simply a text file (encoded in UTF-8) that consists of major sections:
- A
CACHEsection This part specifies the relative and/or absolute URLs of the resources that the device should keep offline.
- A
NETWORKsection This part of the application cache lists the URLs of the resources that cannot (or must not) be kept offline. For example, in this case (a real cache manifest from an application written by the author) we are specifying all the URLs of the Google Maps API, which, according to Google’s Terms of Service, cannot be cached offline.
- A
FALLBACKsection This section provides a URL that will be served whenever a resource specified in the
NETWORKsection is required when the application is offline.
Once your application cache manifest file is defined, you can use it in your HTML files as follows:
<!DOCTYPE html> <html lang="en" manifest="app.manifest"> <!----> <head> <meta charset="utf-8"> <title>title</title> <link rel="stylesheet" href="style.css"> <script src="script.js"></script> </head> <body> <!-- page content --> </body> </html>
-
Here we are specifying the application cache manifest file that belongs to this HTML file.
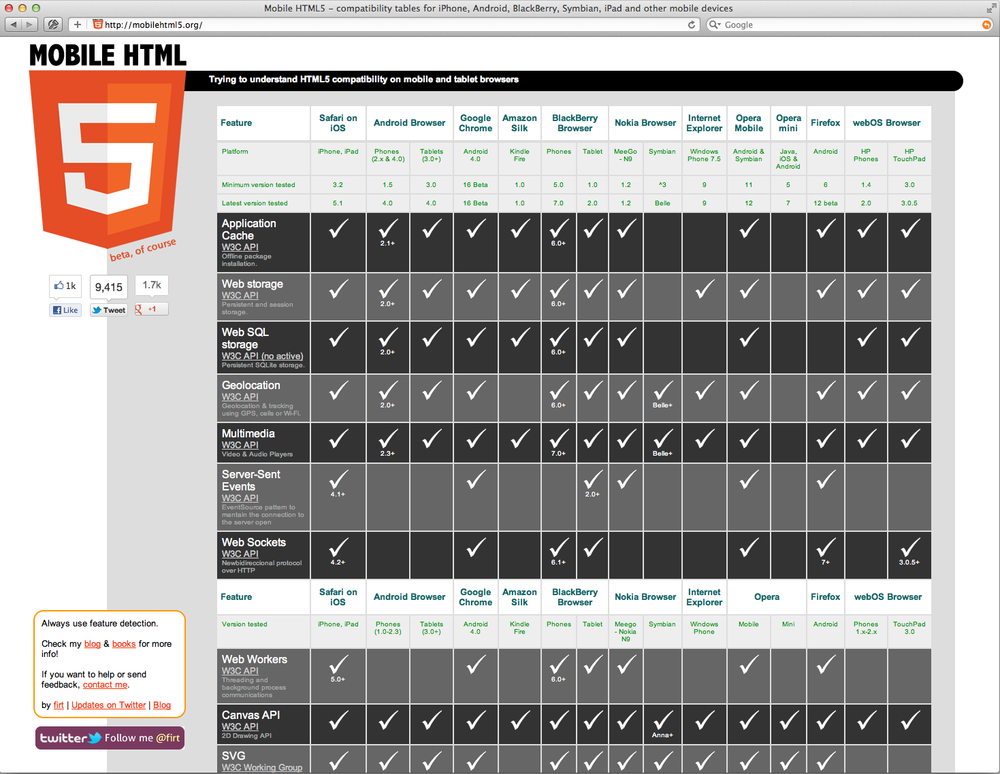
According to Maximiliano Firtman’s Mobile HTML5 site, shown in Figure 1-3, the HTML5 application cache is supported by most major mobile platforms today.
Cache manifests are very flexible, but they have one
important restrictions; to be recognized as such, they
must be served with the text/cache-manifest MIME type. In the following
sections, you’ll learn how to configure some popular web server platforms
and technologies, in order to serve HTML5 Application Cache manifests
properly.
Note
The HTML5 Application Cache is a very interesting technology, but it also has several quirks and gotchas that are not always easy to spot or to debug. Please read the article “Application Cache is a Douchebag” in A List Apart, which provides excellent details about all the potential problems, and how to solve them.
For example, in Apache, you can use the following line in
your local .htaccess file to force all files ending
with the .manifest extension to be served with this
MIME type:
AddType text/cache-manifest .manifest
A very simple technique to return HTML5 application cache manifests is to create a short PHP file (in this case, named manifest.php) with the following contents:
<?phpheader("Content-Type: text/cache-manifest");?>CACHE MANIFEST# version 7CACHE:index.htmlicon.pngapp.js...
As you can see, using the header function we can set the proper MIME
type. To use this manifest, just place this attribute in your HTML
file:
<htmlmanifest=”manifest.php”>
However, be aware that some older versions of iOS actually expect
the HTML5 manifest to have the .manifest extension to work, even if the file
is returned with the proper MIME type. As usual, testing is
required!
To deliver HTML5 manifest files from servers running Windows 7, Windows Server 2008, Windows Server 2008 R2, or Windows Vista with IIS, you can define new MIME types in your server following these steps:
Open the IIS manager.
In the “Features” view, select “MIME types.”
In the “Actions” panel, select “Add.”
The “Add MIME Type” dialog box appears; type the
.manifestfile extension; in the corresponding text field.Enter the following MIME type in the other text box: “text/cache-manifest.”
Click OK.
Restart IIS and you are done.
For more information, including command-line actions for doing this, check out the Microsoft Technet site.
If you do not want (or cannot) modify the configuration of
your web server, you can define custom MIME types directly in .config files. For that, you can create a
Web.config file with the following
contents[11]:
<?xml version="1.0"?><configuration><system.webServer><staticContent><removefileExtension=".manifest"/><mimeMapfileExtension=".manifest"mimeType="text/cache-manifest"/></staticContent></system.webServer></configuration>
Another option, explained by Stephen
Walther in his blog, consists in a custom handler (named
Manifest.ashx in this example) that
sets the proper MIME type and outputs the contents of a text
file:
usingSystem.Web;namespaceJavaScriptReference{publicclassManifest:IHttpHandler{publicvoidProcessRequest(HttpContextcontext){context.Response.ContentType="text/cache-manifest";context.Response.WriteFile(context.Server.MapPath("Manifest.txt"));}publicboolIsReusable{get{returnfalse;}}}}
Then, from your HTML5 file, you need to reference the URL of the handler configured in your ASP.NET application:
<htmlmanifest=”Manifest.ashx”>
This option is a bit more complex, but it might prove useful as a way to automatically create manifest files, reading the contents of folders and such.
As cool as HTML5 application manifests are, they are quite tricky to troubleshoot and debug; there are, however, a couple of tricks that are useful and that every mobile web developer should keep in mind while working with them:
Some versions of iOS 4 not only expect your manifest files to have the
text/cache-manifestMIME type, they also expect the file to have the.manifestextension; if your application is not caching data properly in older versions of iOS, remember to rename your manifest file accordingly.To force a refresh of the local cache, you have to update the manifest file; however, this happens only when the actual contents of the file have changed (that is, you cannot just
touchthe file to trigger the change). The easiest way is then to add aversionline (seen in the example at the beginning of this section) which can be augmented whenever required, even if the actual contents of the file are not changed.In iOS 5, it is very easy to remove all files from the offline application cache; just open the Settings application on your device, select the Safari settings, scroll to the bottom, and select the “Advanced” entry; in that section you will see a “Website Data” entry, where you can see the amount of data stored by each website you visited on your device. Clicking the “Edit” button helps you remove individual entries; you can also remove all website data just by using the “Clear Cookies and Data” button in the main Safari settings.
Given the tremendous array of HTML5 technologies in place, a valid
question would be, “How can I be sure that feature xyz is available in
this particular combination of operating system and browser?” To answer
this question, you could take the long road and check a site such as
Mobile HTML5 by Maximiliano
Firtman, and start writing lots of spaghetti-like if & else
statements all over the place.
Please, do not do this[12]. The recommended technique for any kind of HTML5 application these days is feature detection. In this approach, you do not care about the specifics of a particular operating system or browser version; just ask the browser (whichever it is) for a particular feature, and you are done.
Even better, there is a library that does this for you: Modernizr provides a
cross-platform library that exposes a simple, useful Modernizr global variable, where you can ask for
a number of features in your JavaScript code:
if(Modernizr.geolocation){// this browser supports geolocation}if(Modernizr.touch){// this is a touchscreen-enabled browser}else{// no touchscreen, so you should use the common mouse interactions}
The number of properties exposed by the Modernizr object is outstanding: fontface, opacity, cssanimations, applicationcache, localstorage, webgl… and the list goes on. Check the Modernizr documentation for
more information about all the possibilities offered by this
library.
Even better, when you use Modernizr in older browsers without HTML5 features (think IE6), it will load what it calls “polyfills,” that is, small bits of JavaScript which will provide the same interface as their HTML5 counterparts! This way you can create just one application, using as many HTML5 features as required, and your code will work gracefully in older or newer versions of your favorite browser.
Modernizr supports IE6+, Firefox 3.5+, Opera 9.6+, Safari 2+, Google Chrome mobile, Mobile Safari on iOS, Android’s browser, Opera Mobile, Firefox Mobile, and (still under development at the time of this writing) Blackberry 6+. You can create a production-ready Modernizr script, only with the features that you need, from the Modernizr download page.
We are going to use Modernizr in the following sections of this chapter, to test for the existence of the features we are going to talk about.
One of the new possibilities offered by HTML5 is being able to access the geolocation data from within a web application. There is a very simple JavaScript API that allows you to do this:
functionsuccess(position){// Did we get the position correctly?console.log(position.coords.latitude);}functionerror(error){switch(error.code){caseerror.TIMEOUT:console.log('Timeout');break;caseerror.POSITION_UNAVAILABLE:console.log('Position unavailable');break;caseerror.PERMISSION_DENIED:console.log('Permission denied');break;caseerror.UNKNOWN_ERROR:console.log('Unknown error');break;}}if(Modernizr.geolocation){navigator.geolocation.getCurrentPosition(success,error);}
For privacy reasons, the browser will ask the user permission to use this information. Coupled with the Google Maps API, you can create compelling geolocation-enabled application directly from your browser.
Another cool element of the HTML5 umbrella is the device orientation API. This API allows you to detect the position of the orientation of the device in space, and to redraw your user interface accordingly:
functionhandleOrientation(eventData){// alpha is the compass direction the device is facing in degreesvaralpha=eventData.alpha;// gamma is the left-to-right tilt in degrees, where right is positivevargamma=eventData.gamma;// beta is the front-to-back tilt in degrees, where front is positivevarbeta=eventData.beta;vardata=[alpha,beta,gamma];console.log('Orientation changed: '+data.join(', '));}if(Modernizr.deviceorientation){window.addEventListener('deviceorientation',handleOrientation,false);}
The device orientation event returns only the rotation data, which includes how much the device is leaning side-to-side (beta), front-to-back (gamma), and if the phone or laptop has a compass, the direction the device is facing (alpha).
Similar to the orientation API, the device motion API of HTML5 returns information about the acceleration of the current device. Acceleration data is returned as a coordinate frame with three axes, x, y, and z. The x-axis runs side-to-side across the mobile phone screen and is positive towards the right side. The y-axis runs front-to-back across the mobile phone screen and is positive towards as it moves away from you. The z-axis comes straight up out of the mobile phone screen and is positive as it moves up.
The device motion event is a superset of the device orientation
event. It returns data about the rotation information and also
acceleration information about the device. The acceleration data is
returned in three axes: x, y, and z. They are measured in meters per
second squared (m/s^2). Because some devices might not have the hardware
to exclude the effect of gravity, the event returns two properties,
accelerationIncludingGravity and
acceleration, which excludes the effects of gravity
(when this is the case, the acceleration data will be null):
functionhandleDeviceMotion(eventData){// Grab the acceleration including gravity from the resultsvaracc=eventData.accelerationIncludingGravity;varaccData=[Math.round(acc.x),Math.round(acc.y),Math.round(acc.z)];// Display the raw acceleration datavarrawAcc="["+accData.join(", ")+"]";// Z is the acceleration in the Z axis, and tells us if the device is facing up, or downvarfacingUp=-1;if(acc.z>0){facingUp=+1;}// Convert the value from acceleration to degress// acc.x|y is the acceleration according to gravity, we'll assume we're on Earth and divide// by 9.81 (earth gravity) to get a percentage value, and then multiply that by 90 to convert to degrees.vartiltLR=Math.round(((acc.x)/9.81)*-90);vartiltFB=Math.round(((acc.y+9.81)/9.81)*90*facingUp);vartilt=[tiltLR,tiltFB];console.log('Acceleration: '+rawAcc);console.log('Facing up? '+facingUp);console.log('Tilt: '+tilt.join(', '));}if(Modernizr.devicemotion){window.addEventListener('devicemotion',handleDeviceMotion,false);}
Mobile web applications storing their resources offline might need to know whether the device is online or not, for example to update their information, ping a remote server or provide some supplementary service. To do that, HTML5 introduces a small yet very useful API: the network connectivity API.
functiondeviceOnline(e){console.log('device is online');}functiondeviceOffline(e){console.log('device is offline');}if(Modernizr.applicationcache){window.addEventListener("online",deviceOnline,false);window.addEventListener("offline",deviceOffline,false);}
The new online and offline events are triggered whenever the
connectivity status of the current device changes, allowing the developer
to perform some operation in that moment.
The network connectivity API also provides an imperative way to ask the current device whether the device is connected or not:
if(Modernizr.applicationcache){if(navigator.onLine){console.log('This device is online');}else{console.log('This device is offline');}}
Pay attention to the fact that the event is spelled online while the property on the navigator
object is spelled onLine… this is a
common source of errors.
Network connectivity = Internet access
You must be aware that this API is not reliable; your device might be connected to a network, yet not have a proper Internet access. For example, routers could be down, you could have a self-assigned IP address, and many other situations could provide a “false positive” in the API calls above. In those cases, you should always provide error callbacks to your XMLHttpRequest calls, so that you are able to fail gracefully in some situations.
This API is a perfect companion for the HTML5 Application Manifest; taking your application offline and being able to tell (with certain accuracy) whether you are online or not, can help you create more sophisticated applications covering different and complex use cases.
The new <canvas> object is,
together with CSS3 animations, one of the few HTML5 features that are
available in nearly all modern browsers at the time of this
writing[13].
The Canvas API allows developers to perform 2D drawing on a section
of the web page; this section, conveniently called the canvas, is
implemented through the new <canvas> object, originally introduced in
the WebKit project by Apple.
To use the Canvas API you have to first define a <canvas> element in your HTML file:
<canvasid="canvasObject"width="320"height="480">Any text displayed here will be used as fallback, in case the current browser does not support the canvas object.</canvas>
Once this is in place, the rest happens in JavaScript code:
if (Modernizr.canvas) {
var canvasObject = document.getElementById('canvasObject');
if (canvasObject) {
var context = canvasObject.getContext('2d');  if (context) {
context.fillRect(0, 0, 150, 100);
if (context) {
context.fillRect(0, 0, 150, 100);  // This sample comes from
// http://dev.opera.com/articles/view/html-5-canvas-the-basics/
context.fillStyle = '#00f'; // blue
context.strokeStyle = '#f00'; // red
context.lineWidth = 4;
// Draw some rectangles.
context.fillRect (0, 0, 150, 50);
context.strokeRect(0, 60, 150, 50);
// Draw an image
var image = new Image();
image.src = "http://someserver.com/somepath/file.gif"
image.onload = function () {
// Loading an image can take a while; hence the callback on the onload
// event... which is executed asynchronously.
context.drawImage(image, 10, 40);
}
}
}
}
// This sample comes from
// http://dev.opera.com/articles/view/html-5-canvas-the-basics/
context.fillStyle = '#00f'; // blue
context.strokeStyle = '#f00'; // red
context.lineWidth = 4;
// Draw some rectangles.
context.fillRect (0, 0, 150, 50);
context.strokeRect(0, 60, 150, 50);
// Draw an image
var image = new Image();
image.src = "http://someserver.com/somepath/file.gif"
image.onload = function () {
// Loading an image can take a while; hence the callback on the onload
// event... which is executed asynchronously.
context.drawImage(image, 10, 40);
}
}
}
}-
Here we retrieve a pointer to the
<canvas>element in our HTML file, defined in the previous snippet.-
Here we get a reference to the 2D drawing context of the
<canvas>element; there are apparently plans to provide a 3D context one day, but there are no standard or complete implementations available yet.-
… and from here on we actually draw something!
The most important thing to know about the Canvas drawing API is that it is a stateful API, whose design is based on a real painter canvas, where every paint stroke goes on top of the previous one. The Canvas API provides functions that allows developers to draw the following primitives:
Rectangles
Ellipses (and circles, of course)
Arbitrary lines and paths, with any stroke width and color
Arbitrary images, loaded from any URL
Text
Gradients
Finally, the <canvas>
object also exposes a .toDataURL
method, which takes a MIME type as parameter, allowing the end user to
export any drawing to another format:
if(Modernizr.datauri){varurl=canvas.toDataURL("image/png");window.open(url);}
The code above works in some mobile browsers that understand special
URLs starting with the data:image/gif;base64,R0lGODlhyAD3APcAAAA...
text, which allows images to be inlined using their base64 representation.
This works in most recent smartphone browsers, like Safari on iOS and the
Android browser, and thankfully Modernizr provides a datauri test that allows us to wrap the code
properly, and eventually to provide a fallback solution.
A Tool for Generating Canvas Drawings
There is a very interesting tool for the Mac, that can be used to
draw complex illustrations, and to export them as <canvas> code: Opacity. This commercial
tool allows to export any drawing (within limitation) as JavaScript code
targeting the <canvas> object,
so you and your design team might want to check it out.
In October 2007 the WebKit browser engine included for the first time the capability to animate effects using CSS properties. These properties were lated introduced in the CSS3 standard, which is commonly considered part of the overall HTML5 technology umbrella.
Why are animations and transitions a part of CSS and not, say, JavaScript functions or objects [14]? It turns out that considering them as presentational rather than behavioral parts of a web page has several advantages:
It allows to separate animation and transitions from other JavaScript behaviors, which basically simplifies the development of applications.
CSS animations and transitions can be hardware-accelerated, by executing them in the GPU rather than in the CPU of your device; this is even more important in relatively low powered mobile devices.
Familiar to Core Animation and Flash developers
The specification of CSS3 animations and transitions will appear very familiar to iOS and Adobe Flash developers; concepts like timing functions, keyframes, animatable properties and other keywords will resonate in those developers having experience with iOS and OS X Core Animation framework, as well as in those who have been exposed to Flash movies and animations.
You can think of transitions as simple animations, that occur when certain values of some CSS property is changed.
The simplest possible transition can be achieved with the following CSS code:
li.animatedHover{-webkit-transition-property:background-color,color;-webkit-transition-duration:500ms;-moz-transition-property:background-color,color;-moz-transition-duration:500ms;-o-transition-property:background-color,color;-o-transition-duration:500ms;-ms-transition-property:background-color,color;-ms-transition-duration:500ms;transition-property:background-color,color;transition-duration:500ms;background-color:green;color:white;}li.animatedHover:hover{background-color:yellow;color:black;}
Note
As you can see, unfortunately we have to specify the individual
prefixes for all browser vendors (like -webkit, -moz, etc) to make sure that these
transitions are enabled in most browsers. You might want to use a
language like SASS or
LESS to remove duplication
and to streamline the generation of your CSS stylesheets.
The above CSS styles can be used in any <li> element that has the animatedHover class:
<ol><liclass="animatedHover">First</li><liclass="animatedHover">Second</li><liclass="animatedHover">Third</li><liclass="animatedHover">Fourth</li><liclass="animatedHover">Fifth</li></ol>
If you move your mouse over any of these elements, you are going to see that the transition between green and yellow is animated; the following CSS properties are used:
transition-propertyinstruction in the CSS file specifies which properties to animate. You can use theallkeyword to indicate that all properties should be considered for an animation, but this should be used with care.transition-durationspecifies the duration of the operation [15]transition-delaycan be used to introduce a certain time (specified inmsors) before the transition is triggered.transition-timing-functionspecifies the acceleration pattern of the animation:ease, which is the default value.linear, which specifies no acceleration at all.ease-in, which specifies acceleration only when the animation starts.ease-out, which specifies acceleration only when the animation stops.ease-in-out, which specifies acceleration at the beginning and a deceleration at the end of the animation.
Animations are very similar to transitions, but they introduce some complexity of their own. To begin with, they also allow developers to define transitions between values of specific CSS properties; you can use all the properties that you commonly use for transitions.
However, they also provide the capacity of specifying keyframes, which should be familiar to developers having experience with Adobe Flash. Animations can also be repeated a certain number of times, and they can also be played backwards.
Let’s implement a simple animation; let’s consider a square, red
<div
      id="animatedBlock"></div>
element in our page, with a
bit of CSS to animate it around the page.
#animatedBlock{height:100px;width:100px;display:block;position:absolute;top:200px;left:200px;background-color:red;}
(This is not a book about design, which means that I can draw extremely ugly boxes to demonstrate concepts!) Now let’s define an animation to our block:
#animatedBlock {
    height: 100px;
    width: 100px;
    display: block;
    position: absolute;
    top: 200px;
    left: 200px;
    background-color: red;

    -webkit-animation-delay: 300ms;
    -webkit-animation-name: pulsating-animation;
    -webkit-animation-duration: 10s;
    -webkit-animation-iteration-count: infinite;
    -webkit-animation-timing-function: ease-in;
    -webkit-animation-direction: normal;
    -webkit-animation-play-state: running;
    -webkit-animation-direction: alternate;
}

@-webkit-keyframes pulsating-animation
{
    0% {
        height: 100px;
        width: 100px;
    }

    100%
    {
        height: 300px;
        width: 300px;
    }
}
}
@-webkit-keyframes pulsating-animation
{
0% {
height: 100px;
width: 100px;
}
100%
{
height: 300px;
width: 300px;
}
}-
Very important: Do not quote this value! The animation name is used as is, and of course you can specify any kind of name.
-
The
infinitevalue specifies that the animation will never stop (at least, not until theanimation-play-stateproperty is set topaused).-
The
animation-play-stateproperty can also be set topausedto stop the animation. This can be done using JavaScript code as well.-
If
animation-directionis set tonormalthen the animation jumps back to the default position at start without animation. Thealternatekeyword makes the animation return to the default state with an animation played backwards.
The example above will make the <div> element grow in size, back and
forth, from 100 pixels to 300 pixels in 10 seconds. This will be
repeated forever, with a timing function that accelerates the movement
when the animation starts, and where the same animation is played
backwards before repeating itself.
The @-webkit-keyframes section
defines, for the animation named pulsating-animation, the different values of
the animatable properties taken into account in this sequence; the
browser takes this information to interpolate the intermediate values to
provide the final animation on the page.
Before you start using CSS3 transitions and animations in your sites and applications, you might want to remember the following facts:
It is important to know which properties can be animated: the official W3C page for CSS Transitions provides an extensive list of properties that are “animatable”; for example, beyond the
background-colorandcolorproperties we have just seen, the following properties are also animatable:border-colorfont-size,height,opacity,text-shadow,z-index,left,top,right,bottom,margin, andpadding(including all of their flavors).Beware of usability, accessibility and health issues related with animations on a computer screen; the fact that you are able to animate elements does not mean that you should do it.
Nearly all modern mobile browsers support CSS3 transitions and animations; Internet Explorer 10 (at least in its developer previews), Firefox since version 5, Safari since 4, Chrome since 9, Opera since 10.6 [16], iOS since 3.2 and Android since 2.1.
One of the most exciting new features about HTML5 is the set of new specifications that enables client-side storage options for HTML5 web applications. Web Storage is a very simple API, composed of two different global objects that can store and retrieve strings:
localStorage is persisted even if the user closes the browser
sessionStorage is not persisted, and is removed when the user closes the browser window
These two objects act as global dictionaries, that can be populated and queried using any key (which must be a string, too):
if(Modernizr.localstorage){// Just append key values to this dictionary!// It's that easy. However only strings are supported!localStorage.someData="some data here";// You can also use the common 'dictionary' syntaxlocalStorage['some complex key']='some complex data there';}if(Modernizr.sessionstorage){// This data will only persist while the current// browser window is open!sessionStorage.someData="some data here";// Similarly, you can also use the 'dictionary' syntax:sessionStorage['just keep this for now']=true;}
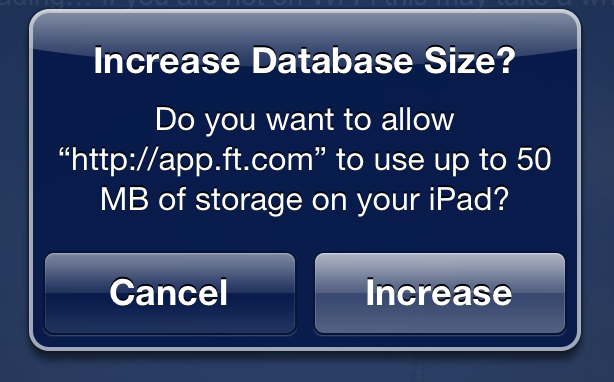
HTML5 web applications are able to store up to 5 MB of data in the local browser, which is usually more than enough for mobile applications. In some particular cases, though, applications might require users to store more than 5 MB. For those cases, iOS provides developers with a bonus feature. Your application can continue storing data until it reaches the limit of 5 MB, and when it goes beyond that limit, Safari will ask the user for extending the maximum. You can see this mechanism in action when opening the Financial Times Web Application on an iPad, as shown in Figure 1-4.
Note
In the case of SQL Storage (described in the following section), the maximum limit can be set to 50 MB, as described in this StackOverflow question.
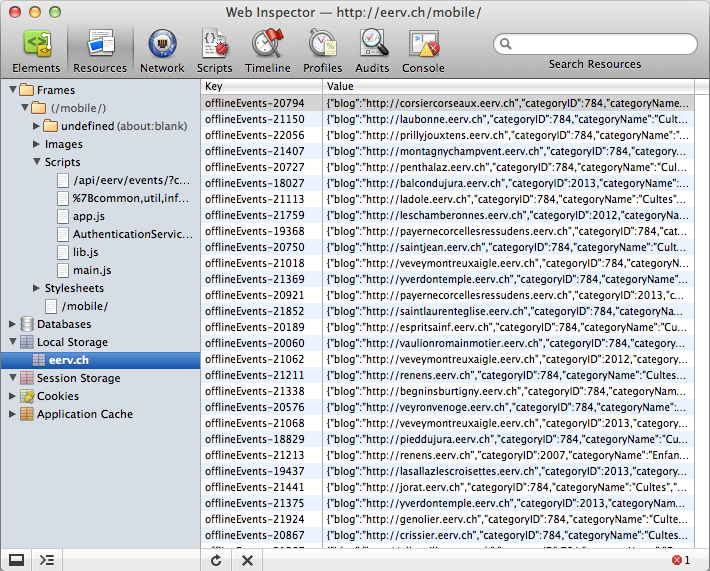
Developers can use the web inspector included in WebKit-based
browsers, such as Safari and Chrome, to inspect and modify the contents of
the localStorage and sessionStorage objects, as shown in Figure 1-5.
Once part of the original HTML5 specification, the Web SQL
Database is a very impressive piece of technology, allowing you to
create, update, and edit items stored in a local SQL database on the
browser. Similar to localStorage
items, web SQL databases allow you to persist structured data in your
browser, allowing developers to use the full power of the SQLite database engine embedded in most
mobile browsers these days.
The code below shows a snippet of code, required to create a new database, and to execute a transactional SQL statement. The API is asynchronous, and requires the developer to specify a callback function to be executed once the SQL operations are completed:
this.db=openDatabase('geomood','1.0','Geo-Mood Checkins',8192);this.db.transaction(function(tx){tx.executeSql("create table if not exists "+"checkins(id integer primary key asc, time integer, latitude float,"+"longitude float, mood string)",[],function(){console.log("done");});});
Even if many modern mobile browsers support this feature, unfortunately the W3C Web Application Working Group no longer maintains it, and some consider this API as deprecated. The proposed replacement is the IndexedDB API which is (at the time of this writing) only supported by Google Chrome for Android and Firefox. In any case, a good rule of thumb is to ignore this otherwise excellent idea.
Probably the most hyped feature of HTML5 are the new media elements <canvas>, <video>, and <audio>. They have been tailored to bring
native media functionality to the browser without the need for a
plug-in (which usually was Adobe Flash).
Not all is perfect, though, as different browser vendors still do
not support the same media formats, and care must be taken to ensure that
all HTML5-compliant browsers can play the same audio and video. This
usually can be done by nesting different formats in the same <audio> tag:
<audio><sourcesrc="audio.ogg"><sourcesrc="audio.mp3"></audio>
To solve these incompatibilities in the case of video, solutions such as SublimeVideo, created by the Swiss company Jilion, allow web developers to use a cross-browser HTML5 player in their applications.
HTML5 is a breakthrough specification in terms of simplicity, extensibility, and focus on applications. It is strongly suggested to start using HTML5 documents in all your applications, and do not forget to validate them using the excellent HTML5 Validator by Henri Sivonen!
[8] Apple’s yearly Worldwide Developers Conference, held in San Francisco.
[9] The native SDK would be announced later in October that year, to be finally released in March 2008.
[12] I mean, of course check Maximiliano’s site, but do not write spaghetti code!
[13] Source: Mobile HTML5 by Maximiliano Firtman
[14] Actually, the whole “Animations are presentation or behavior” debate was fueled by long discussions about the relative merits of both approaches to the same problem; for example, Jonathan Snook first expressed concern and disagreement about considering animations and transitions as presentation and later changed his mind.
[15] In this case, in milliseconds, but you can also specify
s to specify a time in
seconds; this is part of the CSS3 standard.
[16] At the time of this writing, Opera supports only transitions, not animations, but apparently they will be supported in version 12, currently in beta.
Get Mobile JavaScript Application Development now with the O’Reilly learning platform.
O’Reilly members experience books, live events, courses curated by job role, and more from O’Reilly and nearly 200 top publishers.

