II.1.2. Connecting to a Database Server
Before you can interact with the information kept in a database, you first need to connect to the instance of a database server that holds that data. Here are the simple steps you need to follow:
Launch the SQL Server Management Studio.
Fill in the details on the Connect to Server dialog box.
This dialog box appears automatically whenever you launch the SQL Server Management Studio. If you don't see it or have closed it by mistake, just click the Connect button at the top of the screen, and it will reappear.
Choose the Database Engine option.
This opens the Connect to Server dialog box, as shown in Figure 1-2. Here's where you choose the specific database instance you want.
Figure II.1-2. Connecting to a server from the SQL Server Management Studio.
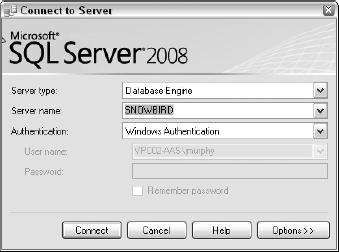
Choose a server from the Server Name drop down menu.
Select an authentication method.
Your choices here are:
Windows Authentication: In this case, SQL Server inherits your login information from when you logged in to the Windows operating system.
SQL Server Authentication: Choose this method when you have a separate login for the database itself, in addition to the username and password that you provide when signing in to the computer.
(Optional) Click the Options button and fill in any other connection properties if you like.
In most cases, the default connection options should suffice. However, here's ...
Get Microsoft® SQL Server™ 2008 All-In-One Desk Reference For Dummies® now with the O’Reilly learning platform.
O’Reilly members experience books, live events, courses curated by job role, and more from O’Reilly and nearly 200 top publishers.

