MediaWiki articles are written not in plain text, but with
wikitext, a special language for typesetting we
saw briefly in Editing Primer. Table 4-1
gives a quick preview of wikitext’s special symbols that change the
appearance of the text. For example, a bold word is surrounded by three
single quotes '''like this''', and an
internal link is surrounded by double square brackets [[like this]]. Wikitext is a type of
markup language, which simply means that you
“mark up” ordinary text with these symbols. (HTML, the language of web
pages, is another example of a markup language.)
In this chapter, we’ll cover:
- The edit page
The appearance and mechanics of the MediaWiki edit page, a web-based tool for writing wikitext.
- Creating and editing articles
Starting new articles and modifying existing ones.
- Formatting articles with wikitext
Paragraphs, headings, typestyles, images, lists, tables, and mathematics (links are covered more fully in Chapter 5).
- Suppressing wikitext
Using the
<nowiki>tag to display special symbols literally, “escaping” them so they’re not treated as typesetting commands.- Edit conflicts
When two people try to change an article simultaneously.
To modify an article, click one of its Edit links:
Any Edit link takes you to MediaWiki’s edit page, shown in Figure 4-1, with the article’s wikitext loaded and ready to be modified.
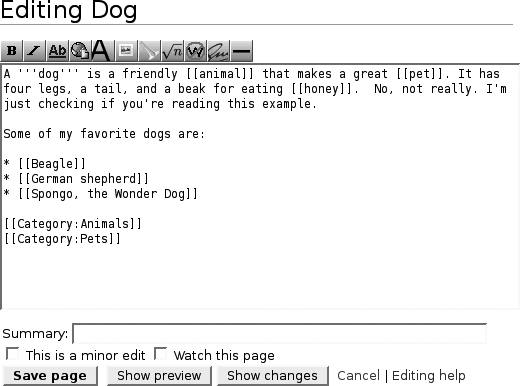
On the edit page, the edit box is an ordinary text area for adding, removing, and modifying wikitext. It is a standard text area as found on many other websites.
Tip
A few editing tips:
The toolbar or “button bar” above the edit box contains convenient buttons to insert wikitext symbols for boldface, italics, links and more. To see the purpose of any button, check out Figure 2-5 within the section Wikitext, or hover your mouse over any button and a tool tip will pop up.
Each button can be used in two ways:
- Click, then replace
If you simply click a button, it inserts wikitext containing some dummy text for you to change. For example, the bold button inserts:
'''Bold text'''
- Select, then click
If you select some text and click a button, it formats the selection for you. However, unlike Microsoft Office and similar programs, the button does not remove the formatting when clicked a second time. A second click will just insert the wikitext again.
The button bar is convenient but cannot completely substitute for learning wikitext. This is because the button bar can only insert wikitext, not change or remove it. In other words, it can italicize a word but cannot remove the italics, so you’ll still need to understand that two single quotes means italics.
Below the edit box is an area labeled Summary for describing your change briefly, so other wiki users understand what you did. These summary comments appear on an article’s history page, providing a quick rundown of everything that’s been done to the article during its lifetime.
Below the edit box is an array of buttons and links for taking the next action:
- Save page
Save your changes, creating a new revision of the article. Remember to first preview your changes and enter a summary comment.
- Show preview
Display how the article will look, but without saving it. The edit box will remain on the page so you can continue editing.
- Show changes
Display a two-column “before and after” view of the article, showing only your changes. As with Show Preview, the edit box will remain on the page for further editing.
- Cancel
Give up. Return to the article without saving your changes. (Alternatively, just leave the edit page.)
- This is a minor edit
If your change is trivial, click this checkbox before saving, and on the article’s history page your change will be marked with an “m” to indicate it was minor.
- Watch this page
If selected before saving, this checkbox adds the article to your watchlist (see Watchlists).
Note
If two people edit the same article simultaneously and both try to save it, only one will succeed. See Conflicts for more information.
For more information on the edit page, see http://meta.wikimedia.org/wiki/Help:Editor.
Don’t look for a button labeled “create article” in MediaWiki: there isn’t one. To create an article, first search for it: enter an article name in the search box and click Go. If the article exists, you’ll jump right to it (so you needn’t create it). But if there’s no such article, you’ll be offered the opportunity to create it.
Suppose you search for “dog food” and no such article exists. On the search results page, you’ll see these two lines:
You searched for dog food
There is no page titled “dog food”. You can create this page.
The links “dog food” and “create this page” lead you to the edit page to create the article.
To create a paragraph, just start typing. A blank line indicates the end of a paragraph:
This is a paragraph.  What fun!
This is the third sentence of the same paragraph.

This is a new, second paragraph.
Blank lines are significant: the more you add, the more space there is between the paragraphs.
To create a heading, surround a line of text with equals signs:
== This is a heading ==
The first equals sign must be at the beginning of a line with no leading spaces. The number of equals signs indicates the level of heading, subheading, sub-subheading, and so on.
= Level 1 heading =
== Level 2 heading ==
=== Level 3 heading ===
==== Level 4 heading ====
As a rule, avoid level 1 headings: they are too large, the same size as the page title, which can be confusing for readers. It’s a standard to start with level 2.
To break a paragraph in the middle, use the <br> or <br/> tag:
This is a paragraph<br>broken in the middle
Here’s a larger example containing several paragraphs and headings:
== All about wikis ==

The MediaWiki edit page has many interesting features.

Read on to learn them.

=== A button bar ===

The button bar contains buttons that are helpful for typesetting
your text.  Try clicking a few of them.

=== The edit box ===

The edit box is where you type your wikitext.

== For more information ==

See "MediaWiki" from O'Reilly Media for more details.
If a wiki article has more than three headings, a table of contents of links automatically appears above the first heading. The table of contents displays all headings in order, each linking to the corresponding article section.[23]
There are several ways to control the table of contents:
- Force it
If an article has too few headings but you want a table of contents anyway, place the word
__FORCETOC__(two underscores on each side) anywhere in the article. This “magic word” forces a table of contents to be produced.[24]- Move it
The magic word
__TOC__, when placed in an article, causes the table of contents to appear at that exact location instead of the default location above the first heading.- Suppress it
Place the magic word
__NOTOC__anywhere in an article to prevent a table of contents from appearing.- Suppress it just for you
In your preferences (
Special:Preferences), under Misc, uncheck “Show table of contents (for pages with more than 3 headings)” to suppress all tables of contents for yourself.
To indent a paragraph, place a colon at the beginning of the first line:
:This paragraph will be indented. The colon is
placed only in the first line.
The more colons, the greater the indenting:
:::::Very far indented indeed!
To produce a preformatted text box, suitable for computer programming examples or any verbatim text, precede each line (including blank lines) by a single space:
[space here]function dog_catcher($name, $truck) {[space here]...[space here]}
Similarly, use the <pre> tag:
<pre>
function dog_catcher($name, $truck) {
 ...
}
</pre>
which produces the same visual effect as leading spaces but
ignores wikitext and HTML formatting. So with leading spaces,
'''hello''' displays as hello,
but inside a <pre> region
it displays literally as '''hello'''.
Italic text is produced by enclosing words in two single quotes:
''this is italics''
For bold text, use three single quotes:
'''this is bold'''
And for bold italics, use five quotes:
'''''this is bold italics'''''
These “single quote” styles do not span multiple lines—they end at the first line break (when you press Enter):
''these italics will end here<ENTER>
and not continue on this second line''
Underlined text is produced by the <u> tag:
This is <u>underlined</u> text.
For monospaced text, use the <code> tag:
<code>This is monospaced</code>
which is great for presenting computer code within a sentence.
To change the color or size of small amounts of text, use the HTML tags <big>, <small>, <font> or <span>:
Here's some <big>large text</big> and some
<small>little words</small>.

<font color="red">Here is red text</font>

<font size="+3">Here is big text</font>

<span style="color:green">Here is green text</span>
For controlling the style of a paragraph, use the HTML <div> tag:
<div style="color:purple">
Here is a long paragraph in purple, blah blah blah....
</div>
Links are a rich subject covered in detail in Chapter 5, but here’s a quick peek. To create a link to another wiki article—an internal link—simply enclose its title in double square brackets:
For more information, see [[dog food]].
If the article dog food
doesn’t exist, that’s fine: the link will automatically point to the
edit page for dog food, encouraging
others to create the article! To use different text for the link,
append the desired text after a pipe symbol:
For more information, see [[dog food | my article about dog food]].
This link displays “my article about dog food” but points to the
article dog food.
To link to an external website, just type the URL and MediaWiki turns it into a link:
http://www.oreilly.com/
Or, if you want alternate text for your link, use single square brackets, followed by a space, followed by the link text:
Visit [http://www.oreilly.com/ O'Reilly Media, Inc.] for a good time.
MediaWiki articles can contain images (and other files) that have been uploaded to the wiki. That is, any file must first be “copied into” the wiki via uploading before it can appear in an article.[25]
The 10-second tutorial on images is:
Upload the image (say, myfile.jpg)—if it’s not already in the wiki—by clicking the “upload file” link in the Toolbox and following the instructions.
To display the image in your article, add an image tag, i.e.,
[[Image:myfile.jpg]].If your wiki is configured to display external images (which is not the default behavior), then any URL of an image, such as
http://example.com/picture.gif, will be transformed into the image itself.[26]
Armed with this knowledge, you can do simple things with images, and this might keep you happy for a long time. Nevertheless, we’ll now go into more depth so you can have a thorough understanding of uploaded files.
Tip
In MediaWiki jargon, every uploaded file lives in the Image namespace, even nonimages like PDFs and Microsoft Office files
(if these file types are permitted by the wiki administrator).
There are two ways of working with uploaded files:
- Embed, then upload
Create image links like
[[Image:myfile.jpg]], save the article, and later click the (now red) links to visit the upload page. This is a good method when you’re writing an article at high speed and don’t want to interrupt your work to upload files.- Upload, then embed
Visit the upload page to upload your files, remember their names, and later edit articles to add image links. This is a good method when you have lots of images to upload, but aren’t sure where you’ll use them yet.
Assuming your wiki permits uploads (not all do), look in the
Toolbox menu and click Upload File. The upload page (Special:Upload) appears as in Figure 4-2.
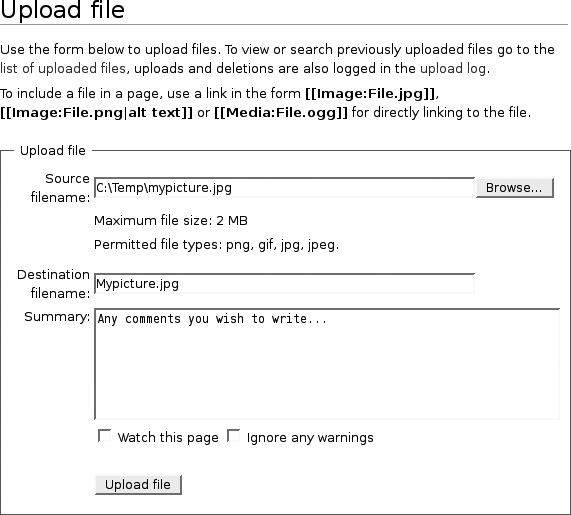
From the Special:Upload
page, do the following:
Click the Browse button to locate and select your desired file.
Take note of the name that appears as the “Destination filename”. This will be the filename within the wiki, i.e.,
[[Image:. Modify it here as needed. If a file of this name exists in the wiki already, you’ll be warned to change the name or overwrite the file.NameGoesHere]]Add a brief description of the file in the Summary box. Consider adding category tags to categorize the file, described in Adding an Article to a Category.
Click Upload File.
If the upload is successful, you can now embed the file in articles.
Tip
If you’re in the middle of an editing session, Shift-click the Upload File link rather than simply clicking it. This opens a new window for the upload. If you merely click the link, you’ll navigate away from the edit page and possibly lose your edits.
Any uploaded image can be embedded in a wiki article by
referring to its name in the Image namespace, creating an image tag:
[[Image:NameOfFileHere]]For example:
[[Image:Myfile.jpg]]
If you can’t remember the name of an uploaded image, visit the
special pages Special:NewImages
and Special:ImageList to locate
it.
Remember that the image link has two purposes:
It embeds the image in the article.
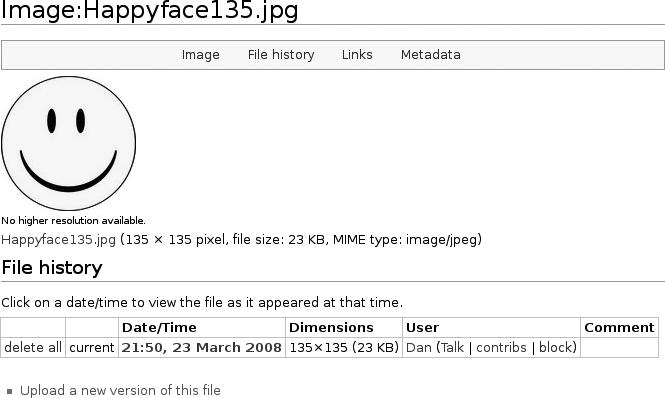
It makes the image a link to its image page, a wiki article that documents the image.
Image links may have options following the name and separated by pipe symbols. These options are listed in Table 4-2. For example, the following link displays an image scaled to 100 pixels wide with a border around it and alternate text of “Hi there”:
[[Image:Myfile.jpg|Hi there|100px|border]]
Image tags lead to an image page, a wiki article dedicated to that image, as shown in Figure 4-3. These articles can be edited (to add explanatory wikitext and categories) just like any other, and they list the file’s revision history and other information.
To produce a link to an uploaded file, refer to it using the
Media namespace:
[[Media:Myfile.jpg]]
[[Media:Document.pdf|Click to download]]
The full URL path to an uploaded file can be displayed and manipulated using the filepath parser function, so you can produce an “external”
style link to the file:[27]
My image, which is located at {{filepath:myimage.jpg}},
may be [{{filepath:myimage.jpg}} downloaded here].
This produces:
My image, which is located at http://wiki.example.com/w/images/5/5a/myimage.jpg, may be downloaded here.
It’s easy to link to an external image with an ordinary external link:
[http://images.example.com/myfile.jpg My favorite picture]
Displaying an external image within a wiki article is another matter, as this operation is not permitted by default. The wiki administrator can change this with a configuration setting (see External Images).
Wikitext provides three kinds of lists:
Bulleted lists
Numbered lists
Definition lists
These lists are discussed in the following sections.
To make a bulleted list, simply begin each line with an asterisk, and end each line with a newline (pressing the Enter key):
* Dog
* Cat
* Cute little bird
The results look like:
Dog
Cat
Cute little bird
The asterisk must begin the line: no leading space is permitted.[28] Any space between the asterisk and its text is ignored, however, so you could equivalently write:
*Dog
*Cat
*      Cute little bird
but not:
* Dog
* Cat
* Cute little
bird
because the linebreak after “little” ends the bullet, leaving “bird” in the next paragraph:
Dog
Cat
Cute little
bird
You can insert linebreaks with the <br> tag:
* Dog
* Cat
* Cute little bird<br>Tweet<br>Tweet
which produces:
Dog
Cat
Cute little bird
Tweet
Tweet
Bullets can be nested at multiple levels:
* This is a bulleted item
* Here is another!
** This is a level 2 bullet
*** Here is a level 3 bullet
** Now we're back at level 2
* And now back at level 1
which appears as:
This is a bulleted item
Here is another!
This is a level 2 bullet
Here is a level 3 bullet
Now we’re back at level 2
And now back at level 1
The list ends when it reaches a nonbulleted line (or the end of the article). This means that if you insert a nonbulleted item in the middle of a list, you’ll end the list, which might not be what you want. For example, this broken list:
* My favorite dogs are:
** Fido
** Spike
(My neighbor's dog)
** Rover
produces a misplaced “Rover” with a broken-looking double bullet:
My favorite dogs are:
Fido
Spike
(My neighbor’s dog)
•Rover
because “(My neighbor’s dog)” ends the list. To indicate that “(My neighbor’s dog)” should be considered part of the list, place bullet symbols in front of it—the right number for the indent level—and add a colon:
* My favorite dogs are:
** Fido
** Spike
**: (My neighbor's dog)
** Rover
This produces:
My favorite dogs are:
Fido
Spike
(My neighbor’s dog)
Rover
Tip
To insert a preformatted text box into a nested, bulleted list, use a <pre> tag explicitly:
* First item
** Nested item
*: <pre>here's the preformatted text</pre>
** Another nested item
because you can’t have a leading bullet (continuing the list) and a leading space (for preformatted text) at the same time.
Numbered lists have the same rules as bulleted lists, but instead of asterisks, you use hash marks:
# Dog
# Cat
# Cute little bird
This produces:
Dog
Cat
Cute little bird
Numbered lists can also be nested at multiple levels:
# This is a numbered item
# Here is another!
## This is a level 2 item
### Here is a level 3 item
## Now we're back at level 2
# And now back at level 1
which produces:
This is a numbered item
Here is another!
This is a level 2 item
Here is a level 3 item
Now we’re back at level 2
And now back at level 1
Notice that every level begins with the number 1. There is no way in wikitext to substitute letters, Roman numerals, or any other format instead.
When you insert a nonnumbered item in the middle of a list, you need the same continuation trick as for bulleted lists, but using hash marks:
# My favorite dogs are:
## Fido
## Spike
##: (My neighbor's dog)
## Rover
Note
In this author’s opinion, numbered lists in wikitext are
frustrating, limiting, and just plain badly implemented. Using a
numbered list to document the steps of a complicated process, full
of embedded examples and images, will make you tear your hair out.
For a list of any complexity, break the “no HTML” rule and use the
<ol> tag instead:
<ol>
<li>First item</li>
<li>Second item</li>
 <ol type="a">
 <li>First subitem</li>
This inserted text will '''not''' break the numbering,
and nor will this image:

[[Image:Myfile.jpg]]

 <li>Second subitem</li>
 </ol>
<li>Third item</li>
</ol>
For more on HTML numbered lists, see http://www.w3schools.com/tags/tag_ol.asp.
Definition lists are a convenient format for documenting a set of terms (words or phrases). Sandwich your term between a leading semicolon and a colon, followed by a paragraph:
; Dog
: A cuddly canine

; Cat
: A furry feline
or equivalently:
; Dog: A cuddly canine
; Cat: A furry feline
both of which produce:
- Dog
A cuddly canine
- Cat
A furry feline
A term can have multiple paragraphs, each preceded by a colon:
; Dog
: A cuddly canine
: Man's best friend
which appears as:
- Dog
A cuddly canine
Man’s best friend
Definition lists do not suffer from the same “broken list” problems as numbered lists, because leading colons cause indenting anyway. So, other wikitext can be inserted without a problem into the middle of the definition:
; Dog
: A cuddly canine
WOOF WOOF
: Man's best friend
Here’s a numbered list inside a bulleted list:
* Bullet one
* Bullet two
*# Numbered item 1
*# Numbered item 2
*# Numbered item 3
* Bullet three
which produces:
Bullet one
Bullet two
Numbered item 1
Numbered item 2
Numbered item 3
Bullet three
How about a bulleted list inside a numbered list?
# Numbered item one
# Numbered item two
#* Bullet 1
#* Bullet 2
#* Bullet 3
# Numbered item three
which produces:
Numbered item one
Numbered item two
Bullet 1
Bullet 2
Bullet 3
Numbered item three
A definition inside a numbered list:
# Numbered item one
# Numbered item two
#; Term
#: Definition
# Numbered item three
which produces:
Numbered item one
Numbered item two
- Term
Definition
Numbered item three
A numbered list as part of a definition:
; Term 1
: Definition 1
:# Numbered item 1
:# Numbered item 2
:## Numbered subitem 1
:##: <pre>A preformatted text box in subitem 1</pre>
:## Numbered subitem 2
: Definition 1 continued
; Term 2
: Definition 2
which produces:
- Term 1
Definition 1
Numbered item 1
Numbered item 2
Numbered subitem 1
........................................
: A preformatted text box in subitem 1 :
........................................
Numbered subitem 2
Definition 1 continued
- Term 2
Definition 2
For more information on lists, see http://en.wikipedia.org/wiki/Help:List.
MediaWiki articles can contain tables with rows, columns, and headings. The syntax for creating tables is perhaps the most complicated “basic” wikitext. We’ll cover a useful set of features; the full documentation can be found at http://www.mediawiki.org/wiki/Help:Tables.
Tables begin with this character sequence at the start of a line:
{|They contain one or more rows, separated by this sequence (again at the start of a line):
|-
and end with this sequence (at the start of the line):
|}
Here’s a small example:
{|
| dog
| woof
|-
| cat
| meow
|-
| bird
| tweet
|}
which produces this three-row, two-column table:
dog cat bird woof meow tweet
Within a row, each table cell begins with a pipe (|) at the start of a line:
| This is a table cell
To throw a border around the table and each cell, add border="1" to the top line:
{| border="1"
| dog
| woof
|-
| cat
| meow
|-
| bird
| tweet
|}
Of course, cells can contain other wikitext such as links, boldface, and so on:
{| border="1"
| [[dog]]
| '''woof'''
|-
...
An alternative table syntax places each row on a single line, with cells separated by double pipe symbols, a format that is sometimes easier to read:
{|
| dog || woof
|-
| cat || meow
|-
| bird || tweet
|}
That’s all you need to create simple tables. Read on for more details.
To create optional headings over each column, add them as the first table row, replacing the pipes with exclamation points:
{|
! Animal
! Sound
|-
| dog
| woof
|-
...A table may have an optional caption preceded by the sequence:
|+
For example:
{|
|+ Animals and Their Sounds
! Animal
! Sound
|-
| dog
| woof
|-
...Tables can be stylized using the same attributes as in HTML
tables, including the style
attribute for cascading stylesheet (CSS) directives. To stylize
an entire table, the attributes go in the first row:
{| align="center" border="1"To stylize a row, the attributes appear just after the |- sequence:
|- valign="top"
And to stylize a cell, the attributes come immediately after the pipe and must be separated from the cell text by another pipe:
| style="color:green" | this is a lovely green cell
You can even stylize the table caption, for instance, moving it to the bottom of the table:
|+ align="bottom" | Animals and Their Sounds
Tip
To provide custom table styles for all wiki users, the wiki
administrator may write them
in CSS and add them to MediaWiki:Common.css, described in CSS for All Pages.
If you can’t decide on a good order for your table rows, make
them sortable and let the reader decide instead. Add the attribute
class="sortable" to your table
definition:
{| class="sortable"
...
Now each column contains an icon that, when clicked, sorts the rows of the table according to that column.
MediaWiki can optionally display complicated mathematical
formulas. If your wiki is configured for this feature, place the
formula inside a <math>
tag:
<math>\sqrt{x^2 + y^2}</math>and MediaWiki will display it beautifully, as in Figure 4-4.
The math typesetting system is rich and complex. It uses a powerful, third-party software package called LaTeX (http://www.latex-project.org) with its own syntax. We won’t teach you LaTeX here (it’s large enough for its own book), but for a reasonably quick overview of math mode, check out:
| http://en.wikipedia.org/wiki/Help:Displaying_a_formula |
| ftp://ftp.ams.org/pub/tex/doc/amsmath/short-math-guide.pdf |
Tip
When reading a traditional LaTeX guide to learn its math
syntax, mentally substitute MediaWiki’s <math> tag where the documentation
uses LaTeX’s usual symbols. For example, the traditional LaTeX
formula for the square root of two, $\sqrt{2}$, would be written for
MediaWiki as <math>\sqrt{2}</math>.
Wikitext is full of symbols with special meaning for typesetting. For example, a leading asterisk like this:
* Here is a bullet
produces a bullet like this:
Here is a bullet
But what if you need to produce a symbol literally, and not have
it interpreted as wikitext? Suppose you want a line to begin literally
with an asterisk, and not have it turned into a bullet. This is the
purpose of the <nowiki> tag.
Anything appearing between <nowiki> and </nowiki> is displayed literally. To
produce a leading asterisk, you’d write:
<nowiki>*</nowiki> Here is a leading asterisk, not a bullet
which would appear as:
* Here is a leading asterisk, not a bullet
<nowiki> is
particularly useful for writing about MediaWiki’s features, when you
must display literal wikitext symbols. For example, to produce this
paragraph about wikitext syntax:
Internal links use square brackets [[like this]]. A bold internal link looks '''[[like this]]'''. And then there’s the mysterious <nowiki> tag, which is always followed by </nowiki>.
you’ll need a liberal application of the <nowiki> tag:
Internal links use square brackets
<nowiki>[[like this]]</nowiki>.
A bold internal link looks
<nowiki>'''[[like this]]'''</nowiki>.
And then there's the mysterious <nowiki><nowiki></nowiki> tag,
which is always followed by <nowiki><</nowiki>/nowiki>.
Yikes—what’s going on with the final </nowiki> display? Its first character
"<" is escaped by surrounding it
with <nowiki> and </nowiki>, so the remainder of the
tag, /nowiki>, is not
interpreted as anything special.
As you know, MediaWiki permits multiple people to edit the same article. But what if two users edit the same article at the same time? In this case, the first one to save the article will succeed. The second one to save will encounter an edit conflict. The second save cannot succeed until the second author manually merges the two authors’ changes.
Note
Conflicts are rare in practice, but you need to know how to resolve them.
Suppose you’re editing the article dog food:
'''Dog food''' comes in many shapes and sizes. The most
popular brands are...
and you make a change, adding “and flavors”:
'''Dog food''' comes in many shapes, sizes and flavors. The most
popular brands are...
Meanwhile, as you work within the edit page, another wiki user, Dora, quickly edits the same article, adds a sentence, and saves her changes behind your back:
'''Dog food''' comes in many shapes and sizes. It is eaten by canines
all over the world. The most popular brands are...
When you try to save your changes, you see this message:
Edit conflict: Dog food
MediaWiki has blocked your save operation, preventing you from blindly overwriting Dora’s changes. Below this message, MediaWiki displays all the information you need to make things right:
It also prints these instructions:
Someone else has changed this page since you started editing it. The upper text area contains the page text as it currently exists. Your changes are shown in the lower text area. You will have to merge your changes into the existing text. Only the text in the upper text area will be saved when you press “Save page”.
In other words, your job now is to examine Dora’s changes and your changes, and figure out the best way to merge your changes into her version of the article, which is in the edit box. (If you do nothing, or just click Save Page, Dora’s changes will remain and yours will be lost.) In this case, you decide on:
'''Dog food''' comes in many shapes, sizes and flavors. It is eaten by
canines all over the world. The most popular brands are...
Now when you save the article, the save succeeds.[29]
Edit conflicts might be annoying, but they’re arguably better than the alternatives: blindly overwriting other users’ changes (definitely bad), or allowing only one writer at a time, locking out all others, possibly for a long time (the model used by some other systems).
This chapter only scratches the surface of MediaWiki’s editing capabilities. Chapter 7 will cover more advanced topics such as templates, dynamic lists, and parser functions.
[22] A wiki administrator can implement limited privacy by configuring user rights (see User Rights and Permissions) and installing some third-party extensions, but overall, MediaWiki’s working model favors public access to everything.
[23] Each heading becomes an anchor (see Anchors), and the table of contents links to those anchors.
[25] Unless the wiki administrator has tailored MediaWiki to permit “external” images—located on another website—to be embedded in articles.
[26] See External Images to configure this behavior.
[27] Available in MediaWiki 1.12.0 or later.
[29] Of course, if another edit and save happens while you’re merging, you’ll get another conflict. This rarely happens though.
Get MediaWiki now with the O’Reilly learning platform.
O’Reilly members experience books, live events, courses curated by job role, and more from O’Reilly and nearly 200 top publishers.

