Chapter 4. Web Projects
Microsoft wanted its first truly integrated development environment to be usable for all layers of your application; they did a pretty good job at making that happen. Class libraries, Windows applications, database code, web applications, and web services can all be developed and debugged in VS.NET, even though these various components may be distributed across multiple machines. Web applications and web services get a certain amount of special handling—VS.NET can communicate with local or remote web servers on your behalf in order to create and debug the web-based parts of your distributed systems. Also, certain aspects of the development process are different for web projects than for other project types, so this chapter will outline the basic operation of VS.NET when dealing with web projects.
Web Project Templates
When you create a new project, the project template you choose determines whether your project is web-based. A web-based project is one that is accessed or managed via a web protocol, such as HTTP, HTTPS, or FTP. The list of web project templates is listed in Table 4-1.
|
Project template |
Managed |
Description |
Output |
|
Yes |
ASP.NET Web Forms Application |
Managed DLL and content files | |
|
Yes |
ASP.NET Web Service |
Managed DLL and content files | |
|
ASP.NET Mobile Web Application |
Yes |
ASP.NET Web Forms Applications for mobile devices |
Managed DLL and content files |
|
Yes |
An empty project to which to add source and content files |
Managed DLL and content files | |
|
No |
ATL-based web application |
Unmanaged DLL and content files | |
|
No |
ATL-based web service |
Unmanaged DLL and content files |
Although web projects look like normal projects when viewed in the IDE, they behave quite differently behind the scenes. Any content files (web pages, graphics, etc.) must reside on a web server; the same is true for the build output (a managed or unmanaged DLL).
VS.NET has two completely different strategies for ensuring that all of the necessary files are in the right place. One is used by C#, VB.NET, and J# projects, and the other is used by Visual C++ projects. We will talk about each separately, in Section 4.2" and Section 4.3" later in this chapter. Before we do that, we need to talk about IIS web applications, since both types of projects depend on the separation provided by web applications to function properly.
IIS Virtual Directories and Web Applications
I n IIS, every directory is considered to be either a nonvirtual directory or a virtual directory. Nonvirtual directories are stored under the web server’s root directory. A virtual directory can be anywhere on the server’s filesystem, but the URL that is used to access that content makes it appear to the end user that it is physically below the root directory (hence the term virtual).
For example, suppose that the web server root is in the default location, c:\inetpub\wwwroot. If that directory were to contain a file called default.htm, a web browser would use the address http://server/default.htm to access that resource. If there were a directory at c:\inetpub\wwwroot\dir1 containing a file foo.htm, then the URL would be http://server/dir1/foo.htm. dir1 would be a nonvirtual directory within the web server’s root directory. The structure of nonvirtual directories is presented directly through the structure of the URLs used to access their contents.
IIS does not force us to have such a strict mapping between URLs and the structure of our filesystem. Virtual directories allow us more flexibility. For example, we could use the IIS administration tool (located in the Administrative Tools section of the Control Panel) to map the e:\website directory as a virtual directory called dir2. (A virtual directory can have a different name than the actual directory on which it is based.) If e:\website contains a page.htm file, a web browser could access this with the URL http://server/dir2/page.htm. Because we set up a virtual directory called dir2, IIS will map the request for /dir2/page.htm to the e:\website\page.htm.
A web application is a directory tree with its own application settings. These application settings include security configuration, error handling, and file extension mappings. By default, a directory (virtual or not) will belong to its parent directory’s application. However, any directory can be set as having its own application, at which point it gets its own settings. (Of course, these settings will propagate to any subdirectories that do not have their own application.)
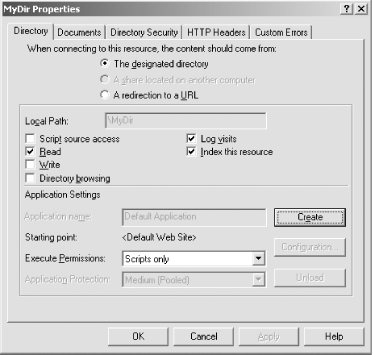
You make a directory the root of a web application using the IIS administration utility. Open the directory’s Properties page by right-clicking on the directory in the tree and selecting Properties from the context menu. If the directory is not a web application directory (i.e., if it picks up its application settings from its parent), you will be able to turn it into a web application by clicking on the Create button in the Application Settings section of the Directory tab, which is shown in Figure 4-1. (If the directory is already a web application, in place of a Create button, you will see a Remove button, enabling you to remove the web application—this will cause the directory to revert to using its parent’s settings.)
Tip
Windows XP lets you add new virtual directories using Windows Explorer. The Properties page for a directory will have a Web Sharing tab. (Certain directories do not support web sharing, so the Web Sharing tab will not always be present.) If you share a directory in this way, Windows Explorer will create both a new virtual directory and a new web application for that directory.
A web server will always have at least one web application—even if you do not create any web applications of your own, there is an application for the web server’s home directory. You can configure this from the Properties page for the web site itself. The tab has a different name in this case—it is labeled Home Directory instead of just Directory, but it otherwise works in the same way.
Once you create an application by clicking the Create button, all of the code in that application and all of the directories below it (at least those that are not applications themselves) now share application-wide settings. In an ASP application, Session and Application state are scoped by the web application. Process isolation settings are also configured on a per-application basis. In ASP.NET, the Session and Application state are partitioned in a similar way, but the process isolation settings are ignored in favor of an ASP.NET worker process.
Tip
Although ASP.NET ignores the IIS isolation settings, it gives each web application its own AppDomain, which serves a similar purpose. Web applications also determine the scope for configuration settings in the application’s web.config.
Web applications and web projects
Whenever you create a new web project, VS.NET creates a new web application (unless an appropriate one already exists). This means there is a one-to-one mapping between VS.NET web projects and IIS web applications. For a .NET web project, VS.NET will also create a bin directory underneath the web application directory. The bin directory is where VS.NET places the project’s build output. (ASP.NET automatically loads any assemblies in the bin directory into the web application’s AppDomain.)
Managed Web Projects
Visual Studio .NET allows managed (.NET) web projects to be written in C#, VB.NET, or J#. Each of these languages has four web project templates: ASP.NET Web Application, ASP.NET Web Service, ASP.NET Mobile Web Application, and Empty Web Project. (Mobile Web Applications are not available in VS.NET 2002.)
Tip
Visual C++ has only one .NET web project type: ASP.NET Web Service. However, the way it works within VS.NET is more like the other unmanaged Visual C++ web projects than the C#, VB.NET, or J# managed projects. We will therefore describe that project type in Section 4.3.’
The ASP.NET Web Application template is used for building web applications that will be accessed from a normal web browser. The ASP.NET Web Service template is used to build web services—programs that present a programming interface instead of a user interface, but which are still accessed using HTTP. The ASP.NET Mobile Web Application template is designed for building web applications that will be accessed from a web browser on a mobile device such as a PDA or mobile phone. The Empty Web Project template can be used to build any kind of web application.
These four template types are very similar to one another—they
manage and build their files in much the same way. The only
differences between them are the default set of files that are added
to the project initially. For the ASP.NET Web Application project,
the main file added to the project is an ASP.NET Web Form named
WebForm1.aspx, while for a Mobile Web
Application, the main form is called
MobileWebForm1.aspx. (Mobile Web Applications
also have an additional reference to
System.Web.Mobile.) For ASP.NET Web Service
projects, the main file is Service1.asmx, which
acts as the main web service entry point. An Empty Web Project
contains no files at all to start with.
VS.NET treats all of these project types in exactly the same way once they have been created. So for the rest of this section, we will not distinguish between the different types of managed web projects.
Creating a New Web Project
You create new managed web projects using the New Project dialog (Ctrl-Shift-N) as usual. When you have selected a managed web project type, you must enter a URL into the Location text box, as shown in Figure 4-2.
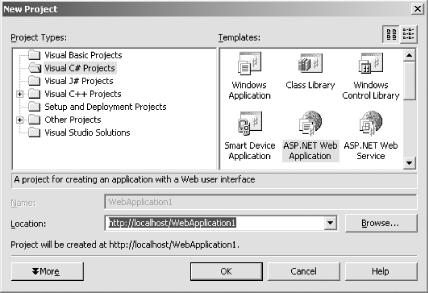
When you click OK, VS.NET immediately communicates with IIS to see if a web application with the specified name exists. If not, VS.NET will create a new application that takes its name from the last part of the location name (i.e., the string typed in after the last forward slash). For example, if the string http://localhost/app1 is entered into the Location text box, VS.NET will create a new web application called app1. It will not create a virtual directory however—when VS.NET creates a new application in this way, it just adds a nonvirtual directory underneath the web server’s home directory. So if the home directory were the default c:\inetpub\wwwroot, VS.NET would create the new directory at c:\inetpub\wwwroot\app1.
Note
The URL of the web project is stored in the VS.NET solution file. If you choose to create a web project on your local web server by using a URL of the form http://localhost/project, this may cause problems if you copy the solution to another developer’s machine—VS.NET will look for the corresponding web application on the local web server. You will therefore need to make a local copy of the web application. (If you put your development machine name in the URL instead, you won’t encounter this problem, but this will, of course, mean that the other developer will now be using your machine’s local web server to do her development, which is probably not a great idea.)
Fortunately, source control offers a better solution to this problem. If your projects are in a source control database, VS.NET will be able to create a new copy of a web project when you check it out. If the web project’s URL refers to localhost, VS.NET will offer to build a new web application on your local server to contain the copy.
You can optionally prepare the IIS web application before creating the project. This can be useful since it enables you to control the location of the files on the web server. For example, you could create a new virtual directory and associated web application called app2 that maps to a physical directory called, say, e:\MyApp. When you use VS.NET to create a new web project using the path http://localhost/app2, instead of creating a new application, VS.NET will happily use the existing one. See Chapter 1 for more information about pre-creating folders for Web projects.
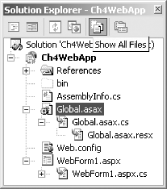
If you have an existing web application, you can create a VS.NET project for the application and its files, rather than having to build a new application from scratch. You can do this by building an Empty Web project (based upon your language of choice) and using the location of your existing web application in the Location box of the New Project dialog. Once you have created the project, it will, of course, be empty as far as VS.NET is concerned, so the next step will be to add the files in the web application to the VS.NET project. To do this, click on the Show All Files button in the Solution Explorer window (see Figure 4-3) to show all the files that already exist in the application, and then add the files you are interested in working with by right-clicking on them and selecting the Include in Project option.
If you have a web application in which you want to create a project, but you don’t recall the exact name, you can use the Browse button from the New Project dialog. This shows the Project Location dialog box, which allows you to browse for projects.
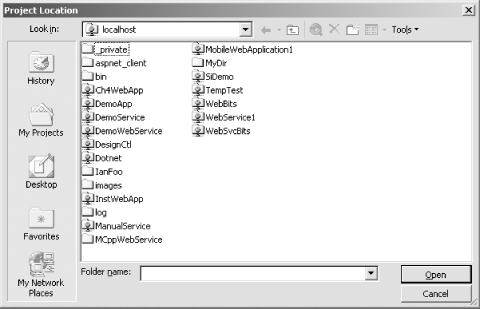
The Project Location dialog is normally used for browsing through the filesystem. However, it can also browse web servers. There is a Tools menu in the upper-righthand corner of this dialog, and it provides an Open from Web Server... option. This brings up the Connect to Web Server dialog, into which you can type the URL of the web server where you want to create the new project. If you supply a URL that contains only the server name (e.g., http://localhost/), VS.NET will show you a list of all the directories on the server, as Figure 4-4 shows. The dialog indicates a directory that is already a web application by embedding a small globe icon in its folder icon.
You can pick the directory in which you would like to create the new project. VS.NET will then use that directory for creating all the files based upon the project type you selected. If you select a directory that does not have its own web application, VS.NET will create a new application for that directory.
Storage of Project Files
When you create a managed web project, the project files are not kept on your local hard disk, as they are for other VS.NET project types. Only the solution files (.sln and .suo) are kept in a local folder. All the other files (including the .xxproj file) are kept on the web server.
Tip
The prospect of having all of your source and project files on a web
server may sound slightly unnerving. Fortunately, ASP.NET takes steps
to prevent end users from accessing the project files (and other
source files)—all the project file extensions are mapped to the
System.Web.HttpForbiddenHandler in
the
machine.config file. If a user tries to get one
of these files with a browser, the server will return an HTTP 403
forbidden error code.
Although the master copies of a web project’s files all live on the web server, VS.NET keeps a local copy of all the web project files in a special folder called the web project cache—it needs local copies in order to be able to edit and compile files. The default folder for the project cache is a folder called VsWebCache under your user account’s Document and Settings folder. You can change the location of this folder using the Tools → Options dialog. Select the Projects folder in the lefthand pane of the Options dialog, and then choose the Web Settings subitem. The cache directory can then be set in the Offline Projects section on the righthand side. (This is a per-user setting—there is no way to configure the cache directory on a per-project basis.)
Codebehind
In ASP.NET, we are discouraged from having all of our source code inside of .aspx files, intermingled with HTML code. Instead, the .aspx file should contain only user interface elements, while any dynamic server-side behavior should be in a separate source file associated with the .aspx page. This separate source file is known as the codebehind file—it contains the server-side code behind the HTML frontend. (This same concept is also applied to other ASP.NET-related files, such as the global.asax and any .asmx or .ascx files.) Use of codebehind is not mandatory—you are free to create a spaghetti-like tangle on a single page if you prefer—but it is almost always better to separate user interface from implementation.
To use codebehind, you must put a special attribute into the
@Page directive in your .aspx
file (or the analogous directive for other file types). The attribute
is Inherits, which specifies the name of a type.
ASP.NET will use this type as the base class for the class that it
builds dynamically based upon the HTML and code contained in the
.aspx file.
This named type obviously needs to be available to ASP.NET at
runtime—it can build a class derived from a type only if it has
access to that type. One way of doing this is to use the
Src attribute. The Src
attribute names a source file, and whenever either the
.aspx file or the file referenced in the
Src attribute is modified, ASP.NET will recompile
both files. The intended usage model is that the source file contains
the source for the page’s base class.
However, although VS.NET uses codebehind, it does not use the
Src attribute. Instead, it compiles the source
file that contains the base class for the .aspx
page into the main assembly for the web application. VS.NET will copy
this assembly into the web application’s
bin subdirectory, and ASP.NET automatically
loads any assemblies in that directory into the web
application’s AppDomain. This means that when
ASP.NET compiles the .aspx page, it will already
have loaded the application’s main assembly and will
therefore already have access to the base class. So VS.NET has no
need to use the Src attribute—it needs to
use only the Inherits attribute.
Tip
The fact that VS.NET builds the codebehind class into the main
assembly instead of using the Src attribute means
that you always need to build your project in order to push changes
to the web server. When using the Src attribute,
it is sufficient just to save the file and let ASP.NET do the
compilation. (One advantage of not using the Src
attribute is that VS.NET is able to provide IntelliSense for classes
that are built into the main assembly but cannot do so for classes
compiled by ASP.NET. It also means that the page will be served up
slightly faster the very first time it is used, as ASP.NET will not
need to compile the codebehind page.)
Although it does not use the Src attribute, VS.NET
does place an attribute in the @Page directive
that refers to the source file: the Codebehind
attribute. ASP.NET ignores this attribute—it is present only
for VS.NET’s benefit. It tells VS.NET which source
file is associated with a particular content file.
By default, VS.NET hides the codebehind files in the Solution Explorer. However, if you want to see them, you can click on the Show All Files button. This will cause the Solution Explorer to show you all the source files associated with particular content files—codebehind files appear as children of their corresponding content files in the tree. (You do not need to do this merely to edit the codebehind file. If you right-click on an .aspx file in the Solution Explorer and select View Code, VS.NET will open the codebehind file instead of the .aspx file.)
Source files do not have to be codebehind files in a web project—you can also add raw source files as you would with any other kind of project. These files get built into the main application assembly as usual.
Opening an Existing Web Project
If someone else has created a project for an existing web application, you may need to open it in order to work on the files in the project. To do this, you select File → Open → Project from Web. This brings up the Connect to Web Server dialog in which you can type the URL of the web server from which you want to open up the project. This dialog presents a view of the web applications on the web server like the one shown in Figure 4-4. Once you open the correct web application folder, you should find the project file (with a .csproj, .vbproj, or .vjsproj file extension) on the server. When you open it, VS.NET will create a local solution file for you (unless you are adding this to an existing solution).
Tip
If you are using a source control database that is integrated with VS.NET, such as Visual Source Safe, you will not normally need to locate an existing web project manually like this. When you open an existing solution that contains a web project from a source control database, VS.NET will automatically connect to the web server for you—the solution file contains enough information for VS.NET to locate the web server.
Building and Debugging
You build a managed web project in the same way as all other projects, using Build → Build Solution (Ctrl-Shift-B). However, VS.NET performs some extra work when building a web project. As usual, VS.NET takes all of the source files in your project and builds them into a single assembly. (Since the compilers cannot work directly from a web server, this compilation takes place in the folder in the local web cache that corresponds to this project.) Once compilation is complete, VS.NET copies the results to the actual web application.
To get debugging to work, you need to make sure that you are building
a debug configuration (which causes VS.NET to create a
.pdb file for your assembly). The configuration
can be selected from the Solution Configuration drop-down list in the
Standard toolbar or you can use the Build →
Configuration Manager... menu option. (The Debug solution will be
selected by default for a newly created web project, so you will
normally need to select only the Debug configuration if you have
previously selected a different configuration.) You will also need to
tell ASP.NET that you want to debug your application. The simplest
way to do this is to make sure that the
web.config in your application has the
debug attribute on the
compilation element set to
true. Example 4-1 shows a
suitable minimal configuration file. (Note that the default
web.config generated by VS.NET for a new web
project will already contain a compilation element
with debug set to true, so
again, you will not need to take any special action on a newly
created .NET web application.)
<?xml version="1.0" encoding="utf-8" ?>
<configuration>
  <system.web>
    <compilation debug="true" />

    ...other configuration stuff here...
  </system.web>
</configuration>
Setting this attribute will tell the ASP.NET compilation system to generate debugging information for dynamically compiled files (e.g., .aspx, .asmx). This enables source-level debugging of such files in VS.NET.
Once the debug symbols are in place, you can debug this project like any other. See Chapter 3 for detailed information about debugging.
Debugging with team projects
Note that when you debug a web application, the application effectively becomes unusable for anyone else—whenever you suspend execution in the debugger, the application will not be able to respond to requests until you allow it to continue.
IIS 6 can mitigate this with application pools, but usually the simplest solution is for developers to have their own copies of the application on their machines’ local web servers.
FrontPage Versus File Share
One of the choices you need to make when working with a web project is whether to use File Sharing or FrontPage Server Extensions to access your project files on the web server. By default, VS.NET will use File Sharing.
When using File Sharing, VS.NET copies your files to the web server
using normal Windows File Sharing. If your project points to a remote
web server, you will need to have a share open on the server (VS.NET
looks for a wwwroot$ share by default). For this
to work, the web server will have to be able to recognize your
Windows login credentials. This will usually mean that the web server
must be in the same Windows domain as you. (Or if you are not using
domain authentication, the web server will need to have an account
with the same name and credentials that you use.)
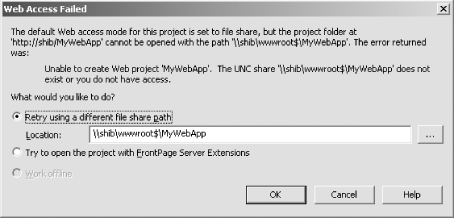
If the machine you are trying to connect to does not have a share
named wwwroot$, you will get the dialog box shown
in Figure 4-5. With this dialog, you can either
fill in the correct share name or switch the project to use
FrontPage Server Extensions (FPSE).
Microsoft advises that if you are using File Sharing, you should use
the wwwroot$ share name, so although it is
possible to use this dialog to select something else, VS.NET can
sometimes get confused by this. So you should really use this dialog
only to select between File Sharing and FPSE.
If you switch from File Sharing to FPSE, then instead of using SMB to connect to the files on the web server, VS.NET will use its FPSE libraries to communicate with the web server via the FPSE HTTP protocol.
The main advantage of FPSE over File Sharing is that FPSE can work better when the web server that hosts your web application is not on your local network. When the web server is on your local network, this is not likely to be an issue—you will typically have a large amount of bandwidth, which will make using SMB fast, and the web server will likely be in the same Windows domain as you, so security will not be an issue. If your server is remote, however, FPSE may be a better bet since it uses HTTP. This is less likely to be tripped up by firewalls or other security configuration issues and is also generally faster than Windows File Sharing over longer distances. However, VS.NET prefers the use of File Sharing, so you should use that if possible.
Visual C++ Projects
VC++ web projects act more like nonweb VS.NET projects than like the managed web projects described earlier. All of the solution, project, and source files are kept on the local hard disk and not the web server. When you build a VC++ web project, all of the usual build and debug build directories are used, and not the local web cache folder. The only real difference between a nonweb project and a VC++ web project is that a VC++ web project has a final build step that copies the appropriate DLLs and content files to the web server.
Creating a New VC++ Web Project
Creating a new unmanaged web project is similar to creating a nonweb project. Unlike with managed web projects, you do not specify a remote web server in the New Project dialog—you just specify a folder on the local filesystem as usual. When you build an unmanaged web project, VS.NET communicates with IIS via DCOM (Distributed Component Object Model) and creates the appropriate web application for your project. (By default, it will use the project name, but you can change this in the Project Property Pages dialog—in the Web Deployment settings, the General section contains a Virtual Directory Name property that you can use to control where VS.NET will send the build output.)
The two basic types of VC++ web projects are ATL Server and ASP.NET Web Service (or Managed C++ Web Service as it was called in VS.NET 2002). Although they create different kinds of output, these projects interact with the web server in the same way.
- ATL Server
An ATL Server project creates a new web application whose main executable is an ISAPI (Internet Server Application Programming Interface) extension DLL. This ISAPI extension responds dynamically to HTTP requests. There are two ATL Server project templates. ATL Server Project creates an ISAPI DLL that uses .srf files to create dynamic HTML UIs. ATL Server Web Service creates an ISAPI DLL that exposes a web service via SOAP (Simple Object Access Protocol). See ATL Internals, Second Edition (Addison-Wesley) for a more detailed discussion of ATL Server.
- ASP.NET Web Service
An ASP.NET Web Service in Managed C++ is similar to ASP.NET Web Services in other managed languages. The ASP.NET Web Service template creates a project that provides a SOAP-based web service. The project builds a .NET assembly. It puts this assembly in the bin directory of a web application and then links a type in that assembly to an .asmx file (via the .asmx file’s
WebServicedirective).
Files
VC++ web projects manage files in the
typical VS.NET manner, keeping all of the source files in the project
directory. Content files are copied to the web server automatically
as part of the build process. (You can tell VS.NET which files are
content by selecting the files in the Solution Explorer and setting
their Content property to true.)
Building and Debugging
When a project is built, the files necessary for the web application are copied to the corresponding directory on the web server. If you need to deploy a VC++ project to another server, you will have to move the appropriate files by hand (as well as set up an appropriate IIS application).
When building an unmanaged project for debugging, all you need to do is make sure that you are building a Debug configuration. Otherwise, debugging is the same as any other project. See Chapter 3 for more detailed information about debugging.
Conclusion
VS.NET provides two kinds of web projects—C#/VB.NET/J# web projects and VC++ web projects. C#/VB.NET/J# projects keep all the project files on the web server, using a local cache directory when local copies are required. VC++ web projects (whether managed or unmanaged) keep project files on the local machine and copy all necessary files to the web server as part of the build process. Both types have a one-to-one mapping between projects and IIS web applications.
Get Mastering Visual Studio .NET now with the O’Reilly learning platform.
O’Reilly members experience books, live events, courses curated by job role, and more from O’Reilly and nearly 200 top publishers.

