Chapter 4. The Kubernetes API Server
As mentioned in the overview of the Kubernetes components, the API server is the gateway to the Kubernetes cluster. It is the central touch point that is accessed by all users, automation, and components in the Kubernetes cluster. The API server implements a RESTful API over HTTP, performs all API operations, and is responsible for storing API objects into a persistent storage backend. This chapter covers the details of this operation.
Basic Characteristics for Manageability
For all of its complexity, from the standpoint of management, the Kubernetes API server is actually relatively simple to manage. Because all of the API server’s persistent state is stored in a database that is external to the API server, the server itself is stateless and can be replicated to handle request load and for fault tolerance. Typically, in a highly available cluster, the API server is replicated three times.
The API server can be quite chatty in terms of the logs that it outputs. It outputs at least a single line for every request that it receives. Because of this, it is critical that some form of log rolling be added to the API server so that it doesn’t consume all available disk space. However, because the API server logs are essential to understanding the operation of the API server, we highly recommend that logs be shipped from the API server to a log aggregation service for subsequent introspection and querying to debug user or component requests to the API.
Pieces of the API Server
Operating the Kubernetes API server involves three core funtions:
- API management
-
The process by which APIs are exposed and managed by the server
- Request processing
-
The largest set of functionality that processes individual API requests from a client
- Internal control loops
-
Internals responsible for background operations necessary to the successful operation of the API server
The following sections cover each of these broad categories.
API Management
Although the primary use for the API is servicing individual client requests, before API requests can be processed, the client must know how to make an API request. Ultimately, the API server is an HTTP server—thus, every API request is an HTTP request. But the characteristics of those HTTP requests must be described so that the client and server know how to communicate.
For the purposes of exploration, it’s great to have an API server actually up and running so that you can poke at it. You can either use an existing Kubernetes cluster that you have access to, or you can use the minikube tool for a local Kubernetes cluster. To make it easy to use the curl tool to explore the API server, run the kubectl tool in proxy mode to expose an unauthenticated API server on localhost:8001 using the following command:
kubectl proxy
API Paths
Every request to the API server follows a RESTful API pattern where the request is defined by the HTTP path of the request. All Kubernetes requests begin with the prefix /api/ (the core APIs) or /apis/ (APIs grouped by API group). The two different sets of paths are primarily historical. API groups did not originally exist in the Kubernetes API, so the original or “core” objects, like Pods and Services, are maintained under the '/api/' prefix without an API group. Subsequent APIs have generally been added under API groups, so they follow the '/apis/<api-group>/' path. For example, the Job object is part of the batch API group and is thus found under /apis/batch/v1/….
One additional wrinkle for resource paths is whether the resource is namespaced. Namespaces in Kubernetes add
a layer of grouping to objects, namespaced resources can only be created within a namespace, and the name of that namespace is included in the HTTP path for the namespaced resource. Of course, there are resources that do not live in a namespace (the most obvious example is the Namespace API object itself) and, in this case, they do not have a namespaces component in their HTTP path.
Here are the components of the two different paths for namespaced resource types:
-
/api/v1/namespaces/<namespace-name>/<resource-type-name>/<resource-name>
-
/apis/<api-group>/<api-version>/namespaces/<namespace-name>/<resource-type-name>/<resource-name>
Here are the components of the two different paths for non-namespaced resource types:
-
/api/v1/<resource-type-name>/<resource-name>
-
/apis/<api-group>/<api-version>/<resource-type-name>/<resource-name>
API Discovery
Of course, to be able to make requests to the API, it is necessary to understand which API objects are available to the client. This process occurs through API discovery on the part of the client. To see this process in action and to explore the API server in a more hands-on manner, we can perform this API discovery ourselves.
First off, to simplify things, we use the kubectl command-line tool’s built-in proxy to provide authentication to our cluster. Run:
kubectl proxy
This creates a simple server running on port 8001 on your local machine.
We can use this server to start the process of API discovery. We begin by examining the /api prefix:
$ curl localhost:8001/api
{
  "kind": "APIVersions",
  "versions": [
    "v1"
  ],
  "serverAddressByClientCIDRs": [
    {
      "clientCIDR": "0.0.0.0/0",
      "serverAddress": "10.0.0.1:6443"
    }
  ]
}
You can see that the server returned an API object of type APIVersions. This object provides us with a versions field, which lists the available versions.
In this case, there is just a single one, but for the /apis prefix, there are many. We can use this version to continue our investigation:
$ curl localhost:8001/api/v1
{
  "kind": "APIResourceList",
  "groupVersion": "v1",
  "resources": [
    {
….
    {
      "name": "namespaces",
      "singularName": "",
      "namespaced": false,
      "kind": "Namespace",
      "verbs": [
        "create",
        "delete",
        "get",
        "list",
        "patch",
        "update",
        "watch"
      ],
      "shortNames": [
        "ns"
      ]
    },
    …
    {
      "name": "pods",
      "singularName": "",
      "namespaced": true,
      "kind": "Pod",
      "verbs": [
        "create",
        "delete",
        "deletecollection",
        "get",
        "list",
        "patch",
        "proxy",
        "update",
        "watch"
      ],
      "shortNames": [
        "po"
      ],
      "categories": [
        "all"
      ]
    },
    {
      "name": "pods/attach",
      "singularName": "",
      "namespaced": true,
      "kind": "Pod",
      "verbs": []
    },
    {
      "name": "pods/binding",
      "singularName": "",
      "namespaced": true,
      "kind": "Binding",
      "verbs": [
        "create"
      ]
    },
   ….
  ]
}
(This output is heavily edited for brevity.)
Now we are getting somewhere. We can see that the specific resources available on a certain path are printed out by the API server. In this case, the returned object contains the list of resources exposed under the /api/v1/ path.
The OpenAPI/Swagger JSON specification that describes the API (the meta-API object) contains a variety of interesting information in addition to the resource types. Consider the OpenAPI specification for the Pod object:
{
      "name": "pods",
      "singularName": "",
      "namespaced": true,
      "kind": "Pod",
      "verbs": [
        "create",
        "delete",
        "deletecollection",
        "get",
        "list",
        "patch",
        "proxy",
        "update",
        "watch"
      ],
      "shortNames": [
        "po"
      ],
      "categories": [
        "all"
      ]
    },
    {
      "name": "pods/attach",
      "singularName": "",
      "namespaced": true,
      "kind": "Pod",
      "verbs": []
    }
Looking at this object, the name field provides the name of this resource. It also indicates the subpath for these resources. Because inferring the pluralization of an English word is challenging, the API resource also contains a singularName field, which indicates the name that should be used for a singular instance of this resource. We previously discussed namespaces. The namespaced field in the object description indicates whether the object is namespaced. The kind field provides the string that is present in the API object’s JSON representation to indicate what kind of object it is. The verbs field is one of the most important in the API object, because it indicates what kinds of actions can be taken on that object. The pods object contains all of the possible verbs. Most of the effects of the verbs are obvious from their names. The two that require a little more explanation are watch and proxy. watch indicates that you can establish a watch for the resource. A watch is a long-running operation that provides notifications about changes to the object. The watch is covered in detail in later sections. proxy is a specialized action that establishes a proxy network connection through the API server to network ports. There are only two resources (Pods and Services) that currently support proxy.
In addition to the actions (described as verbs) that you can take on an object, there are other actions that are modeled as subresources on a resource type. For example, the attach command is modeled as a subresource:
    {
      "name": "pods/attach",
      "singularName": "",
      "namespaced": true,
      "kind": "Pod",
      "verbs": []
    }
attach provides you with the ability to attach a terminal to a running container within a Pod. The exec functionality that allows you to execute a command within a Pod is modeled similarly.
OpenAPI Spec Serving
Of course, knowing the resources and paths you can use to access the API server is only part of the information that you need in order to access the Kubernetes API. In addition to the HTTP path, you need to know the JSON payload to send and receive. The API server also provides paths to supply you with information about the schemas for Kubernetes resources. These schemas are represented using the OpenAPI (formerly Swagger) syntax. You can pull down the OpenAPI specification at the following path:
- /swaggerapi
-
Before Kubernetes 1.10, serves Swagger 1.2
- /openapi/v2
-
Kubernetes 1.10 and beyond, serves OpenAPI (Swagger 2.0)
The OpenAPI specification is a complete subject unto itself and is beyond the scope of this book. In any event, it is unlikely that you will need to access it in your day-to-day operations of Kubernetes. However, the various client programming language libraries are generated using these OpenAPI specifications (the notable exception to this is the Go client library, which is currently hand-coded). Thus, if you or a user are having trouble accessing parts of the Kubernetes API via a client library, the first stop should be the OpenAPI specification to understand how the API objects are modeled.
API Translation
In Kubernetes, an API starts out as an alpha API (e.g., v1alpha1). The alpha designation indicates that the API is unstable and unsuitable for production use cases. Users who adopt alpha APIs should expect both that the API surface area may change between Kubernetes releases and that the implementation of the API itself may be unstable and may even destabilize the entire Kubernetes cluster. Alpha APIs are therefore disabled in production Kubernetes clusters.
Once an API has matured, it becomes a beta API (e.g., v1beta1). The beta designation indicates that the API is generally stable but may have bugs or final API surface refinements. In general, beta APIs are assumed to be stable between Kubernetes releases, and backward compatability is a goal. However, in special cases, beta APIs may still be incompatible between Kubernetes releases. Likewise, beta APIs are intended to be stable, but bugs may still exist. Beta APIs are generally enabled in production Kubernetes clusters but should be used carefully.
Finally an API becomes generally available (e.g., v1). General availability (GA) indicates that the API is stable. These APIs come with both a guarantee of backward compatability and a deprecation guarantee. After an API is marked as scheduled for removal, Kubernetes retains the API for at least three releases or one year, whichever comes first. Deprecation is also fairly unlikely. APIs are deprecated only after a superior alternative has been developed. Likewise, GA APIs are stable and suitable for all production usage.
A particular release of Kubernetes can support multiple versions (alpha, beta, and GA). In order to accomplish this, the API server has three different representations of the API at all times: the external representation, which is the representation that comes in via an API request; the internal representation, which is the in-memory representation of the object used within the API server for processing; and the storage representation, which is recorded into the storage layer to persist the API objects. The API server has code within it that knows how to perform the various translations between all of these representations. An API object may be submitted as a v1alpha1 version, stored as a v1 object, and subsequently retrieved as a v1beta1 object or any other arbitrary supported version. These transformations are achieved with reasonable performance using machine-generated deep-copy libraries, which perform the appropriate translations.
Request Management
The main purpose of the API server in Kubernetes is to receive and process API calls in the form of HTTP requests. These requests are either from other components in the Kubernetes system or they are end-user requests. In either event, they are all processed by the Kubernetes API server in the same manner.
Types of Requests
There are several broad categories of requests performed by the Kubernetes API server.
GET-
The simplest requests are
GETrequests for specific resources. These requests retrieve the data associated with a particular resource. For example, an HTTPGETrequest to the path /api/v1/namespaces/default/pods/foo retrieves the data for a Pod named foo. LIST-
A slightly more complicated but still fairly straightforward request is a
collection GET, orLIST. These are requests to list a number of different requests. For example, an HTTPGETrequest to the path /api/v1/namespaces/default/pods retrieves a collection of all Pods in thedefaultnamespace.LISTrequests can also optionally specify a label query, in which case, only resources matching that label query are returned. POST-
To create a resource, a
POSTrequest is used. The body of the request is the new resource that should be created. In the case of aPOSTrequest, the path is the resource type (e.g., /api/v1/namespaces/default/pods). To update an existing resource, aPUTrequest is made to the specific resource path (e.g., /api/v1/namespaces/default/pods/foo). DELETE-
When the time comes to delete a request, an HTTP
DELETErequest to the path of the resource (e.g., /api/v1/namespaces/default/pods/foo) is used. It’s important to note that this change is permanent—after the HTTP request is made, the resource is deleted.
The content type for all of these requests is usually text-based JSON (application/json) but recent releases of Kubernetes also support Protocol Buffers binary encoding. Generally speaking, JSON is better for human-readable and debuggable traffic on the network between client and server, but it is significantly more verbose and expensive to parse. Protocol Buffers are harder to introspect using common tools, like curl, but enable greater performance and throughput of API requests.
In addition to these standard requests, many requests use the WebSocket protocol to enable streaming sessions between client and server. Examples of such protocols are the exec and attach commands.
These requests are described in the following sections.
Life of a Request
To better understand what the API server is doing for each of these different requests, we’ll take apart and describe the processing of a single request to the API server.
Authentication
The first stage of request processing is authentication, which establishes the identity associated with the request. The API server supports several different modes of establishing identity, including client certificates, bearer tokens, and HTTP Basic Authentication. In general, client certificates or bearer tokens, should be used for authentication; the use of HTTP Basic Authentication is discouraged.
In addition to these local methods of establishing identity, authentication is pluggable, and there are several plug-in implementations that use remote identity providers. These include support for the OpenID Connect (OIDC) protocol, as well as Azure Active Directory. These authentication plug-ins are compiled into both the API server and the client libraries. This means that you may need to ensure that both the command-line tools and API server are roughly the same version or support the same authentication methods.
The API server also supports remote webhook-based authentication configurations, where the authentication decision is delegated to an outside server via bearer token forwarding. The external server validates the bearer token from the end user and returns the authentication information to the API server.
Given the importance of this in securing a server, it is covered in depth in a later chapter.
RBAC/Authorization
After the API server has determined the identity for a request, it moves on to authorization for it. Every request to Kubernetes follows a traditional RBAC model. To access a request, the identity must have the appropriate role associated with the request. Kubernetes RBAC is a rich and complicated topic, and as such, we have devoted an entire chapter to the details of how it operates. For the purposes of this API server summary, when processing a request, the API server determines whether the identity associated with the request can access the combination of the verb and the HTTP path in the request. If the identity of the request has the appropriate role, it is allowed to proceed. Otherwise, an HTTP 403 response is returned.
This is covered in much more detail in a later chapter.
Admission control
After a request has been authenticated and authorized, it moves on to admission control. Authentication and RBAC determine whether the request is allowed to occur, and this is based on the HTTP properties of the request (headers, method, and path). Admission control determines whether the request is well formed and potentially applies modifications to the request before it is processed. Admission control defines a pluggable interface:
apply(request): (transformedRequest, error)
If any admission controller finds an error, the request is rejected. If the request is accepted, the transformed request is used instead of the initial request. Admission controllers are called serially, each receiving the output of the previous one.
Because admission control is such a general, pluggable mechanism, it is used for a wide variety of different functionality in the API server. For example, it is used to add default values to objects. It can also be used to enforce policy (e.g., requiring that all objects have a certain label). Additionally, it can be used to do things like inject an additional container into every Pod. The service mesh Istio uses this approach to inject its sidecar container transparently.
Admission controllers are quite generic and can be added dynamically to the API server via webhook-based admission control.
Validation
Request validation occurs after admission control, although it can also be implemented as part of admission control, especially for external webhook-based validation. Additionally, validation is only performed on a single object. If it requires broader knowledge of the cluster state, it must be implemented as an admission controller.
Request validation ensures that a specific resource included in a request is valid. For example, it ensures that the name of a Service object conforms to the rules around DNS names, since eventually the name of a Service will be programmed into the Kubernetes Service discovery DNS server. In general, validation is implemented as custom code that is defined per resource type.
Specialized requests
In addition to the standard RESTful requests, the API server has a number of speciallized request patterns that provide expanded functionality to clients:
/proxy, /exec, /attach, /logs
The first important class of operations is open, long-running connections to the API server. These requests provide streaming data rather than immediate responses.
The logs operation is the first streaming request we describe, because it is the easiest to understand. Indeed, by default, logs isn’t a streaming request at all. A client makes a request to get the logs for a Pod by appending /logs to the end of the path for a particular Pod (e.g.,
/api/v1/namespaces/default/pods/some-pod/logs) and then specifying the container name as an HTTP query parameter and an HTTP GET request. Given a default request, the API server returns all of the logs up to the current time, as plain text, and then closes the HTTP request. However, if the client requests that the logs be tailed (by specifying the follow query parameter), the HTTP response is kept open by the API server and new logs are written to the HTTP response as they are received from the kubelet via the API server. This connection is shown in Figure 4-1.

Figure 4-1. The basic flow of an HTTP request for container logs
logs is the easiest streaming request to understand because it simply leaves the request open and streams in more data. The rest of the operations take advantage of the WebSocket protocol for bidirectional streaming data. They also actually multiplex data within those streams to enable an arbitrary number of bidirectional streams over HTTP. If this all sounds a little complicated, it is, but it is also a valuable part of the API server’s surface area.
Note
The API server actually supports two different streaming protocols. It supports the SPDY protocol, as well as HTTP2/WebSocket. SPDY is being replaced by HTTP2/WebSocket and thus we focus our attention on the WebSocket protocol.
The full WebSocket protocol is beyond the scope of this book, but it is documented in a number of other places. For the purposes of understanding the API server, you can simply think of WebSocket as a protocol that transforms HTTP into a bidirectional byte-streaming protocol.
However, on top of those streams, the Kubernetes API server actually introduces an additional multiplexed streaming protocol. The reason for this is that, for many use cases, it is quite useful for the API server to be able to service multiple independent byte streams. Consider, for example, executing a command within a container. In this case, there are actually three streams that need to be maintained (stdin, stderr, and stdout).
The basic protocol for this streaming is as follows: every stream is assigned a number from 0 to 255. This stream number is used for both input and output, and it conceptually models a single bidirectional byte stream.
For every frame that is sent via the WebSocket protocol, the first byte is the stream number (e.g., 0) and the remainder of the frame is the data that is traveling on that stream (Figure 4-2).
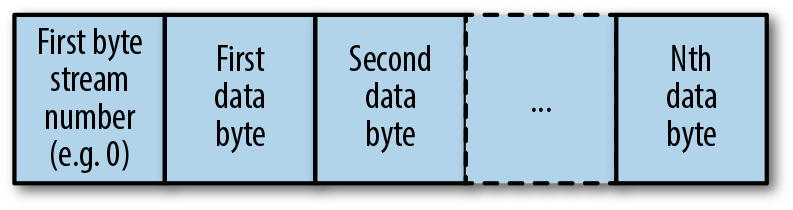
Figure 4-2. An example of the Kubernetes WebSocket multichannel framing
Using this protocol and WebSockets, the API server can simultaneously multiplex 256-byte streams in a single WebSocket session.
This basic protocol is used for exec and attach sessions, with the following channels:
- 0
-
The
stdinstream for writing to the process. Data is not read from this stream. - 1
-
The
stdoutoutput stream for readingstdoutfrom the process. Data should not be written to this stream. - 2
-
The
stderroutput stream for readingstderrfrom the process. Data should not be written to this stream.
The /proxy endpoint is used to port-forward network traffic between the client and containers and services running inside the cluster, without those endpoints being externally exposed. To stream these TCP sessions, the protocol is slightly more complicated. In addition to multiplexing the various streams, the first two bytes of the stream (after the stream number, so actually the second and third bytes in the WebSockets frame) are the port number that is being forwarded, so that a single WebSockets frame for /proxy looks like Figure 4-3.
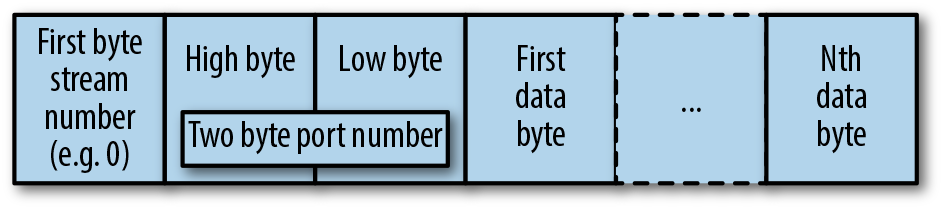
Figure 4-3. An example of the data frame for WebSockets-based port forwarding
Watch operations
In addition to streaming data, the API server supports a watch API. A watch monitors a path for changes. Thus,
instead of polling at some interval for possible updates, which introduces
either extra load (due to fast polling) or extra latency (because of slow polling), using a watch enables a user to get low-latency updates with
a single connection. When a user establishes a watch connection to the API
server by adding the query parameter ?watch=true to some API server
request, the API server switches into watch mode, and it leaves the
connection between client and server open. Likewise, the data returned
by the API server is no longer just the API object—it is a Watch object
that contains both the type of the change (created, updated, deleted) and the API object itself. In this way, a client can watch and observe
all changes to that object or set of objects.
Optimistically concurrent updates
An additional advanced operation supported by the API server is the ability to perform optimistically concurrent updates of the Kubernetes API. The idea behind optimistic concurrency is the ability to perform most operations without using locks (pessimistic concurrency) and instead detect when a concurrent write has occurred, rejecting the later of the two concurrent writes. A write that is rejected is not retried (it is up to the client to detect the conflict and retry the write themselves).
To understand why this optimistic concurrency and conflict detection is required, it’s important to know about the structure of a read/update/write race condition. The operation of many API server clients involves three operations:
-
Read some data from the API server.
-
Update that data in memory.
-
Write it back to the API server.
Now imagine what happens when two of these read/update/write patterns happen simultaneously.
-
Server A reads object O.
-
Server B reads object O.
-
Server A updates object O in memory on the client.
-
Server B updates object O in memory on the client.
-
Server A writes object O.
-
Server B writes object O.
At the end of this, the changes that Server A made are lost because they were overwritten by the update from Server B.
There are two options for solving this race. The first is a pessimistic lock, which would prevent other reads from occurring while Server A is operating on the object. The trouble with this is that it serializes all of the operations, which leads to performance and throughput problems.
The other option implemented by the Kubernetes API server is optimistic concurrency, which assumes that everything will just work out and only detects a problem when a conflicting write is attempted. To achieve this, every instance of an object returns both its data and a resource version. This resource version indicates the current iteration of the object. When a write occurs, if the resource version of the object is set, the write is only successful if the current version matches the version of the object. If it does not, an HTTP error 409 (conflict) is returned and the client musty retry. To see how this fixes the read/update/write race just described, let’s take a look at the operations again:
-
Server A reads object O at version v1.
-
Server B reads object O at version v1.
-
Server A updates object O at version v1 in memory in the client.
-
Server B updates object O at version v1 in memory in the client.
-
Server A writes object O at version v1; this is successful.
-
Server B writes object O at version v1, but the object is at v2; a 409 conflict is returned.
Alternate encodings
In addition to supporting JSON encoding of objects for requests, the API server supports two other formats for requests. The encoding of the requests is indicated by the Content-Type HTTP header on the request. If this header is missing, the content is assumed to be application/json, which indicates JSON encoding. The first alternate encoding is YAML, which is indicated by the application/yaml Content Type. YAML is a text-based format that is generally considered to be more human readable than JSON. There is little reason to use YAML for encoding for communicating with the server, but it can be convenient in a few circumstances (e.g., manually sending files to the server via curl).
The other alternate encoding for requests and responses is the Protocol Buffers encoding format. Protocol Buffers are a fairly efficient binary object protocol. Using Protocol Buffers can result in more efficient and higher throughput requests to the API servers. Indeed, many of the Kubernetes internal tools use Protocol Buffers as their transport. The main issue with Protocol Buffers is that, because of their binary nature, they are significantly harder to visualize/debug in their wire format. Additionally, not all client libraries currently support Protocol Buffers requests or responses. The Protocol Buffers format is indicated by the application/vnd.kubernetes.protobuf Content-Type header.
Common response codes
Because the API server is implemented as a RESTful server, all of the responses from the server are aligned with HTTP response codes. Beyond the typical 200 for OK responses and 500s for internal server errors, here are some of the common response codes and their meanings:
- 202
-
Accepted. An asyncronous request to create or delete an object has been received. The result responds with a status object until the asynchronous request has completed, at which point the actual object will be returned.
- 400
-
Bad Request. The server could not parse or understand the request.
- 401
-
Unauthorized. A request was received without a known authentication scheme.
- 403
-
Forbidden. The request was received and understood, but access is forbidden.
- 409
-
Conflict. The request was received, but it was a request to update an older version of the object.
- 422
-
Unprocessable entity. The request was parsed correctly but failed some sort of validation.
API Server Internals
In addition to the basics of operating the HTTP RESTful service, the API server has a few internal services that implement parts of the Kubernetes API. Generally, these sorts of control loops are run in a separate binary known as the controller manager. But there are a few control loops that have to be run inside the API server. In each case, we describe the functionality as well as the reason for its presence in the API server.
CRD Control Loop
Custom resource definitions (CRDs) are dynamic API objects that can be added to a running API server. Because the act of creating a CRD inherently creates new HTTP paths the API server must know how to serve, the controller that is responsible for adding these paths is colocated inside the API server. With the addition of delegated API servers (described in a later chapter), this controller has actually been mostly abstracted out of the API server. It currently still runs in process by default, but it can also be run out of process.
The CRD control loop operates as follows:
for crd in AllCustomResourceDefinitions:
    if !RegisteredPath(crd):
       registerPath

for path in AllRegisteredPaths:
    if !CustomResourceExists(path):
       markPathInvalid(path)
       delete custom resource data
       delete path
The creation of the custom resource path is fairly straightforward, but the deletion of a custom resource is a little more complicated. This is because the deletion of a custom resource implies the deletion of all data associated with resources of that type. This is so that, if a CRD is deleted and then at some later date readded, the old data does not somehow get resurrected.
Thus, before the HTTP serving path can be removed, the path is first marked as invalid so that new resources cannot be created. Then, all data associated with the CRD is deleted, and finally, the path is removed.
Debugging the API Server
Of course, understanding the implementation of the API server is great, but more often than not, what you really need is to be able to debug what is actually going on with the API server (as well as clients that are calling in to the API server). The primary way that this is achieved is via the logs that the API server writes. There are two log streams that the API server exports—the standard or basic logs, as well as the more targeted audit logs that try to capture why and how requests were made and the changed API server state. In addition, more verbose logging can be turned on for debugging specific problems.
Basic Logs
By default, the API server logs every request that is sent to the API server. This log includes the client’s IP address, the path of the request, and the code that the server returned. If an unexpected error results in a server panic, the server also catches this panic, returns a 500, and logs that error.
I0803 19:59:19.929302       1 trace.go:76] Trace[1449222206]:
 "Create /api/v1/namespaces/default/events" (started: 2018-08-03
 19:59:19.001777279 +0000 UTC m=+25.386403121) (total time: 927.484579ms):
Trace[1449222206]: [927.401927ms] [927.279642ms] Object stored in database
I0803 19:59:20.402215       1 controller.go:537] quota admission added
 evaluator for: { namespaces}
In this log, you can see that it starts with the timestamp I0803 19:59:… when the
log line was emitted, followed by the line number that emitted it, trace.go:76, and
finally the log message itself.
Audit Logs
The audit log is intended to enable a server administrator to forensically recover the state of the server and the series of client interactions that resulted in the current state of the data in the Kubernetes API. For example, it enables a user to answer questions like, “Why was that ReplicaSet scaled up to 100?”, “Who deleted that Pod?”, among others.
Audit logs have a pluggable backend for where they are written. Generally, audit logs are written to file, but it is also possible for them to be written to a webhook. In either case, the data logged is a structured JSON object of type event in the audit.k8s.io API group.
Auditing itself can be configured via a policy object in the same API group. This policy allows you to specify the rules by which audit events are emitted into the audit log.
Activating Additional Logs
Kubernetes uses the github.com/golang/glog leveled logging package for its logging. Using the --v flag on the API server you can adjust the level of logging verbosity. In general, the Kubernetes project has set log verbosity level 2 (--v=2) as a sane default for logging relevant, but not too spammy messages. If you are looking into specific problems, you can raise the logging level to see more (possibly spammy) messages. Because of the performance impact of excessive logging, we recommend not running with a verbose log level in production. If you are looking for more targeted logging, the --vmodule flag enables increasing the log level for individual source files. This can be useful for very targeted verbose logging restricted to a small set of files.
Debugging kubectl Requests
In addition to debugging the API server via logs, it is also possible to debug interactions with the API server, via the kubectl command-line tool. Like the API server, the kubectl command-line tool logs via the github.com/golang/glog package and supports the --v verbosity flag. Setting the verbosity to level 10 (--v=10) turns on maximally verbose logging. In this mode, kubectl logs all of the requests that it makes to the server, as well as attempts to print curl commands that you can use to replicate these requests. Note that these curl commands are sometimes incomplete.
Additionally, if you want to poke at the API server directly, the approach that we used earlier to explore API discovery works well. Running kubectl proxy creates a proxy server on localhost that automatically supplies your authentication and authorization credentials, based on a local $HOME/.kube/config file. After you run the proxy, it’s fairly straightforward to poke at various API requests using the curl command.
Summary
As an operator, the core service that you are providing to your users is the Kubernetes API. To effectively provide this service, understanding the core components that make up Kubernetes and how your users will put these APIs together to build applications is critical to implementing a useful and reliable Kubernetes cluster. Having finished reading this chapter, you should have a basic knowledge of the Kubernetes API and how it is used.
Get Managing Kubernetes now with the O’Reilly learning platform.
O’Reilly members experience books, live events, courses curated by job role, and more from O’Reilly and nearly 200 top publishers.

